
Shooting Stars - Part I & II
Article and Photographs by Alan Dyer ©
February 18, 2013
Nature doesn’t turn in at nightfall. Familiar landscapes take on a new look when illuminated by moonlight and stars. Here are my tips and techniques for shooting nature by night.
.jpg)
Star trails over Patricia Lake, Jasper National Park, July 28, 2012
Today’s digital cameras make it easier than ever to capture both Earth and sky in the same image. You can choose to record the night sky as your eyes saw it, with pinpoint stars, or go for more abstract effects with stars wheeling above a moonlit landscape, as in my portrait of Pyramid Lake in Jasper, Alberta.
We’re now living in a golden age for nightscape photography. In the dark ages before digital I shot nightscapes on film, and the results were impressive … for the time. But looking back I wonder how we tolerated film’s limitations.
First, and most obvious, you couldn’t see what you were getting until days later at the camera shop. You could spend hours taking long-exposure images in the cold and dark and never be sure you had the exposure right. Lots could go wrong but you would never know it.
Second – and excuse the astro-geek speak here – film wasn’t “linear” in its response. You could expose for many minutes and still never pick up any detail in the dark areas of a moonlit landscape. Exposing longer wouldn’t help because of the evils of “reciprocity failure.” Unlike under bright sunlight, exposing twice as long at night didn’t produce twice the density of recorded image. Shadows remained featureless and dark, despite all your best efforts to get the exposure right.
Third, during long exposures film could behave in odd ways that daytime photographers would never experience. At night, film would absorb humidity and begin to warp, producing out of focus images at the corners of the frame. Conversely, when winding film in cold, dry weather it could snap, or be struck with sparks of static electricity.
Digital cameras eliminate all those issues in one fell swoop. Shooting stars over scenic landscapes is now easy to get right and has never been more popular.
Big Dipper over Peyto Lake September 4, 2011

A few hours earlier in the daytime, this well-known viewpoint at Peyto Lake, Banff was jammed with busloads of tourists. At night, I had the place to myself.
Despite its newfound popularity nightscape photography can be a lonely pursuit. You begin nightscape photography when other nature photographers have packed up and headed home, thinking the light is gone. Not so. New photo opportunities are just beginning. New niches await the nocturnal photographer.
FOCUSING
At a location like Peyto Lake I start shooting long before the sky gets fully dark. An hour or so after sunset, the sky remains a deep blue from the last vestiges of twilight, but with stars now well in view.
In scenes like this, focusing can be a challenge. Auto-focus might work but I prefer not to trust it. I manually focus, very carefully, using the DSLR’s Live Focus mode at 10x magnification zoomed in on a bright star (in this case, Arcturus at left), or at a distant light or landscape edge detail – if you can see it.
For this shot I used a 30-second exposure at ISO 800 to pick up the Big Dipper and northern stars over the lake. I also used a camera on a fixed tripod, the same kit any daytime nature photographer would own. No special astronomical gear was employed for any of the images in this article.
Stars over Prince of Wales Hotel in Waterton National Park, July 20, 2011
MAGIC HOUR
I took this image at Waterton Lakes under similar lighting as the Peyto Lake view. We’re again looking north toward Polaris and Cassiopeia. It’s well after sunset but the sky has not yet fully darkened. It’s a “magic hour” for nightscapes that comes much later than the classic twilight time for other photography. Waiting until the sky is darker than you might think ideal for twilight shots allows stars to show up but the sky still has colour that the camera picks up. In June and July from southern Canada, this twilight time can last all night.
This is also a 30-second exposure at ISO 1250. Digital SLR cameras are so sensitive mine is picking up the yellow illumination on the distant mountainside from the nearby lights of the Prince of Wales Hotel and the urban streetlights of Waterton townsite. With film those dark areas would have contained no detail at all.
Big Dipper over old school house - Canon 7D with 10 mm lens.
FULL MOON
Despite a digital camera’s great dynamic range scenes taken in twilight are often high contrast silhouettes. To show details in the earthly portion of a starry nightscape we still need some form of illumination, usually supplied by the Moon.
Here, for a photo of the Big Dipper over the old 1909 Liberty School on the southern Alberta plains I shot at Full Moon, which is off camera but lighting the foreground and distant landscape. While I took this in the middle of the night the sky is blue, just as it is during the day, and the foreground looks like daylight. That’s because moonlight is sunlight, with the same colour temperature, just much fainter.
Under the light of a bright Full Moon, exposures are typically what I’ve used here, 30 seconds at ISO 800 and f/4. I could have shot at ISO 400 and f/2.8, and often do, but here I preferred to stop down here for better corner sharpness.
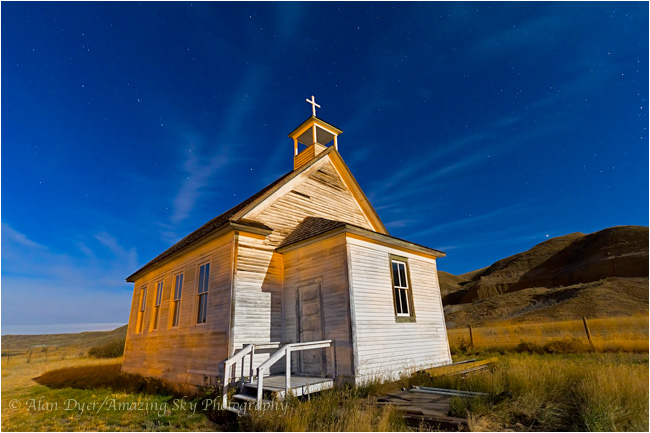
Church from Dorthy, AB - October 9, 2011, Canon 7D with 10 mm lens.
FIGHTING LIGHTS
Shooting at Full Moon also provides a natural source of lighting than can help mute the unwanted illumination from streetlights, which can colour the sky an ugly yellow near urban areas.
In this case, the weathered 1940s Catholic Church at the ghost town of Dorothy, Alberta sits under skies free of light pollution but is still lit by ubiquitous sodium vapour yard lights, which add the yellow glow to the shadows. You wouldn’t have known if I didn’t tell you!
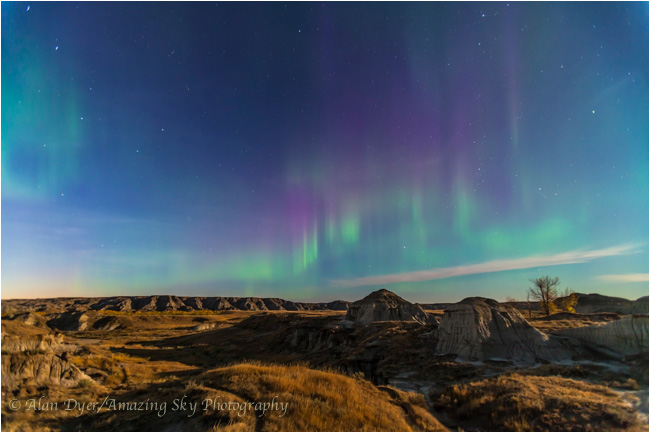
Aurora over Dinosaur Park September 30, 2012.
FAST LENSES
Having stars appear in a blue night sky is eye-catching, but even better is a display of Northern Lights. Exposures vary, depending on how bright the sky and aurora is. For this image taken on September 30, 2012 at Dinosaur Provincial Park, I used just an 8-second exposure at ISO 800 and f/2.8. Keeping exposures short minimizes blurring from the often fast-moving auroral curtains. For a more active and brighter display I might shoot at ISO 1600 and 2 to 4 seconds.
A fast wide-angle lens is required equipment for the nightscape shooter. Zoom lenses, such as the 16-35mm f/2.8 lens I used here, allow for flexible framing but fixed prime lenses usually provide even faster apertures and better optical quality – stars look sharper at the corners.
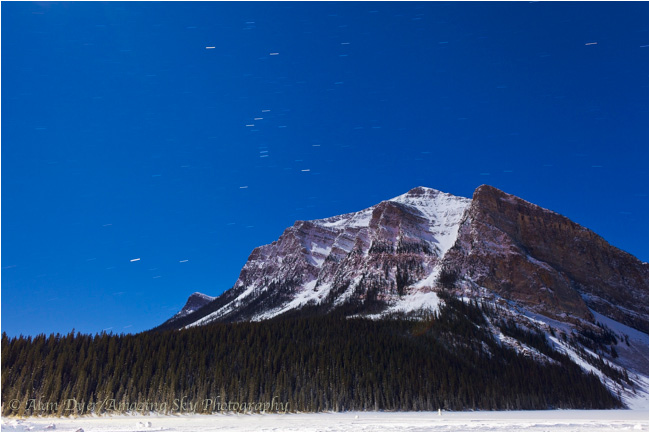
Orion over Mount Fairview, Long exposure, February 2012.
STAR TRAILS
Keeping exposures short means shooting at higher ISO speeds, typically 800 or higher, which can introduce more noise. While shooting at slower ISO speeds yields cleaner images, that demands longer exposures. Going longer than 15 to 30 seconds results in the stars trailing due to the rotation of the Earth. Sometimes you don’t want star trails.
But sometimes you do. To introduce them on purpose, shoot exposures that are 2 to 20 minutes long. Here I’m standing on frozen Lake Louise under the light of a Full Moon looking toward Orion and Sirius trailing over Mount Fairview. I opened the shutter for 4 minutes at f/4. The scene isn’t vastly overexposed because I set the camera to ISO 100.
It’s easy to determine the correct long exposure for such a scene without having to take many minutes worth of trial-and-error tests. Here’s how.
First, set the camera to a high ISO, perhaps ISO 3200. Shoot test shots – in bright moonlight they will be just a few seconds at such a high ISO. Now figure out how many stops difference there is between your test ISO and ISO 100, which is where you likely want to shoot a star trail.
For example, say a 4-second exposure looks good at ISO 3200 and f/2.8. You might be able to meter that under bright moonlight, but usually you determine that exposure by experience and trial-and-error. It will vary from night to night, and scene to scene.
What, then, will be the correct exposure at ISO 100? There are five “f-stop” steps between ISO 3200 and 100 (3200 > 1600 > 800 > 400 > 200 > 100). Each halving of ISO requires a doubling of exposure time. So that means the exposure at ISO 100 now has to be 2 x 2 x 2 x 2 x 2 = 32 times longer than at ISO 3200. So if 4 seconds worked at ISO 3200, then you’ll need to shoot for 4 x 32 = 128 seconds, or two minutes at ISO 100.
But two minutes won’t produce very long star trails, especially when aimed north to where the sky moves the least as it rotates around Polaris. To lengthen the exposure even more, stop down the lens. At f/4 our exposure will be 4 minutes. At f/5.6, 8 minutes will produce a correctly exposed scene.
All this works because digital sensors are linear. An exposure of 4 minutes at ISO 100 and f/4 will have the same density – the histogram chart of number of pixels vs. intensities on your camera’s display will have the same distribution – as an exposure of 4 seconds at ISO 3200 and f/2.8.
Film would never do that. Exposures were not reciprocal when extended to long exposures – that’s what reciprocity failure meant. In that example, I’d actually have to shoot for 20 or 30 minutes on film to get a long exposure that looked presentable, if I guessed right! Even then, the resulting image would still have no shadow detail.
Part II
The merging of landscape and astronomical photography for shooting stars by night requires learning new techniques you would never employ by day.
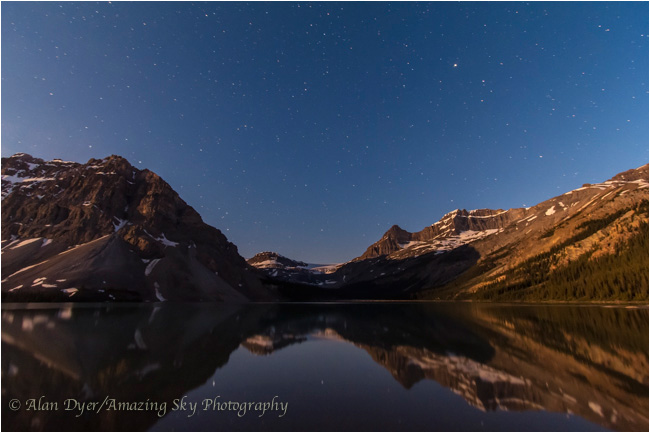
Num-Ti-Jah Lodge at Bow Lake, Banff National Park, AB - July 7, 2012
SHOOTING SHORT & MANY
While you can create unique star trail images by taking single long exposures (explained in Part 1) digital cameras allow another way to do long exposures that was never possible with film.
Instead of shooting single long exposures you instead shoot lots of short but nevertheless correctly exposed frames and stack them. A remote interval timer is essential. It can tirelessly fire the shutter while you sleep. Just be sure your camera battery is charged and you have a spare one at the ready.
This frame is one of 250 I took in July 2012 at Num-Ti-Jah Lodge at Bow Lake, Banff. It’s a 50-second exposure at ISO 1250 and f/4. It records a nice moonlit scene with the Big Dipper and a bit of aurora showing up, much as the eye saw it. What it doesn’t record is the apprehension of the photographer because of the grizzly bear wandering the area just two hours earlier.
Circumpolar Star Trails over Num-Ti-Jah Lodge at Bow Lake, Banff National Park, July 7, 2012.
STACKING
This is the same scene, but now with all 250 frames, each 50 seconds long, stacked in Photoshop using the Lighten blend mode. The result is a sky filled with concentric star trails spinning around the North Star over 3.5 hours.
While I could have taken a single 3.5-hour exposure (and multi-hour shots were normal with film cameras) digital sensors will introduce too much noise in such ultra-long exposures. Plus so many other things can go wrong (dew fogging the lens in the last hour for example) there’s little sense torturing yourself and your camera with such a marathon.
So instead we take lots of short shots. The trick is then stacking those frames in Photoshop. While Photoshop’s Load Files Into Stack command (under File>Scripts) will work the resulting file with 200+ layers may strain your computer’s memory.
Instead, I use a free Photoshop Action from astrophotographer Chris Schur (available at http://schursastrophotography.com/software/photoshop/startrails.html). It will stack and blend a folder of frames automatically while flattening the image as it goes to keep the file size manageable.
Alternatively, dedicated programs will do the job. Try StarStaX for MacOS (http://www.markus-enzweiler.de/StarStaX/StarStaX.html) or StarTrails for Windows (http://www.startrails.de). Both are free.
The other advantage of the “shoot-short-and-stack” method is that you end up with a folder of images ideal for sequencing into a time-lapse movie, an entirely new field of nighttime landscape photography.
Bow Lake by Moonlight, July 6, 2012.
KNOWING THE MOON
Here’s another example of a single frame vs. a stacked image. This frame taken at Bow Lake is a 45-second exposure, with the camera at ISO 1600 and the 10-22mm lens at f/4.5. The rising last quarter Moon out of frame at left lights the peaks.
One of the keys to successful nightscape shooting, as with daytime landscapes, is knowing where your source of illumination will be and what part of the scene will be lit. Unlike the Sun, the Moon changes its position in the sky a lot from night to night as it cycles through its monthly phases. Summer moons usually shine low in our Canadian sky, just as the Sun does in winter. All that complicates the planning.
Here, for example, I knew the last quarter Moon would be in the southeast and clearing the peaks on the east side of the Icefields Parkway. That meant I could shoot west and have a well-illuminated scene with good cross lighting and without the Moon itself in the frame. At first quarter Moon this scene would not be possible – you’d be shooting into the glaring Moon.
Applications for mobile devices like The Photographer’s Ephemeris and LightTrac are superb for planning lunar lighting angles at your shooting sites, as are planetarium programs such as Sky Safari.
Star Trails over Bow Lake, July 6, 2012. Canon 60Da with 10mm lens.
REDUCING NOISE
This is the final stack of the 180 frames I took that night over 3.5 hours. The interval between exposures was just one second, as little as the intervalometer running the camera would allow. Any longer and the interval between shots would create noticeable gaps in the star trails.
Normally, for any long exposures I suggest setting your DSLR to automatically take a “dark frame” after each image (Long Exposure Noise Reduction ON). The resulting dark frame is a picture of just the noise. Subtracting it from the image, which the camera does automatically, eliminates much of the coloured speckles that creep in during long exposures. The longer the exposure, and the warmer the camera, the worse the noise, as some of it is heat-induced. Long Exposure Noise Reduction works great for individual images. I use it all the time. Well, most of the time.
The exception is when shooting lots of short shots for later stacking into a star trail image, or for a time-lapse movie. You then have to turn Long Exposure Noise Reduction OFF. If you don’t the time the camera takes to shoot a dark frame between each image will introduce gaps in the stacked star trails, or jumps in the motion of stars in time-lapse movies.
And yet without a dark frame, in a stack of hundreds of images you’ll see noise build up to blizzard proportions. Some can be eliminated with a median filter of 1 or 2 pixels. But for images free of coloured noise specks you need to take dark frames separately (just leave the lens cap on and take shots of the same length) then subtract them later “in post.” The specialized programs StarStax and StarTrails can do this subtraction as part of their automatic routines. They can be set to apply a “master dark frame” they create by averaging a set of 8 or more dark frames you’ve taken, perhaps at the beginning and end of a shoot.
Moonlight on Hoodos, July 23, 2011. Canon 7D and 10 mm lens.
BALANCING MOONLIGHT
While nights with a Full Moon provide great photo ops, even better are nights with a waxing or waning Moon, say a crescent or quarter Moon. For this image at Writing-on-Stone Provincial Park in Alberta, I shot at last quarter Moon, which is lighting the scene from behind the camera. It provides enough light to illuminate the sandstone hoodoos, and to tint the sky blue. But the moonlight is dim enough to allow the Milky Way to show up. At Full Moon the Milky Way would be washed out entirely. This is a single 60-second exposure at ISO 1600 and f/4 with a 10-22mm lens.
Summer Triangle thru trees consisting of the bright stars, Deneb, Vega and Altair. September 8, 2012.
THE MILKY WAY
By shooting on nights with little or no Moon you can pick up the Milky Way in all its majesty. This is the rich Milky Way of summer shining amid pine trees on a moonless night in Banff. I used a 70-second exposure at ISO 1600 and f/3.5 with a camera on a fixed tripod.
For this type of “deep shot,” you could use a tracking unit that will follow the turning stars, allowing exposures of 1 to 4 minutes, allowing you to pick up even more stars and use a slower ISO speed. While the stars won’t trail the ground will blur. But with a foreground such as silhouetted trees some blurring won’t matter much.
A unit I can recommend is the $400 iOptron SkyTracker (http://www.ioptron.com/), available from several telescope dealers in Canada.
SHOOTING RAW
As good as today’s DSLRs are, and while you might have applied a dark frame in the camera, you still have to apply further noise reduction in processing. For that I recommend shooting in raw format and “developing” the image in Adobe Camera Raw (in Photoshop) or in Adobe Lightroom, to make use of the superb noise smoothing routine of Adobe’s raw processing software. Make the mistake of shooting only in JPG and you are throwing away much of your image data. You will end up with noisier and less-detailed images. JPGs are quick but dirty.
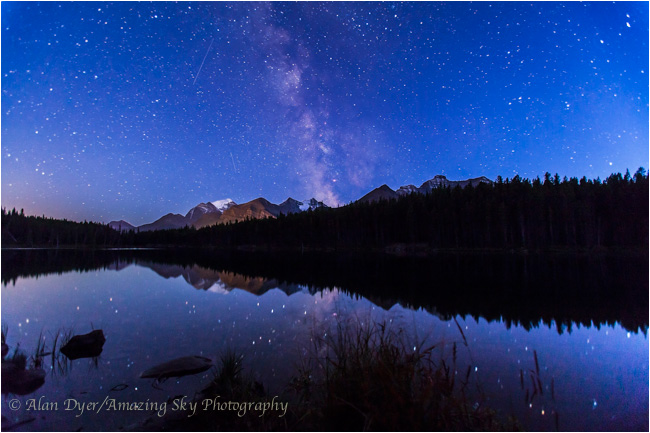
My parting shot is a 40-second exposure of the Milky Way in the summer twilight reflected in the still waters of Herbert Lake in Banff on September 7, 2012.
The fall of night unveils a new universe of photo opportunities. Don’t pack the camera away after sundown. Keep shooting and you’ll be amazed at what you can capture when shooting stars!


 |
Alan Dyer is one of Canada’s best-known astronomy popularizers and authors, and astrophotographer of many years standing. He is co-author of The Backyard Astronomer’s Guide (Firefly, 2010), a comprehensive guidebook for amateur astronomers which contains a major chapter on astrophoto techniques with DSLR cameras. He writes for SkyNews and for Sky and Telescope magazines. He lives in southern Alberta and works as an astronomer and digital planetarium programmer at the TELUS Spark science centre in Calgary. Asteroid #78434 is named for him.
On Saturday, April 27, 2013 Alan will be presenting a half-day workshop on “The World at Night: Nightscape and Time-Lapse Techniques” in conjunction with telescope dealer All-Star Telescope. Cost $60. For more information and to register visit All-Star telescope.
Alan’s photos can be seen at his blog at http://amazingsky.net
|
Additional Links & Resources
- Amazing Sky Photos by Alan Dyer - amazingsky.photoshelter.com
- Amazing Sky - Blog by Alan Dyer - amazingsky.net
- Backyard Astonomer's Guide by Terrence Dickinson & Alan Dyer
- All-Star Telescope located in Didsbury, AB
- Photographers Emphemeris
- LightTrac
- The Summer Triangle - Wikipedia
- IOptron SkyTracker
- Sky Safari 3 for iIphone, iPad, iPod Touch
- Star Stax software
- Star Trails software
- Timelapse photography of the Aurora Borealis by RB
- Star trail photography and time lapse movies by RB
- Star trails created with Adobe Photoshop by RB
- Num-Ti-Jah Lodge in Jasper National Park
[ Top ] |