
Digital Photography Basics for Beginners
by Dr. Robert Berdan
Download Slide Show Science & Art of Photography PDF
Download Slide Show on Composition PDF
The Nikon D2X is now obsolete and much better models are available for a fraction of the cost like the D90 and D300. Small compact cameras can be had for only a few hundred dollars.
CHOOSING A CAMERA - basically their are 2 main types of digital cameras
1) Point and Shoot Compact Cameras (usually do not have interchangeable lenses though some of the more expensive models do and some allow additional lens attachments). E.g. above Canon G6.
Point and shoot cameras are compact and lightweight and can be easily carried in a pocket and are generally economical in price though the best ones can also be expensive. Some are even waterproof and shockproof.
2) Single Lens Reflex or SLR - cameras with interchangeable lenses SLR cameras are bigger, heavier, more expensive and usually offer better image quality, they have the most features and are preferred by photo enthusiasts and professional photographers because of their flexibility. They offer a viewfinder that allows you to see through the lens attached to the camera. Their name is derived from the fact that a mirror projects the light from the lens to the viewfinder, but when the camera take a picture the mirror is briefly retracted (reflex action) and then returned. The advantage is that you see exactly what the camera sees.
Professional photographers use both types of cameras and some use even bigger cameras.
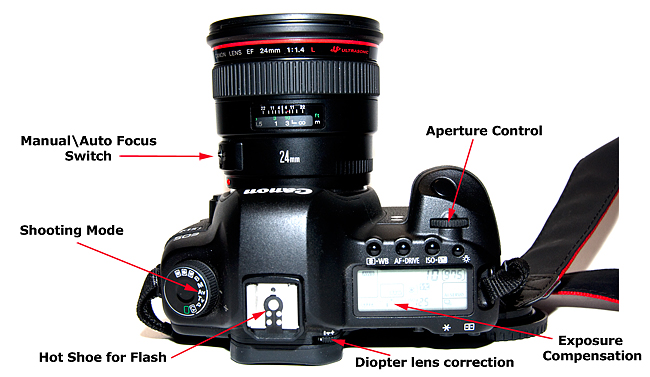
IMPORTANT CAMERA CONTROLS
1. ISO Speed - determines the digital sensors sensitivity to light and the amount of "grain" in your pictures. When there is lots of light e.g. sunny day, set your camera to 100-200 ISO. If you are shooting inside without a flash - then set your camera to ISO 400-1600 - the higher the ISO speed, the grainier your image will be so always use the lowest ISO speed that allows you to shoot with a relatively fast shutter speed i.e. 1\30, 1\60, 1\125 or faster. Doubling the ISO speed e.g. from 100 to 200 doubles the camera's sensitivity to light (equal to one F-stop or one shutter speed). Some cameras will automatically change the ISO speed depending on the ambient light, though I don't recommend using this setting very often but generally prefer to control the ISO speed myself.
2. Camera Shooting Modes: A, S, M, P, B & various other automated modes - use P Program or "party" mode when you don't want to think, use A or aperture priority mode most of the time where you control the F-stop and depth of field. Other modes are used more rarely to control S shutter speed, or use M or manual to control both shutter speed and aperture, B or bulb opens the shutter as long the shutter button is held down - used for long or night time exposures.
In A or Aperture priority mode you select the F-stop which controls how much of the picture will be in focus. Small F-stops (F1.4, 2.8, 4.0) have shallow depths of field when the subject is relatively close and is ideal for portraits and or action shots requiring fast shutter speeds.
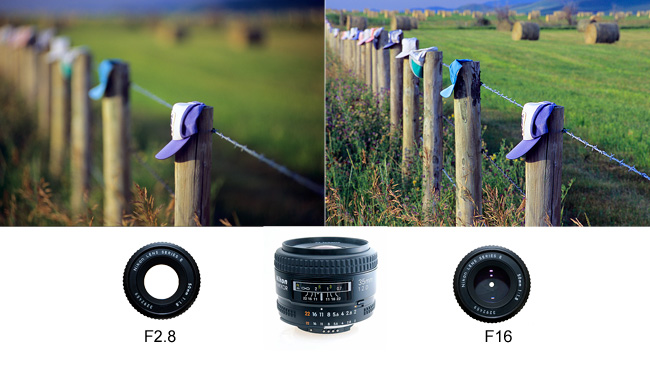
F-stop and Apertures Perhaps more then any other aspect of photography this simple lens control confuses beginners.
As the lens opening gets smaller the F ratio gets bigger. The largest F-stop on your camera or lens varies, compact cameras might have a maximum aperture of F8 or F11 where an SLR camera lens can have F-stops of F16, F22 or F32. These F-stops have small openings or apertures and produce a greater depth of field in your pictures. Sometimes you want a greater depth of field such as in landscapes and sometimes you don't such as in portrait photos.
The reason F-stops are important is that they control how much light comes into the camera (hence the shutter speed you can use) and they control the depth of field that is visible in your picture. Each F-stop is also equal to halving or doubling of your shutter speed. E.g. F1.4 to F2 will mean if you were using a shutter speed of 1\30 sec going to F2 means you need to shoot at 1\15 sec.
F-stop 11, 16, 22 - have small apertures - these are preferred when you shoot landscapes where you want a large depth of field so that rocks in the foreground and the objects in the background are both in focus.
F-stop 2.8, 4.0 - have wide openings and let a large amount of light in so you can use faster shutter speeds, and result in shallow depth of field. These F-stops are used to create out of focus backgrounds in portrait shots. Controlling depth of field in your photos is one of the most important controls a photographer has. For wildlife, photographers often use the widest opening (lowest F-stop) so they can use the fastest shutter speed available.
Some SLR cameras have a depth of preview button that when you push it the lens will stop down to the aperture you have set, the viewfinder will get darker but you will be able to see the true depth of field. The reason you don't see the depth of field normally is that most cameras leave the aperture at its widest setting and only close it down when you press the shutter button.
Controlling the F-stop which is usually done on digital cameras by putting your camera in A or Aperture priority mode and dialling in the F-stop. On some compact cameras you may have to go into a menu to alter the F-stop. I have my camera set to A or Aperture priority mode 95% of the time.
As a General guide line with F-stops;
1) landscapes try to use F11-F22 for maximum depth of field - but be sure the shutter speed can be handheld i.e. faster then 1\30 sec or else use a tripod.
2) For portraits of people you can use your widest aperture to something in the middle such as F1.4 to F8 will work well. If you want the background to be more blurred use the widest aperture you lens has and move in close. Longer focal length lenses like telephotos or telephoto zoom lenses will between 100-300 mm tend to blur the backgrounds even more.
3) For wildlife, sports and other activities that require movement, use the widest aperture you can so you get the fastest shutter speed available. Also do not put on a polarizing filter and if necessary change the ISO speed to a higher setting if you need even faster shutter speeds.
To stop this speeding fawn I used F3.2 with a 300 mm lens and 1.7X teleconverter so the final F-stop was F3.2 and the ISO Speed set to 1600 which allowed me to use a very fast 1\6400 of a second shutter speed. The camera and lens was hand held.
3. Exposure meter - most new cameras have several types of metering systems you can use - they all measure light. The choice usually includes multisegment (best) also called Matrix, evaluative, or honeycomb; Center weighted and spot meter. Most of the time I recommend using multisegment (matrix or evaluative) metering. Then check your histogram after taking a photograph to determine if you got a good exposure. The camera spot meter is used by advanced photographers in tricky lighting situations such as strong backlight - e.g. someone standing in front of a window. You need to place the spot over a middle tone to get the correct exposure with spot metering.
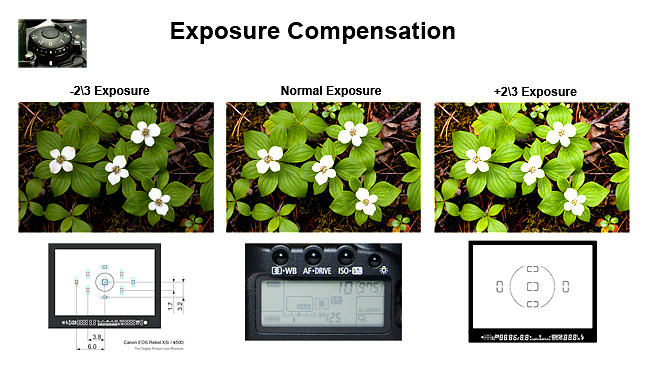
4. View exposure histogram to evaluate exposure. The graph simply indicates how many pixels are light, medium or dark in tone. If the histogram is too far left or too far right your exposure is either under or overexposed. Sometimes even the best light meters are fooled if the background is really bright or really dark. You can alter the exposure by making the picture lighter or darker using exposure compensation button. Generally it is better to side on a little underexposure rather then overexposure since we can fix underexposure using software, but not an overexposed image with burned out (overexposed) highlights (bright areas).
Left shows a histogram from and underexposed image, the middle properly exposed and the right overexposed.
5. Exposure compensation button - usually has a +\- sign beside it if not check your camera manual as some manufacturers only make the exposure compensation available by viewing the LDC screen. When you press this button you may have to press another button to make the exposure + lighter or - darker. Exposure compensation is an important camera control to use when lighting conditions are unusual or you prefer a picture that is lighter or darker then your meter suggests. When you are finished taking the shot don't forget to reset the button back to zero!
5. File type to store you images: JPG (most common) file type and usually comes in S, M, L - always choose L the largest file for best quality and greatest amount of flexibility. If your camera offers different quality settings always pickthe maximum quality - you can always reduce an image in size, but not enlarge it without serious degradation.Advanced photographers and professional quality cameras also offer what is called a RAW file format. RAW files are bigger then JPG files so you get less pictures, but their quality is better (more data and colours). RAW files must be processed in software before you can print the files. RAW files permit you to enlarge your images 100-200% without visible degradation and it is possible to modify exposure, white balance and many other properties after you take the picture. Most professional photographers choose RAW file format if they want to make enlargements or have the flexibility to modify the image afterwards. Some cameras will permit you to shoot both RAW and JPG files simultaneously.
6. Storeage Cards - smart media and compact flash vary in size with bigger cards (more GBs) holding more images - the number of photos you can take with a particular card is usually indicated on your camera. I recommend having at least one extra card if you are planning to shoot a lot e.g. on a vacation or at a wedding. Memory cards are cheap and prices are dropping.
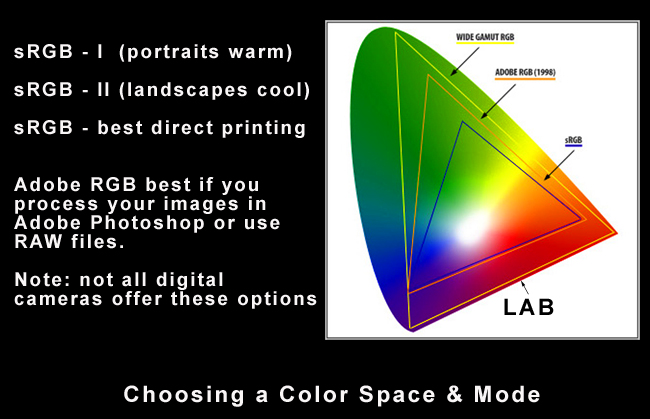
7. Colour Space and Color Modes. sRGB stands for small Red Green Blue and this is the best setting if someone will be printing your pictures such as local photo store. Adobe RGB colour space is the best if you plan to use Photoshop or other image editing program to process and print the images yourself. Colour space refers to the range of colours captured in your picture. Images taken with sRGB look more vivid and punchy straight out of the camera. Adobe RGB is used with RAW files, the images initially tend to look flat and need to be processed in Photoshop to look their best. Adobe RGB records more colours and data and once processed will usually look better then images stored in sRGB mode.
8. Lenses and focal length -lenses with 40-50 mm focal length have a similar perspective as the human eye and are called normal lenses. Every time you double the focal length e.g. 100, 200 or 300 mm you magnify the images 2X, 4X or 6X (divide the lens focal length/50mm to determine the approx. magnification). Lenses with less then 40 mm e.g. 24 mm lens are considered wide angle lenses and are useful for interiors and landscapes - they also tend to make people look thinner in your pictures. If you don't have a wide angle lens it is possible to take several overlapping pictures and stitch them together using software to make a panorama.
Above shows a selection of Nikon Lenses of various focal length
If you only want one lens an 18-200 mm Zoom lens is ideal for travel photography. Macro lenses are special lenses which allow you to focus close to flowers, mushrooms, insects etc. Some zoom lenses have a macro mode built in. Macro lenses come in different focal lengths such as 50, 100 and 200 mm. The longer focal length lenses let you shoot your subjects form further away and still achieve a close-up picture.
VR (vibration reduction - Nikon) or IS (Image stabilization - Canon) lenses - are special lenses that reduce vibration due to camera shake while hand holding. These are especially useful when you are using a telephoto lens which magnifies any movement or camera shake. Vibration reduction is generally not very useful for wide angle lenses or when the camera is mounted on a tripod. If you are considering purchasing a telephoto lens the VR features cost more, but it is a feature worth investing in if you plan to hand hold your telephoto lenses.
9. Holding your Camera Steady
Sharp pictures are a result of holding your camera steady when you shoot. How steady you can hold the camera depends on a number of factors:
Shutter speed, the faster it is the easier it is to get sharp pictures, generally you should not try to hand hold a camera if the shutter speed is less then 1\30 of a second. If you use a telephoto lens the rule is most folks can hand hold the slowest shutter speed of 1\focal length of the lens. In other words if you have a 300 mm lens 1\300 sec is the slowest shutter speed you should try to hand hold. (Vibration reduction will help improve this by one or two shutter speeds i.e. 1\150 or 1\75 of second).
Holding your camera properly can make a big difference - hold the camera close to your face with your elbows tucked in, feet spread apart with one foot slightly forward. When you shoot hold your breath. If you lean on a wall or other object this can help steady you and your camera. Otherwise there are tools such as bean bags, monopods and tripods that will allow you to support your camera and get sharper pictures. Professionals will often use a tripod when ever they photograph a landscape, take a macro photograph or shoot a group photo. Another useful tool is a monopod for birds and wildlife. Another accessory used to reduce camera shake when a camera is on a tripod is a cable release, a remote control release or you can even use the camera's self timer.
10. Filters
A) Cooling filter B) Hard edge neutral grad 2 F-stops C) 81B warming filter D)Circular polarizer E) Coking Blue-Yellow Polarizer f) Lee Sun grad filter G) Lee 2 F-stop soft edge neutral density graduated filter
Some camera stores will try to sell you a UV or Skylight filter to protect your lens - and they do protect it from scratches but I don't feel they are necessary. Use your lens hood instead. I generally don't use a clear glass filters unless I need to protect my lens in harsh environments like from ocean spray or sand on the beach. These UV filters will not improve your pictures.
One filter that every SLR photographer should own is a circular polarizer - these filters reduce reflections and increase apparent colour saturation. They also reduce the amount of light coming in through your lens by 2 F-stops resulting in longer shutter speeds. These filters are used most often for landscape photography or for fall colours. Polarizing filters are also useful even when it is overcast. If you become serious about landscape photography where you often shoot at sunrise and sunset - then neutral density grad filters will balance the exposure of the sky with your foreground.
Graduated filters are generally used by more experienced landscape photographers. Most other types of filters are no longer necessary as colour corrections can be done more easily using a computer program like Adobe Photoshop or adobe elements.
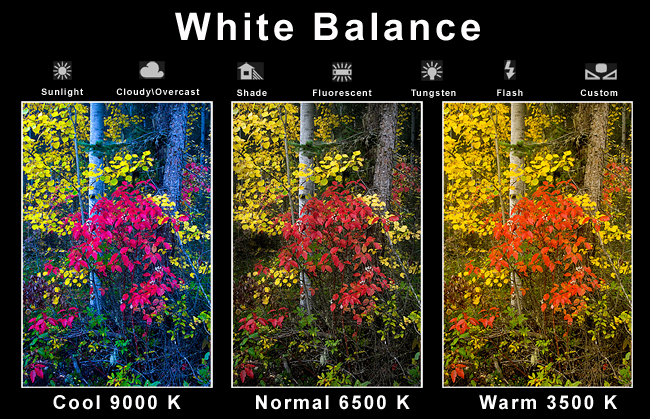
11. White Balance - refers to the "colour" of the light you are shooting in. If you are shooting indoors and you are shooting under "yellow" tungsten light bulbs, your images may appear very yellow or "warm". If you shoot outside the light has much greater amount of blue light and pictures can appear "cold". To get the best colour, you want to set you camera setting to the same kind of light you are shooting under - this is called matching the white balance. If your camera has a auto white balance - this often produces good results, but when shooting JPG files you may get better results if you match the white balance to your current lighting conditions. Most cameras use icons like a light bulb for indoors, clouds for a cloudy day and sun for clear sunny day. If you shoot RAW files its possible to change the white balance afterwards in the software which is another reason many pros shoot RAW files and leave their camera white balance set on Auto.
12. Important Accessories
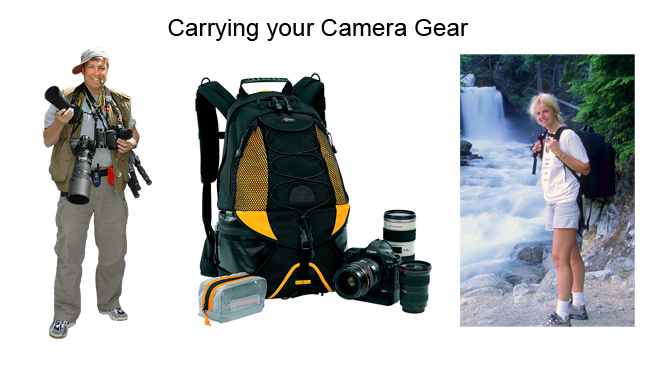
Camera Bag -an important accessory is a camera bag that will protect your gear and help you carry your equipment. The size and type your bag depends on the size of your camera, how many lenses and accessories you own or intend to purchase in the future. Look for something that is rain proof and comfortable to carry and just a little bit bigger then you think you will need. I recommend that you avoid bags that scream "Camera equipment inside" as they can become targets for thieves. There are many to choose from and I own several for different occasions and even sometimes wear a photo vest.
Lens cloth or paper are important to clean your lenses. You can also buy a lens pen with brush and soft cleaning chamois. All lenses should have a lens cap which is placed over the lens when its carried in your bag. It's a good idea to use proper lens cleaning fluid and always put the fluid on the lens paper not the lens before cleaning. Blow or brush away any grit before cleaning your lens with paper so you don't scratch the lens surface.
Lens Caps and Lens hoods protect your lens from scratches and a lens hood also prevents sidelight from reducing contrast in your images. Many compact cameras have automatic lens protectors when the camera is off. If you shoot with an SLR camera, a lens hood is more important then a UV or Skylight filter in my opinion.
Extra Batteries are essential if you plan to take a lot of pictures. Every photographer should have at least one spare battery for their camera.
Tripod - do you need one? If you plan on shooting pictures of friends and family, or places you visit during the day then a tripod is not essential. If you are serious about taking landscapes, macro-photography, or low light photography then a tripod is essential. Carrying a tripod with you is a sure sign you are no longer a beginner. If you do consider buying a tripod they range in price from $25 to $1,000 - do some research, or ask someone knowledgeable for advice. The right tripod depends on how far you plan to carry it, what type and weight of camera gear you have and what type of subjects you plan to photograph. If the tripod is too heavy you will be inclined to leave at home in which case you may as well not buy one.
Flash - most point and shoot cameras come with an on-camera flash. The flash is very useful even in daylight as it can be used to fill in the shadows and put a small highlight in your subjects eye making your pictures look more professional. The downside of a built in camera flash is that it's positioned very close to the lens axis so that if you shoot in low light (e.g. indoors), your pictures may show people with red eyes and an on camera flash is usually not very powerful. Red eyes can be fixed easily in most image processing software programs. Professionals usually use a separate more powerful flash where the flash is positioned much higher and further away from the lens - this reduces the occurrence of red eye. If you do a lot of indoor photography, weddings, parties then you might consider investing in an external flash unit. The more expensive flashes put out more light and have more features. If you are using an on camera flash in low light - you can reduce red eye effect by selecting the strobe or "eye" flash setting. This sends a brief pulse of light before the main flash fires which in turn makes your subjects pupils get smaller and reduces the incidence of "red eye" which is caused by the reflection of blood vessels from the back of the eye. If you have an on camera flash, consider using if in bright sunlight to fill the shadows of your subjects - your pictures will look more professional.
Camera manuals Most people hate to read manuals and some camera manuals are hundreds of pages long. Some modern digitals camera's are so complex that even some pros carry their manuals with them. The manuals are important and will describe special features that your camera has or how to access features buried away in a submenu. Different manufacturers use different buttons or menu commands on their cameras so carrying your camera manual with you is essential. If you don't read your manual at least flip through it and learn how to find specific topics using the index. If you lost your manual you can sometimes find a copy on the internet as a PDF file.
Before Digital Photography it took a lot of time and money to get good at taking pictures. Today, digital cameras let you see what you took right after so you can re-shoot or experiment with different settings and their is no additional cost. The more you use your camera the more comfortable you will be come with it and the more you will be able to concentrate on seeing which is the most important aspect of photography. It is a good idea to practice with your camera before a special event or taking a trip. You don't have to go anywhere to special your backyard will do fine or go for a walk with your camera in your neighbourhood. When you find a subject that interests you, take lots of shots from different angles and experiment - you can always discard those images you don't like - but you can't throw away images you didn't take. Getting photographs is about knowing your camera so well you don't need to think about the controls. Experiment and play with your camera settings to get to know them and most of all have fun and photograph what you like. If you plan to photograph something elusive like wildlife have your camera preset and ready to shoot so you can just grab your camera and press the button.
Seeing & Composition:
Most beginners when starting out either try to put too many elements in their pictures or they put the main subject smack in the middle most of the time. When photographing people, don't forget to check out the background to make sure nothing appears to be coming out of your subjects head. Learning to see like your camera takes time.
To improve your pictures - First don't try to get everything in your picture! Get closer to your subject and check if there is anything in the view that doesn't need to be there. Ask yourself what is important and what do you want to show. Sometimes just moving in closer or a little to one side can result in a significantly better picture.
Second - if you are shooting a landscape, don't put the horizon in the middle. Either move the horizon down and emphasize the sky or move it up in the frame and emphasize the foreground.
Third - when shooting people or animals - try not to put them in the center of your frame, move them off to the side. Photographers often refer to "the rule of thirds" which is simply a guide to improve composition by moving your subject away from the center of the frame and near one of the points of intersection.
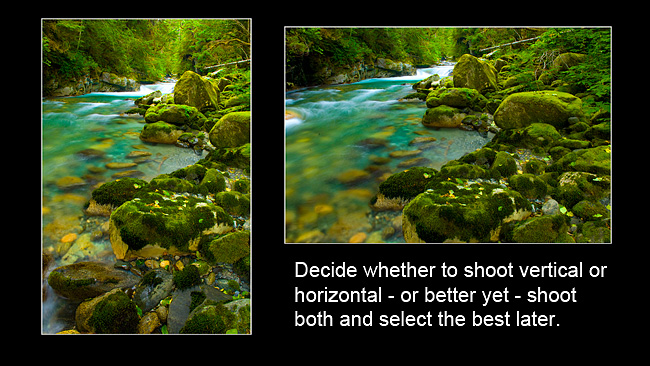
Finally most folks take all their pictures in a horizontal format, however some subjects like people often work better if you turn your camera on its side and take some vertical shots. Most professional photographers often take the same scene with both horizontal and vertical formats for greater sales potential. Cover shots on magazines are usually vertical compositions and some pictures just look better vertically oriented - remember to try and shoot both.
Once you are comfortable with your camera, experiment, have fun and take lots of pictures. Like playing a musical instrument, the more often you play, the more comfortable you will get with your camera and the more you can concentrate on composition and timing.
If you are still feeling unsure about some of the camera controls you can learn more by:
1) Taking out some photography books from the library or purchasing some of the photo guides.
2) Join a camera club and folks will be happy to share their knowledge with you
3) Take a photography class, workshop or take some private training with a professional photographer.
Finally a note about Camera brands. First you should realize that no matter what camera you decide to buy or use, the photographer is the most important part of the process of photography. A good photographer can take great shots with almost any camera type or brand. Your choice will in part depend on your interest in photography, how much you are willing or can afford to spend on equipment and whether or not you are taking pictures for pleasure or profit.
Keep in mind most photographers, including professionals tend to be biased toward the brand they are using because they have invested a lot of money in their equipment. In an ideal world all SLR cameras would use the same lens mount and we could attach lenses from different manufacturers, but unfortunately that's not the case so photographers tend to invest in one brand. I shoot with several camera brands as I have found different brands have strengths and weaknesses or some have features that I need or want. If you plan to invest a significant amount of money, first do your homework before you invest thousands of dollars. Check out web sites like www.dpreview.com and others for reviews and gather several opinions. Alternatively consider renting some equipment and trying it out before you buy.
Photography can be one of the most enjoyable hobbies or professions you can find. Photography will force you to see more and possibly appreciate more of your surroundings. Photographs also document your history, your life and family and your unique experiences so you can share them with others. Enjoy - it has never been easier to take and share photos with those you care about.


[ Top ]