
Cell Phone Cameras, Dedicated Digital Cameras and Digital Single Lens Reflex Cameras for Photomicrography
by Dr. Robert Berdan and Brandon Berdan*
August 27, 2020
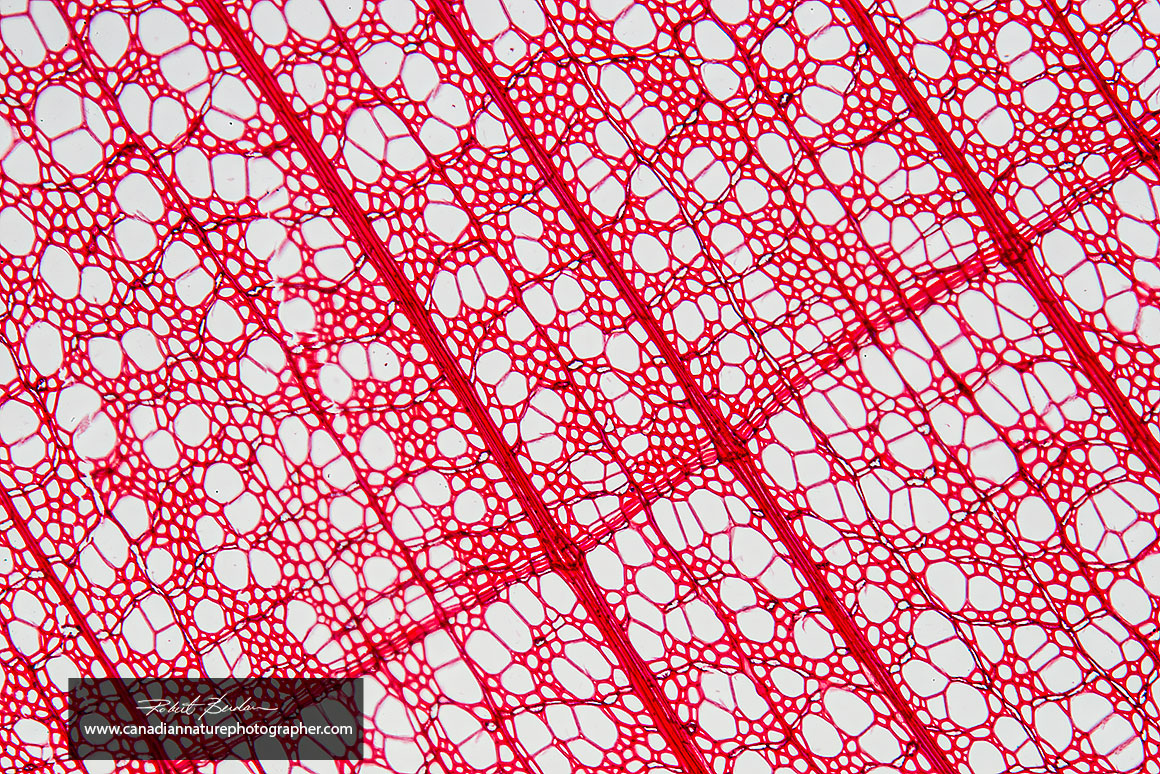
 Diatoms are single cell organisms living in fresh water. Their tiny frustules are composed of silica which have fine pores and have been used to test microscope resolution. Image taken with DSLR camera (Nikon D800) using DIC (Differential Interference microscopy).
Introduction
The main question we wanted to determine is how do DSLR (digital single lens reflex) cameras compare to dedicated scientific cameras for photomicrography? Furthermore, given the growing popularity of cell phones we tested several to find out how suitable they might be for photomicrography along with one mirrorless camera. These questions are relevant to those using a microscope including: students, teachers, biologists, histopathologists, petrographers, forensic scientists, amateur photomicrographers and even artists. Those not interested in some background or technical details can skip directly to the pictures. We hope this article will be of value to both amateur and professional microscopists and save readers money if they might be planning on investing in a camera for photomicrography.
Table of Contents - Click on Link to Go to Section
1. Digital Cameras a Short Historical Perspective
2. How many Megabytes or Megapixels are required to make a print?
3. Cell Phone Cameras for Photomicrography
4. Apple iPhone 5s
5. Samsung Galaxy SIII
6.
Google Pixel 3
7. Dedicated Cameras for Photomicrography
8. AMscope 3MP USB 2.0 Color CMOS C-Mount microscope camera with Reduction lens
9. Zeiss Axiocam Erc5s
10. Moticam ProS5 Lite dedicated camera
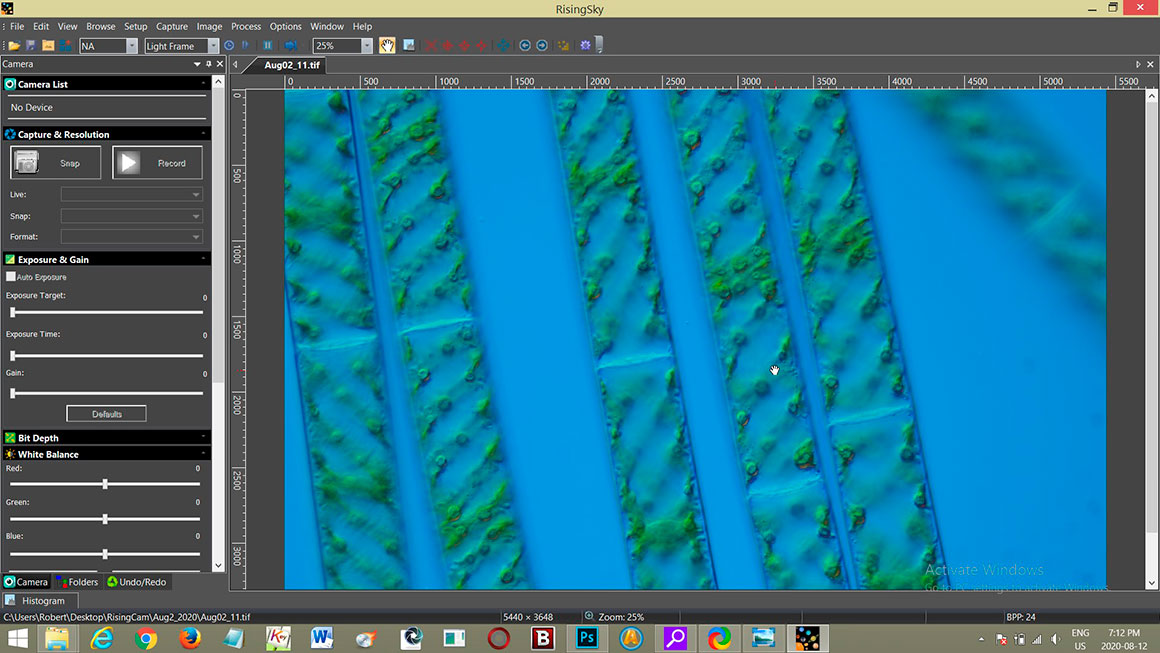
11. RisingCam 20 MP Sony IMX183 dedicated camera
12. Nikon Dedicated Cameras for Microscopy
13. Leica 20 MP DMC 5400 dedicated microscope camera
14. Dedicated Camera Software
15. Digicam control software available free to control DSLRs
16. DSLR cameras for Photomicrography
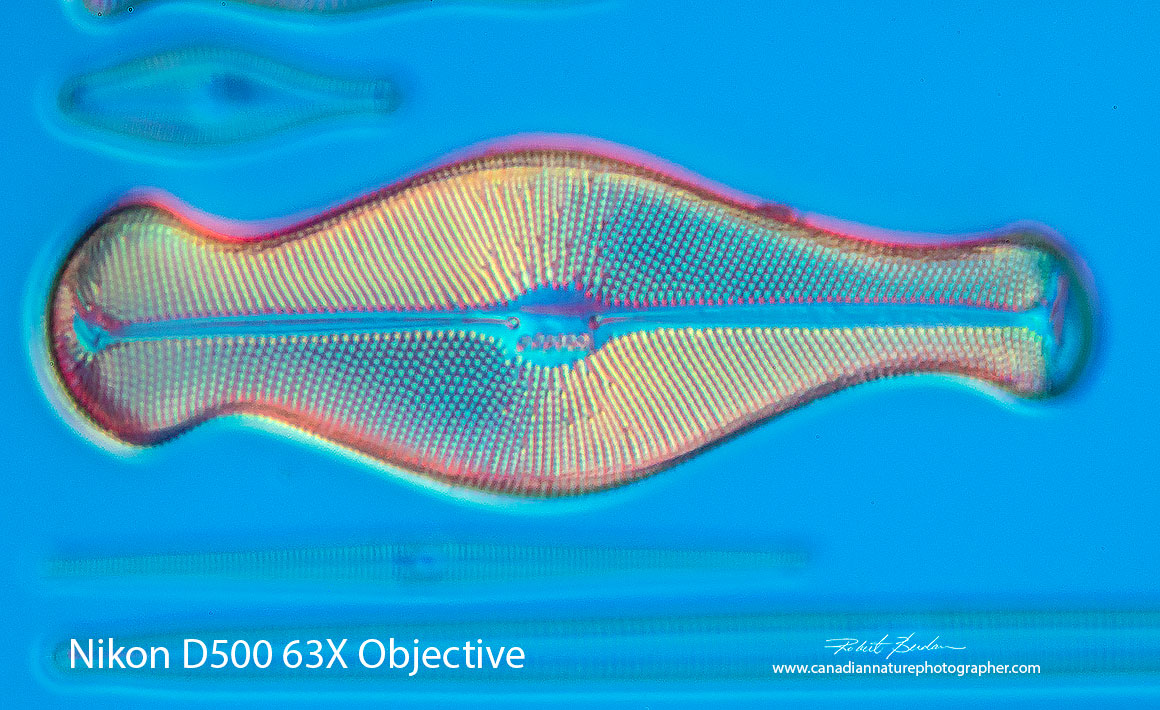
17. DSLR images - Nikon D500 (24 MP) and D800 (36 MP)
18. Mirrorless Camera - Canon G16 12 MP
19. Video with DSLRs and Dedicated Cameras
20. Summary & Conclusions
21. References & Links

Above is a Polaroid ED-10 camera for photomicrography introduced in 1970, it cost $70 and could be used with any light microscope. The shutter has no timer and exposure was determined by trial and error. This was a good way to get started in photomicrography in 1970.

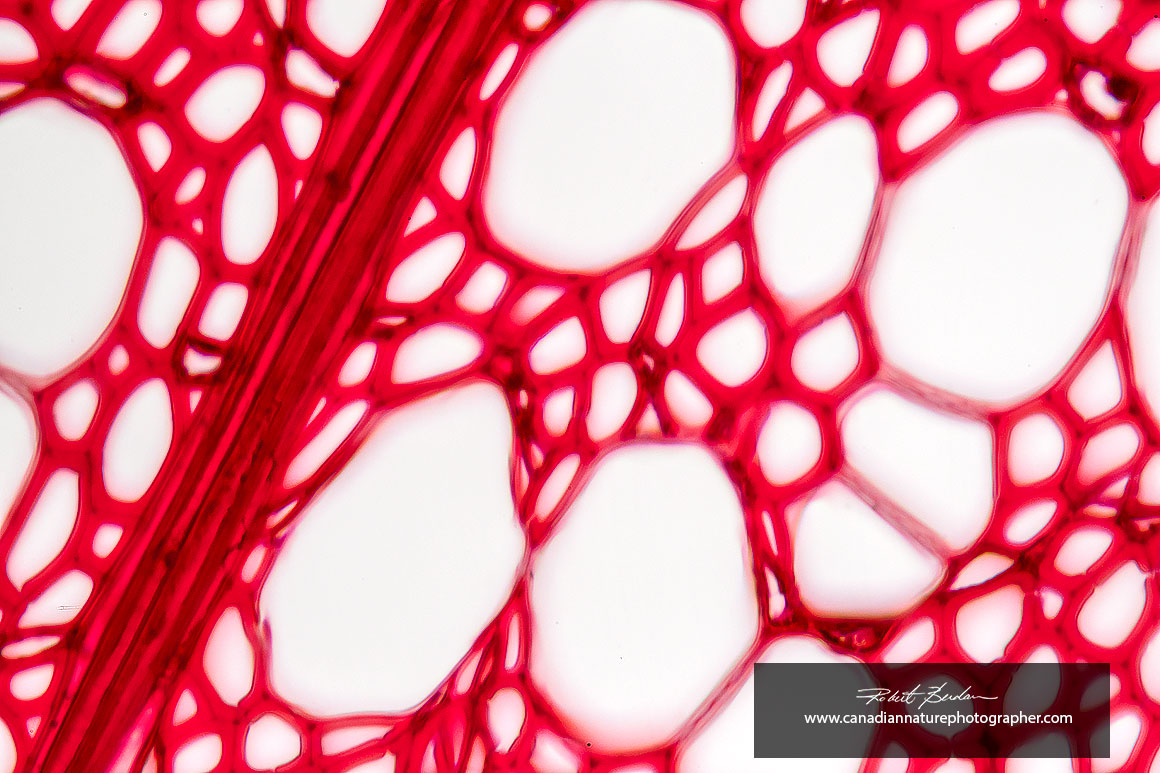
White pine longitudinal section in polarized light with a full wave compensator photographed with Kodak Colour Photomicrography film 2483 and an Olympus OM-1 Camera 400X. This film had an ISO speed of 16 and was the finest grained slide film ever made. 
Kodak photomicrography color film 2483 - this film is still being sold on E-bay
I started taking pictures with a microscope so that I could share the amazing micro-world with others. The first camera I used was a Polaroid ED-10 costing $70 (shown above). The camera used Polaroid Type 100 film resulting in prints 3.25 x 4.25 inches in size. The cost per image was high and there was no way to conveniently enlarge these images. Six months later I started to use an Olympus OM-1 35 mm SLR (single lens reflex) film camera attached to an Olympus microscope and began experimenting with various types of 35 mm film. I used a darkroom to process my film and make prints. With this camera I was able achieve 16 x 20 inch enlargements. I continued to use Olympus 35 mm film cameras (OM-1, OM-2, OM-4) until 1989 with various types of light microscopy with excellent results. In the late 1990's digital cameras began to grow in popularity and in a few years dominated the market place.
Above left is a Wild M8 stereo microscope and on the right an Olympus E light microscope - both have an Olympus OM-4 SLR camera attached to the trinocular tube. Olympus developed a metering system that measured the light reflected off the film during exposure and so these cameras offered excellent automatic exposure even in low light such as those used in fluorescence microscopy. Olympus later chose to focus on the development of compact cameras and I switched to Nikon and later used both Nikon and Canon cameras.

Radiolarians photographed on Kodak Technical Pan film with an Olympus OM-1 Camera. Photograph taken 40 years ago using darkfield microscopy.
1. Digital Cameras a Short Historical Perspective
The first digital camera was invented in 1975 by Steven Sasson working at Eastman Kodak. This camera stored 30 images on a cassette tape, weighed 8 lbs (3.6kg) and captured 0.01MP images. I first used digital technology to capture images in my research lab in the mid 1980's. I used a frame grabber which was an electronic card that fit into a computer slot and it would capture still frames from a video camera attached to the microscope. The image resolution was only 640 x 480 pixels (1MP). In spite of the low resolution I was able to photograph images of cells moving toward an injured nerve fibre. I processed the images with free software called NIH image that is now called Image J - Fiji and it is still widely used in research and us available free.
In my research (RB) on nerve regeneration I used a specialized video camera with image intensification that was able to record isolated neurons injected with fluorescent dyes. I needed the image intensification because illumination of cells injected with a fluorescent dye was photo-toxic. I used a Hammatsu video intensified camera costing about $16,000 and even though I could see nothing through the eyepieces, the camera was able to record the growth of the neurons which I could watch on a TV monitor. Similar technology is used in night vision cameras.

My first Digital camera in 1998 Olympus Camedia C-840L
In 1998 I purchased an Olympus Camedia C-840L. It had a 1.3 MP CCD sensor (charge coupled device) and stored only 36 images. Most early digital cameras did not use memory cards and battery life was limited to 40 images. Image quality was adequate for posting on the web. A digital DSLR was available to press photographers made by Nikon and Kodak (1994 Kodak/AP NC2000) based on a Nikon N90 body and offered 1.3MP, had a removable memory card and offered ISO 1600. In digital photography ISO (International Standards Organization) speed is a measure of the sensitivity of the image sensor to light. The same rating applied to film which used larger silver-halide crystals to increase light sensitivity. Digital cameras increase the light sensitivity by amplifying the signal electronically. Lower ISO speed images have less grain or digital noise. Higher ISO speed permits shooting images in low light or the use of faster shutter speeds. Returning to the Nikon\Kodak DSLR when it first became available it cost $17, 950. The Vancouver Sun became the world's first newspaper to convert completely to digital photography with this camera in 1995.

Nikon D1 camera introduced in 2000 was the first consumer DSLR and cost $7000
In 2000 I purchased a consumer DSLR, a Nikon D1 which offered 2.7 MP (megapixel) CCD sensor which cost $7,000. I recovered the cost of the camera in about 6 months by providing images for web sites. Because this camera offered RAW files I enlarge the files up to 10 x 15 inches. Shortly after I stopped using 35 mm film and sold my 4 x 5 camera which I had used mainly for landscapes. The issue of film versus digital is not simple as it depends on the type and size of film as well as the digital camera it is being compared to, but overall a full frame DSLR with 12 MP exceeds the resolution of the best 35 mm films (Kodak Technical Pan Film 2415). 35 mm colour film (Fuji Velvia ISO 50) captures the equivalent of about an 8 MP digital camera (R. Clarke Clarkvision.com). However, digital cameras have many advantages over film including the ability to change ISO speed during the shoot, the ability to save thousands of images on a single memory card, instant preview, and zero cost to process the images except for one's time. Digital sensors have a wider dynamic range than film, lower noise (grain) and better shadow detail (higher dynamic range). Exposure of RAW files often omits the need to bracket exposures and white balance can be altered after shooting. Colour digital images can be converted to black and white, or sepia so there is no longer need for different types of film. Digital images can also be stitched, stacked, combined to extend dynamic range, emailed, compressed and analyzed electronically. In short digital cameras save time, money and offer higher quality and photographers can learn to use them faster because of the on camera instant preview.

Above is light photomicrograph of white pine wood in polarized light showing that a colour image can be converted to black and white. Colour slide film can also be digitized and converted to to a digital image, but 35 mm scanned images are noticeably lower in quality than images produced by most DSLR cameras. Image above photographed with a DSLR camera at 100X with an Olympus E microscope.
After 2000 new digital camera models offered higher sensor resolution and reduced digital noise. When Nikon produced the D300 DSLR camera in 2007 it offered 12.3 MP and they switched to a CMOS (Complimentary Metal Oxide Semiconductor) sensor that resulted in extended battery life and lower digital noise. I still use two D300 bodies on my microscopes in 2020. Used D300 camera bodies can be purchased for about $100-$400.
Desmid Staurastrum sp (unicellular algae) photographed at 400X darkfield microscopy with a 12 MP DSLR camera - Nikon D300.
The Nikon D300 camera uses a crop sensor APS-C (Advanced Photo System type C - 25.1 x 16.7 mm). Because the APSC sensor is smaller than a full frame 35 mm film (36 mm x 24 mm), it magnifies the image 1.5X so that a lens with a 100 mm focal length behaves like a 150 mm focal length. A crop sensor camera on the microscope also magnifies the image over a full frame sensor (shown below). Nikon at the time claimed they had no intention of making a full frame sensor that was until many photographers began to switch to Canon's full frame DSLR camera.
In 2005 Canon offered a full frame sensor DSLR - the EOS 5D MKII. I began photographing with both Nikon and Canon cameras. The main advantage of the Canon camera was the bigger sensor (same size as 35 mm film), it offered 21 MP and it was the first to capture HD video (1920 x 1080 pixels). Nikon followed later by offering a camera with 1920 x 1080 video. Sometime later Nikon offered the D800 camera with 36 MP sensor and HD video capture. The competition is ongoing between Nikon, Canon and Sony to offer the highest resolution sensor. Several DSLRs available today can capture 4K (3840) and 8K (7,680 x 4,320 pixels) video (e.g. Canon 8K EOS). The highest resolution "compact" cameras available as of this date are the Canon EOS R 50.6 MP and Sony Alpha 7R IV mirrorless camera that has 61 MP.

Two main sizes of sensor found in DSLRs - their actual size varies slightly in different camera brands.
One can argue that the majority of consumers don't need more resolution. For most folks cell phones are suitable for capturing their day-to-day lives. The popularity of cell phone cameras has negatively affected other camera sales. However, when one of my clients showed me a 36 MP image of a snowy owl sitting on a fence way off in the distance and we were able to zoom in and crop the image, I was amazed at the quality and sharpness of the owl. Shortly after I purchased a Nikon D800 with 36 MP. Not everyone needs a high MP camera, but they permit large sized prints and ability to crop into the image.
Other camera improvements include very high ISO speeds (100,000 or more) and the ability to use shutter speeds up to 1\8000 of a second. The price of DSLRs cameras has been kept relatively low by consumer demand and sales. Cameras designed for the smaller science market are high in cost and most use smaller lower resolution sensors. Sensor size is is one of the most important factors in providing low light sensitivity and image quality- see Crisp (2013).
Medium format digital cameras offer even larger sensors and more MP than DSLRs, but they are costly (often over $10,000) and rarely used for photomicrography. See this blog posting for an example of how one person connected his medium format camera to a microscope, and note the images have vignetting.

Volvox forms spherical colonies of up to 50,000 flagellated cells. The orange ball inside Volvox is a daughter colony. Photographed with a Nikon D800 DSLR and DIC microscopy 400X.
Concurrent advances in image editing software, namely Adobe Photoshop provided the ability to further reduce digital noise in an image and permit extreme enlargements when using RAW files or by panoramic stitching. Stitching images together allows any low resolution digital camera to produce larger images.
Software can also be used to stack images (e.g. Photoshop or Helicon Focus) where images taken at different levels of focus are combined to increase the overall depth of field. One can also combine different image exposures to extend the dynamic range (HDR) of an image. Image processing can also reduce out of focus blur in fluorescence microscopy (Deconvolution) and significantly improve overall sharpness and quality of the photomicrography image.

Diatom taken with a Nikon D800 DSLR, Zeiss Axioscope and DIC microscopy 400X - focus stack.
Software can also be used to control a DSLR camera attached to the microscope and a live view of the image can be seen on the computer screen. Cameras that support "Live View" have the mirror locked up so there is no vibration caused by the mirror moving up in a DSLR when taking a photo. Canon and Nikon also make software to support in ordere to control their cameras via a computer as do several other companies. I use a shareware program called Digicam control that supports a variety of DSLRs on a PC and even allows me to connect several cameras at one time. Many dedicated cameras come with software that can control the image before shooting, including white balance, colour, gain, exposure etc. Some of the cameras programs can add scale bars, perform morphometric analysis, stack images or stitch them. I am able to do most of the image processing I need with Photoshop.

Closterium sp Desmid photographed with a DSLR and DIC microscopy 400X - Focus stack
Photomicrographs for publications generally do not require images larger than about 8 x 10 inches but a high quality image this size still requires 20 MP at 300 dpi (dots per inch) - note these images can be compressed into smaller files as .jpg and still offer sufficient resolution for printing.
Some authors compared digital images taken with different MP cameras and present small postage stamp size images in their publications and conclude there is no significant difference between the images. Also comparing a low res digital image e.g. 3 MP to a 12 MP image on a web site isn't a good comparison because of the relatively low resolution of most monitors compared to prints.
My message is that if you only intend to view the images on a computer monitor you are likely to be satisfied with a low resolution digital camera. I surmise it is better to capture more information and have the ability to enlarge or crop the image. Many of my clients require prints larger than 8 x 10 inches (e.g. Calgary Science Center needed images of plant sections 4 x 5 feet in size).
2. How many Megabytes or Megapixels are required to make a print?
Images are generally printed at 300 dpi for publication. To calculate how many MP one can use this formula:
Length inches x width inches x image dpi squared x 3(RGB)/ 1,048,576 bytes = File size in Megabytes.
8 bits (0 or 1) = 1 byte; 1024 bytes = 1 kilobyte; 1,048,576 bytes = 1 Megabyte. The file is multiplied by three for images produced using RGB colour printer.
For an 8 x 10 inch print in 8 bit colour (dpi = dots per inch)
(8 x 10 in x 300 dpi x 300 dpi x 3)/1,048,576 = 20.6 Megabytes
A simpler method to determine how many megapixels is required is to create a new image in Photoshop and choose image size e.g. 8 x 10 inches x 300 dpi = 20.6 MB. Photoshop shows the file size when you select Image > Image size. The same size image at 72 dpi used for web is only 1.2 MB uncompressed - which is why I think some authors believe you only need a low resolution digital camera for photomicrography. Note that 20.6 MB file can be compressed to a smaller file size e.g. in .jpg file format and still offer a good print, but you still need to take the image with sufficient resolution.
Pixel Size Required to Match the Microscope Optical Resolution

Learn more about the Nyquist sampling theorem also see resolution equations from Abbe
Number of Megapixels Required for a 1 inch Sensor Using Different Magnification Objectives

Table 2 Digital Camera Resolution for Optical Microscopy - the data shown above was generated using a Java Applet on Microscopyu.com by M.J. Parry-Hill et. al. and shows the relationship between objective magnification, Numerical aperture, Field number and the size of the sensor required to capture detail. The applet shows this information for 1\3, 1\2, 2\3 and 1 inch sensors. Only the data for a 1 inch sensor is shown above.
In some circumstances the light sensitivy of the camera's sensor is a more imporant than resolution - especially in fluorescent microscopy. Larger pixels allow the camera to capture more photons, so putting more pixels on a smaller sensor is not the answer for low light applications.
I am able to achieve high resolution and low light sensitivity with a DSLR camera attached to a trinocular head of the microscope. A monochrome camera will permit even greater sensitivity and increased spatial resolution (C. Brown, 2007). Monochrome images can then be pseudo-colored by combining different colour channels R, G, B using software where the colours of each channel are added in post processing. Some dedicated camera software also permit pixel binning which combines adjacent pixels to make larger pixels and allows a user to exchange higher sensitivity for lower spatial resolution. By combining adjacent pixels a 2x2 binned pixel is twice the height and width of the original pixel and offers 4X the area. The digital information is summed into a single pixel. Software from AMscopes and Rising Cam offer pixel binning when greater sensitivity is required.

Rotifers Brachionus sp photographed with a wide field fluorescence microscope (Nikon Optiphot) at 100X, Nikon D500 DSLR at ISO 400 - Photoshop Deconvolution was used to remove out of focus haze and blur.
3. Cell Phone Cameras for Photomicrography
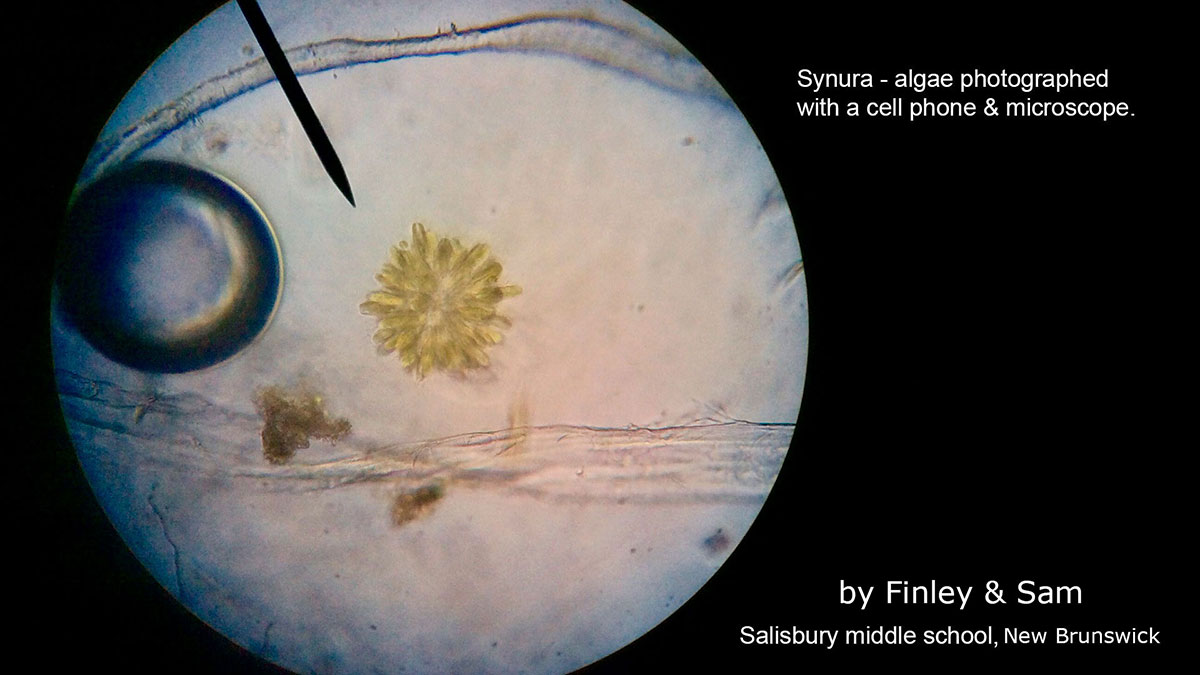 Above is a cell phone photomicrograph that two students from Salisbury middle school sent me requesting assistance in the identification of a microorganism that turned out to be a Synurid which is a small group of algae found in fresh water. This cell phone image conveys the value of taking pictures with a microscope and the process can make any biology class more interesting and interactive.
According to Global System for Mobile Communications real time intelligence data, there are 5.2 Billion people that use a mobile device in the world (i.e. 67 percent). Smart phones are popular among young people and even children. To take a picture through a microscope with a cell phone or tablet you hold the camera in front of the eyepiece and shoot. This is called the afocal method of photography which can also be used with compact cameras and a DSLR.
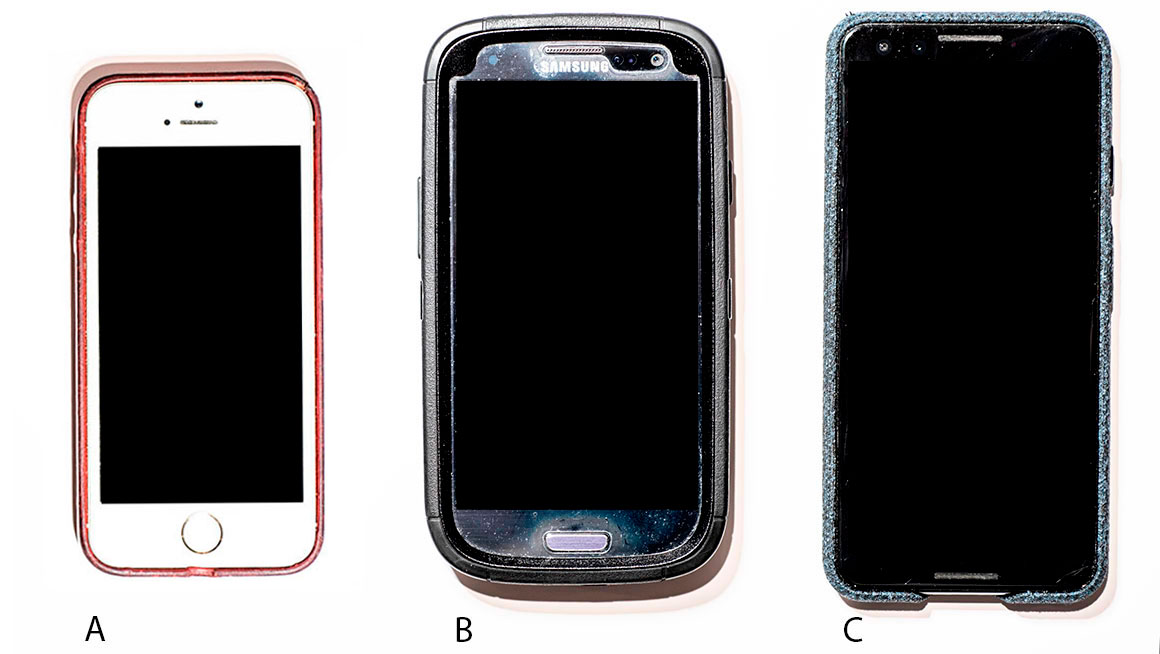
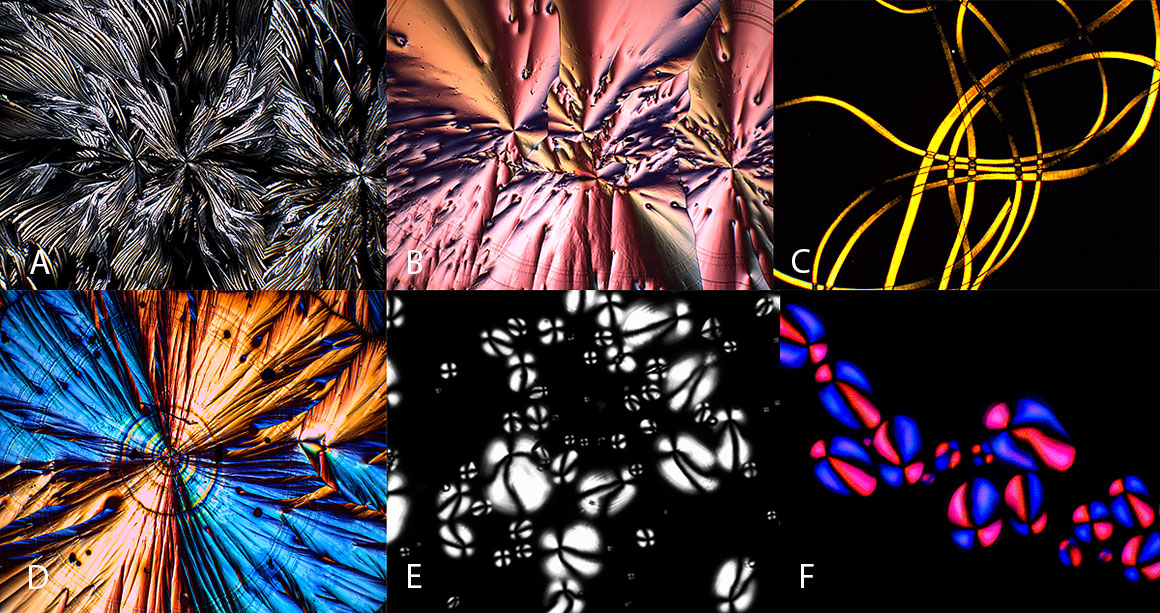
We tested A) iPhone 5s, B) Samsung Galaxy SIII and C) Google Pixel 3. We think these cell phones are still common. The iphone 5s has an 8MP primary camera and became available September 2013, the main camera uses a 1\3 inch sensor with 1.5 micron pixels and offers 1080p video 30 fps. The Samsung Galaxy SIII offers an 8MP main camera, 1\3 inch sensor, 1080p video at 30 fps. The Google Pixel 3 has 12.2 MP camera 1/2.5 inch sensor with 1.4 micron pixels.
With some cell-phone cameras it was possible to zoom in on the image by touching the screen and spreading our fingers until the image filled the frame. With older cell phone cameras we only saw the image in a circular region with little or no ability to zoom in.
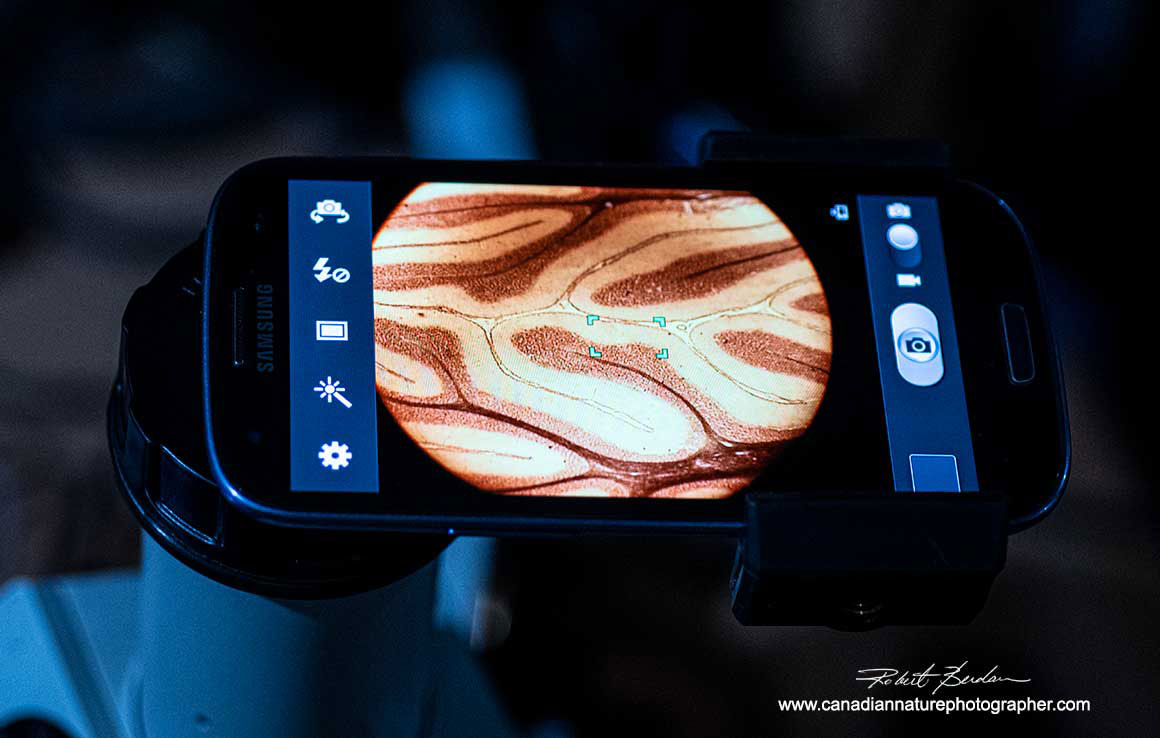
Above is a Samsung Galaxy SIII cell phone attached to a trinocular head of an Optiphot microscope using a Universal adapter. The image shows the maximum amount of zoom this cell-phone permitted.
Taking a picture with a cell phone is simple, but it takes steady hands to get sharp pictures photographing with a microscope. There are a variety of cell phone adapters that will hold a cell phone and clamp on to the microscope eyepiece. We purchased a universal adapter from Amazon for $40 for these tests. We chose the universal adapter as it is able to attach to wide variety of different sized eyepieces, binoculars or a telescope. The adapter allows the camera lens to be held in place in front of the microscope eyepiece. An adapter is particularly valuable if you want to capture video. We caution that this particular phone adapter may not hold the camera securely as we found it sometimes sliped off a 30 mm wide eyepiece so be sure to have something soft for the phone to land on if it does fall off. Some researchers surveyed different cell phone adapters (S. Roy et. al. 2014) and others described how to construct one from a coke can (H. Mondal et. al., 2017) or cardboard toilet-paper roll (S. Singaravel and M. Aleem, 2016).

Above is a universal cell phone adapter available on Amazon. On the right the adapter is clamped to an eyepiece which is inserted into a microscope ocular tube. We chose to use a trinocular tube that held the camera horizontally, but the adapter can also be attached to a microscope with a monocular or binocular head.

The image above shows a cell phone attached to the trinocular head of a Nikon Optiphot microscope using the Universal adapter while Brandon takes a picture. We found it easier to focus on the camera screen when the room lights were dimmed or turned off.
Most cell phones have small sensors less then one inch, though a few use large sensors. The sensor is the most important part of a digital camera and in most cell phones it's between 1\2 to 1\3 of an inch, the pixels range size varies from 1.6 microns to 2.4 microns. Bigger pixels offer greater sensitivity to photons. DXOMark tested 31 cell phone cameras from 2019 and ranked the top 5: 1) Huawei Mate 30 Pro 2) Xiaomi Mi CC9 Pro 3) Apple iPhone Pro Max 4) Samsung Galaxy Note 10+5G and 5) Samsung Galaxy S10 5G. The DXOMark web site includes full size images that can be previewed.

Relative sensor sizes of Digital Cameras and Cell Phones (graphic from pikping.com).
Pictures taken with Cell Phones
We found that some 8-12 MP cell phone images were suitable for low resolution web pictures but the iPhone 5s lacked clarity. Below each photo you can download a full size unprocessed image of each picture. Some cell phone images are adequate for making small prints, viewing on the web, inclusion in technical reports and beginning photomicrography. Each cell phone image shown shown embedded in this web page was processed in Adobe Photoshop in order to correct white balance, optimize contrast and sharpen the image.
The iPhone 5s was introduced in September 2013, offers an 8MP main camera and uses a 1\3 inch sized sensor. This phone produced the poorest quality images, had a tendency to over expose and most images lacked any fine detail. Colours were inaccurate and correcting the images in Photoshop did not significantly improve the images. Full phone specifications are available from gsmarena.com

Pine wood 40X iPhone 5s - no detail of the wood fibers is visible. Download full size image.

Cerbellum section Brightfield microscopy photographed with iPhone 5s 100X - Download full size image.
Vitamin C crystal photographed with IPhone 5s - poorly saturated colour, low contrast and some pixelation visible. Download full size image.
Images from the iPhone 5s camera are so poor that we do not recommend using this camera for photomicrography even for educational purposes.
The Samsung Galaxy SIII phone was introduced in 2012, offers 8 MP main camera with a 1\3 inch sensor. Images often exhibited uneven exposure and the zoom function (4X) did not permit us to completely fill the viewing area. This is an 8 year old phone and the images were barely acceptable. Full camera specifications can be found here.
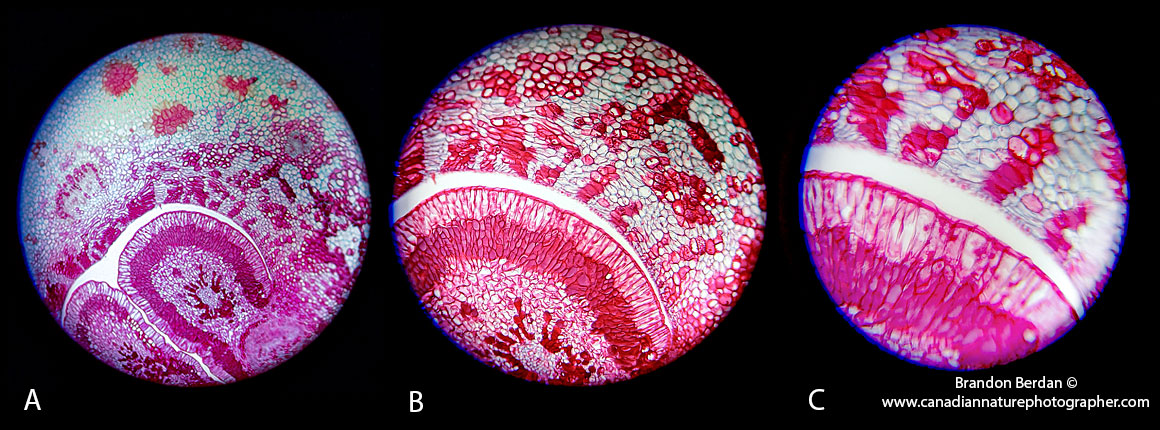
Plant section Pinus fruit (Pear) A) 40X B) 100X C) 200X Bright field microscopy

Diatoms photographed with bright field microscopy - illumination was uneven but you can see the pores in the middle Diatom Gomphonema sp. 400X Download full size image.
The Samsung phone often over exposed images in the central region of view.

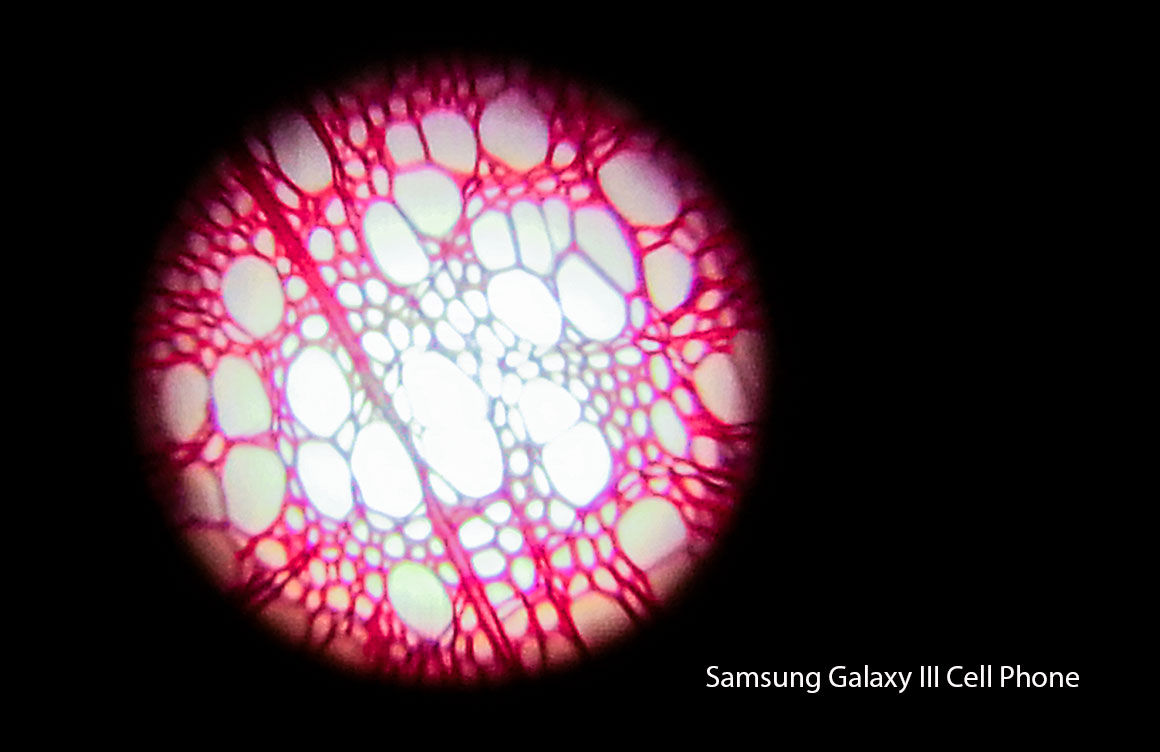
Cerebellum tissue photographed 100X with the Samsung Galaxy SIII 4X zoom - Download full size image.

Vitamin C crystals 200X Polarized light microscopy. Download full size image.
The Samsung Galaxy SIII camera does offer some useable images, though we could not fill the frame with the pictures. We think it is suitable for children in an educational setting or someone starting out in photomicrography.
The Google pixel 3 was introduced October 2018 and cost between $400 to $800. It was the newest phone we tested and uses a 1\2.5 inch sensor with 12 MP - full phone specifications are here. This cell phone camera offered the best pictures in the group. The phone has an image stabilization feature which moved the image back and forth while we were trying to focus on the screen that was annoying. Image quality with the Google Pixel 3 is acceptable for web pages, but image quality pales in comparison to dedicated digital cameras and DSLR cameras shown below.

Cerebellum 100X Photographed zoomed out - Download full size image. Note the edges of the image and the drop off in sharpness. The image was processed in Photoshop.

Cerebellum 200X - using Google Pixel 3 zoomed in 7X, fine details are not clear - Download full size image.

Cerebellum 400X - using Google Pixel 3 zoomed in 7X - Download full size image.

Vitamin C crystals in Polarized light 100X - Download full size image
Vitamin C crystals Polarized light microscopy 200X zoomed in - Download full size image.

Vitamin C crystals Polarized light 400X - Download full size image.
The images produced with the Google Pixel 3 are suitable for science projects or anyone beginning photomicrography. The images from this phone might also be of value in telemedicine.
We do not show video because none of the cell phones permitted us to fill the frame with video. We also did not assess the optics of the cell phones, but some new cell phone cameras offer several lenses to choose from when taking a picture. We did find that an adapter to hold the phone was helpful and worth purchasing. The main advantage of a cell phone is their ubiquity and the ability to email images quickly to friends, associates or insurance agents following an accident.
Cell phone cameras are improving and have even been used for super resolution microscopy after custom programing of the phone (Diederich et. al. 2019). Other researchers constructed a mobile phone microscope that used a flash or sunlight to visualize cells (A. Orth et. al. 2018). In the future cell phone cameras may become more popular for scientific documentation (e.g. see A. Skandarajah et. al., 2014, C. Zhou et. al. 2016).
As an aside, I recall photographing the Aurora borealis in Yellowknife with my DSLR on a tripod and a young fellow standing next to me showed me some pictures of the Aurora he had taken handheld with his cell phone - they were impressive - the future looks bright.
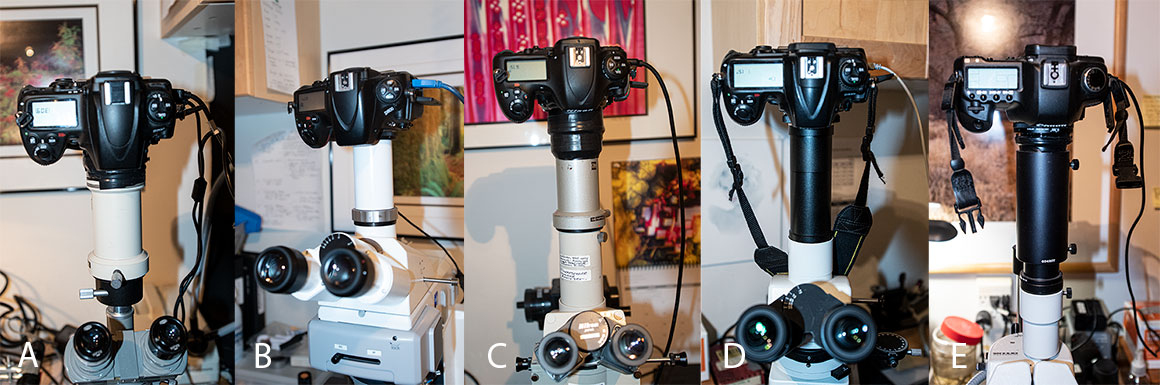
7. Dedicated Cameras for Photomicrography

We tested A) 3MP AM microscope camera ($125 US) 1\2 inch sensor, B) 5MP Zeiss Axiocam Erc5s 1\2.5 inch sensor ($1300 US) C) 5.5 MP Moticam ProS5 Lite 2\3 inch sensor ($1000 US) and D) 20 MP Rising Cam dedicated camera ($638 US) with a one inch sensor. The AM microscope camera dropped in price by over 50% in the past year and it is shown above with an eyepiece attached to it that inserts into an ocular, but the camera can connect directly to a C mount. All the cameras can use these eyepieces for insertion into an ocular tube. The eyepieces vary in magnification from 0.39X to 1.0X. It is important to choose the correct eyepiece if you are inserting the camera into a microscope ocular port. Similarly a C mount needs to match the sensor size, if you are not sure which one to purchase we recommend you contact your microscope sales representative. Some C mounts are hollow tubes others have lenses inside.
Dedicated microscope cameras vary in price from $125 to over $10,000. Most of them use small sensors not much larger then cell phone cameras though a few have sensors up to one inch in size or larger. Bigger sensors are better and offer higher signal to noise ratio in low light and allow more "photosites" pixels to capture the image. Some articles I have read suggest that one only needs a 1-6 MP camera - I disagree, unless you are happy with small images suitable for presentation on the web. A 3 MP is the absolute minimum in my opinion. For those doing research I would recommend a 10 MP as minimum with a dedicated camera. One disadvantage of dedicated cameras is that most of them must be tethered to a computer in order to function. One exception that I know of is the 8 MP dedicated cameras offered by Zeiss - Axoicam 202 mono-PDF and 208 colour - PDF.

Above - Motic BA310 Polarizing microscope with Moticam SProS5 Lite dedicated camera attached to a C mount. The camera is tethered via a USB cable to a computer and via a 0.63X C-mount adapter to the microscope trinocular port. I reviewed and purchased this microscope recently.
Dedicated cameras offer a number of advantages over a DSLR - the first is their compact size and weight allowing some microscopes and camera to be moved or carried - e.g. in a classroom. The second is that they are "mirrorless" so the camera shutter provides no vibration that might add blur to the image. The third advantage is that many of them come with software that permits you to view the image live on an LCD screen or TV for presentations. The software also permits you to alter the exposure, colour, gain, sharpness and other factors before you take the photo. These small cameras can also be attached to an eyepiece ocular and some come with adapters so they fit into larger diameter oculars of stereomicroscope tubes. They can also be used on monocular or binocular microscopes. Software with these cameras may provide additional tools which may by a deciding factor for some research studies.
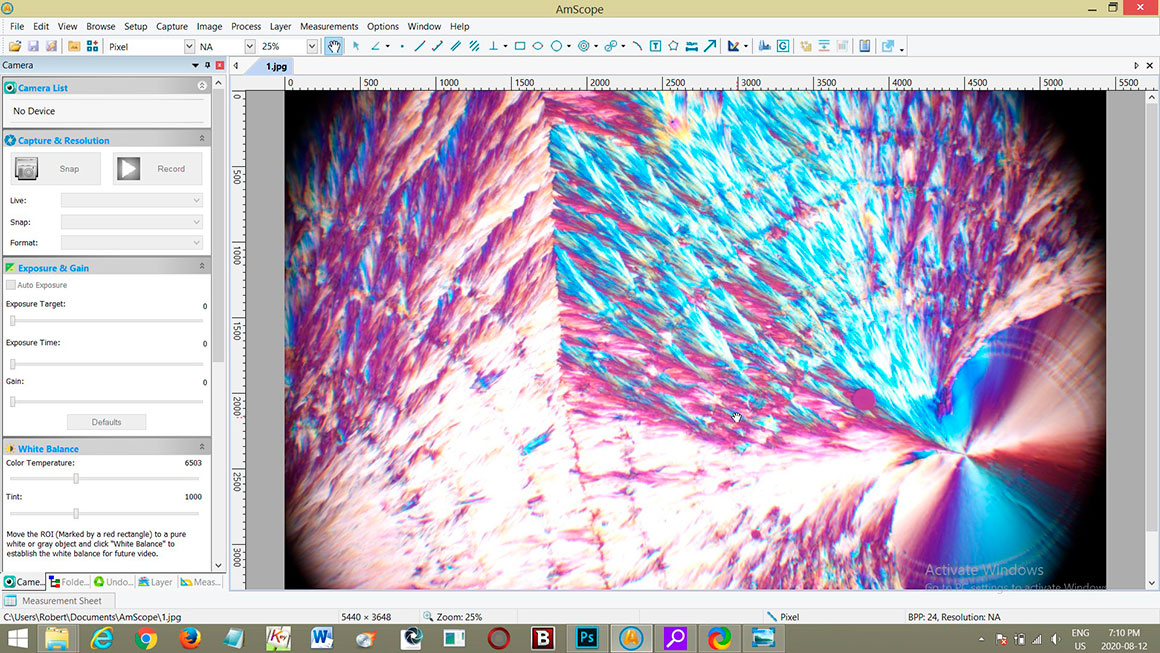
8. AMscope 3MP USB 2.0 Color CMOS C-Mount microscope camera with Reduction lens
This camera currently cost $125 US, comes with a 0.5X reduction eyepiece, and several adapters so the eyepiece can fit into different diameter ocular tubes. Software installation and camera setup is straightforward. This camera uses a 1\2 inch sensor with 3.2 micron pixel size. The software permits binning 2x2, 3x3 pixels with the camera. Detailed specifications for this camera can be found here. The software is easy to use and can be downloaded for free from the Amscope web site and it supports PC, Mac and Linux. The software also includes on online manual that can be printed or saved as a PDF from their web site. The camera's video frame rate was slow and when I moved the subject you could see the video smear, but otherwise it took acceptable video of stationary and slow moving subjects. Picture quality was good, but not great. AMscope also offers higher resolution dedicated cameras up to 20 MP which cost more. The image files when opened in Photoshop were 9 MP 2048 x 1536 pixels at 72 dpi. Some of the pictures showed banding (see below).

Diatoms 100X Bright field microscopy. The pores in the diatoms are clear and crisp. The arrows point to visible banding (flicker) in the background that sometimes appeared. Download full size image unprocessed.

Basswood section 400X bright field microscopy. Download full size unprocessed image.
Plant section 400X brightfield microscopy. Download full size unprocessed image.

Coin photographed with a Zeiss Stemi stereomicroscope at 1.2X magnification. Download full size image. To flip the mirror image in Photoshop select Image > Image rotation > flip horizontally to view the correct coin orientation.

Montage of different pictures taken with the AMscope 3MP camera when attached to a compound light microscope (A-C) and attached to a Zeiss stemi stereo microscope (D-F). A) Vitamin C crystals polarized light 100X b) Wood section 200X brightfield microscopy c) Vitamin C crystals 100X polarized light D) drill bit 10X stereomicroscope E) Louse 10X stereomicroscope transmitted light F) Glass filter 10X stereomicroscope.
For the price of this camera ($125) it offers excellent value for making images for the web or small prints. These pictures above also show that even a low MP camera can produce images that look good on a web page. Prints with this camera are limited to 8 x 10 inches or smaller. I recommend this as a good beginner camera, use in schools or inspection in industry.
This camera was introduced a few years ago but is still being offered on Zeiss's web site. It uses a 1\2.5 inch sensor and costs $1300 US today. The camera includes an SD memory card slot and a side button to capture images which can be stored on an SD (secure digital) memory card. The manual is short and and can be download as a PDF. When I first installed the camera and viewed the images they had a red colour cast and the automatic white balance did not work. When I added blue colour correcting filter the colour improved. Below are some pictures taken with this camera.

Axiocam attached to Zeiss Stemi 40X. Image is grainy and shows several Brachionus rotifers swimming freely in a Petri dish. Download original file unprocessed.

Metal ruler photographed with a Zeiss Stemi Stereomicroscope about 40X and the Axiocam - Download original file unprocessed.

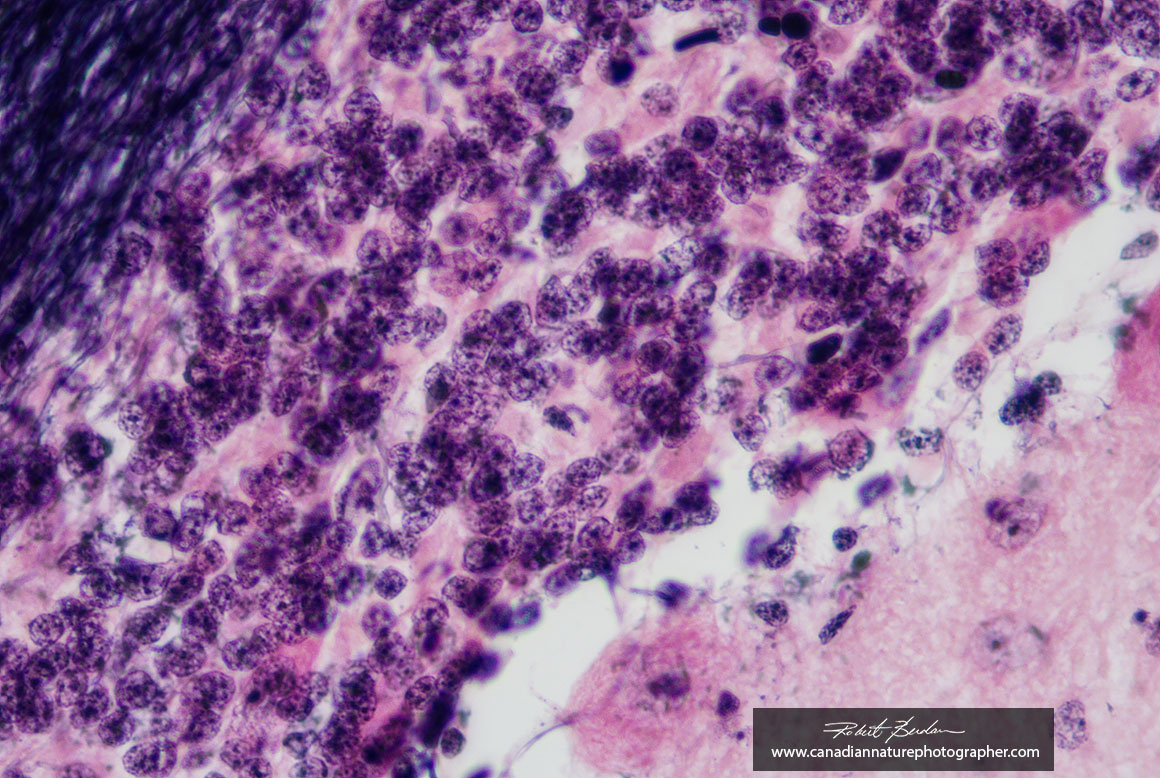
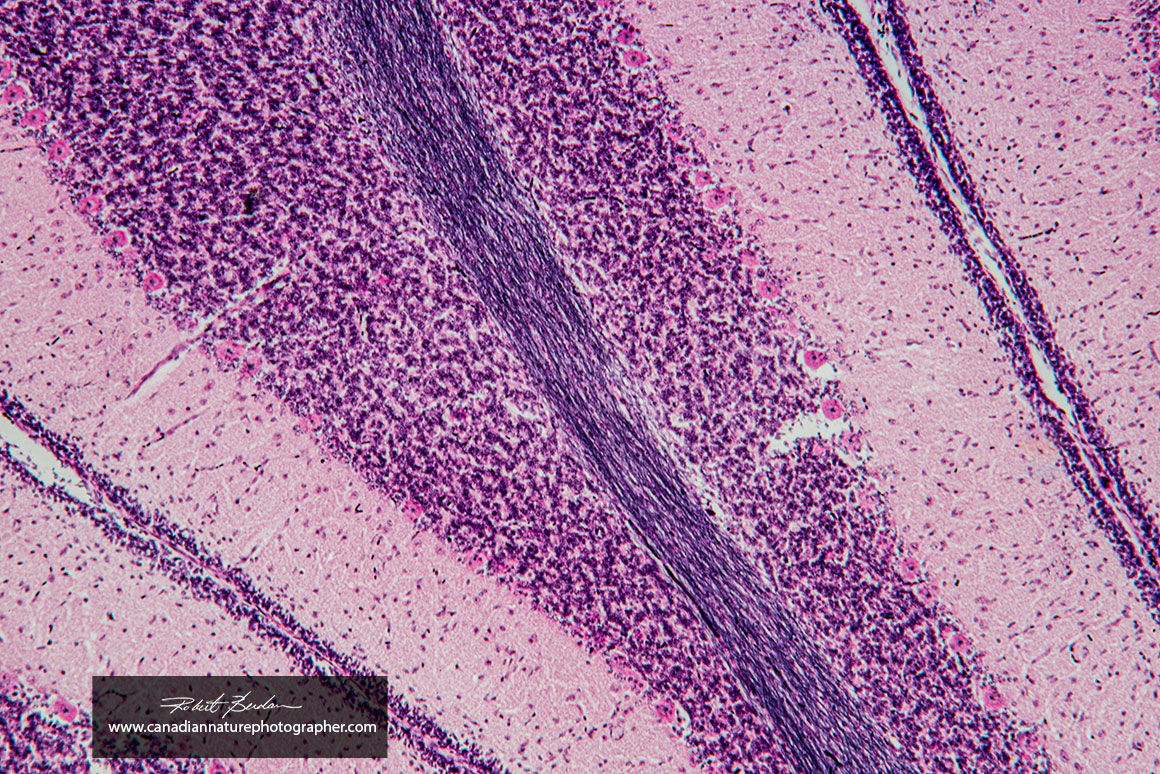
Hematoxylin and Eosin stained tissue 200X - Download original file unprocessed.

Diatoms 200X bright field microscopy. Illumination was uneven and the image is grainy. Download original file unprocessed.

Diatoms 400X Phase contrast microscopy. Image is grainy but sharp across the field. Download original file unprocessed.
When first testing the Zeiss Axiocam I used a 1X eyepiece attached to the camera but this only exposed about half the sensor. I tried a 0.5X eyepiece and more of the sensor area was exposed. When I tried a 0.39X eyepiece all of the sensor was illuminated except for a little vignetting on one side of the picture which could be cropped. It is possible to get some good photos with this camera as you can see from H & E stained tissue. I own a Zeiss Axioscope which is one of the finest microscopes I have ever used, but I was disappointed with the results of this camera and a few weeks later I sold it on Kijjii.
10. Moticam ProS5 Lite Dedicated Camera
The Motic ProS5 Lite camera offers 5.5 MP (1600 x 1200 px) and was on loan to me for evaluation and it cost about $1000. I spent several days taking photos mostly with a polarizing microscope that Motic also provided for evaluation. I liked the polarizing scope so much I ended up purchasing it. After first installing the software I was not able to see a live image until I installed the twain driver on my PC. I wrote some Quick guide instructions I hope will help others get started with this camera. Autoexposure, white balance and colour correction were not straight forward. I had to tweak the exposure and gain manually to get good results, once I did this I was able to achieve images like those shown below. I also stitched 20 or more images to make large panoramas. I added a mechanical stage to the microscope so I could easily take images that were overlapping for panoramas. Individual images can be enlarged to a max size of about 8 x 10 inches for prints. Image quality was better than the AM camera or the Zeiss Axiocam camera.
Vitamin C crystal photographed with the Moticam ProS5 Lite Camera 100X Polarized light - download full size image.

Above is an example of a panorama which can be made with any dedicated camera to increase the overall image size. The only limitation is that the subject can not be moving. Vitamin C crystals polarized light 100X.
Basswood section bright field microscopy 40X - Download full size unprocessed image.

Vitamin C crystals in polarized light 100X - download unprocessed file full size.

Wood in polarized light 100X - Download full size unprocessed image. This image was interpolated up in size using their software to 12.9 MP - this increases the file size but does not add additional detail.
Images taken with the Motic Camera a) Vitamin C crystals polarized light 100X B) Vitamin C crystals polarized light 100X C) Wool fibres polarized light 100X D) Vitamin C crystals polarized light 100X E) Potato starch grains polarized light 100X F) Potato starch grains 100X polarized light with a full wave compensator.
After purchasing the Motic 310BA Polarizing microscope I returned the camera and purchased a Motic DSLR adapter with a 2.5X and 4X photo eyepieces (see photo of the adapter further down the page). The images I obtained with this dedicated camera are good but limited in size to prints of about 8 x 10 inches but are suitable for scientific publications.
11. Rising Cam 20 MP Sony IMX183
I purchased the Rising Cam on Ebay direct from the company in Hong Kong - their main web site is on AliExpress. The camera offers a 1 inch sensor, 60 fps, USB 3 and with software cost me $638 US on Ebay though it is priced less on their own web site (I paid with PayPal on Ebay which offers security and protection). The camera uses a rolling shutter a method of image capture in which a still picture (in a still camera) or each frame of a video (in a video camera) is captured not by taking a snapshot of the entire scene at a single instant in time but rather by scanning across the scene rapidly, either vertically or horizontally.The vast majority of CCD sensors employ rolling shutter scanning. The sensor uses a back-illuminated design which alters the position of the layers so that the light receptor is not blocked by the wire circuit which results in more light on the sensor and less electronic amplification required thus improving light signal at low intensities (see diagram below).

Comparison of back-illuminated and front-illuminated sensors in cross-section - diagram from Wikipedia.
What appears to be the same camera is being sold by AMscope web site for $923.99. I had requested if I could test the camera from AMscope, but received no reply. RisingCam offers a large number of different dedicated cameras and some of their cameras are designed for astrophotography. The software interface closely resembles software supplied with the AMscope 3MP camera except the RisingCam software is darker in colour. The software was easy to install and use, offers stitching, stacking and many other features. Their software supports the AM scope camera and vice versa. The manual provided with the software is clear and easy to follow. When I mentioned I needed the camera quickly for this article they sent me the camera by courier at no additional cost and I received it in under a week. In contrast other items I have purchased from China on Ebay have taken 1-3 months to arrive in Calgary.

For this image the camera was attached to a Zeiss Stemi stereomicroscope. The camera was parfocal with the eyepieces. The unprocessed image is 5440 x 3648 px x 72 dpi (56.8 M) uncompressed - Download the full size image file.
Images from the RisingCam were sharp and detail is excellent. The image quality was better then any of the other dedicated cameras I have tested and rivals my DSLR images. On the Zeiss Stereomicroscope there is a slight vignetting around the outside of the image, but this was not visible on my Zeiss Axioscope light microscope images (shown below).
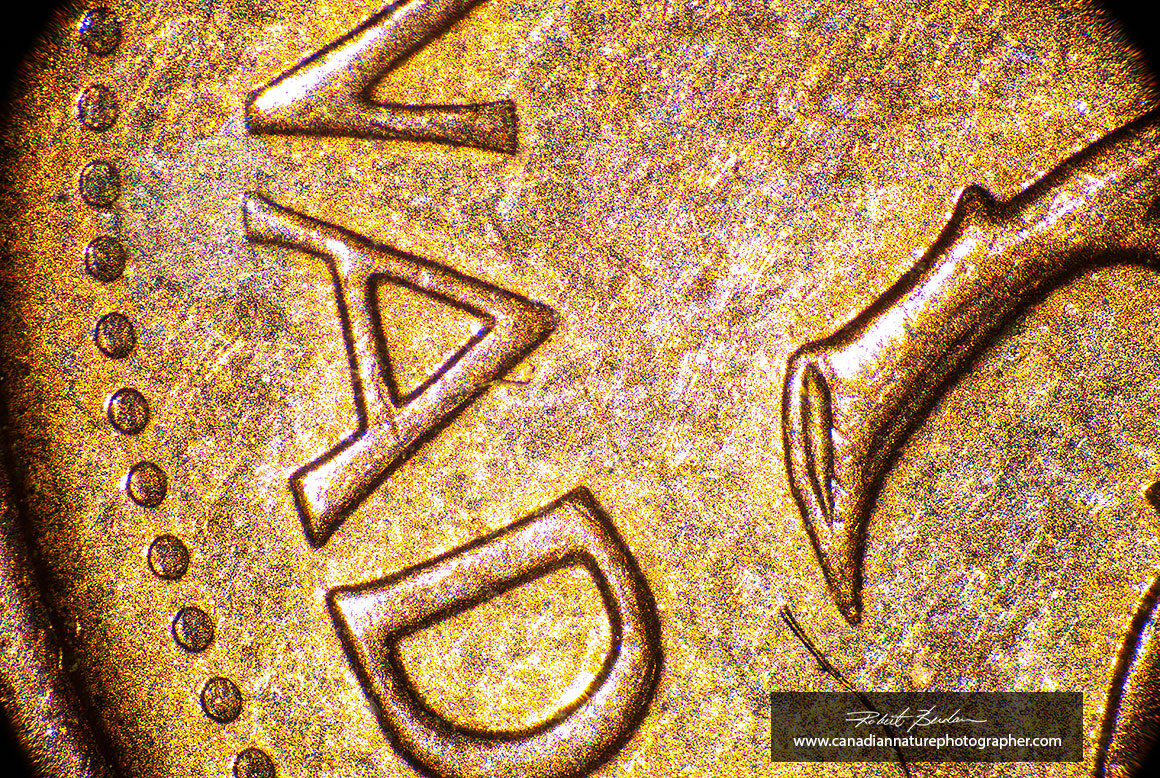
Higher magnification (40X) view of a Canadian Penny photographed with the RisingCam and Zeiss Stemi stereomicroscope. Download full size image.

Cerebellum 40X brightfield microscopy RisingCam - Download the full size image no colour correction or processing.

Cerebellum 100X brightfield microscopy RisingCam - Download the full size image no colour correction or processing.
Cerebellum 630X brightfield microscopy RisingCam - Download the full size image no colour correction or processing.
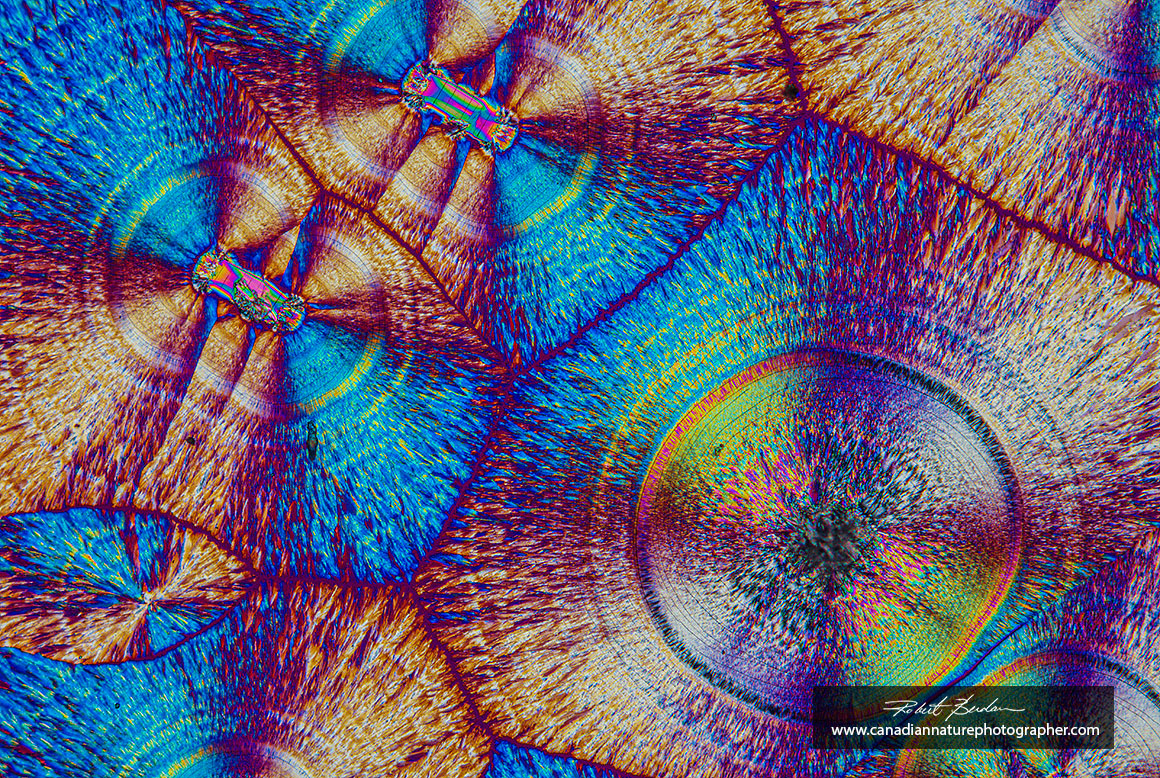
Vitamin C crystals in polarized light and full wave compensator 100X - Download the full size image no colour correction.

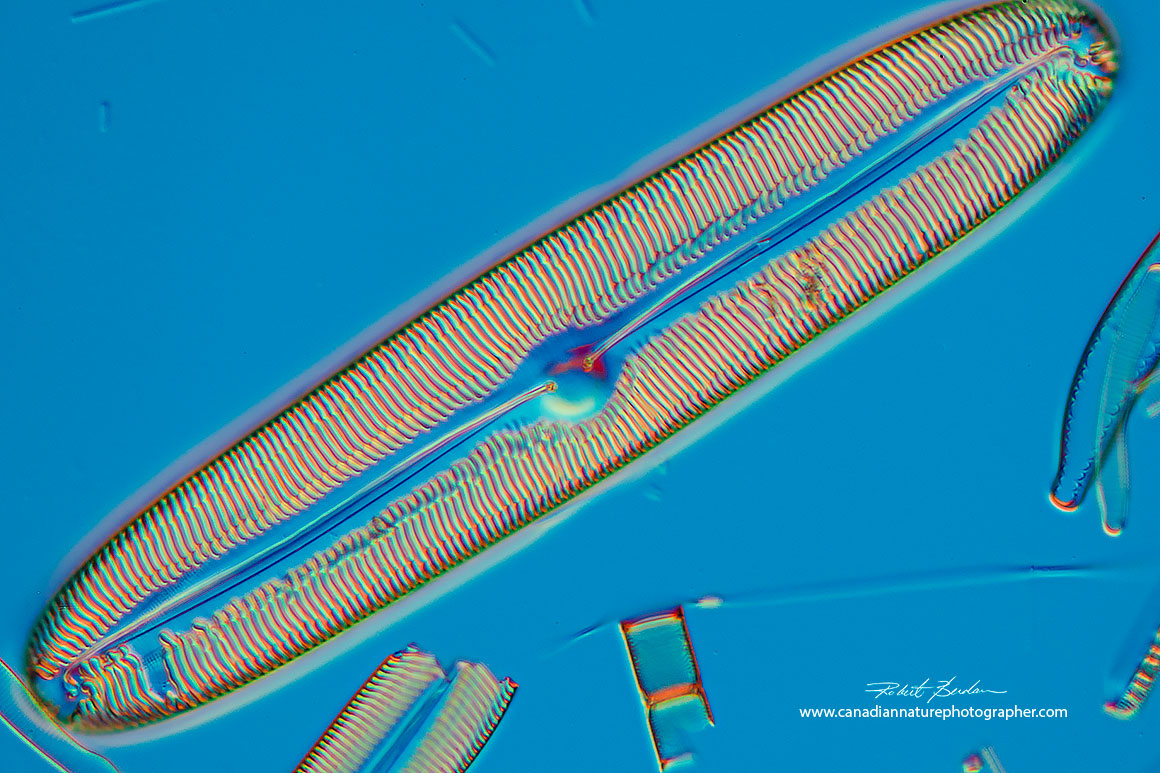
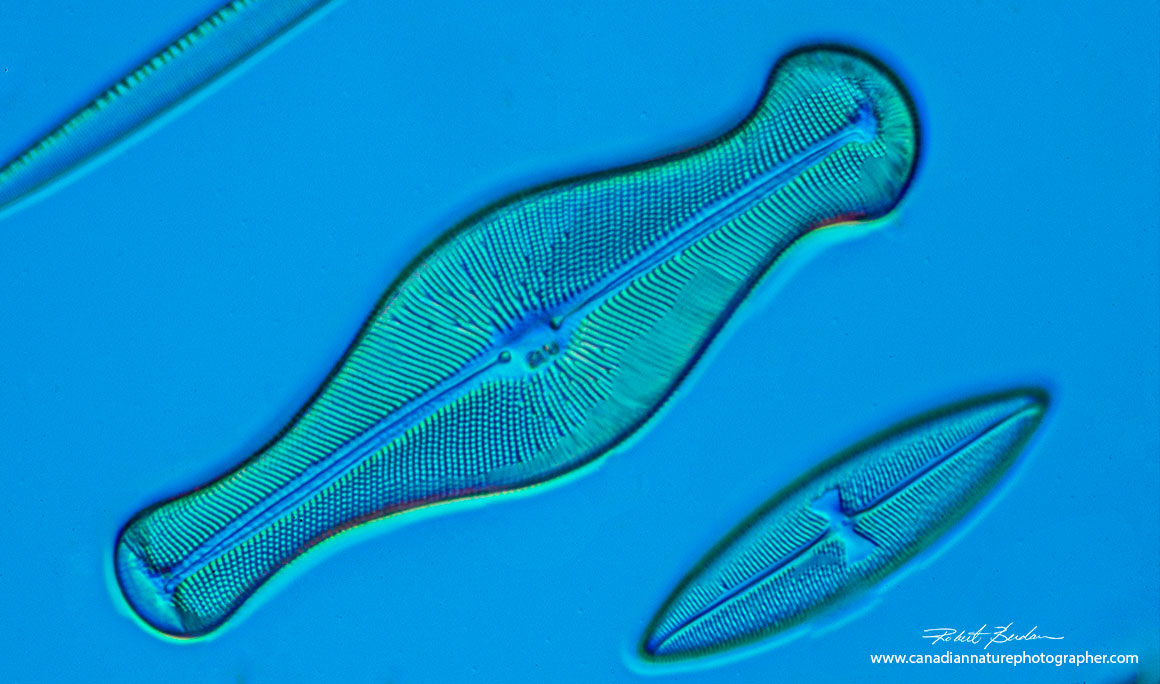
Diatom Gomphonema sp DIC microscopy 400X - Download the full size image no colour correction. The detail in the Diatom is similar to what I see with a DSLR camera after focus stacking.
This RisingCam camera claimed to be good for low light microscopy, so I tested it on my Nikon Optiphot Fluorescence microscope by viewing autofluorescence and specimens stained with Acridine orange. I photographed images illuminated with both Green (535-550 nm) and blue excitation (420-485 nm) wavelengths. The images are shown below.

Plant section (Pyrus communis European pear) autofluorescence with Green excitation - 100X - Download full size unprocessed image.

Plant section (Pyrus communis European pear) autofluorescence with Blue excitation - 100X - Download full size unprocessed image.

Ciliate stained with Acridine orange - blue excitation 200X - Download full size unprocessed image.
When viewing small (1160 px wide) images for this web site it is often difficult to distinguish between images taken with the RisingCam and the Nikon D500 DSLR. See this web page for comparison images of ciliates and other invertebrates stained with Acridine orange photographed with the Nikon D500 DSLR. The take home message is that the Rising cam performed very well with fluorescence microscopy.

Montage of photomicrographic images taken with the RisingCam A) Pinularia sp Diatom DIC microscopy 630X B) Plant section (pear) 100X C) Wood polarizing microscopy with full wave compensator 100X D) Vitamin C crystals polarized light microscopy 100X E) Spirogyra algae Darkfield microscopy 100X F) Peritrich ciliate DIC microscopy 200X.
The RisingCam offers 20 MP, high resolution, and good automatic colour correction - though I still needed to correct the white balance afterwards. Some of the images taken with the Rising Cam e.g. the Gomphonema diatom appeared better then the Diatoms taken with the DSLR cameras. The Rising cam also has the same size chip as the Nikon D500 - Rising Cam full specs.
From the dedicated cameras we tested this one is a clear winner in terms of image quality and price. Below I show a more pictures of a diatom taken with the RisingCam and compare them directly with a Nikon D800 and 500 DSLR below.
I would recommend anyone looking to buy a dedicated camera for photomicrography to consider this camera for both the quality of images and the price. RisingCam now offers an even larger sensor camera with 26 MP 1.8 inch sensor, 16 bit , USB 3, output TE cooling for $1269 US.

Nikon offers three dedicated cameras for photomicrography (DS-Ri2 colour and DS-Qi2 monochrome - see brochure - PDF). The sensors are made by Nikon and the cameras cost over $10,000 including additional costs for the software. The Nikon cameras use an F-mount that is the same as on their DSLR camera bodies. Nikon also offers a monochrome dedicated camera. Monochrome cameras can offer about a 1 to 1.5 stop improvement in light sensitivity and an overall reduction in noise (red.com). I requested sample full size images from the Nikon cameras shown above, they promised to send some but I never received them.
13. Leica 20 MP DMC 5400 dedicated microscope camera

Leica offers a 20 MP dedicated camera with rolling shutter and a one inch Sony sensor. Leica kindly sent me a link to some full size images from their 20MP DMC5400 camera which you can download from their web site. For more information about this camera visit their web site. This camera costs over $10,000.
Tissue section photographed with the Leica 20 MP DMC 5400 camera. View this full size image and several others on their web site. Photo courtesy Leica.
Below are some screen shots showing various software programs that come with dedicated cameras. A thorough review of the software is not possible here, but we include links to where you can download some of the programs to try. Most of the programs will open .jpg or .tif files so that you can experiment with and learn what kinds of features they offer.
Above Rising Sky software appears very similar to the AMscope software (below) except this program has a dark interface. Both the Rising cam and AMscope programs support each others cameras (software probably made by same company). The manuals accompanying both programs were clear and easy to follow and we had the software installed and the cameras operating in under an hour. I learned afterwards that the Rising Sky software is designed for astrophotography and their RisingView software is better for photomicrograpy (see screen shot below of the Rising View software) though you can use either program to control their camera.
Above is the RisingView software which looks identical to the AM sofware shown below.
Amscope software
AMscope software with white-grey interface. Both Rising Cam and AM system software was easy to learn and the AM software can be downloaded freely from their web site. Documentation is good. Their software can be used to process images or make measurements even if you don't have one of their cameras. You will need to calibrate the software using a glass microscope slide with a micrometer scale that is provided with their cameras in order to make measurements and add scale bars to your images.

Moticam software has a nice interface and the colors can be customized, but the online help needs to be expanded. I was able to achieve good photos with the Motic BA310 Polarizing microscope using this software and I provide a quick guide to help anyone get started with this software in a review article on the Motic BA310 Polarizing microscope on this web site. The Moticam camera includes a microscope slide with a dot, line and micrometer scale which can be used to calibrate the software so you can add magnification sale bars and perform various types of measurement analysis. It does not permit stitching or stacking like the two programs above.

Above - Zeiss Axiovision Lite software. I found it difficult to colour correct with this program and I needed to add a blue filter to the microscope illuminator before I could get an acceptable white balance especially when imaging red coloured specimens. I was frustrated and disappointed with their camera and software.

Zeiss Zen Lite has a modern interface, but because this was a free evaluation program I wasn't able to test many of its features or acquire images with it. The Lite version is available for free download here and you can add more modules to it with additional features for a hefty price.
15. Digicam control software available free to control DSLRs

Screen shot of Digicam control software which is my go to program for controlling my Nikon and Canon DSLRs and it is available free as Shareware (PC only, supports Nikon, Canon, Sony and a few other brands see this web page for a complete list of cameras supported). This software supports time lapse, movies and full control over the camera functions. The software is easy to work with, occasionally there are some glitches, but overall this software permits remote control of the camera, exposure control, ISO control, white balance, time-lapse, and even use of a foot switch to trigger the camera. An important element in photomicrography software is the ability to zoom into the Live image in order to achieve the best focus and this software offers several magnification tools. This software also supports RAW files and a fast workflow. The software does not offer morphometric measurements or the ability to add scale bars to your images automatically.
16. DSLR cameras for Photomicrography
DSLR cameras can be large and heavy compared to dedicated and mirrorless cameras and some have manuals that exceed 500 pages. A DSLR camera should be attached to monocular or trinocular head (they can be attached to a binocular but I wouldn't do it as it could fall off and it puts strain on the microscope ocular tube). In addition some DSLRS require a T mount or adapter to attach the camera to the photo tube and usually requires special projection eyepieces usually 2.5X or 5X to project the image onto the sensor for optimum results. DSLR cameras range in price from about $400 to $10,000 or more. The major brand names that make DSLRs include: Canon, Nikon, Sony, Fuji, Olympus, Panasonic, Pentax and Leica.
I chose Nikon and Canon DSLR cameras because they offered the widest selection of lenses and they have been at the forefront in developing digital technology for over two decades. Nikon and Canon cameras are popular and therefore have good resale value and there are lots of used cameras and lenses available. My third choice would be a Sony as they are leader in video and sensor technology. One advantage of a DSLR is that it can also be used for macrophotography, copy work, or field documentation. Also some DSLRs offer the best video quality up to 8K and are used in the movie industry because of their compact size and price.
Note that some DSLRs cameras if left in Live View mode for several hours may overheat and shut down. Also my DSLR cameras require changing the battery about every hour or so. To avoid the necessity of changing batteries I purchased two AC adapters (Amazon) for my DSLR cameras so I can operate them continuously for long periods of time or for time-lapse recording.
17. DSLR images - Nikon D500 (24 MP) and D800 (36 MP)
The cameras I use most often for photomicrography are the Nikon D500 (APSC) and the full frame Nikon D800, both cameras connected to Digicam control software running on a Alienware laptop with 16GB RAM using Windows 8. Using this software I can also use a foot switch to trigger photo capture so I can continue to focus and follow fast moving specimens which I preview in Live View on the computer. Images are photographed as 14 bit RAW files then processed in Adobe Photoshop before archiving the files on a pair of 8-TB hard drives. The RAW files permit single images to be enlarged to 24 x 36 inches or larger, and there is no limit to image size if one creates panoramas.

Above is an image of my darkroom converted to a microscope laboratory showing some of my microscopes and cameras used in this study. Since it is a darkroom I can dim the lights or turn them off all together which I find helpful with fluorescence microscopy- see article about the value of dimming the lights by C. Zona at the Mcrone Group.
Various DSLR microscope camera adapters: A) Olympus OM-mount Photomicro Adapter L with Nikon extension tube B) Zeiss Axioscope photo tube C) Olympus Adapter L on NikonOptiphot with Nikon Extension tube D) Moticam DSLR photo tube E) Wild stereomicroscope DSLR tube with Canon extension tube. To see an even wider variety of photomicrographic solutions visit this pinterest page.
To attach a DSLR you will need a photo-tube, T mount and usually a 2.5X or 5X photo-eyepiece. You can use any eyepiece, but photo eyepieces provide a "flatter" image for projection onto the sensor. Focusing through the camera viewfinder is possible, but the focusing screen in most cameras is too coarse to permit critical focusing unless it was designed for macrophotography or photomicrography. Some cameras also have a flip out LCD screen which can be used for focusing. If you are not using a laptop to control the camera you can use the mirror lock up function which will reduce vibration due to mirror slap. However, when using this feature you can't see what you are photographing which is a problem for moving subjects.
Another advantage some DSLR cameras offer is the ability to use an electronic flash for high speed photography. Ebay offers custom LED light sources which work with your electronic flash and cost a reasonable $150. These units allow you to connect an electronic flash to the camera and the LED light provides a continuous light source so you can see the specimen while you trigger the flash (.e.g. Nikon Optiphot illuminator and adjustable LED light housing, or Olympus microscope illuminator and adjustable LED - see below). Some DSLR cameras can also synchronize flash at high speed i.e. 1\8000 of a second in order to stop fast moving subjects.
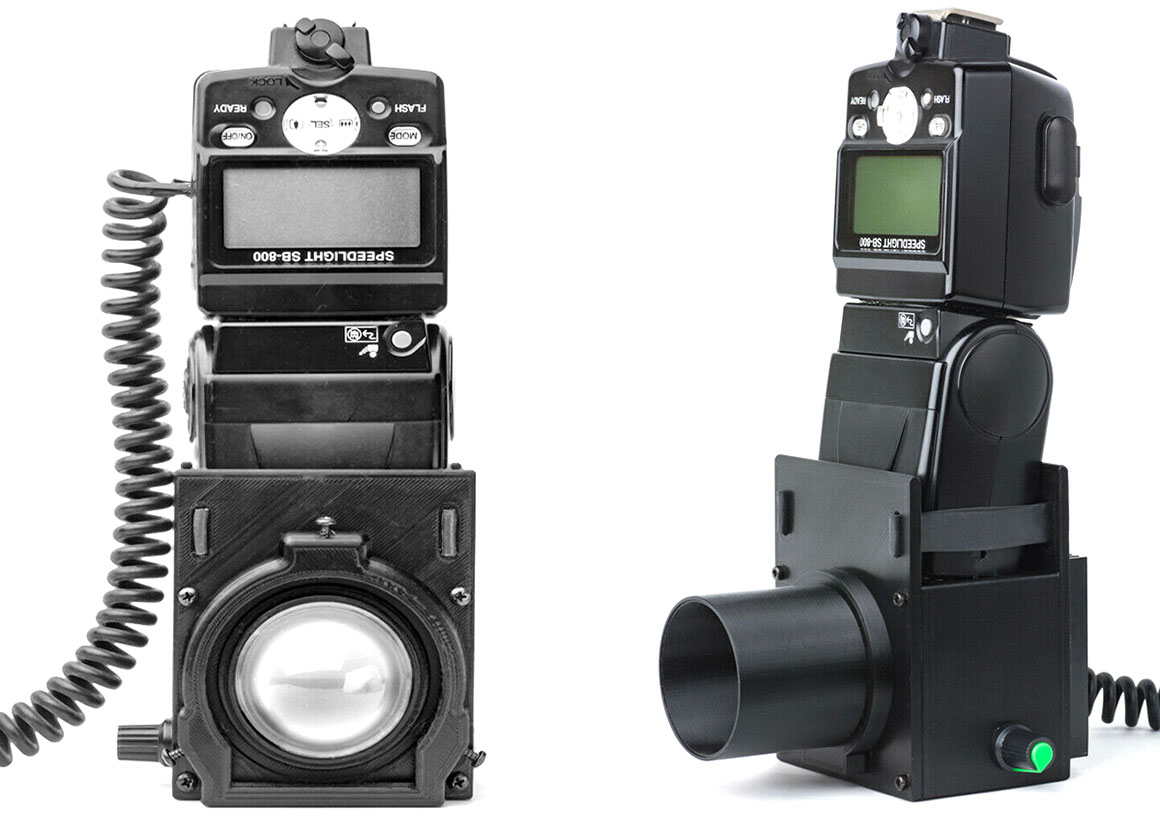
I purchased the LED light which fit my Nikon SB800 electronic flash as shown on the right from Ebay https://www.ebay.com/itm/265357232852 cost is $195 US for my Nikon DSLR cameras.
Many DSLR cameras offer auto exposure up to 30 seconds or more, while some dedicated cameras may only permit a maximum of 2 second exposures. The use of an electronic cable release, or using the built in self timer can also reduce camera vibration during exposure for those cameras not tethered to a computer. Finally the popularity of DSLR cameras and the competition between camera companies has resulted in high resolution cameras for a lower cost than some scientific cameras. Most of the photomicrographs on this web site have been taken with DSLR cameras.
Diatom Gomphenema sp 630X Nikon D500 camera - Download full size unprocessed image.

Vitamin C crystals 50X Polarized light Nikon D800 camera - Download unprocessed .jpg file.
Vitamin C Crystals 100X Polarized light microscopy Nikon D500 - Download unprocessed .jpg file.

Basswood Nikon D500 brightfield microscopy 100X - Download unprocessed .jpg file
Basswood Nikon D500 brightfield microscopy 400X - Download unprocessed .jpg file
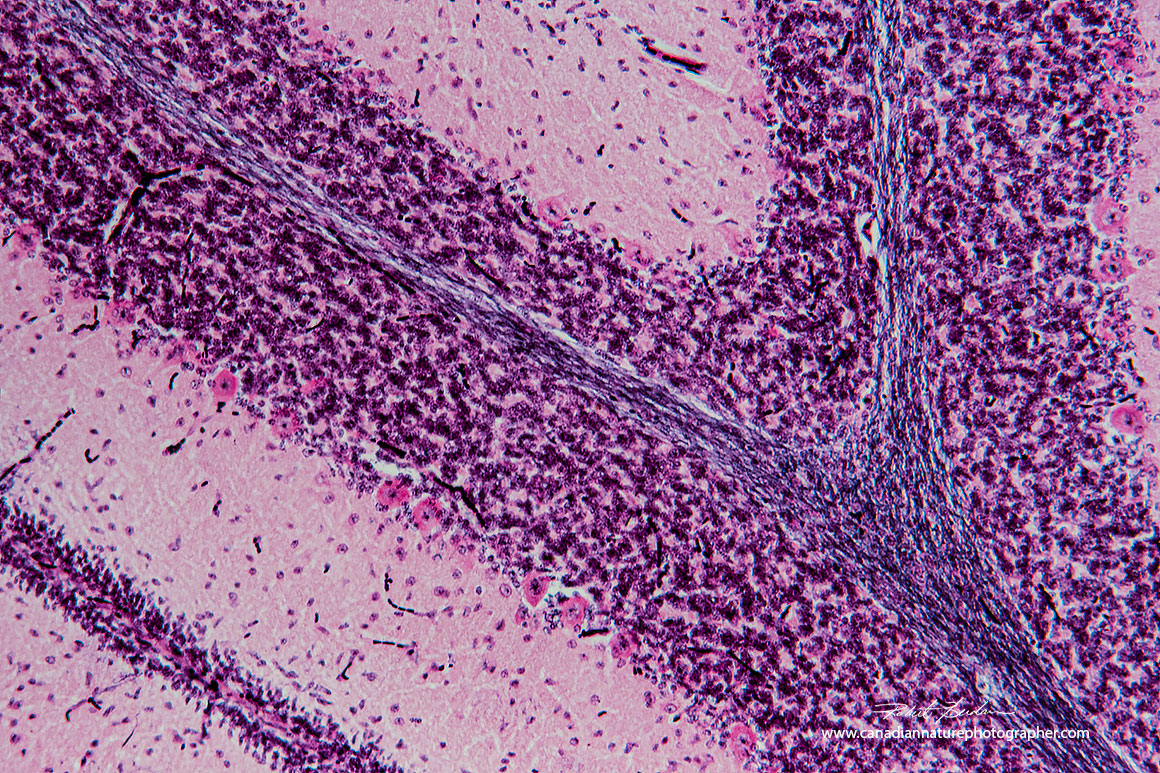
Cerebellum Nikon D500 100X brightfield microscopy - Download unprocessed .jpg file
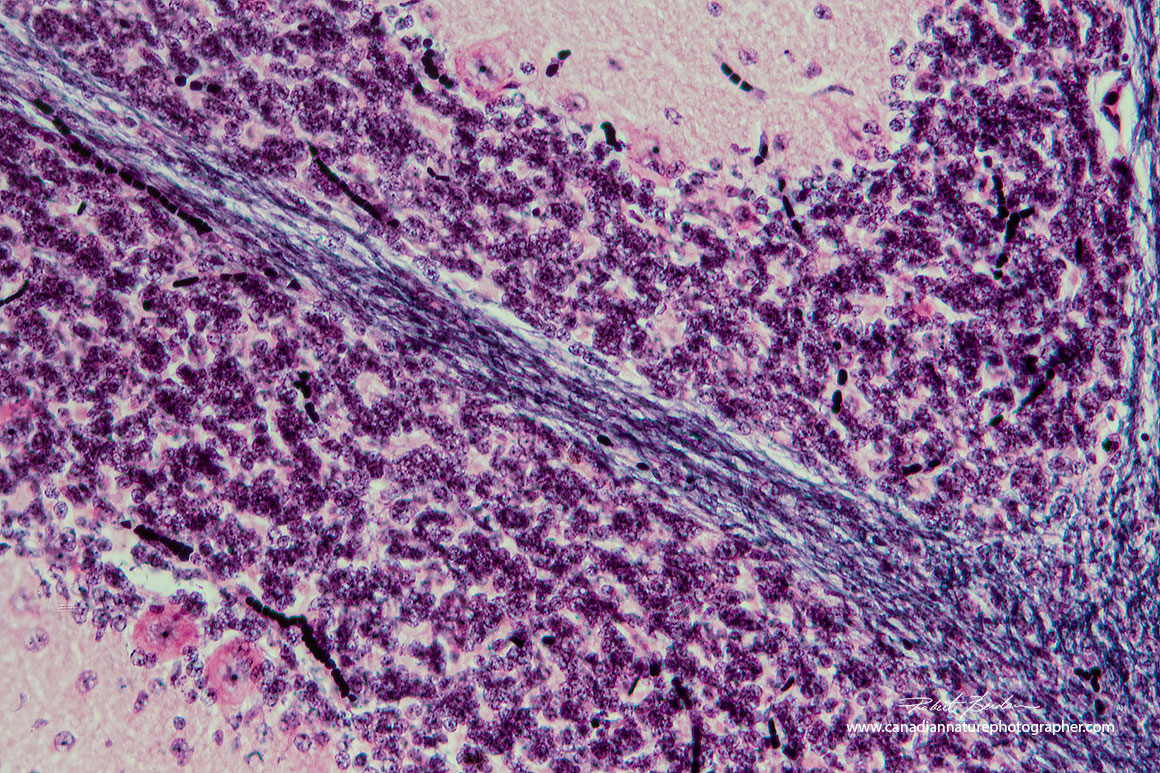
Cerebellum Nikon D500 200X brightfield Microscopy - Download unprocessed .jpg file.

Cerebellum Nikon D500 400X brightfield Microscopy - Download unprocessed .jpg file.
Diatom Pinularia sp Nikon D500 400X DIC microscopy - Download unprocessed .jpg file.
Basswood Nikon D800 100X brightfield Microscopy - Downlad unprocessed .jpg file.

Basswood Nikon D800 630X brightfield Microscopy - Download unprocessed .jpg file.
Cerebellum Nikon D800 100X brightfield microscopy - Download unprocessed .jpg file.

Cerebellum Nikon D800 630X brightfield microscopy - Download unprocessed .jpg file.
Diatom Gomphenema sp (middle) 400X focus stack DIC microscopy. The soft areas are where the focus stacking did not register the images - this can often be improved by using a dedicated focus stacking program like Helicon focus software.
Most DSLR offer proprietary RAW files which can capture 14 bits of information. Raw files appear flat in tone because they have a linear gamma (Adobe white paper by Bruce Fraser - PDF) and require processing before presentation. RAW files permit white balance correction in Photoshop Camera RAW software. Cameras that save .jpg files process these files in camera and convert them to an sRGB (small RGB) colour space which looks better on the web, computer monitors and exhibits increased colour saturation and contrast. The images shown on this web page are all in sRGB mode, the unprocessed files are in Adobe RGB colour space. My monitors are colour calibrated, thoough most user's don't calibrate their screens. Also keep in mind that colours by different monitor brands appear different, though colour calibration helps (for more information see Datacolor). The latest versions of Photoshop can also process .jpg and .tif files using Adobe Camera RAW and you can correct white balance.

Above I photographed a Pinularia Diatom with a 63X Objective using DIC on my Zeiss Axioscope with the Nikon D800 full frame camera, Nikon D500 camera (both set to ISO 200) and the Rising Cam attached via a 0.63X Zeiss C- mount. You can download a 10 x 15 inch 300 dpi verson of this images. All photos were processed in Photoshop Camera RAW with same settings. Rising Cam files were saved as .tif files from the camera.

In the photos above I enlarged the D800 image so the diatom was the same width as the others. The D500 camera and Rising Cam images appear slightly better than the D800 in quality. Both the D500 and Rising cam images appear similar in quality. A densitometric scan of the images might show one camera to be slightly better than the other (something I might do in the future).All three cameras provide high quality images for the web, or making large prints.
18. Mirrorless Camera - Canon G16 12 MP

Mirrorless cameras are growing in popularity primarily because of their compact size and ability to offer high quality images. Some are also able to shoot at faster frame rates than a DSLR, though it is possible to shoot video with a DSLR and extract images suitable for 10 x 15 inch prints. With a DSLR camera you are actually are looking through the lens that you are photographing with whereas mirrorless cameras have an electronic viewfinders or allow you to compose and focus on the back LCD screen like a cell phone. Electronic viewfinders are not as clear or sharp as looking through the optics which is why I prefer shooting with a DSLR.
Because I own a Canon G16 compact mirrorless camera which I take with me when I can't bring along my heavier DSLR gear I thought I would try this camera on one of my microscopes. The G16’s uses a 1/1.7-inch (7.44 x 5.58 mm) BSI-CMOS sensor, offers 5X optical zoom which has a range equivalent to 28-140mm in 35mm format. It uses a 4:3 sensor with 4000 x 3000 pixels or 12 MP and captures RAW files. It can also capture 1920 x 1080 video at 60 fps. View specs and full camera review. Doug Hayden of Quality microscopes generously gave me a photomicrography adapter for the Canon G16. I tried the camera with the adapter on several of my microscopes but was not able to fill the entire frame - see photo below.

Basswood photographed with the Canon G16 camera using a photomicrography adapter - 100X brightfield microscopy. Download full frame unprocessed image.
I tried photo-eyepieces from 1-15X and varied the height of the camera but still could not illuminate the entire frame. I tried attaching the camera to three different microscopes: Nikon Optiphot, Zeiss Axioscope and Olympus E all with trinocular heads, again with no luck. Without being able to fill the frame this camera is of limited value in photomicrography but you could crop part of the image. Lmscopes.com offers custom photomicrography adapters and they might offer one for this camera that can fill the frame. Also Amazon offers a 2X adpater for micro 4/3 mirrorless cameras which I have not tried. If you use a Canon G16 for photomicrography and can fill the frame please let us know how you achieved it.
Note the magnifications in this article refer to the objective used i.e. 400X means we used a 40X objective. Images with a crop sensor (one inch) appear about 1.5X larger than a full frame camera using the same microscope objective.
19. Video with DSLRs and Dedicated Cameras
The Nikon D500 and D800 DSLRs provided the best video of moving subjects like ciliates. I recently made a 5 min Video for Motic of Aquatic Invertebrates taken with the Nikon D500 and D800 DSLRs that you can watch on YouTube (YouTube aggressively compresses the video which reduces its quality and size). You can see more examples of video in different photomicrography articles on this web site (e.g. The Micro-Universe). Some of the dedicated cameras offered satisfactory video but not as good as that from the DSLR cameras and some only offered 4:3 aspect ratio videos (Moticam) rather than the 16:9 format associated with HD video.

Blue-green cyano-bacteria Nostoc sp stained with Acridine orange and photographed at 100X with Nikon D500 DSLR on a wide field Nikon Optiphot Fluorescence microscope - panorama stitched from several images.
Our task in this study was to determine which camera type is best for common forms of microscopy. Our tests show that while some cell phones are capable of taking acceptable photomicrographs, the ones we tested were inferior to dedicated cameras and DSLRs. At this time we feel cell phone cameras are suitable for education, telemedicine or anyone starting out in photomicrography.
The price and performance of dedicated cameras is getting better and the RisingCam with a one inch 20 MP sony sensor costing under $1000 brings high quality photomicrography within the reach of amateurs. DSLR cameras offer some advantages over dedicated cameras including the ability to use them for other purposes such as field photography, capture RAW files, higher quality video and ability to use electronic flash. Dedicated cameras with a one inch sensor having 20 MP and DSLRs with greater than 20 MP offer similar high quality, the choice of which is better depends on what you intend to use the camera for, software requirements, and your budget. We intend to use both from now on.
The good news is that there are affordable options to take high quality photomicrographs, but we remind you that the quality of the final image is also dependent on the skill and knowlege of the photographer.
Disclaimer: no fees or products were received for links or mentioning any product in this review. The purpose of this article is to help microscopists decide which camera might be most appropriate for their needs without the intention of promoting a specific brand or company.
* Brandon Berdan is a chemistry student at the University of Calgary he carried out the cell phone camera photography and plans to enter a career in materials chemistry. The use of "I" in this article refers to Robert Berdan. We appreciate suggestions and corrections to this article by Eddie Jiang from RisingCam, and Mike Codner.
Top of Page
21. References & Links
R. Berdan (2020) Camera Solutions for Photomicrography. Motic America Blog.
J. Piper and R. Pelc (2020) Consumer Versus Dedicated Digital Cameras in Photomicrography. Chapt 13. In book: Neurohistology and Imaging Techniques (Neuromethods, vol. 153) Publisher: Springer (Humana Press) - PDF available on Research Gate.
Gav L. (2020) The Mobile Camera Sensor A simple guide. thesmartphonephotographer.com
C-mounts, CS mounts and Image Sensors - Meiji Techno web site
B. Diederich et. al. (2019) cellSTORM – Cost-effective super-resolution on a cellphone using dSTORM. PLOS ONE - PDF
A. Orth, E.R. Wilson, J.G. Thompson and B.C. Gibson (2018) A dual-mode mobile phone microscope using the onboard camera flash and ambient light. Scientific Reports:8:3298 - PDF
H. Mondal, S. Mondal and D. Das (2017) Development of a Simple Smartphone Adapter for Digital Photomicrography. Indian Dermatology Online Journal. They show how to make an adapter from a coke can. PDF
S. Singaravel and M. A. Aleem (2016) Hands-free: A Low-Cost Adapter for Smartphone Microscopic Photography Using a Cardboard Toilet-Paper Roll. Arch Pathol Lab Med: 140: 741-743. - PDF
T. Jones (2016) Cell phone Still and Video Photomicrography: A Deeper Dive. Applications in outreach, educational and general microscopy. April 2016 Micscape Magazine - PDF
C. Zhou, Y.Yu, and D. Elston (2016) High quality digital photomicrography utilizing a smartphone without adapter. J. Cutaneous pathology. DOI:10.1111/cup.12561 or web site.
(2015) With so many choices, it’s hard to decide – which camera system is best suited to my microscopy application? lmscope.com
A. Skandarajah et. al. (2014) Quantitative Imaging with a Mobile Phone Microscope. PLOS One. Vol 9, Issue 5. 1-12. PDF
S. Roy et. al. (2014) Smartphone adapters for digital photomicrography. J. Pathol Inform. 5:24 - PDF
S. Crisp (2013) Camera Sensor size: Why does it matter and exactly how big are they. newatlas.com
M.L. Duley and R.E. Edelmann (2007) "Prosumer" Digital SLR Cameras vs Dedicated "Scientific Cameras. Microsc. Microanal. 13 (Suppl 2), 2007 Microscopy Society of America.
Published online by Cambridge University Press: 05 August 2007 - Request free publication on researchgate.
C. Brown (2007) Fluorescence microscopy - avoiding the pitfalls. J. Cell Science 120: 1703-1705 - PDF
M.L. Duley and R. E. Edelmann (2007) "Prosumer" Digital SLR Cameras vs Dedicated "Scientific" Cameras Microsc. Microanal 13 (Suppl 2). Microscopy Society of America - Abstract.
-
- DOI: https://doi.org/10.1017/S1431927607075216
- Published online by Cambridge University Press: 05 August 2007
M. Abramowitz and M.W. Davidson - Pixel Binning - software method to increase pixel size and this feature s available in some software e.g. AMscope program and Rising Cam. Olympus.
M.J. Parry-Hill, K.M. Vogt, J.D. Griffin and M.W. Davidson. Matching Camera to Microscope Resolution. See interactive Java applet that compares different sized CCD sensors, pixel size, magnification and Field Number. Microscopyu.com - Nikon
D. George Matching Your Camera to Your Optics. Astronomy and Scientific Imaging Solutions. Diffractionlimited.com
K.R. Spring and M.W. Davidson. Fundamentals of Digital Imaging - Microscopyu.com Nikon
LMscope - Camera recommendation: Which camera is best suited for use with a microscope? They also test and report on Mirrorless cameras.
How much resolution? How wide a field-of-view Hamamatsu
The Nyquist rate - Scientific Volume Imaging - Deconvolution - visualization - Analysis
(July 2020) Nyquist-Shannon sampling theorm Wikipedia
Essential Overview of CCD Spatial Resolution Nyquist's theorem - PDF available. Oxford Instruments
Color vs. Monochrome sensors Red.com
R.S. Wright Jr (2019) Which is better for astrophotography, a color or a mono camera? Both of course! Sky & Telescope.org.
T. Clarke Pixel Array size Needed to replace photomicrographs on Film. The McCrone Group.
O. Kim (2010) Required camera resolution for photography through the microscope. Microbehunter Microscopy.
T. Ogama What to Consider When Choosing a Microscope Camera. Olympus-lifesciences.com
Controlling cameras remotely via PC or Mac - various software programs lmscope.com
Advanced Digital Photomicrography. The Quekett Microscopical Club.
Zeiss Dealer in Calgary - stereomicroscopes, digital cameras, service - Quality Microscopes
Motic North America provides microscopes and cameras - located in Vancouver, BC, Canada.
Dedicated Digital Cameras
Moticam ProS5 Lite Dedicated camera specifications and price - moticmicroscopes.com
Amscope - 3MP Camera specifications and price - amscope.com
Rising Cam Dedicated microscope\astrophotography camera - Ebay.com - Official web site on AliExpress - Link to 20 MP RisingCam.
Leica 20 MP color CMOS camera DMC5400 - specifications, brochure PDF
Nikon Digital Sight Series - Digital Cameras for Microscopes - PDF
Videos
(2020) Microscopic viewing of Aquatic Invertebrates - Rotifers and Ciliates by Robert Berdan for Motic - watch on YouTube.
(2020) Usability considerations of microscope cameras (DSLR vs dedicated cameras) Amateur Microscopy by Oliver Kim - YouTube video.
(2019) Finally: a useful smartphone adapter for a microscope - Amateur Microscope Review - The Microbehunter Oliver Kim - YouTube video.
(2015) Student Builds a Better Microscope Adapter - YouTube video
(2013) Smartphone Microscopic Photography - The Morrison Technique: Free Hand, No Adapter. -YouTube Video
Note: Educators and students may use our images for reports and teaching, all other uses or for commercial use please contact me. If you use our images I appreciate attribution and a link back to this web site where possible. Note magnifications are approximate - 100X means taken with 10X objective, 200X with a 20X objective, 400X with a 40X objective.
Authors Biography & Contact Information
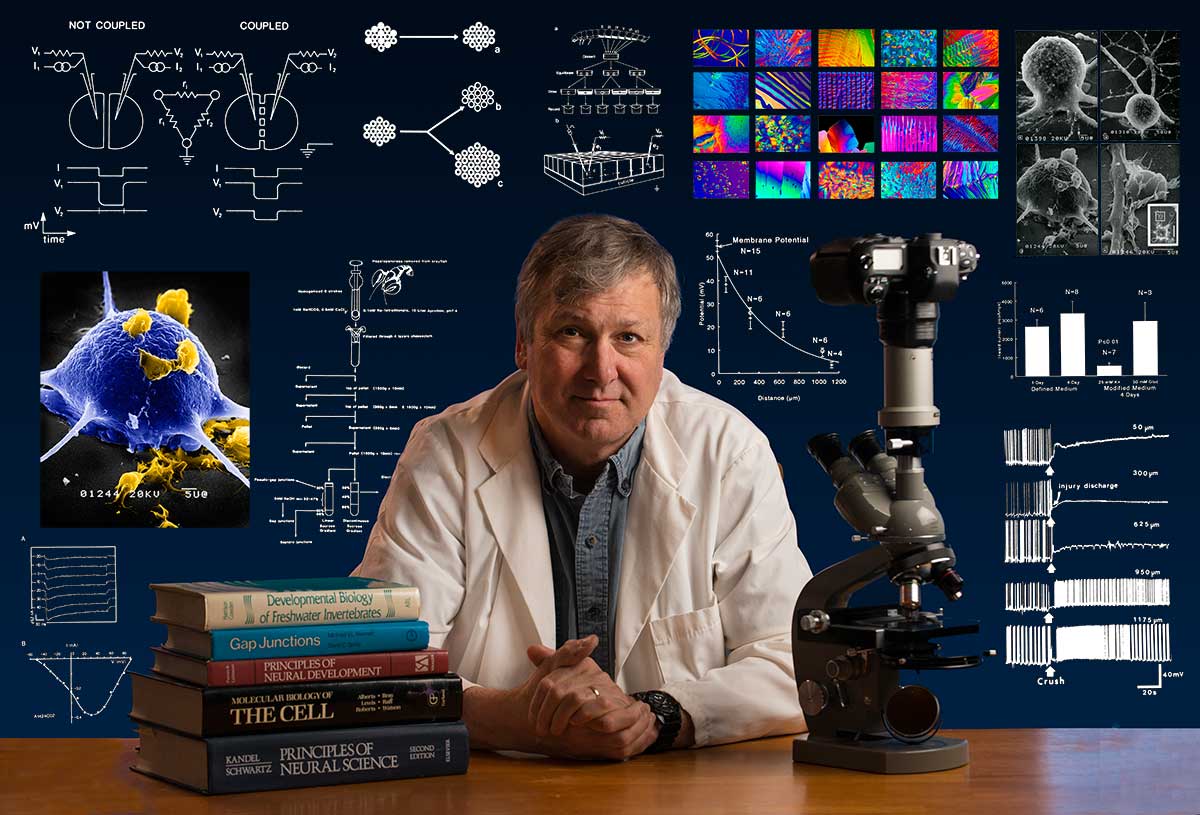
Bio: Robert Berdan is a professional nature photographer living in Calgary, AB specializing in nature, wildlife and science photography. Robert retired from Cell\Neurobiology research to pursue photography full time many years ago. Robert offers photo guiding and private instruction in all aspects of nature photography, Adobe Photoshop training, photomicrography and macro-photography. Portrait of Robert by Dr. Sharif Galal showing some examples of Robert's science research in the background.
Email at: rberdan@scienceandart.org
Web sites: www.canadiannaturephotographer.com
www.scienceandart.org
Phone: MST 9am -7 pm (403) 247-2457.