
Photomicrography of Crystals with a Polarizing Microscope for Art’s Sake - Amino acids, Cannabis (THC) and Caffeine
Dr. Robert Berdan
January 28, 2022
B–Alanine and L-Glutamine dissolved in ethanol and water and crystallized on a microscope slide. The crystals are viewed with a polarizing microscope with the addition of a full wave retardation plate.
Studying crystals and their patterns with a microscope can be a very satisfying hobby. A polarizing microscope is needed, however any microscope can be fitted with a linear polarizer below the stage and an analyzer above the stage (don’t use circular polarizers - circular does not refer to the shape of the polarizer but the type of polarizer). Subjects viewed with the microscope must be birefringent, that is they split polarized light into two components that travel at different speeds through the crystal and upon emergence some wavelengths (colours) undergo destructive interference resulting in a colour change. If the thickness of the specimen is known and the colour compared with a Michel-Levy Chart it’s possible to identify the refractive index and most times the material. Other factors about the molecular orientation can also be determined.
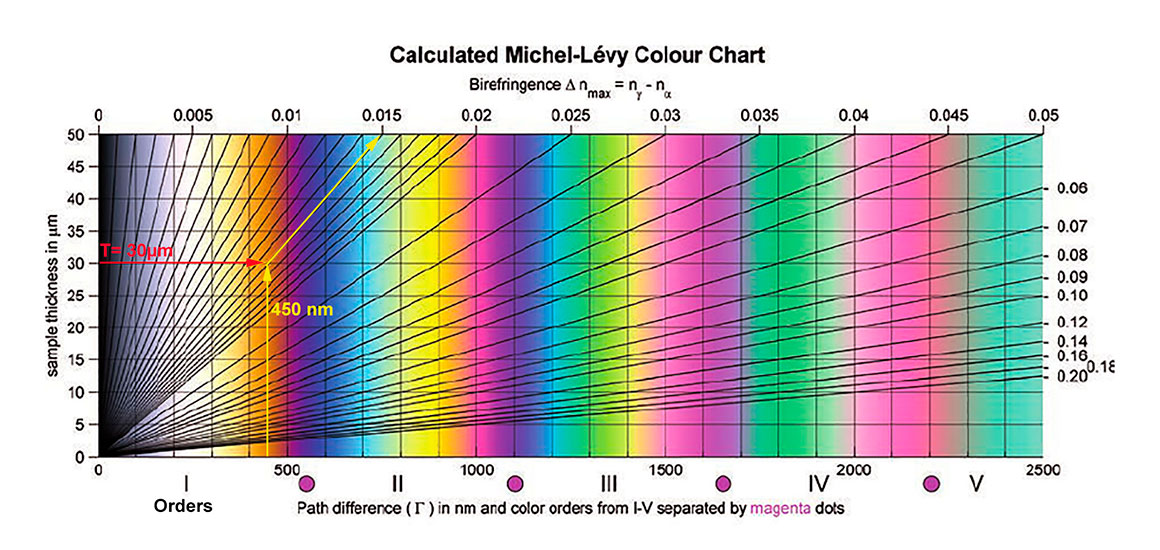
Michel-Levy Colour Charts are available free online (Wikipedia) and are found in books about Polarizing microscopy ( e.g. J. Delly, 2017). If the subjects thickness in microns is known or measured and the interference colour determined one can then measure the birefringence from which the refractive index can be determined. Michel-Levy Chart above by B.E. Sorensen (2013) with permission. I, II, III represent different orders where each colour is repeated but appears less saturated. The increasing orders usually indicate thicker regions of the crystal.
There are also optical aids that can enhance and amplify the colour of thin birefringent specimens called retardation plates (R. Berdan, 2001). A full wave plate (also called a red plate, gypsum plate or lambda plate) increases the amount that a particular wavelength is out of phase with other waves when they emerge from the specimen. A full wave plate with no subject between the polarizing filters turns the background colour pink (magenta-pink) because green wavelengths are removed due to interference. By turning the wave plate or polarizers you can achieve different colours in the background and in the subject. Regular lambda plates start at about $125 each and polarizing microscopes have a slot where one can be inserted. The filters are usually embedded in 6 x 20 mm plastic or metal slider that fits into most polarizing microscopes – see below.
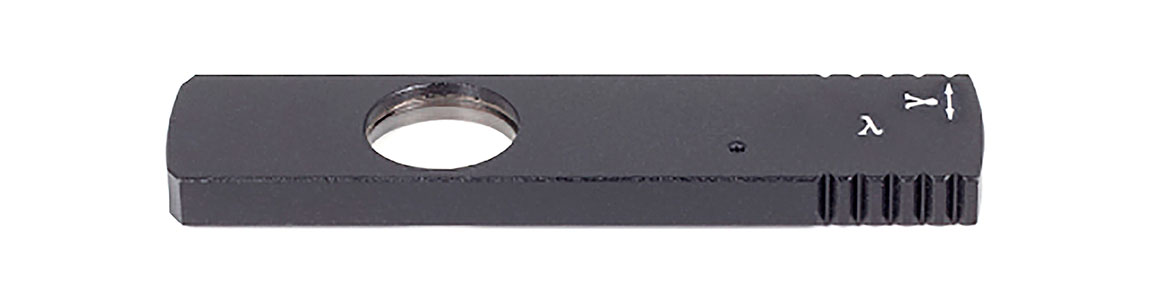
A full wave retardation plate also called a red plate, lambda plate mounted in a slider.
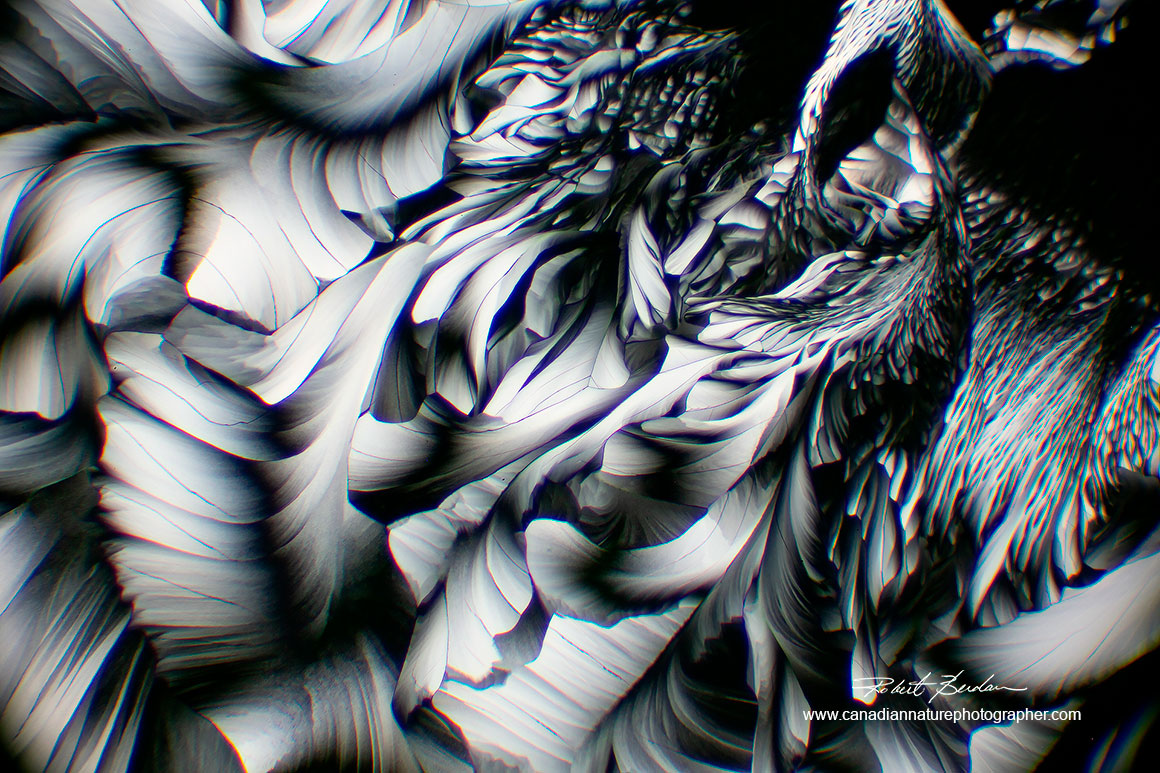
Amino acids Alanine and Glutamine viewed between crossed polarizers only. Because these crystals are very thin they only exhibit shades of grey (first order interference).

When the amino acids are viewed between crossed polarizers and a full wave retardation plate they display multiple colours. By rotating the wave plate they will display different colours.
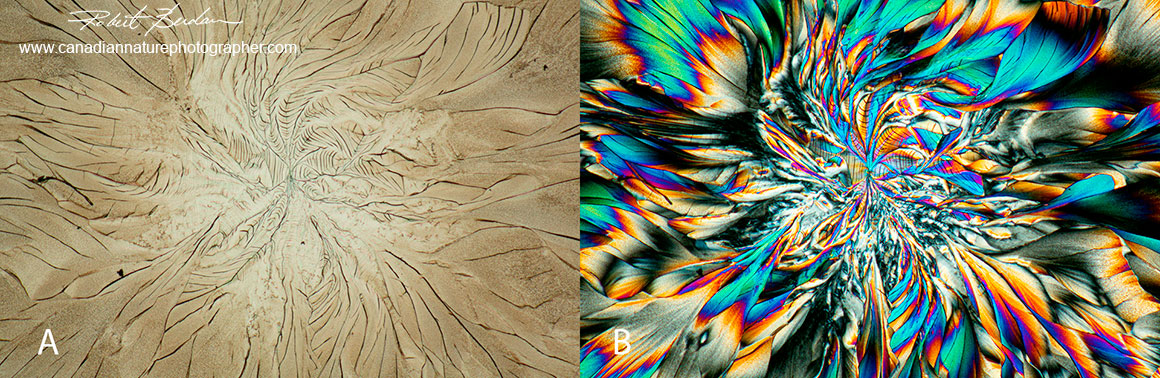
Above A shows amino acid crystals viewed with bright field microscopy and B shows the same field with crossed polarizers and a full wave plate.
A typical lambda wave plate will slide into a slot above the objectives on a polarizing microscope. They cost between $125 to over $500 and can be purchased online from manufacturers or Ebay. Sometimes it is possible to buy acrylic wave plates that can be cut or placed on top of the bottom polarizer for less than $25. Wave plates can also be made from Scotch brand clear tape on a microscope slide and by varying the number of layers of tape you can vary the type of plate you make. Below 4 layers of tape results in pink which makes it a full wave plate.

Top glass slide shows several overlapping layers of Scotch brand transparent tape (it is not the tape you can write on). The lower slide has layers of tape placed at perpendicular orientation to form a black cross which you will see on some crystals and starch grains. The cross represents regions where the polarized light (black background) is visible.
You can also make wave plates by taking a piece of plastic from a CD box or Plastic Petri-dish cover. If you become a serious photographer of polarized specimens I recommend you purchase a full wave plate. There are other wave plates of 1\4 wave, quartz wedge etc that are also used in certain circumstances to alter colour and measure birefrigence (R. Berdan Part II, 2021).
Polarizing microscopes are used in Forensic science, the pharmaceutical industry, geology and are also used to study biological subjects (hair, connective tissue, plants and starch-grains etc.).

Other commonly used wave plates include A) Quartz wedge B) 1\4 wave plate and C) full wave plate. The full wave plate is used most often for photomicrography.
Isotropic versus Anisotropic Substances
When a polarizing microscope is used with the polarizer and analyzer in the crossed orientation so that no light travels through both filters the background will appear black. You may see some stray or refracted light if your microscope objectives and condenser are not strain free. If there are anisotropic materials between the polarizers they will appear bright or coloured. Isotropic substances on the other hand will appear transparent when rotated between the crossed polarizers. Glass for instance is isotropic and so is table salt. Glass is a material that has hardened without crystallizing, making it amorphous and isotropic. Crown glass has a single refractive index 1.517. Table salt has a single refractive index of 1.544 and has a cubic crystal structure – see pictures below.
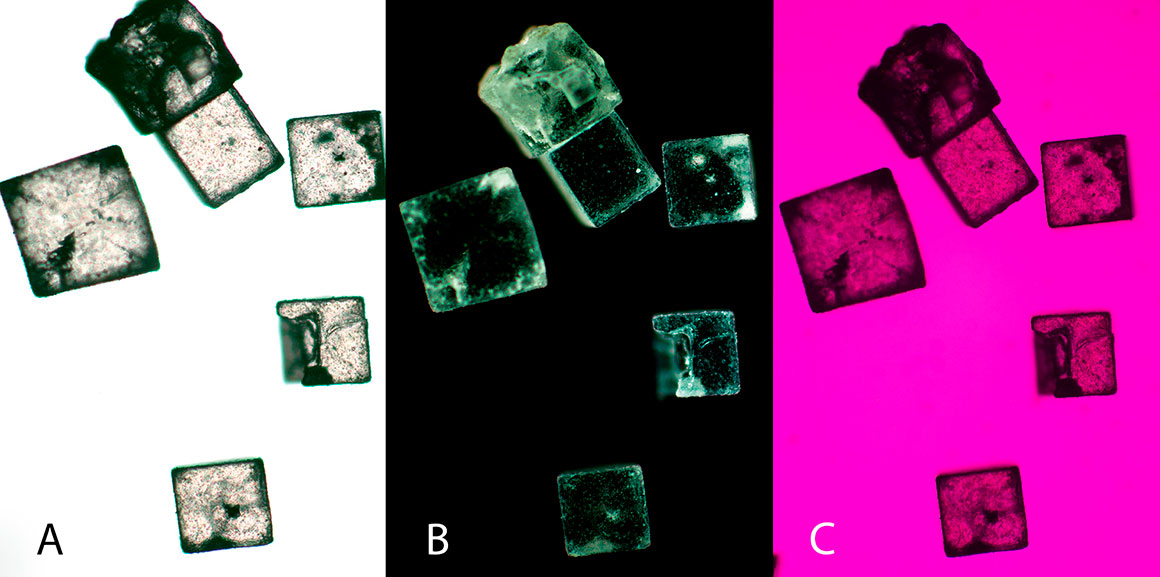
Above showing table salt (sodium chloride) crystals by bright field microscopy B) between crossed polarizers and C) salt viewed by crossed polarizers and full wave retardation plate - 50X. Salt is isotropic and clear in polarized light and adding a full (550 nm) retardation plate into the light path will not add additional colours as it would for anisotropic substances. Some of the bright areas are due to refracted light from flaws in the crystals. Also note the pink-magenta background produced by placing a full wave plate between the polarizers.
Birefringent Crystals
I have been photographing crystals with a microscope and polarized light since 1977 after reading an article in Scientific American - the Amateur Scientist column by J. Walker, 1977. He describes how polarized light and wave plates work, and how to make your own wave plates using Scotch transparent tape. In the article Polaroid offered free polarizing filters and wave plates to anyone that wrote them after reading this article.
Many substances including minerals found in nature are birefringent (e.g. Mica) which is why geologists use polarizing microscopes to study mineral sections. In biology lots of structures have crystal-like properties e.g. hair, wood, starch grains etc. that are interesting to study with a polarizing microscope. Potato starch grains are one of the simplest to study and require cutting a small piece of fresh potato and squishing it on a microscope slide (R. Berdan 2021). One can also investigate a wide range of chemicals found at your hardware store, in your medicine cabinet, or sports nutrition retailer.

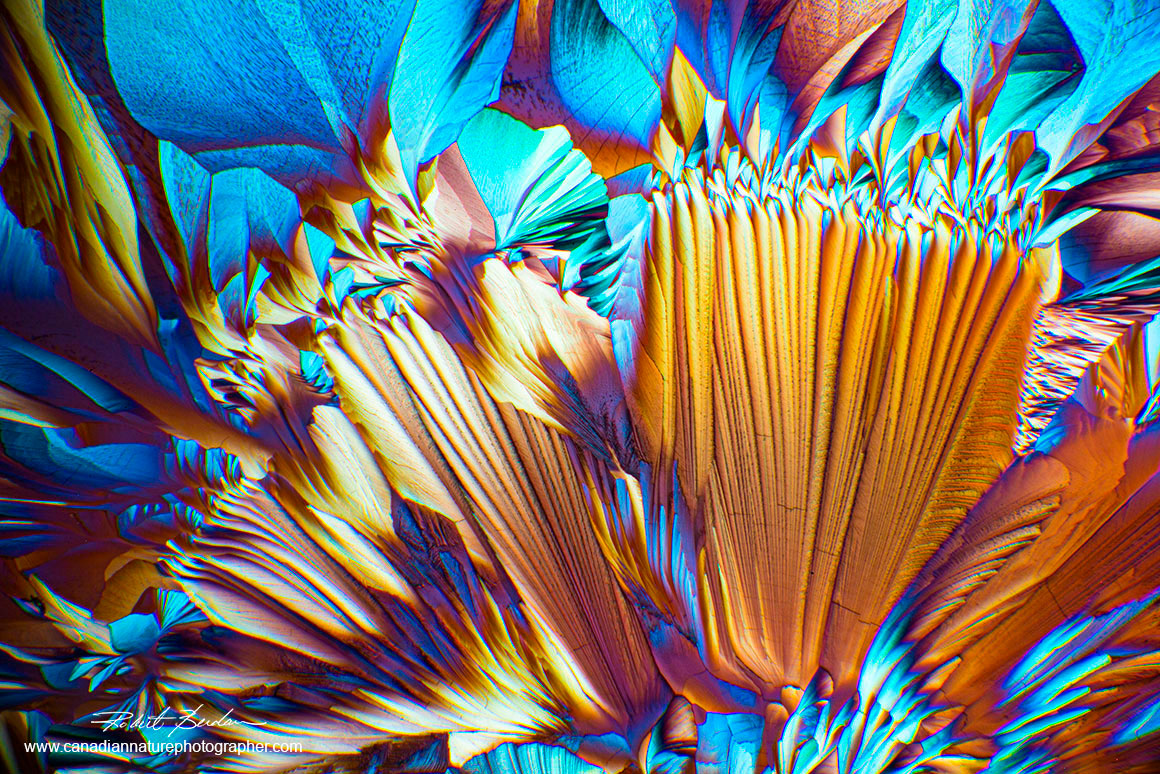
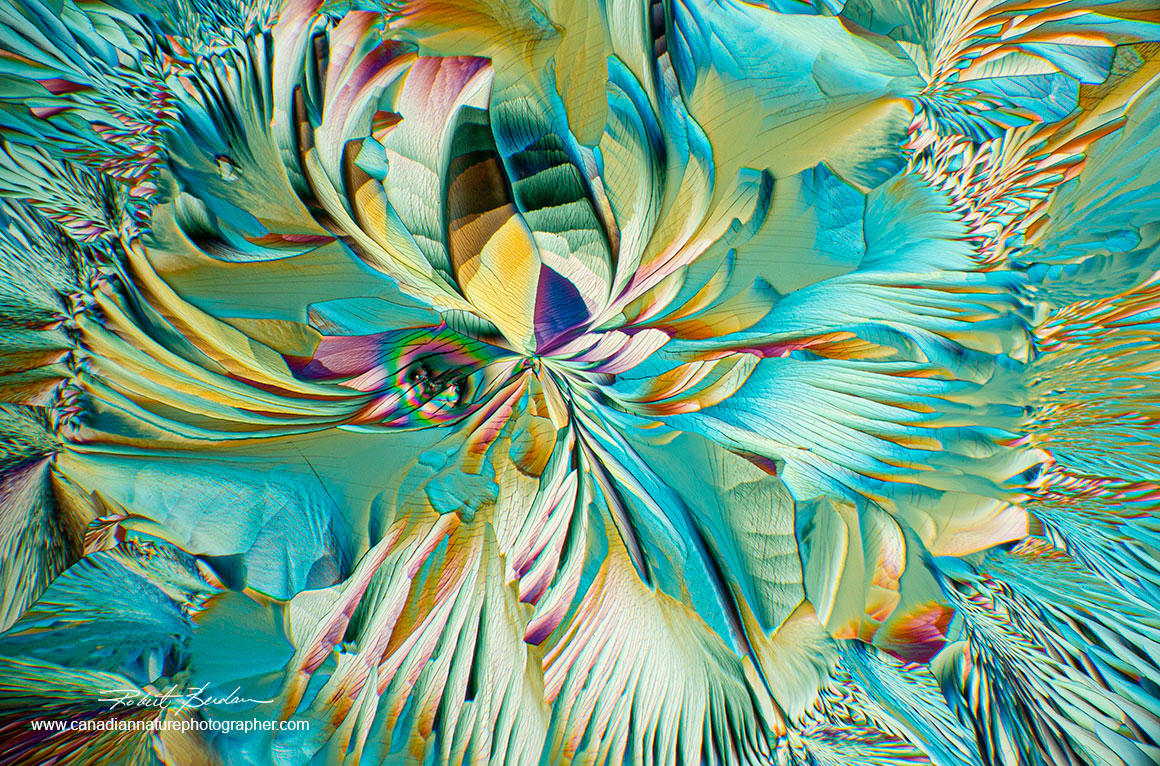
Alanine and Glutamine crystals resemble flowers when viewed with polarized light and wave plate. 40X
Two simple ways to make your own crystals
Crystal Melts
There are different methods to produce crystals from chemicals and drugs but the their are two methods that anyone can use to get started. This first method requires a heat source which can be an alcohol lamp, Bunsen burner or a hot plate. I use a hot plate costing about $25 from Amazon. It has a control to vary the temperature and works well. To use the device I place a small sample of chemical on a microscope slide and place the slide on the hot plate for a few seconds to a few minutes until the powder melts. I then remove the slide using tweezers and place it on a small porcelain plate to cool (bathroom tile). The porcelain cost about a dollar at the hardware store. Sometimes I put a cover slip on top of the chemical to force the melt to form under a thin layer of the glass.
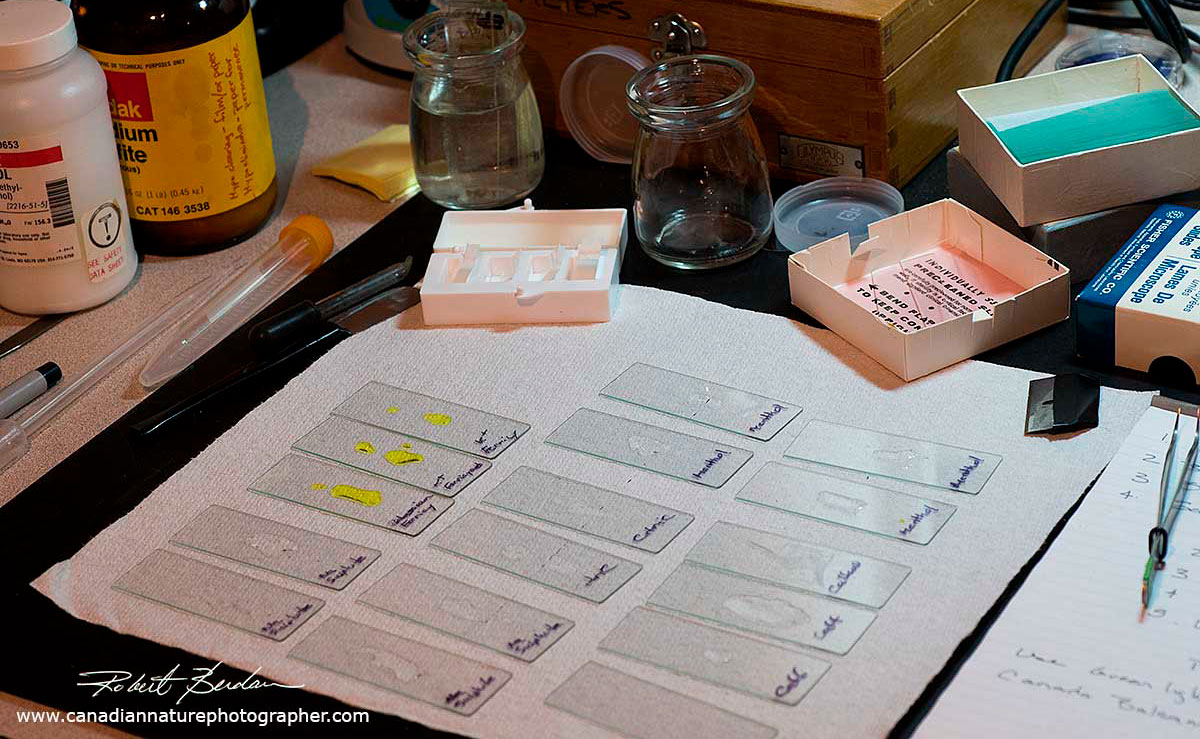
Above are a series of microscope slides with different solutions that I am using to form crystals for polarized light microscopy.
Before melting any substance I look for the melting point temperature of the substance online. This gives me an idea of whether or not to set the hot plate temperature high or low. I also read the MSDS (Material Safety Data Sheet online) before heating any chemical as the substance could be explosive or give off toxic fumes (e.g. Benzoic Acid produces a toxic gas). I recommend using a well ventilated area and only place a very small amount of the chemical on the slide. When the chemical melts I remove the slide and allow it to cool on a piece of porcelain and then view it with my polarizing microscope. The time to melt a substance can vary from a few seconds to several minutes. Some chemicals don’t melt but burn and produce smoke so this method cannot be used with these substances. One further precaution is that when melting a substance under a coverslip the coverslip may explode breaking into small pieces so wearing protective eye glasses is essential for your own safety. Good chemicals to use the melt method include: caffeine or citric acid.
Make solutions and dry them or Heat them on a slide
The second method used to create crystals is to dissolve the substance in a liquid and place a few drops of the liquid on a microscope slide and let it dry at room temperature or heat the slide to accelerate drying and crystallization. I try to saturate the solution with the chemical when possible. Before I dissolve the substance I look up what the substance will dissolve in. My preferred solvent is: water (tap or distilled). My second choice is an alcohol i.e. Isopropyl alcohol, ethanol or methanol. Methanol is toxic so avoid getting it on your skin, eyes or ingesting it. Other solvents include acetone available from the hardware store. Some of these solvents are flammable and you should only use small volumes and keep the solvents away from a flame. Wearing gloves is a good idea to protect yourself while handling chemicals and use a pair of forceps to grab the hot slides. Another solvent I like to use is to mix water and alcohol. For instance for amino acids a mixture of 95% Ethanol and water 1:1 seems to work best. It’s hard to purchase 95% Ethanol, but its available at Liquor stores called Everclear. Vitamin C also makes impressive crystals by dissolving the powder in water, and adding a little bit of alcohol to reduce surface tension seems to help produce large crystals. Varying the solvents or solvent mixtures requires experimentation to achieve the best crystals.

Vitamin C crystal. Vitamin C dissolves in water and I usually add a little bit of alcohol to the mix. The crystals often form circular shapes with a black cross inside when viewed with polarized light microscope. 100X polarized light only. Note the black cross.
An important part of experimenting with different substances and making crystals is to KEEP NOTES. If you don’t keep notes you will forget which solvent or mix provided the best results after a short period of time. All scientists are required to keep detailed notes when conducting experiments. Documentation is an important part of the process. Even so sometimes other factors like humidity, light, temperature or the source of the chemical can influence your success. Try to measure the volumes of the solvent and the amount of powder used and your results will be more repeatable. Sometimes small things can make a big difference.
In general, crystals tend to grow larger when allowed dry or cool slowly. This is true when making crystals from Vitamin C which can take an hour to overnight to form big crystals. Amino acids form some of the most beautiful crystals because they can form curved flower-like patterns which are especially attractive. The crystals are often very thin so they may appear as shades of gray (see above) between polarizing filters, but a wave plate will turn the thin crystals a wide variety of colours.
Crystals from Amino acids

Beta-Alanine and Glutamine crystals form flower-like shapes when crystallized and viewed with polarized light and a wave plate. The amino acids were obtained from a nutritional supplement store. 40X. The individual amino acids also produce crystals, but they don't form the interesting curved crystals shown above.
When I first tried making amino acid crystals they did not form curves. To my surprise a few folks that I contacted that had success with amino acids would not share their methods or even reply to my emails. After spending a week experimenting over Christmas in 2020 I found a way to make curved crystals from amino acids (see curved crystals R. Berdan, 2021). Two things I found that were important: 1) mixing ethanol and water as a solvent and then dissolving about equal amounts of Alanine with Glutamine and 2) placing the solution with amino acids on a microscope slide and hot plate until the solution starts to form crystals around the edge (seeds), then immediately cooling the slide for about 30 seconds and then putting the slide back on the hot plate for about 10-30 seconds and crystallization takes off. You can let the slides finish crystallizing or take the slide and watch the crystals grow in real time using a polarizing microscope. I can now produce the crystals consistently and so can anyone else that follows my instructions. I have tried other amino acids and mixtures but so far none are as good as the Alanine and Glutamine mix. My point is that getting crystals to grow often requires experimentation and perseverance – the same qualities needed to do research.
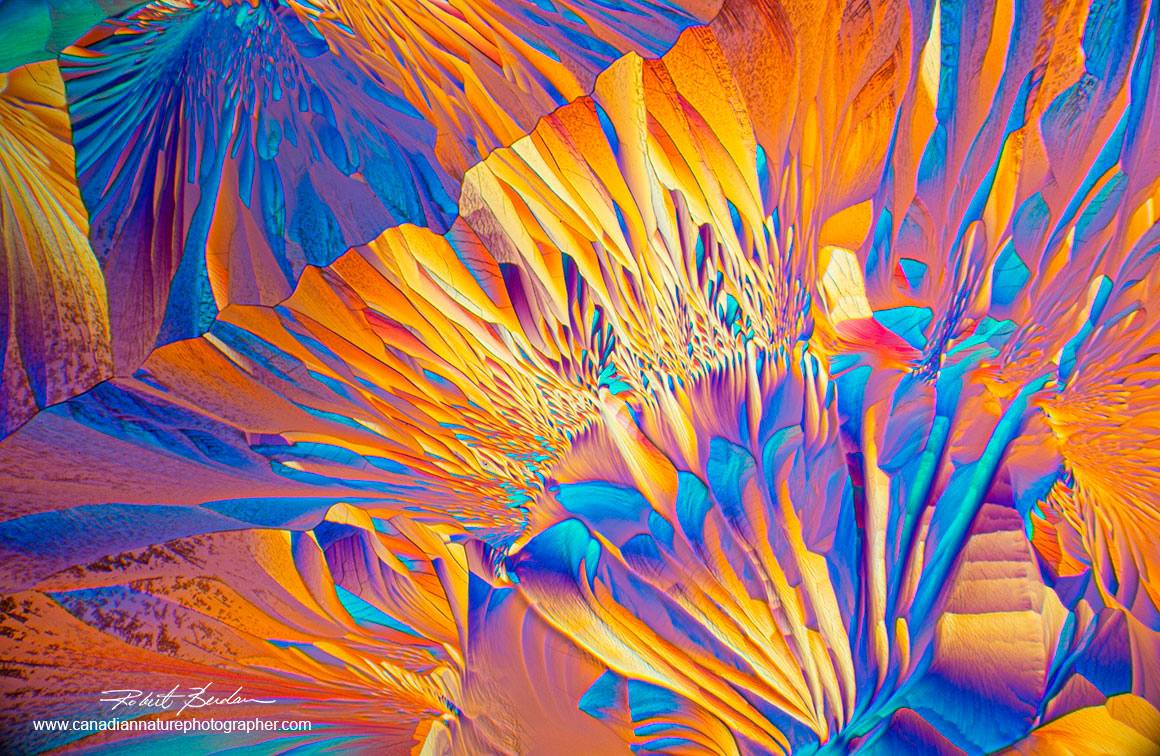
Below are several pictures of crystallized amino acids Alanine and Glutamine. The amino acids were purchased from Popeye's nutritional supplements. All were photographed in polarized light with a full wave plate at different orientations.
Alanine and Glutamine Crystals viewed by polarized light microscopy 40X
Alanine and Glutamine Crystals viewed by polarized light microscopy 40X

Alanine and Glutamine Crystals viewed by polarized light microscopy 40X

Alanine and Glutamine Crystals viewed by polarized light microscopy 40X
Alanine and Glutamine Crystals viewed by polarized light microscopy 40X

Alanine and Glutamine Crystals viewed by polarized light microscopy 40X

Alanine and Glutamine Crystals viewed by polarized light microscopy 40X
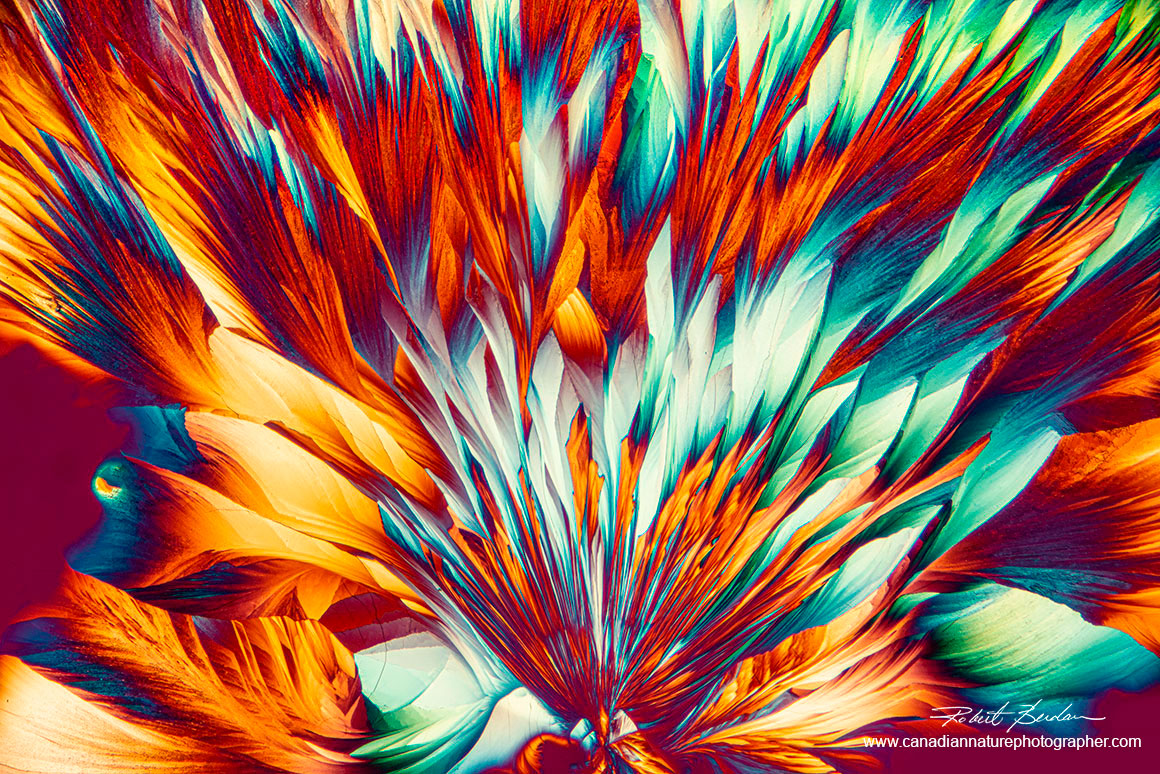
Above all the images are of the amino acids Alanine and Glutamine produced by heating briefly on a hot plate. The amino acids were dissolved in 95% ethanol : distilled water 1:1 ratio and photographed through polarized light and full wave plate.
Top
THCA and THC crystals
THCA (Tetrahydrocannabinolic acid) is extracted from cannabis using ethanol or other organic solvents. When THCA is heated it is converted to THC (tetrahdrocannabinol) the active component of cannabis responsible for the psychoactive effects of cannabis. I had heard a researcher in the US had made crystals and photographed them with a polarizing microscope and I wondered if I could also make THC crystals to photograph.
THCA is the concentrated component of Cannabis sometimes called Diamonds which are legal in Canada and can be purchased for about $50 a gram. I first dissolved small amounts of THCA in 95% ethanol and tried heating some of the fluid on slides but this only resulted in a thin layer of resin forming on the slide. I tried seeding the solution and diluting the ethanol solution with THCA in it. Seeding the solution with a small amount of diamonds resulted in a few small crystals usually around the edges of a coverslip. I decided to add a small amount of 70% methanol to some slides and they formed crystals, but when I tried repeating this step or adding methanol to a small tube it caused a white precipitate that was not birefringent. In spite of taking notes I have not been able to consistently repeat this result so I am still working on it. Below are some of my preliminary results and pictures of THC crystals. If you know of a way to get consistent crystals forming on a microscope and willing to share this information please let me know. See the paper by O.R. Abraham and S.R. Smith (2021) for a recent polarization study of THC crystals in the J. of Forensic science.

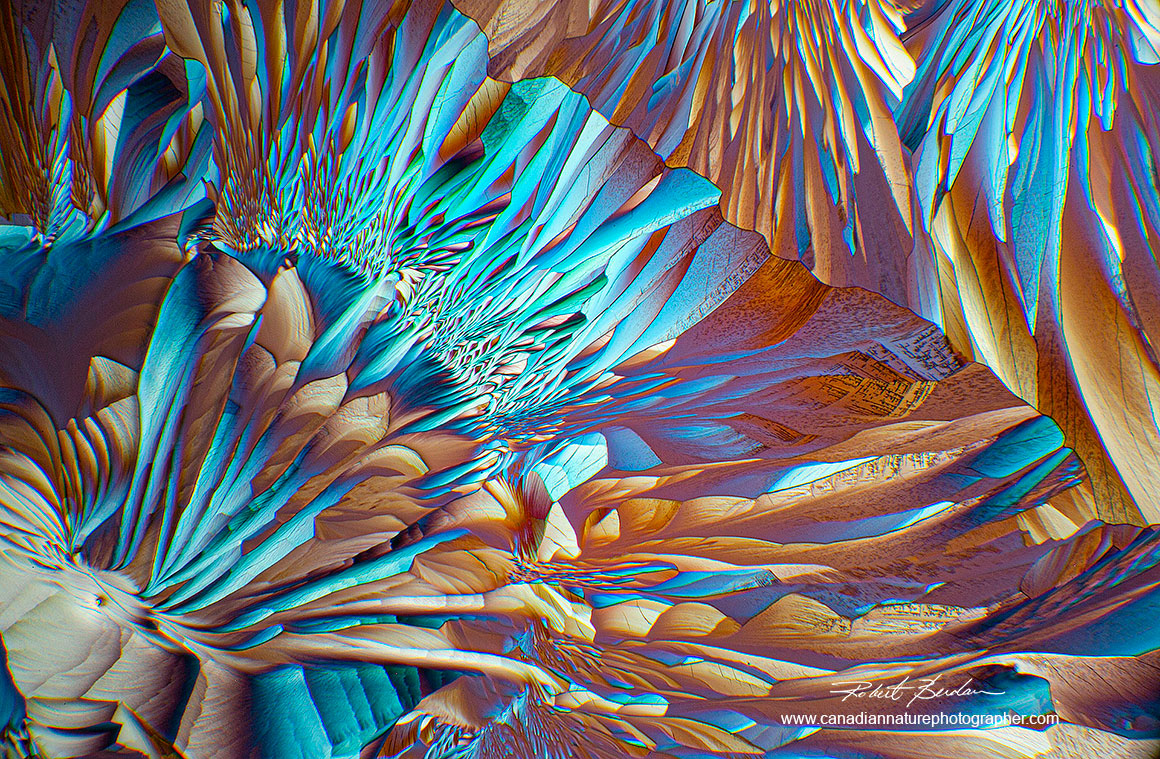
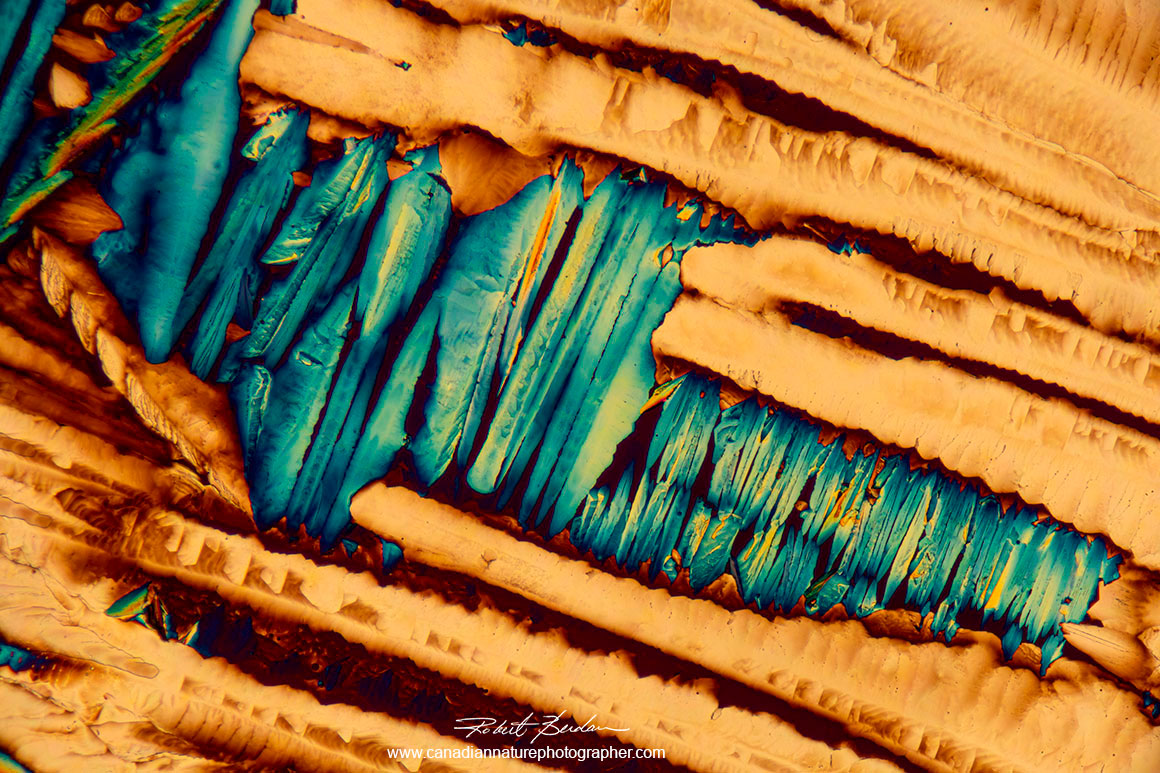
Cannabis THC crystals in polarized light and a full wave retardation plate. The abstract image appers to me like an abstract painting of mountain road going off to the right of the picture with mountains beside the road - maybe because I live near the Rockies.

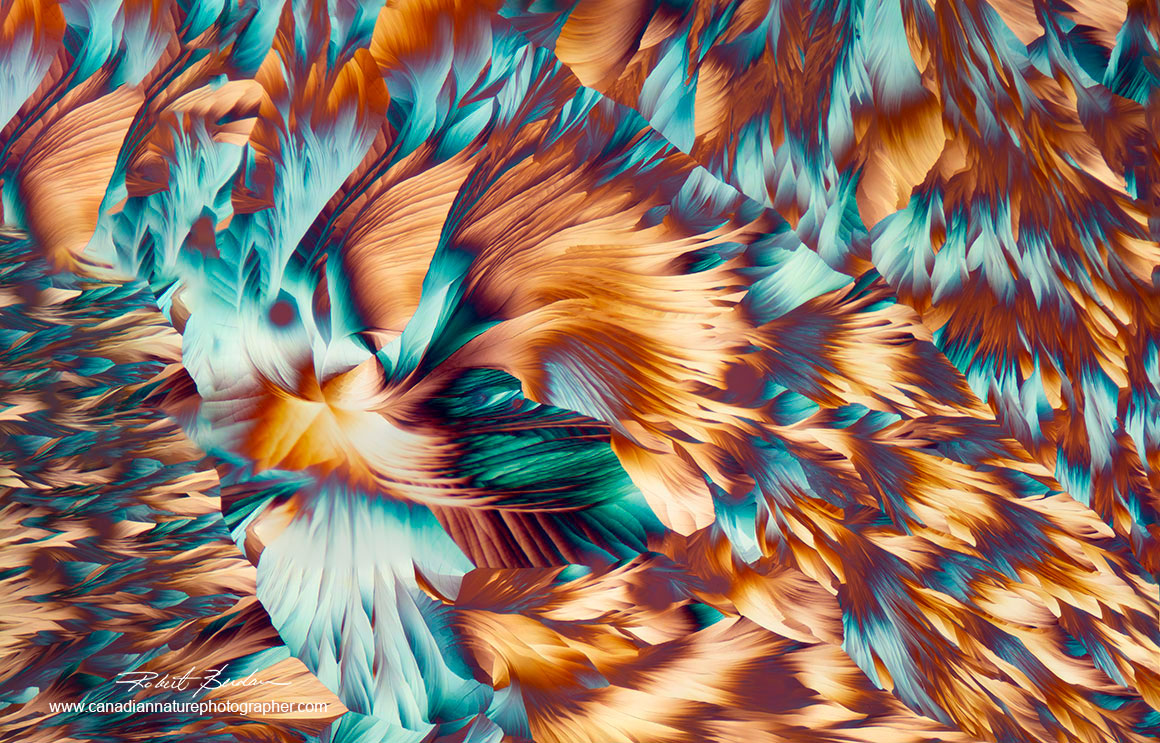
Cannabis THC crystals in polarized light and a full wave plate
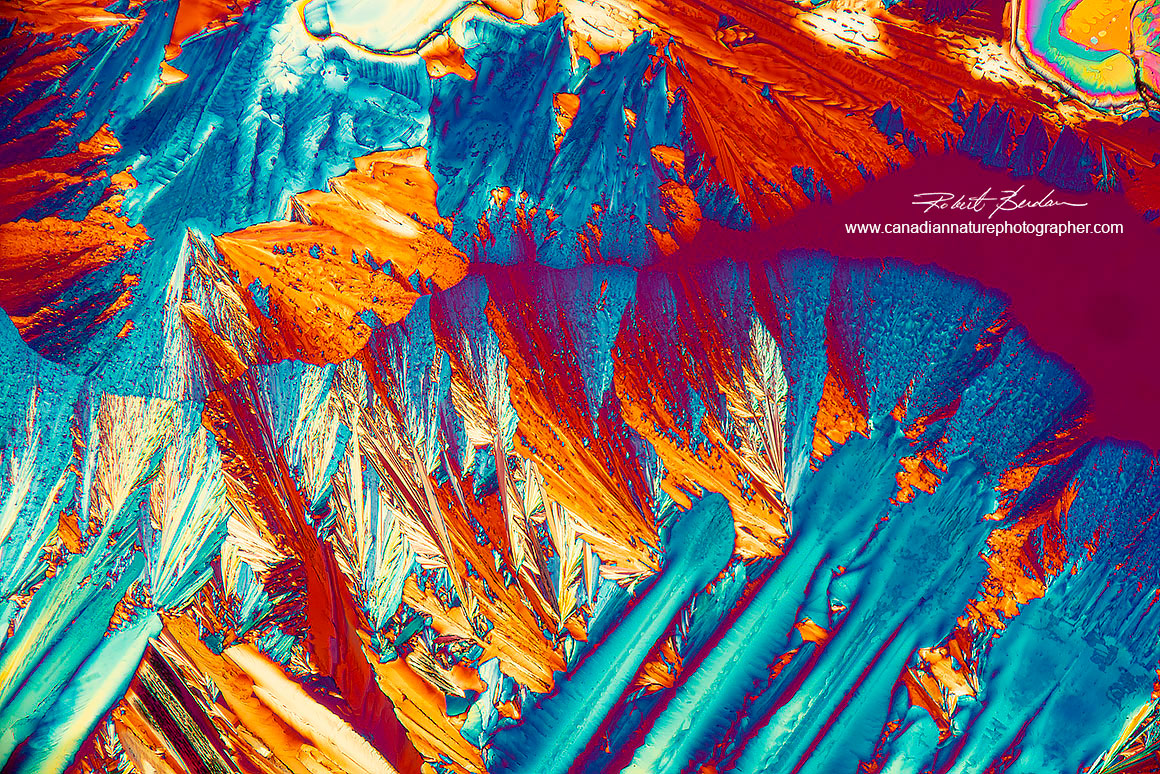
Cannabis THC crystals in polarized light and a full wave plate
Cannabis THC crystalsi in polarized light and a full wave plate

A,B,C,D - Cannabis THC crystals via polarized light and a wave plate
Other substances I have found difficult to crystallize include beer and wine. Beer crystals can take weeks or months to form and some brands seem to work better than others (Corona works best for me). Other techniques include freezing (e.g. water and beer) or the use of sophisticated equipment (rotary evaporators) which are expensive. I have found that melting substances on slides or allowing solutions to dry at room temperature or heating them on a hot plate for a short time works for most substances. It is also important to note that crystals formed by drying from a solution often look different from the same substance formed by melting. For example caffeine crystals dried from water take on the form of fine needle-like crystals but when melted they form flat map-like polygonal shapes (see picture below). So it’s a good to try different methods with the same substance. It’s also good to experiment with different chemicals, but read the MSDS sheets first for your own safety. Young aspiring scientists should always be supervised by an adult when conducting these experiments.

Above left are caffeine crystals formed when dissolved in water and on the right is caffeine melted on a microscope slide. Both photographed by polarized light microscopy 100X.
A photographic technique you can do while photographing the crystals is to join several images together to make larger images or panoramas. Also vary the rotation of the analyzer or stage will also result in different colours varying from saturated to pastels. The microscope slides with crystals can be stored for at least several months though I find the number of cracks increases with drying and age. In my experience freshly made crystals make the best images. To remove dirt from the surface of the crystals I sometimes use a gentle stream of air from an air canister or air blower before photographing them.
Alanine and Glutamine panorama combined from 10 separate images. Using this technique you can capture large areas and make really large prints.
Some crystals can form rapidly on the slide and make for interesting movies. You can also use time-lapse photography for slower growing crystals. Most of my pictures are taken with low power objectives 2.5, 4, and 10X. In short, taking pictures of crystals is easy (they usually don’t move around like ciliates), they require low magnification most of the time so a coverslip is not critical. It is important to make sure your lighting is even (use Köhler illumination), some polarizing microscope condensers have a feature where you can rotate the top lens out to create a broader light source. The biggest challenge is finding interesting compositions. It might all look great initially, but spend time looking for interesting shapes and patterns. It is also helpful to understand some basics of design and composition (read my article The Art of Seeing and Elements of Design in The Art of Canadian Nature photography if you are new to composition). In this regard I find it helpful to slow down and look carefully at the crystals. Take lots of images – then select the best or images that move you and edit ruthlessly.
For editing images I use Adobe Photoshop and find it helpful for cropping images, stitching images, removing dust spots, and adjusting colour saturation. There are lots of other editing programs that are cheaper and easier to learn but I have yet to find a program with the flexibility that photoshop offers. I always shoot RAW files as they offer the greatest flexibility in processing. I often find crystals that appear over saturated in colour and sometimes reduce the colour saturation so they don’t appear garish. Not all substances will form crystals, many of the pills I have tried just precipitate. A chemist at the Medicine shop in Calgary told me that other substances are often added to bind chemicals into pills and they inhibit crystallization. So if you can get pure chemicals you may have better luck. I also take note of what other microscopists have used to produce crystals on their web sites e.g. sulfamic acid which is available from the hardware store. There are no guarantees in producing interesting images as you have to find the optimum conditions for making the substances crystallize and it requires both science and art, but perseverance will be rewarded.
The physics of polarized light passing through birefringent substances can be complex, but the use of polarizers and a full wave plate are simple to implement on an ordinary light microscope (see some YouTube videos on how to add polarizers to your microscope). For those that want to understand a bit more please see my other online articles (R. Berdan, 2021). If you are in the Calgary area I provide a hands on instructional course in my home laboratory, and I am happy to provide a free 1 hour instruction to anyone with a non-toy microscope interested in learning to convert their light microscope to one that can use polarizing filters and wave plates. If you have a microscope I encourage you to try adding polarized filters and if you have questions email me – I will answer any questions that I can. I also refurbish microscopes, including ones for polarized light and post them for sale on Kijjii in Calgary.
Top
Crystals as Art and Use in Advertising
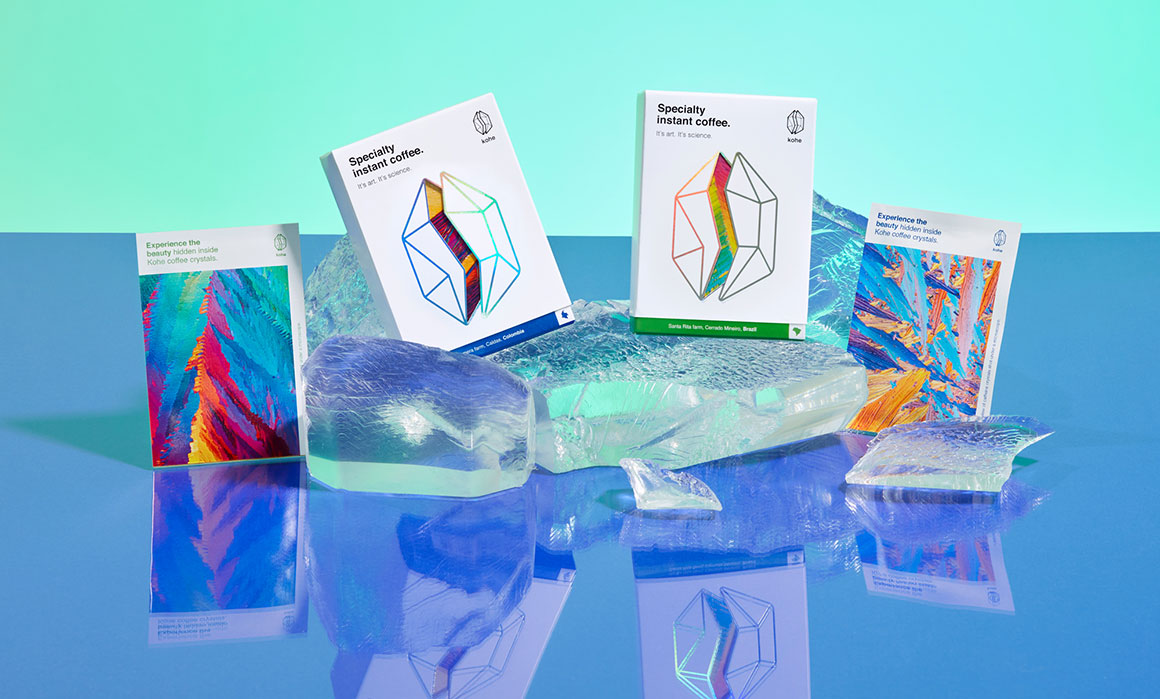
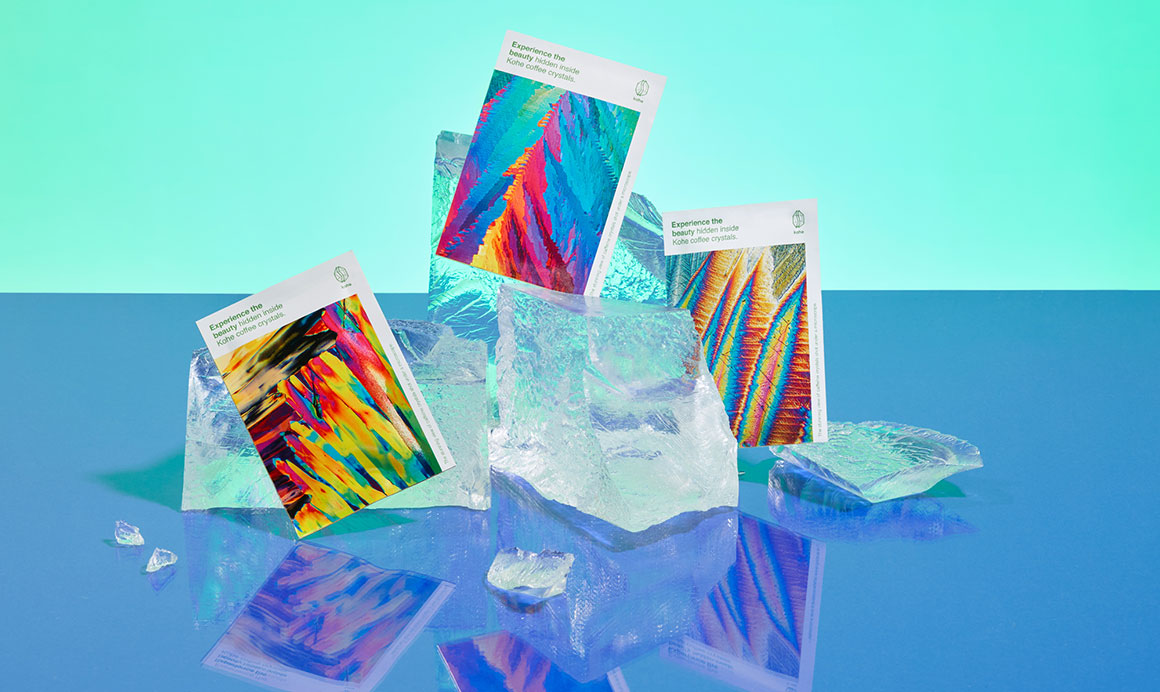
Many of my photomicrographs of crystals have been used as art, and advertising. Promoting your work takes time and lots of effort. I post my images on Blogs, other web sites and print brochures. An effective method is to share your images on your own web site so they can be viewed by a potentially world wide audience. My web size images are free to anyone for non-commercial use. I also publish articles which I hope will attract potential buyers. Below are some pictures I produced for an advertising company selling a new brand of coffee. The designs won awards for their use of caffeine crystals viewed with a polarizing microscope.
Below are various caffeine crystals showing just a small sample of the the variety of crystal forms that can be produced and viewed with a polarizing microscope and caffeine.
Caffeine crystals by polarized light microscopy

Caffeine crystals viewed in polarized light and use of full wave plate 40X

Caffeine crystals viewed in polarized light and use of full wave plate 40X

Caffeine crystals viewed in polarized light and use of full wave plate 40X
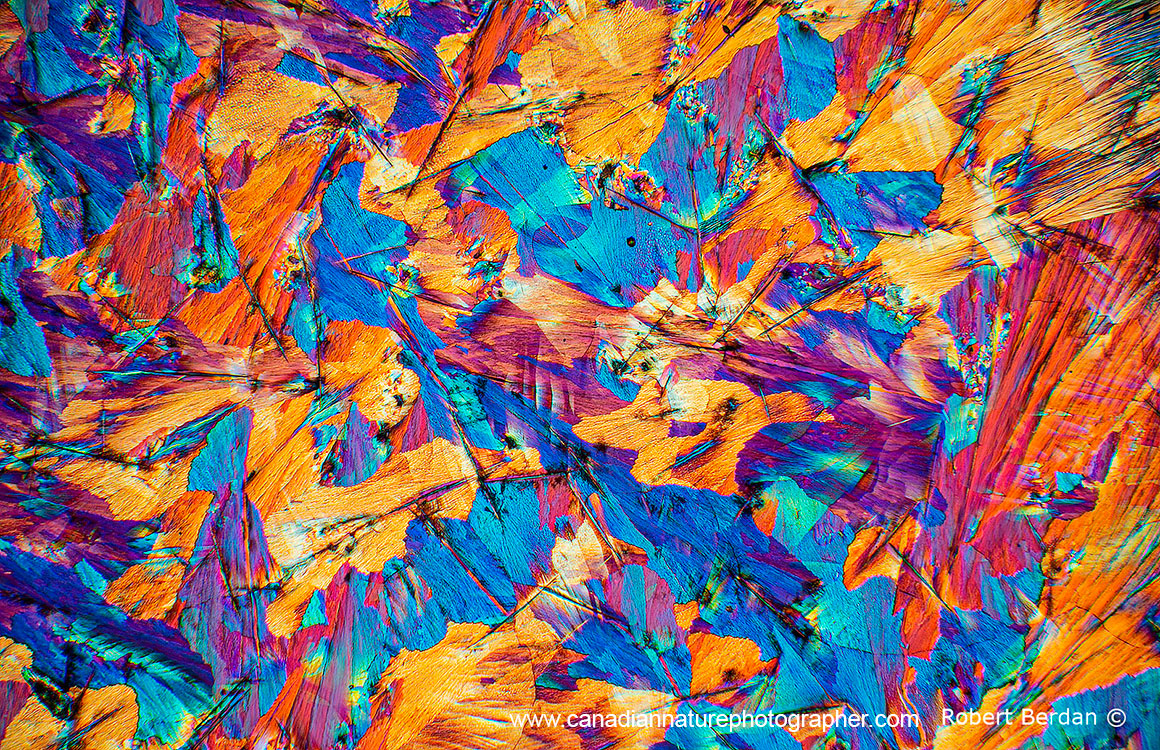
Caffeine crystals viewed in polarized light and use of full wave plate 40X
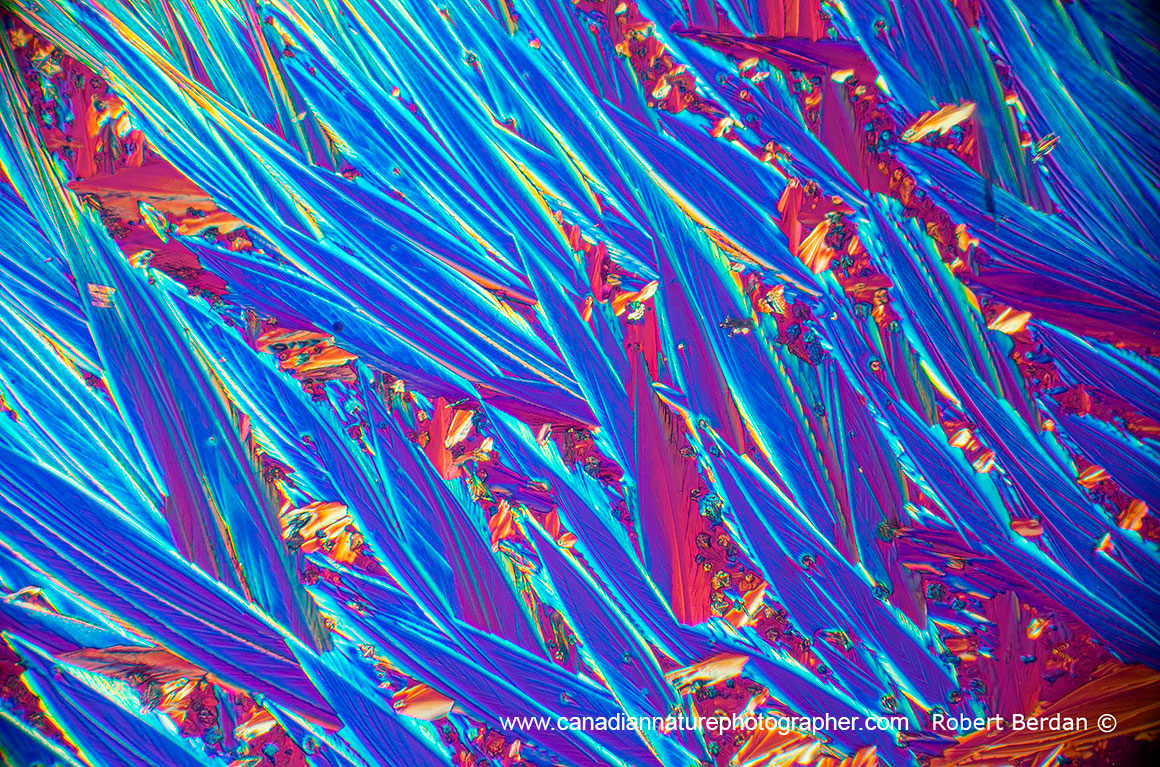
Caffeine crystals viewed in polarized light and use of full wave plate 40X

Caffeine crystals viewed in polarized light and use of full wave plate 40X
Below are some pictures showing the award winning packaging that used my photomicrographs of caffeine crystals.

Interested in Purchasing Crystal Images as Art?
All of my images can be purchased for personal or commercial use - see my price list for personal use. For commercial use the price depends on the size of the image, whether you need exclusive rights and what the image will be used for. If you are interested please contact me and ask about specific photos or custom images. I offer photomicrography services and crystallize, drinks, liquor, medicine etc – also see my custom photomicrography services at Science & Art. If you would like personal training in making crystals and photographing them in my lab please contact me.
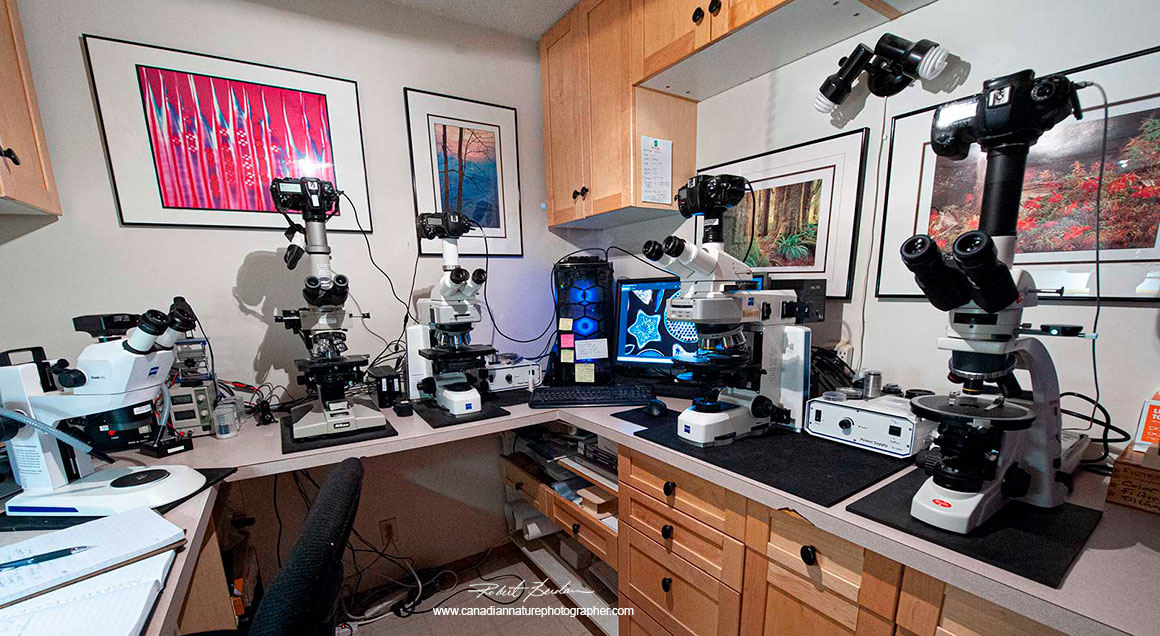
Some of my microscopes in my home laboratory include from left to right: Zeiss Stemi stereo microscope, Nikon Optiphot fluorescence microscope, Zeiss Axioscope with Differential Interference optics, Zeiss Axioscope with phase contrast, polarizing and epi-illumination, and a Motic BA310 polarizing microscope. All have cameras attached to a fast computer and the cameras are controlled with Digicam control software (free online).
References
R. Berdan (2021) Birefringence using a Motic Polarizing Microscope and the Michel-Lévy Chart (Part I) Motic Microscopy. https://moticmicroscopes.com/blogs/articles/birefringence-using-a-motic-polarizing-microscope
R. Berdan (2021) Motic polarizing microscope to analyze birefringence with fixed retardation plates and variable compensators Part II. https://moticmicroscopes.com/blogs/articles/birefringence-using-a-motic-polarizing-microscope-part-two
R. Berdan (2021) Polarization Microscopy The Motic BA310 Polarizing Microscope a Review.
https://www.canadiannaturephotographer.com/MoticBA310Pol_microscope.html
R. Berdan (2021) Curved Crystals viewed by Polarized Light Microscopy Amino acids, Vitamin C, Menthol & Caffeine. https://www.canadiannaturephotographer.com/crazy_crystals.html
R. Berdan (2017) The Art & Science of Photomicrography with Polarized Light
https://www.canadiannaturephotographer.com/art-and-science-photomicrography-polarized-light.html
R. Berdan (2019) Crystals Photographed with Polarization Microscopy: Water, Beer, Caffeine, Vitamins, Amino Acids and Human Tears. https://www.canadiannaturephotographer.com/crystals_polarizedlight.html
R. Berdan (2021) The Microscopic structure of Starch grains – Food microscopy Part I https://moticmicroscopes.com/blogs/articles/food-microscopy-starch-grains
Free Michel-Levy Charts you can download
McCrone’s – available as PDF
https://www.mccroneinstitute.org/uploads/MichelLevy-BirefringenceChart.pdf
Wikipedia – Zeiss Chart
https://en.wikipedia.org/wiki/Interference_colour_chart
B.E. Sorensen (2013) A Revised Michel-Lévy colour chart based on first principles calculations. Eur. J. Mineral 25, 5-10.
https://pdfs.semanticscholar.org/f1b7/c74acc3896a7116f1d9532450de75075c6c0.pdf
Polarization Reference Books and Papers
J. G. Delly (2017) Essentials of Polarized Light Microscopy and Ancillary Techniques - Hooke College of Applied Sciences. Westmont, Illinois. Available on McCrones web site & Amazon.
K. R. Spring , M. J. Parry-Hill and M.W. Davidson Michel Lévy Birefringence Chart. Interactive Java Tutorial where you can select the wavelength and thickness and it will calculate the Birefringence automatically for specimens 60 microns thick or less out to 6 orders.
https://www.olympuslifescience.com/en/microscoperesource/primer/java/polarizedlight/michellevy/
H. Friedman (1997) Minerals.net The Mineral & Gemstone Kingdom – Mineral Properties: Transparency. https://www.minerals.net/resource/property/transpar.aspx#
M. Raith, P. Raase and J. Reinhardt (2011) ISBN 978-3-00-033606-5 PDF. Guide to Thin Section Microscopy (minerals). Determination of thin section thickness pages 27-29. Free download http://www.minsocam.org/msa/openaccess_publications/#Guide
Watanbe et al. (1985) Study of Crystalline Drugs by Means of a Polarizing Microscope. VI. Polarizing Microscopy of Drugs Acting on the Nervous System and on Individual Organs Listed in the Japanese Pharmacopoeia. Chem. Pharm. Bull 33:1599-1608.
https://www.jstage.jst.go.jp/article/cpb1958/33/4/33_4_1599/_article
J. Walker (1977) The Amateur Scientist - Studying polarized light with quarter-wave and half-wave plates of one's own making. https://www.scientificamerican.com/article/the-amateur-scientist-1977-12/
THC and Cannibas
O.R. Abraham and S.R. Smith (2021) Optical and spectroscopic characterization of crystalline structures in cannabis extracts. J. Forensic Sci. 00:1-11. https:..doi.org/10.1111/1556-4029.
https://pubmed.ncbi.nlm.nih.gov/34787321/
Tetrahydrocannabinolic acid - THCA is the precursor to THC - Wikipedia https://en.wikipedia.org/wiki/
Cannabis Detection - overivew (United Nations Office on Drugs and Crime - ebook).
https://www.unodc.org/documents/scientific/ST-NAR-40-Ebook_1.pdf
D. Baker (2019) How to Make Your Own Concentrates (THC) using Alchohol Extraction. https://wayofleaf.com/blog/cannabis-concentrates-using-alcohol-extraction
Authors Biography & Contact Information
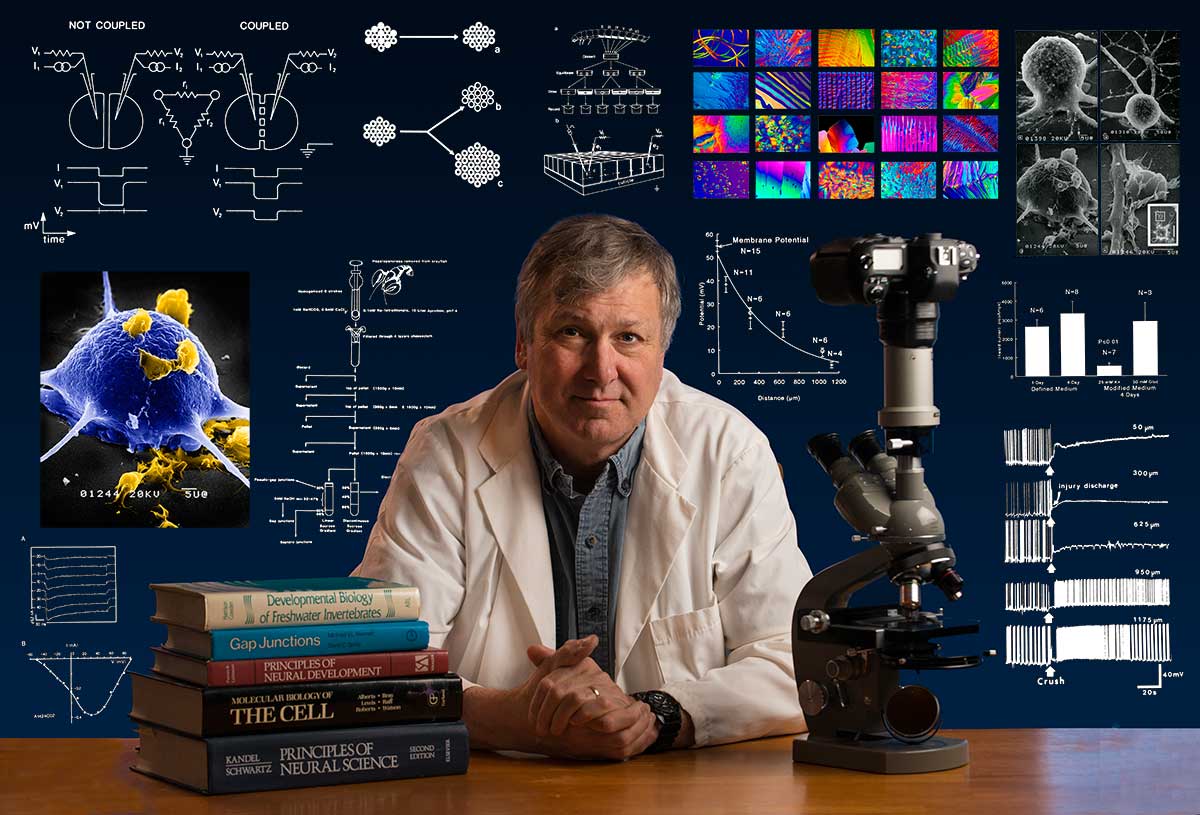
Bio: Robert Berdan is a professional nature photographer living in Calgary, AB specializing in nature, wildlife and science photography. Robert retired from Cell\Neurobiology research to pursue photography full time many years ago. Robert offers photo guiding and private instruction in all aspects of nature photography, Adobe Photoshop training, photomicrography and macro-photography. Portrait of Robert by Dr. Sharif Galal showing some examples of Robert's science research in the background and Robert's first pro-microscope - Olympus E.
Email at: rberdan@scienceandart.org
Web sites: www.canadiannaturephotographer.com
www.scienceandart.org
Phone: MST 9 am -7 pm (403) 247-2457.