
Epi-Fluorescence Microscopy of Protists and other pond organisms using Acridine Orange -
Photoshop Deconvolution
by Dr. Robert Berdan
April 27, 2020 (Updated April 30, 2021)

Above Bdelloid rotifer photographed with a wide field fluorescence microscope using 20X Flour objective and processed in Photoshop, magnified 200X and stained with Acridine orange.
Introduction
Super resolution fluorescent microscopy in research labs around the world can now detect individual molecules. A normal wide field fluorescent microscope can see and detect objects down to 0.0001 mm (100 nm) and can be used to examine bacteria (not viruses), and various components found within cells. Fluorescence microscopy is also used to diagnose various illnesses and perform research on cells. In this short article I share some of my images made with a wide field fluorescence microscope - mostly of pond microorganisms that resemble deep sea creatures that produce their own light. Unlike an ordinary bright light microscopes, fluorescent microscopes are more expensive. There are some economical fluorescent microscopes made in China and you can purchase Fluorescent kits for light microscopes starting around $1500. For those of you that like to make do-it-yourself modifications it is possible to add light emitting diodes (LED) lights for flourescence microscopy along with the appropriate excitation and barrier filters for a few hundred dollars. See links at the end to learn how to do this.
I purchased my Nikon Optiphot Fluorescence microscope online three years ago for $600 and trade. This research microscope was originally purchased at a government auction and is about 20 years old. I refurbished the microscope, added new objectives designed for fluorescence microscopy, installed a new Mercury vapour lamp, and added a new transformer for the base lamp. I am still modifying the microscope in an attempt to achieve higher quality images. There are several different types of fluorescent microscope - mine is referred to as a wide field fluorescent scope which is the most common type. If you are looking to buy a new fluorescent microscope those made in China start around $4000 whereas name brand scopes start at about $10,000 - these microscopes are not cheap.

Above is a Bdelloid rotifer stained with Acridine orange and viewed with a wide field fluorescence microscope using blue excitation light. The image was taken with a 20X Nikon fluor objective. I took two overlapping photos and combined them into a panorama.

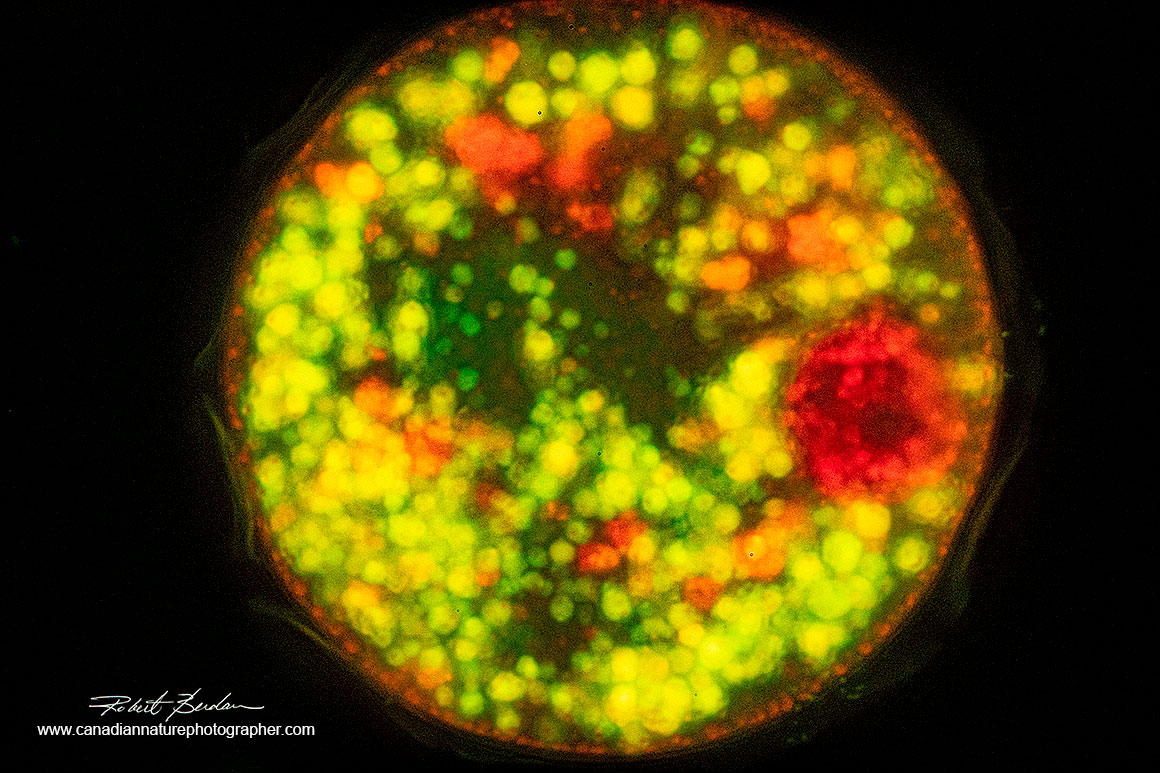
Protist Stentor coeruleus stained with Acridine orange 100X. Stentors often take on a trumpet-like shape, but can quickly contract into a ball (shown below). Stained with Acridine orange, the macronucleus appears like beads-on-a-string and appears bright green or yellow. Single celled Stentors can reach up to 1 mm or more in length so they are considered giants in the micro-world.

Protist Stentor coeruleus stained with Acridine orange 100X. The Stentor has rounded up into a ball and the macronucleus stains green. The red fluorescence is primarily from intracellular lysosomes and cytoplasmic mRNA (messenger Ribonucleic Acid).

Rotifer possibly a notommatid or a proalid (Dr. R Shiel) with large egg stained with Acridine orange 200X Fluorescence microscopy
Some of the most expensive light microscopes are confocal laser scanning fluorescent (CLSM) microscopes costing in the hundreds of thousands of dollars. Two learn more about how they differ from wide field fluorescent microscope see the presentation Introduction to Confocal Laser Scanning Microscopy - PDF. Confocal microscopes offer higher resolution, sharper images, and use lasers as a light source. Confocal microscopes also require more maintenance and are usually shared by several researchers and students.

Above is a laser confocal microscope from the Microscopy facility at the University of Calgary. The microscope is placed on a special anti-vibration table and many features such as focusing are automated using a computer.
In this article I show some pictures taken with my wide-field fluorescent microscope using the fluorescent stain Acridine orange or autofluorescence. When I was a graduate student and post doctoral fellow I used fluorescence microscopy extensively for examining cells after micro-injection of fluorescent dyes as a neuronal tracer, to study cell-cell communication and for examining the distribution of fluorescent labelled antibodies on tissue sections.
Above is a Testate amoeba in its shell 400X stained with Acridine orange - fluorescence microscopy.

Testate Amoeba - side view showing extrusion of protoplasm (top left) from shell (bottom) 400X Acridine orange stain - fluorescence microscopy.

Amoeba stained with Acridine orange 400X fluorescence microscopy.

Amoeba stained with Acridine orange 400X fluorescence microscopy
How a Fluorescent microscope works

Above is a picture of my Nikon Optiphot Epi-fluorescent microscope. It has blue and green excitation filters and uses a mercury vapour lamp.
My microscope is called an Epi-fluorescence microscope because the light source illuminates the specimen from above - the light travels down through the objective to the specimen and then fluorescent light travels back to the viewer or camera. The objectives act as as both the condenser and magnification lens. Although a mercury light is very bright the fluorescence from the specimen is often low in light intensity. For this reason the room is often darkened during viewing. I also tend to use higher ISO speed settings on my digital camera. Higher ISO speed increases digital noise and appears as sand-like grain in the pictures. Using lower ISO speeds require longer exposures of several seconds which can cause fading of the fluorophore or blur if the organism is moving. In this respect photographing fluorescent subjects is much like photographing the northern lights.
Specimen thickness is also important, thicker specimens often have more out of focus blur resulting in "fuzzy looking images" - see section below about deconvolution which tries to remove the out of focus blur. A wide field fluorescent microscope is best suited for thin subjects that are less then 30 microns thick (1 micron = 0.001 mm) Webb and Brown 2013. The confocal laser scanning microscope (CLSM) is better suited for thicker specimens as it eliminates much of the out of focus light and further processing by computer can make images with greater clarity - see picture of a ciliate below.

Image of Tetrahymena a ciliated protozoan photographed with a confocal laser scanning microscope (CLSM). Green fluorescent staining is produced by Green Fluorescent protein coupled to anti-beta tublin antibodies that bind to the ciliate (Wikipedia image by Pawel Jasnos).
My microscope has only two excitation-barrier filters that I can slide into place, one provides blue light excitation (420-485 nm) and the other green light excitation(535-550 nm). Things that are fluorescent are excited by either the blue or green light emit light of a longer wavelength (fluorescent light). To block the excitation wavelengths from returning to the viewer we use dichroic barrier filters. These filters block the excitation wavelengths that are much brighter then the fluorescent light. It is necessary to use different excitation\barrier filters specific for certain fluorophores (fluorescent molecules or stains). It also important to match the excitation light source to the flurophore. Fluorescence illuminators are very bright and usually include: Mercury vapour lamps, Xenon arc lamps, LED (light emitting diode) lights or specific wavelength lasers.
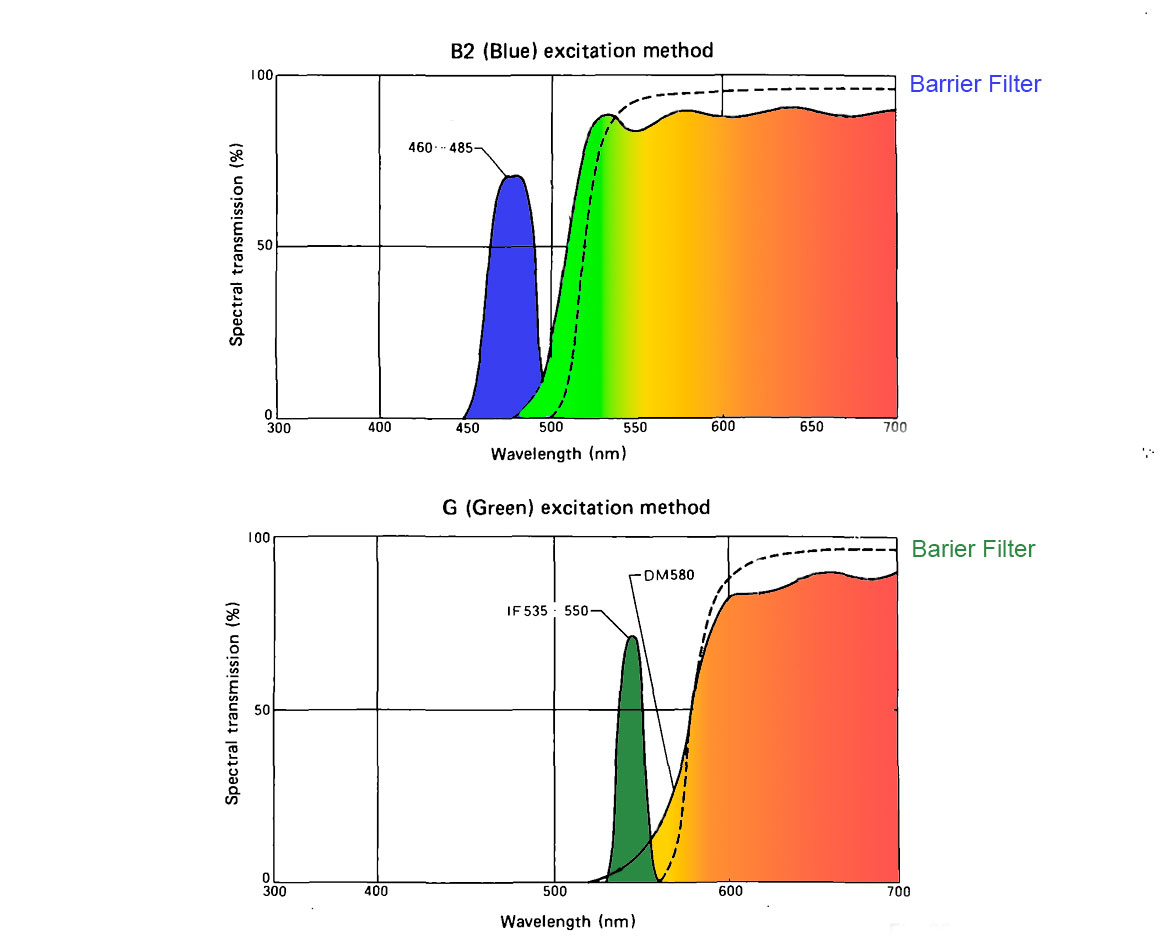 The way epi-fluorescence microscopes work is that the specimen which is either autofluorescent (e.g. plants due to chlorophyll) or stained with a fluorescent dye is irradiated with short wavelength high energy light (coloured peaks shown on the left in the diagrams above) - often blue or green light. The excitation light curves are usually broader except in the case of using LED lights or lasers. This high energy light excites electrons in the fluorophore to rise to a higher energy state which then falls to a metastable excited state, and after a very short time drops down to the ground state and emits a photon of longer wavelength. A small amount of the energy is lost as heat. The barrier filter only allows longer wavelengths of energy to pass to the observer or camera. The graphs above show two common scenarios, but there are many. Blue excitation light can result in green, yellow or red fluorescence. Green excitation light results in the emission of yellow, orange or red fluorescence.
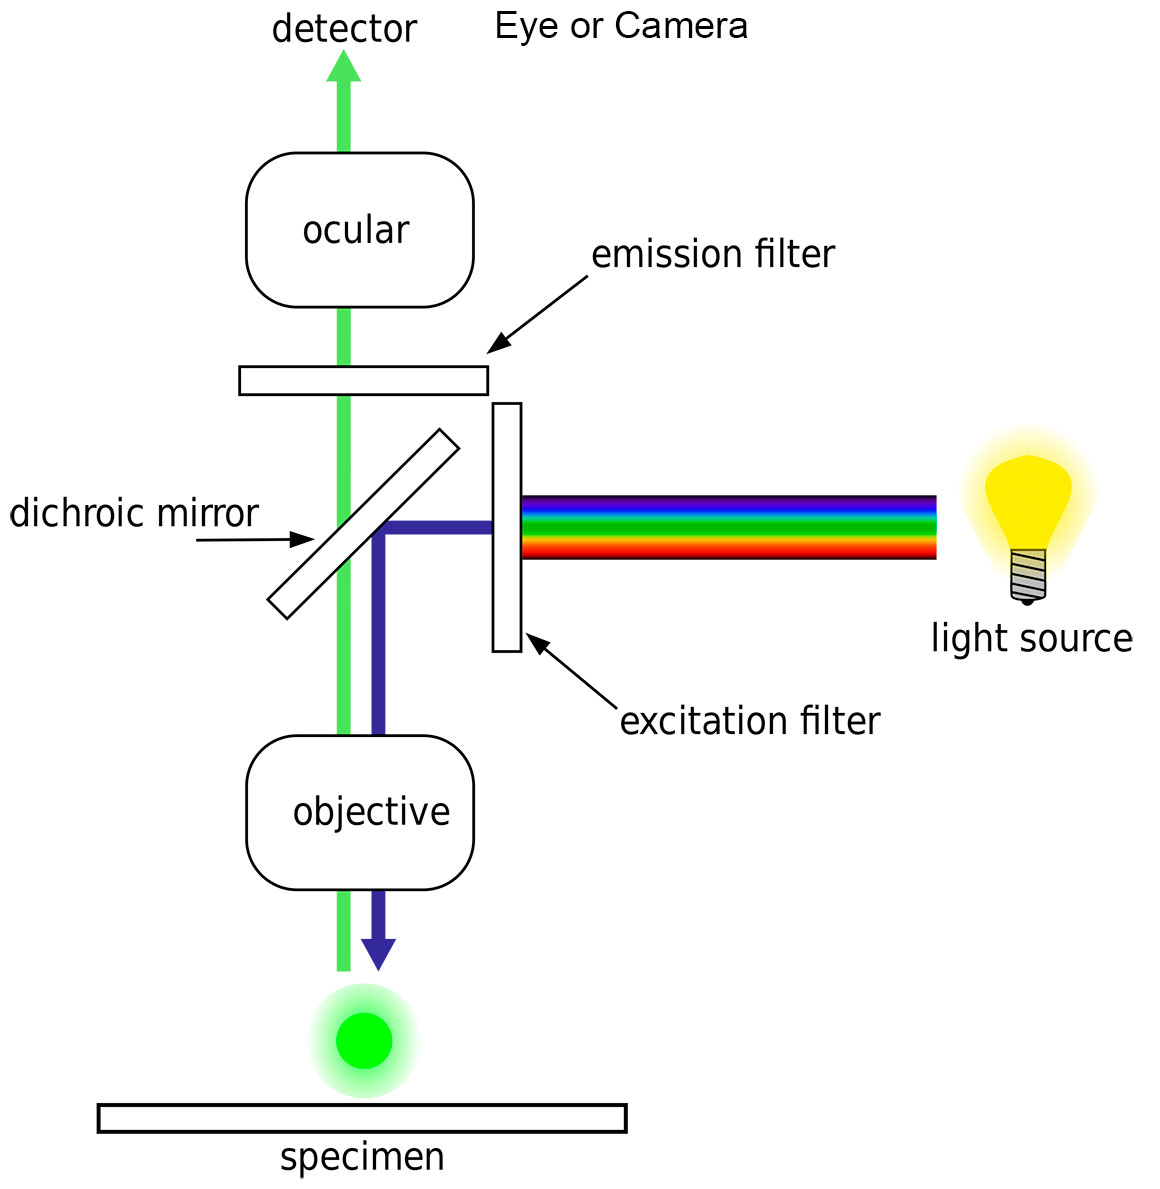
Above diagram by H. Mühlpfordt Wikipedia showing the basic outline of an Epi-fluorescence light microscope. Note the dichroic mirror provides both the excitation filter which permits certain wavelengths to excite the fluorophore and the barrier filter which allows only the passage of longer fluorescent light. These filters are often contained within cubes that can be slid in and out of the light beam inside the microscope.

Amoeba stained with Acridine orange 400X fluorescence microscopy

Rotifer Mytilna sp stained with Acridine orange 200X fluorescence microscopy
Mercury vapour lamps like the Osram HBO 100W are common in wide-field fluorescent microscopes. The bulbs cost about $200 each and require a high voltage power source - the bulbs last only about 200 hours. Their is a timer on the power source that records their usage time. After 200 hours the bulb intensity is reduced and they can potentially explode and are toxic so they should be changed and carefully disposed of as provided in the instructions. When changing the bulb wear gloves, safety goggles and avoid touching the bulb - also pay attention to the + and - ends when installing. The lamps need to be centered using a special objective, and after turning the light on they should be left on for at least 15 minutes. If you should turn them off you should wait at least 10 minutes before relighting. Mercury lamps produce intense light at 184, 254, 365, 405, 436 and 546 nm. The UV light at 184 and 254 nm makes these lamps dangerous so you should never look directly at the light (they are usually housed in special metal shield boxes). Also be sure to have one of the barrier filters in place before viewing. Use of special LED lights is safer and hopefully LEDs for fluorescence microscopy will become cheaper in the future. White LEDs are replacing tungsten bulbs in many of the new microscopes because of their advantages. See article on Tungsten vs LED lighting for microscopy by D. Walker.
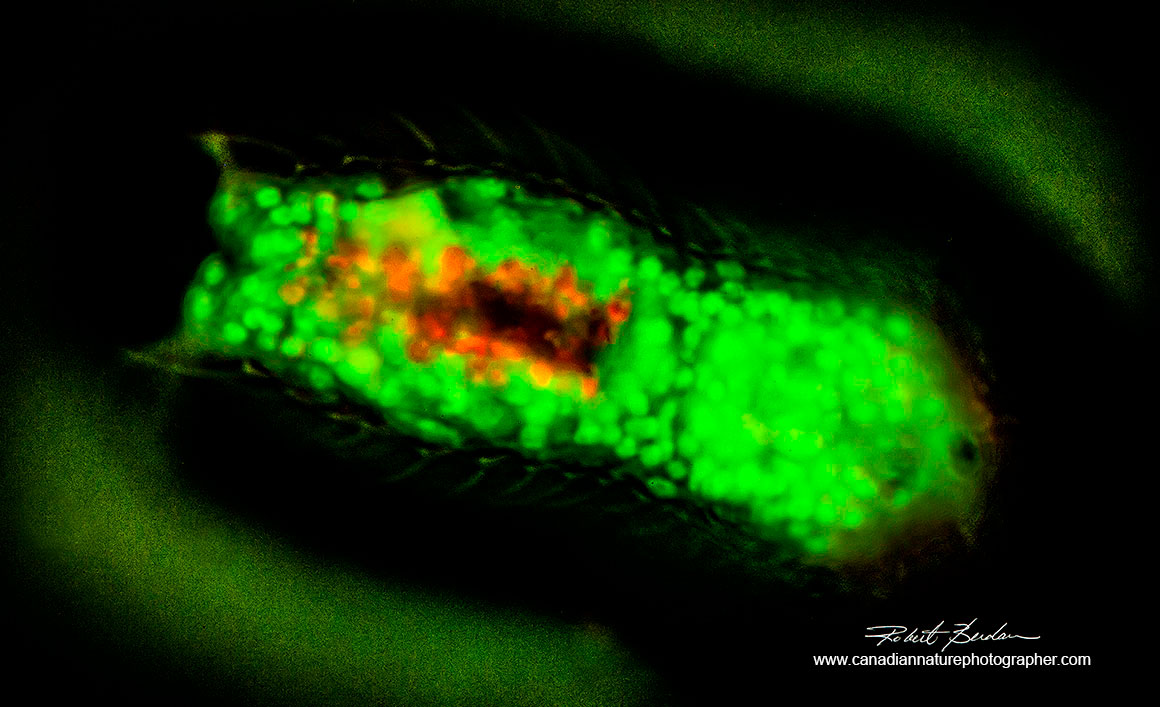
Gastrotrich Chaetonotus sp stained with Acridine orange 400X fluorescence microscopy. The numerous spines on its back are difficult to see in this image but are just barely visible near the top of the picture.

Gastrotrich stained with Acridine orange 400X fluorescence microscopy.
Xenon lamps are also used in some fluorescent microscopes because their emission profile is close to that of sunlight (6000 K) and they are advantageous for some applications in quantitative fluorescence microscopy.
Blue-green algae (cyanobacteria Coelosphaerium sp?) autofluorescence using green excitation 400X fluorescence microscopy
Some wide field fluorescent microscopes use LED lights as these lights can be produced to output a narrow band of wavelengths, can be turned on and off instantly, produce much less heat and can last up to 10,000 hours. Unfortunately at the moment narrow band LEDS for fluorescence microscopes are expensive. Zeiss offers the Colibri LED lighting system (view PDF) for Axioscope microscopes for about $11,000, but there are less costly solutions.

Blue-green algae (Aphanocapsa sp?) stained with Acridine orange 400X fluorescence microscopy. The image resembles atoms in space.
The main advantage of using laser light in fluorescence microscopes is their brightness, the light is polarized, it is also coherent (light is in phase), however their brightness can also be a disadvantage as the light intensity can bleach the fluorophore causing it to fade rapidly. Lasers for microscopy are also expensive. The cost of a confocal microscope can be in the neighbourhood of $250,000 or more and often needs to be matched by an institutional commitment for an annual $10,000 service contract, and or salary support for a technician to manage the microscope. A wide field fluorescent microscopes can cost between $2,000 to $30,000 depending on the features and brand name.
Filamentous cyanobacteria (Phormidium sp?) stained with Acridine orange 200X fluorescence microscopy.

Desmid Closterium sp autofluorescence 100X fluorescence microscopy

Blue-green algae (cyanobacteria) Oscillatoria sp stained with Acridine orange 800X
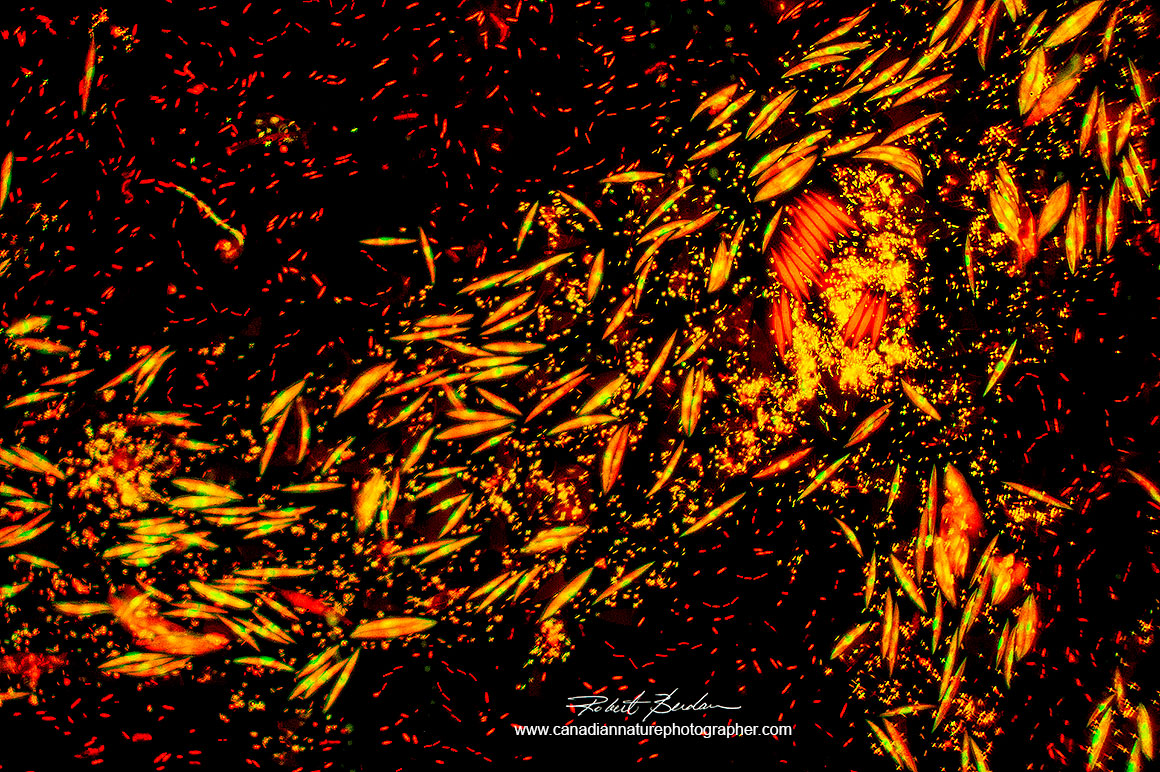
Above bacteria appear as short red rods and algae appear as orange needle shaped objects with yellow nuclei (Elakatothrix viridis?) - stained with Acridine orange 400X Fluorescence microscopy.
Objectives for Fluorescent light microscopy
Objectives are like lenses used for cameras and have different magnification powers (4, 10, 20, 40, 60 or 100X).The total microscope magnification is determined by the objective magnification multiplied by the eyepiece magnification (e.g. 20X objective and 10X eyepiece = 200X). Almost any light microscope objectives can potentially be used for Fluorescence microscopy. Objectives for DIC (differential interference contrast microscopy) and polarizing microscopy work well in my experience. Low power objectives e.g. 4X objective don't seem to gather enough light for good pictures so I often use a 10X objective to take several frames and then stitch them together to form a panorama (e.g. Bedelloid rotifer near the top of the page). The brightest objectives are those specifically designed for Fluorescence microscopy. One of the main determinants of brightness is the objective Numerical aperture (NA) which is printed on the barrel of the microscope objective. The brightness of the light coming through the objective is proportional to the square of the numerical aperture and inversely proportional to the square of the magnification, therefore a small increase in the objective numerical aperture results in a large increase in overall brightness.
The use of immersion oil can significantly increase the numerical aperture (NA) of oil immersion objectives. I replaced my regular objectives with a 10X Nikon Flour NA 0.5; 20X NA 0.75, 40X NA 0.85 resulting in much brighter images. Some objectives can be used with both Phase contrast and fluorescence, but the phase rings will reduce some of the light output. For more information about numerical aperture and different types of objectives see M.W. Davidson and M. Abramowiz (2008).

Rotifer (Lecane sp) stained with Acridine orange 400X Fluorescence microscopy
Nonliving diatom Cymbella cistula stained with Acridine Orange 400X Fluorescence microscopy

Rotifer with head withdrawn - Acridine orange stain 200X Fluorescence microscopy. Rotifers can survive in this state when water evaporates from the pond. This rotifer appears to have two large eggs inside (green ovals).

Rotifer Mytilina 200X stained with Acridine orange Fluorescence microscopy.
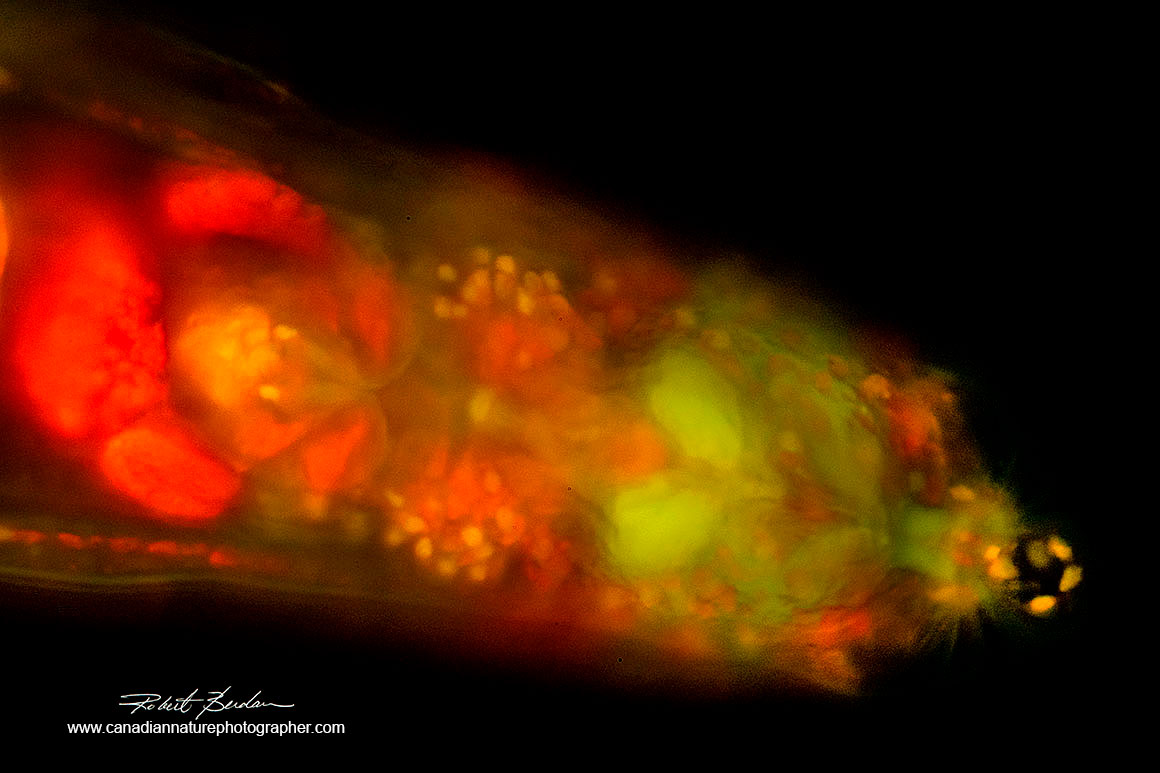
Anterior end of a Bdelloid rotifer stained with Acridine orange 200X Fluorescence microscopy
Fluorescent stains
Light that is emitted by the fluorphores is usually not bright when compared to subjects viewed by other forms of light microscopy. For this reason we usually turn the lights down in the room when using a fluorescent microscope and we require a camera sensitive to low light. Some digital cameras use cooled sensors to reduce electronic noise. Digital cameras are far more sensitive to low light then film and my DSLR (Digital single lens reflex) cameras are very efficient for capturing low light subjects. Below is a video of live fluorescent stained paramecium swimming which requires 1\30 second or faster exposure time to shoot at 30 frames per second.
Live Paramecium stained with Acridine orange and viewed with a wide field fluorescent microscope. To take this movie I set my camera to ISO 10,000 to achieve minium 1\30 of second exposure to capture the movie at 30 frames per second. Alternatively you can watch the video on YouTube.
Modern DSLRs have excellent low light sensitivity, but they are not as sensitive as some of the cameras specialized for low light. One of my research video cameras made by Hamamatsu could record images of cells injected with a fluorescent dye that was so dim that human eyes could not see anything through the scope. Similarly DSLR cameras are more sensitive to low light than the human eye. When photographing the Northern lights my cameras can record faint colours that are not visible to my eyes. Likewise a good digital camera can see fainter objects viewed in a fluorescent microscope. A key factor in photography is also the size of the sensor and the size of the pixels that make up the sensor - bigger is better. Most DSLRs use larger sensors then those in dedicated microscope cameras and cell phones. The best sensors are 1 inch in size or larger.
Some dedicated science cameras are monochrome capturing black and white images using three different channels (RGB) which are then combined using software like Image J or Photoshop. These cameras are more colour sensitive, but require 3 separate exposures. Many of the dedicated microscope cameras use small sensor chips such that researchers can only make prints up to about 8 x 10 inches in size which is fine for science publications. I prefer using a DSLR camera as I can make very large prints if I choose to. Many authors claim CCD (charged coupled device) sensors are the best ones to use, but the newer CMOS sensors are faster, produce less noise and have better dynamic range in my experience. No one has published a direct comparison between dedicated cameras and DSLRs, however in my tests most DSLR cameras offer higher resolution, lower cost and the ability to further enlarge the images. They also produce RAW files which permit altering the exposure, correcting white balance and deconvolution which reduces haze and out of focus blur (see further below).
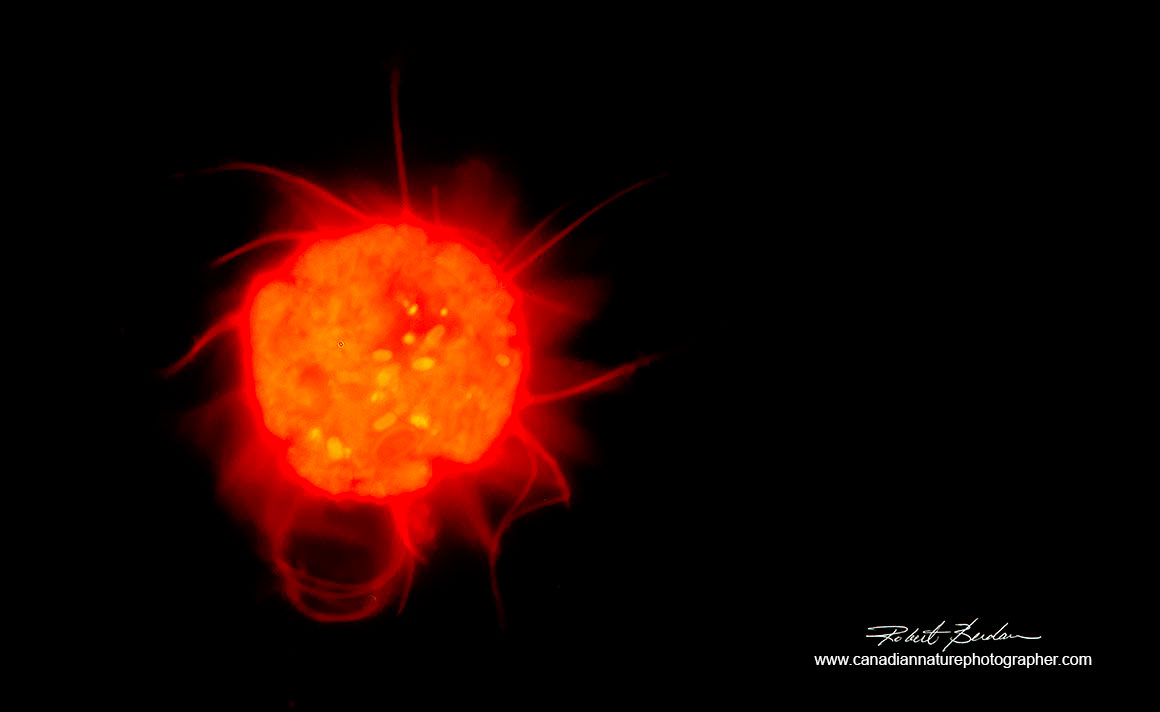
This sun-like looking organism is a ciliate Halteria sp stained with Acridine orange 800X Fluorescence microscopy
One of the problems with fluorescence microscopy is fading of the fluorophore caused by the excitation light. Some fluorophores are more sensitive to irradiation then others and their fluorescent intensity can drop in seconds. One way to reduce fading is to mount the subjects if possible in an antifading agent. I use n-Propyl gallate (Giloh and Sedat, 1982) in glycerol for antibody staining which reduced fading by a factor of 10. There are other effective antifade agents. A common one is citifluor based on p-phenylendiamine in glycerol\water 75%\25%, but it does not work well with Rhodamine dyes in my experience. The glycerol raises the refractive index of the medium close to that glass (RI= 1.5) which can also reduce spherical abberation and may improve image contrast.

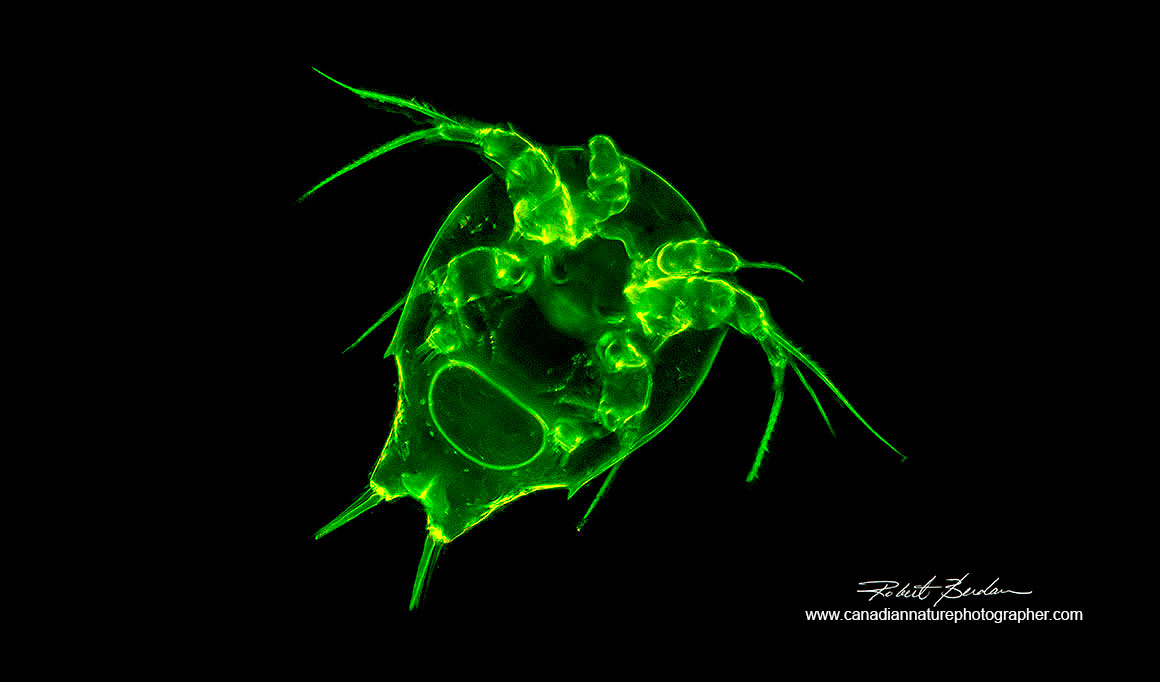
Cladoceran Chydorus sp stained with Acridine orange, blue excitation 100X Fluorescence microscopy.

Cladoceran Chydorus sp stained with Acridine orange, green excitation 100X Fluorescence microscopy.
Another factor that is important to consider is the concentration of the fluorescent stain. Each stain has an optimum concentration. Sometimes too high a concentration causes quenching which results in a decrease in the fluorescent intensity. Also when using live specimens the irradiation of the specimens with UV, blue or infrared light can damage or kill the specimen and the fluorescent probe can sensitize the organism or cell further to irradiation.

Side view of copepod (Cyclopoid) stained with Acridine orange 100X Fluorescence microscopy with 2 red staining egg sacs on the dorsal surface.

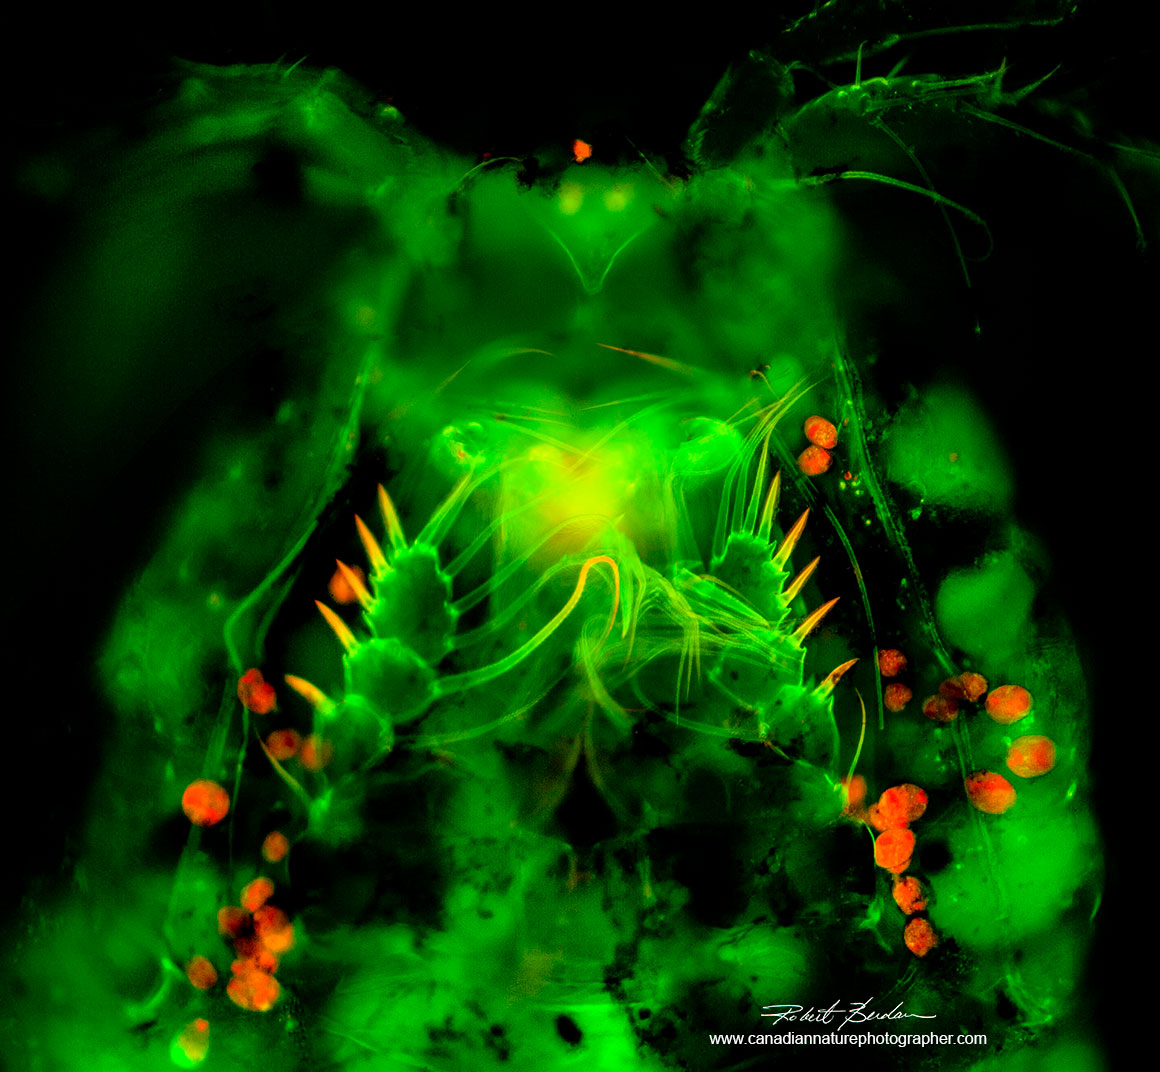
Cyclopoid dorsal section showing the head after staining with Acridine orange fluorescence microscopy 200X.
Ventral surface of Cyclopoid after staining with Acridine orange 200X Fluorescence microscopy - note the single eye at the top of the picture which gives rise to their common name "Cyclops".

Cyclopid eggs stained with Acridine orange 200X Fluorescence microscopy.
Cyclopoid nauplius shell stained with Acridine orange 200X Fluorescence microscopy.
Acridine Orange
In my previous article on rotifers I present information about Acridine orange and more details about this dye. For information about Acridine orange and its use in flourescence microscopy read the mini review by V. A. Byvaltsev et. al. (2019). I used Acridine orange at a concentration 1 µg/ml or less. Most protists survive in low concentratons of Acridine orange for at least several days. Higher concentrations can kill Stentors within minutes and they round up as shown below.
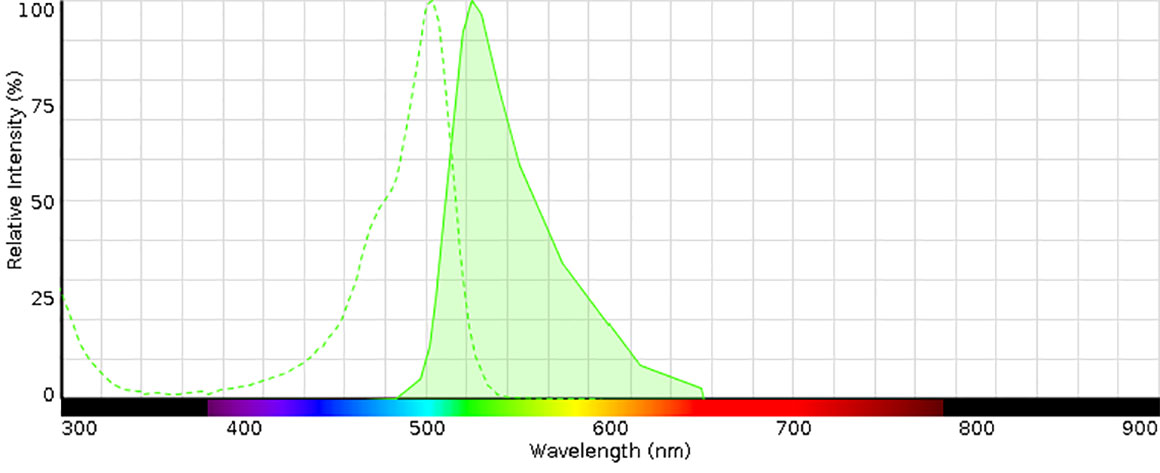
Acridine orange excitation and emission spectra - excitation max approx 502 nm and emission max about 525 nm. (Diagram from Thermo Fisher Scientific - used for educational purposes).
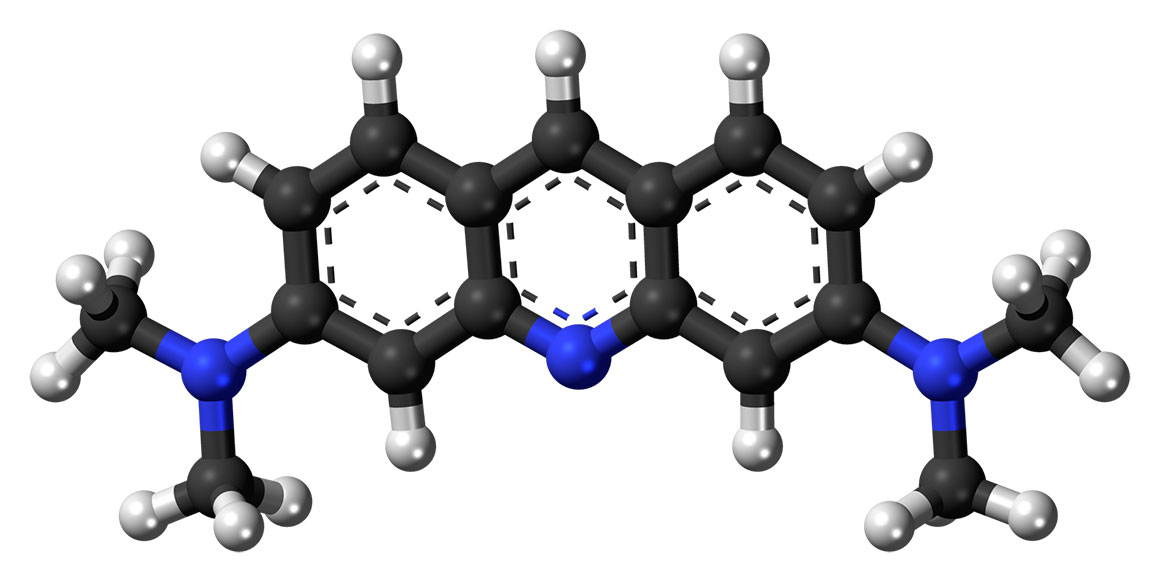
Acridine orange molecular structure by Jynto - Wikipedia.
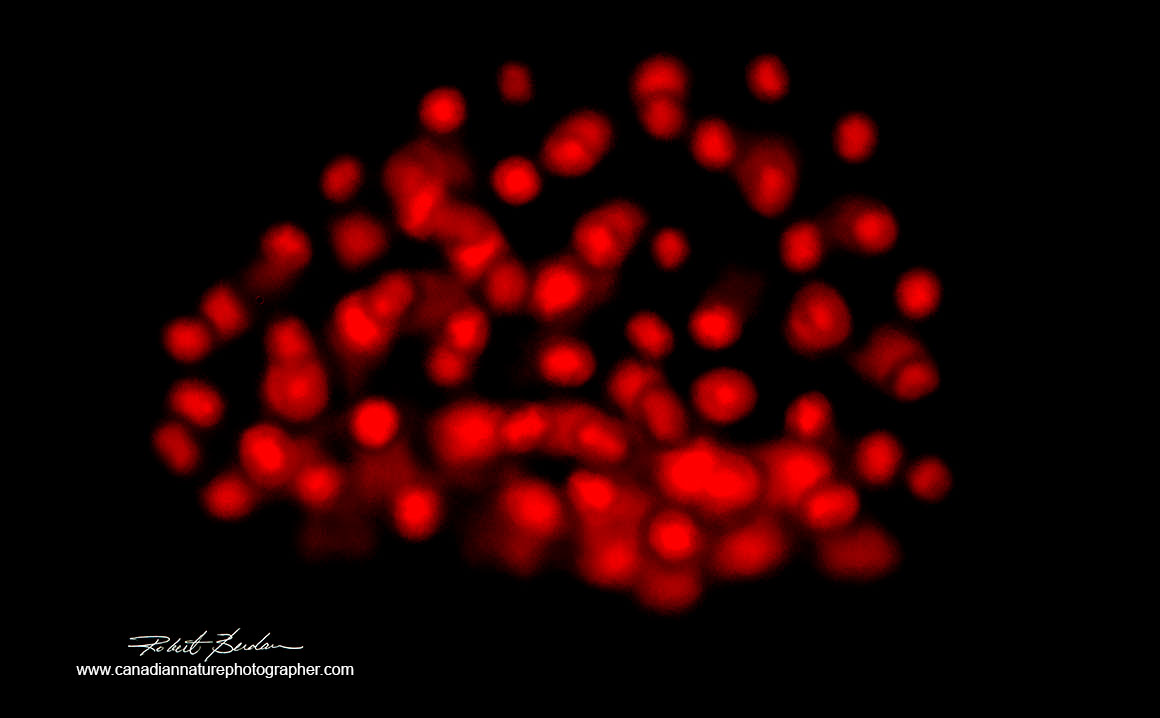
 Dead protist Stentor coeruleus stained with a high concentration of Acridine orange 100X Fluorescence microscopy.
The emission colours of Acridine orange vary depending on whether the organisms are dead or alive , pH and the stain is used to assess viability of rotifer cysts (Shatilovich et. al. 2015) and other cells. In dead, stained or fixed cells the nucleus and DNA appears green to yellow and RNA appears red. In live cells nuclei and some of the cytoplasm appears green and lysosomes appear orange in colour - see below.

Live Stentor coeruleus stained with Acridine orange 100X Fluorescence microscopy. The macronucleus is green and appears like beads-on-a-string. The reddish-orange stain is most likely lysosomes (digestive vacuoles) that have an acidic pH.

Stentor coeruleus Macronucleus stained with Acridine orange 600X Fluorescence microscopy. Some of the orange stained material is not round and may be something other than lysosomes.
Deconvolution and removing Out of Focus Blur from Fluorescent Images
One of the problems with fluorescence microscopy is the contribution of out of focus components that add blur and haze to the image. This contribution is greater for thicker specimens and it is recommended that wide field fluorescence microscopy should only be used on specimens 30 microns thick or less for optimum results. The specimens I used below were generally less then 30 microns thick as determined by fine focusing from top to bottom of the specimens - the Nikon Optiphot offers fine focus control of 1 micron per division (instruction manual PDF).

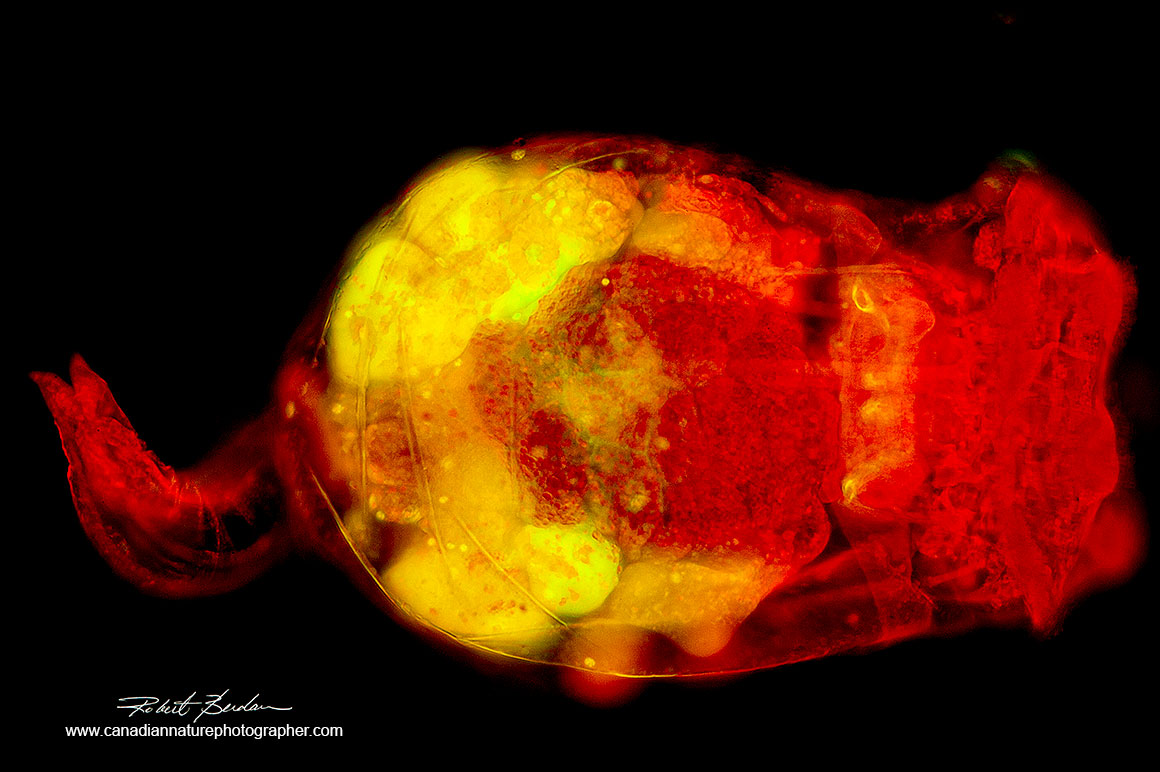
Rotifer Brachinous manjavacas RAW image unprocessed 20X Nikon Fluor objective NA 0.75. Note the out of focus blur and glow around this rotifer stained with Acridine orange - Fluorescence microscopy 200X
Above Brachionus manjavacas stained with Acridine orange and viewed in a fluorescence microscope 200X with blue excitation light. This image was processed using Adobe Photoshop Camera RAW using Texture, Clarity and Dehaze sliders. Once the image was opened in Photoshop I adjusted levels and cleaned up sensor dust spots and debris on the background.

Blind Deconvolution in Image J software
In this image I split the image into three channels using Image J and preformed a blind Deconvolution and reassembled the individual channels. I then cleaned up the background in Adobe Photoshop. The image has more digital noise, and a reduced tonal range. It is called Blind deconvolution because it estimates the Point Spread Function (PSF is a measure of the 3 D optical blur and diffraction). On confocal micrscopes one usually measures the PSF using subresolution fluorescent beads and this data is used in the Deconvolution processing.

This image underwent blind deconvolution image processing in Huygens express (free trial version). This image is similar in appearance to that from Image J - a gritty appearance and reduced blur. Note it also has a lower tone range then the image processed in Photoshop.
My images above are from a single image not a stack of images. Images taken with a confocal microscope usually have additional meta data embedded in the image files e.g. Z stack thickness, Point spread function data, objective numerical aperture and magnification that are used in the deconvolution process.
Free Online Deconvolution with Nikon NIS Elements.
I found that Nikon offers a Free Online Deconvolution where you load a TIF file, enter some data - Modality: Widefield, Objective magnification 20X, Objective NA 0.75, Immersion fluid refractive index (1.3 for water) and a Calibration (start with 1.0) - the site will process the flourescent image which you can download. https://deconv.laboratory-imaging.com/process - I will need to experiment with the settings and look into the NIS-Elements software further, but anyone can try deconvolution with this free online solution by uploading a .TIF file. In this software its not clear if magnification refers to total magnification or objective magnification, but I entered both and got similar results (I recommend using objective magnification) and the calibration numbers can be 0.5 to 2500 and refer to the xy spacing values micrometers-per-pixels (try 0.1, 1 and 10).

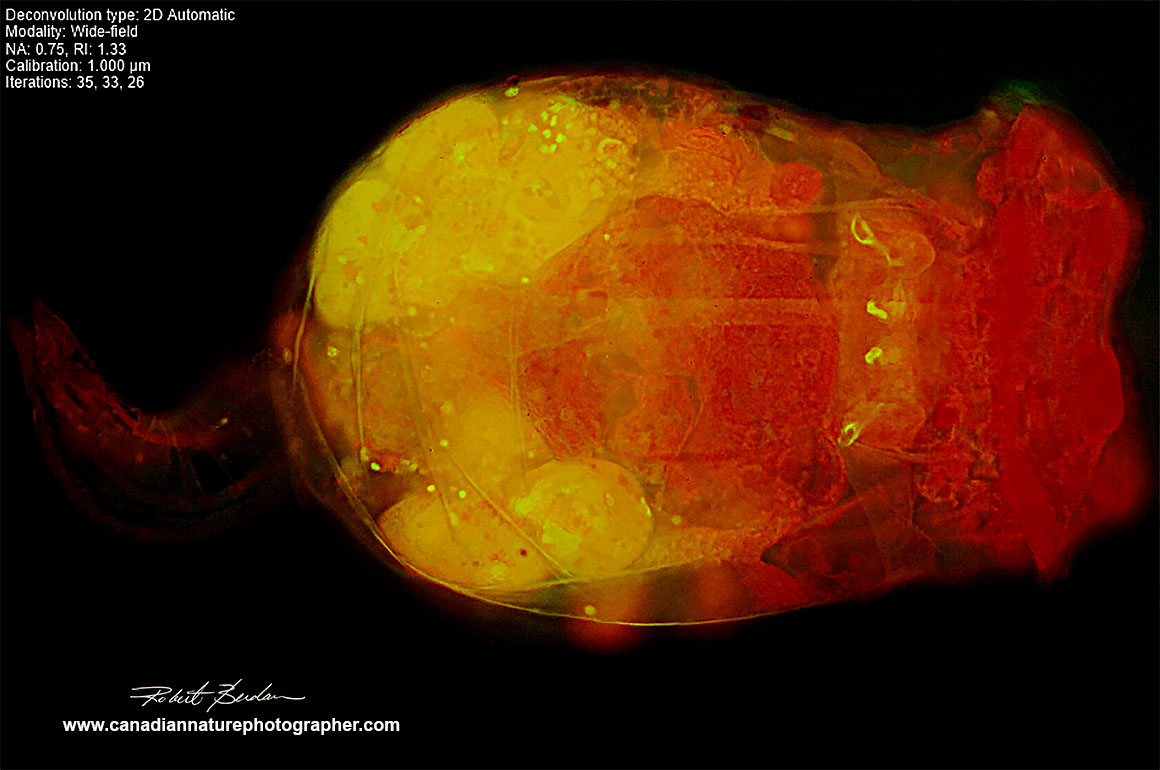
Above image processed with the online NIS elements Deconvolution, opened in NIS elements viewer, converted to .jpg file, then I used Photoshop to adjust levels and sharpen. NIS elements https://deconv.laboratory-imaging.com/process To view the images you may need to download and use the free Nikon NIS Elements Viewer or take a screen shot and save as .jpg file.

Above is a Peritrich ciliate Vorticella sp without its stalk with a large macronucleus (yellow) 400X stained with Acridine orange. The image was processed with Adobe Camera in Photoshop CC 2020 to remove out of focus blurr and haze.
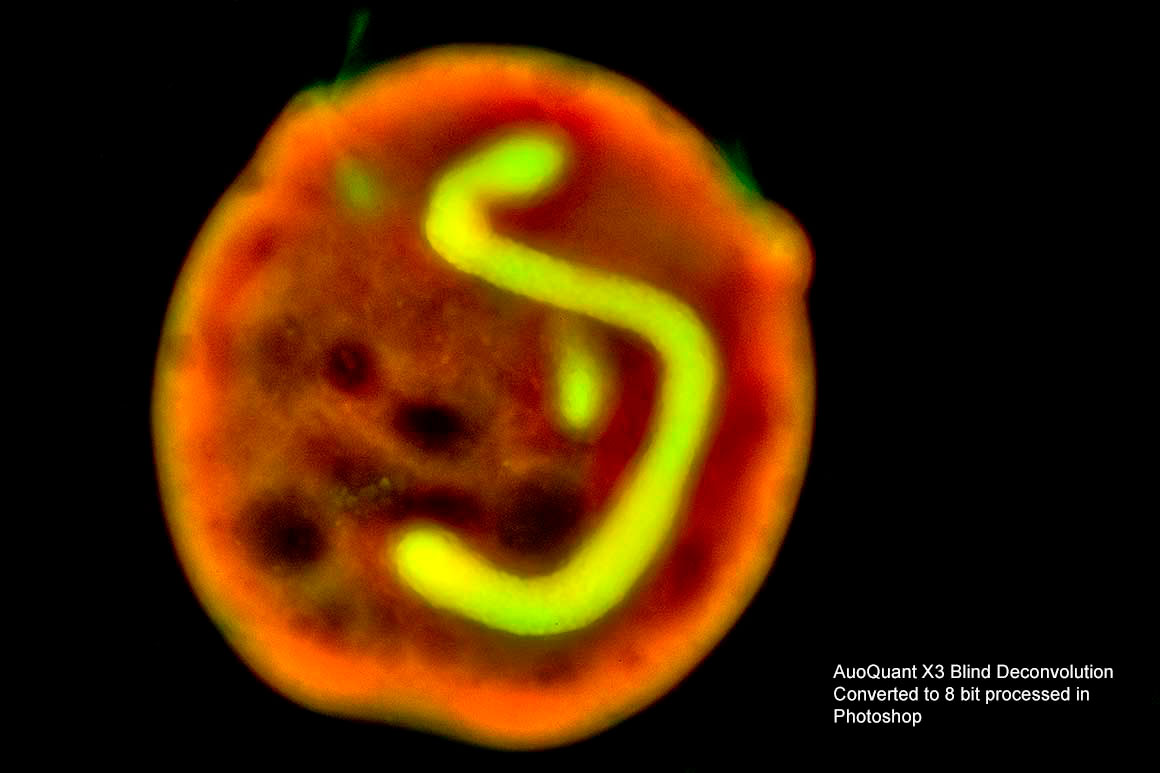
Above the same Petrich processed with Blind Deconvlution in AutoQuant X3. This is a research program costing thousands of dollars though you can request a free trial.

Above is Chydorus sp (Cladoceran) where I compare images procecessed with AutoQuant X3.1 - a research software program that offers Blind Deconvolution. I am using a trial version, it is easy to use, documentation is excellent and deconvolution on my computer is fast usually under one minute. In blind deconvolution you process the image using various algorithms apllied in an iterative maner. I applied 10, 20, 30, 40 interations and also processed the RAW file using Adobe Camera RAW at the far right in the picture. These are my preliminary results, but show that Photoshop processing is sometimesas good or then the dedicated programs and all the images need some final processing in Photoshop anyway.

Mamalian cells in culture stained for filaments and nuclei comparing AutoQuant X3.1 and Photoshop CC 2020. There AutoQuant image (center) has more contrast but there seems to be better finer detail in the fluorescent stained filaments with the Photoshop processed image. (Images above and below were provided with a free trial version of AutoQaunt).

Mamalian cells in culture comparing unprocessed, Photoshop processed and AutoQuant X
I am comparing various Deconvolution software to see which is best for removing out focus blur and haze from Epi-flourescence images taken with a wide field microscope. In some tests I have also tried deconvolution software to sharpen Darkfield and Phase contrast images. I have had some success with dark-field microscopy images, but not with Phase contrast images. All of these results are preliminary as I test different programs.
Amoeba stained with Acridine orange 400X Fluorescence microscopy.

Paramecium caudatum stained with Acridine orange 200X Fluorescence microscopy.
167.jpg)
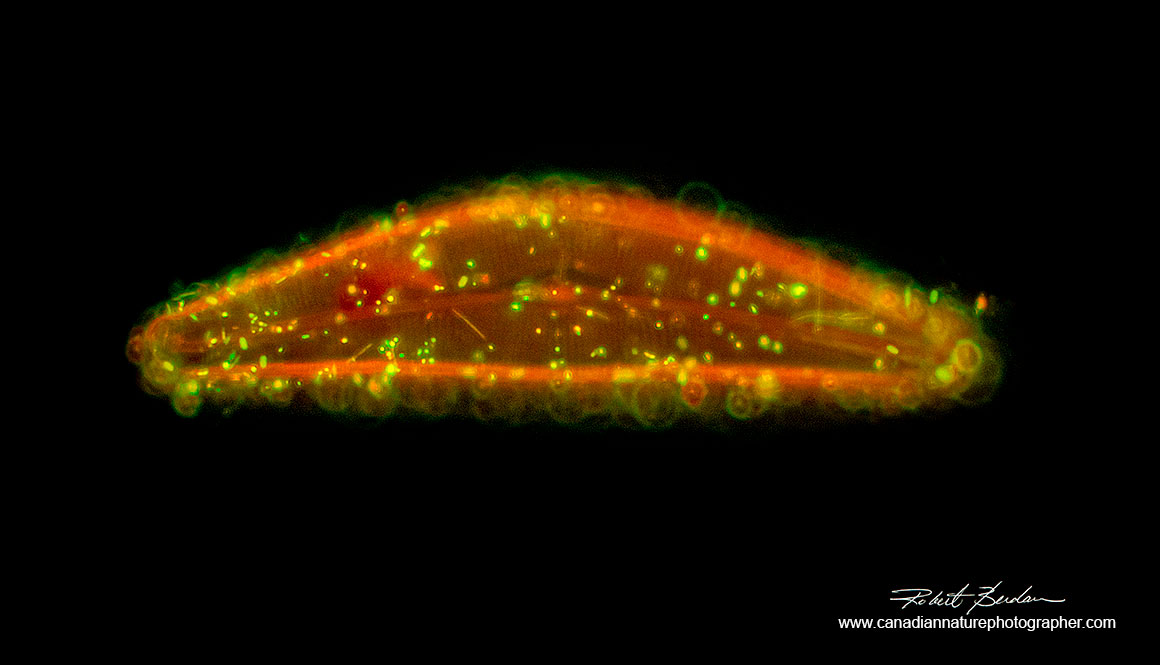
Paramecium caudatum stained with Acridine orange 400X fluorescence microscopy - note part of the contractile vacuole at the top of the paramecium (arrows). The orange staining spots are possibly lysosomes (digestive vacuoles) and they appear more abundant in the anterior and posterior ends of the paramecium.

Unidentified ciliate stained with Acridine orange 400X Fluorescence microscopy - Photoshop deconvolution.
Testate amoeba (Euglypha sp?) with shell stained with Acridine orange 400X Fluorescence microscopy - Photoshop deconvolution.
Notes on Photomicrography
To photograph fluorescent stained subjects I used a Nikon D500 camera (24 Megapixels) most of the time, and a Nikon D700 (12 Megapixels). I shoot RAW image files and mp4 movies. Most of the time I set the ISO speed to 400-800 for routine fluorescence microscopy work and for movies I used ISO 10,000. I process the RAW image files and movies in Adobe Photoshop. It is possible to reduce blur and haze in Photoshop by doing deconvolution sharpening (Greg Benz Deconvolution sharpening in Photoshop - YouTube and Website). I usually use a combination of Texture, Clarity and Dehaze in Camera RAW and then adjust levels and sharpening inside Photoshop. Stacking images sometimes helps but Photoshop is not always able to align the blurred images into a stack effectively possibly because of the out of focus blur.

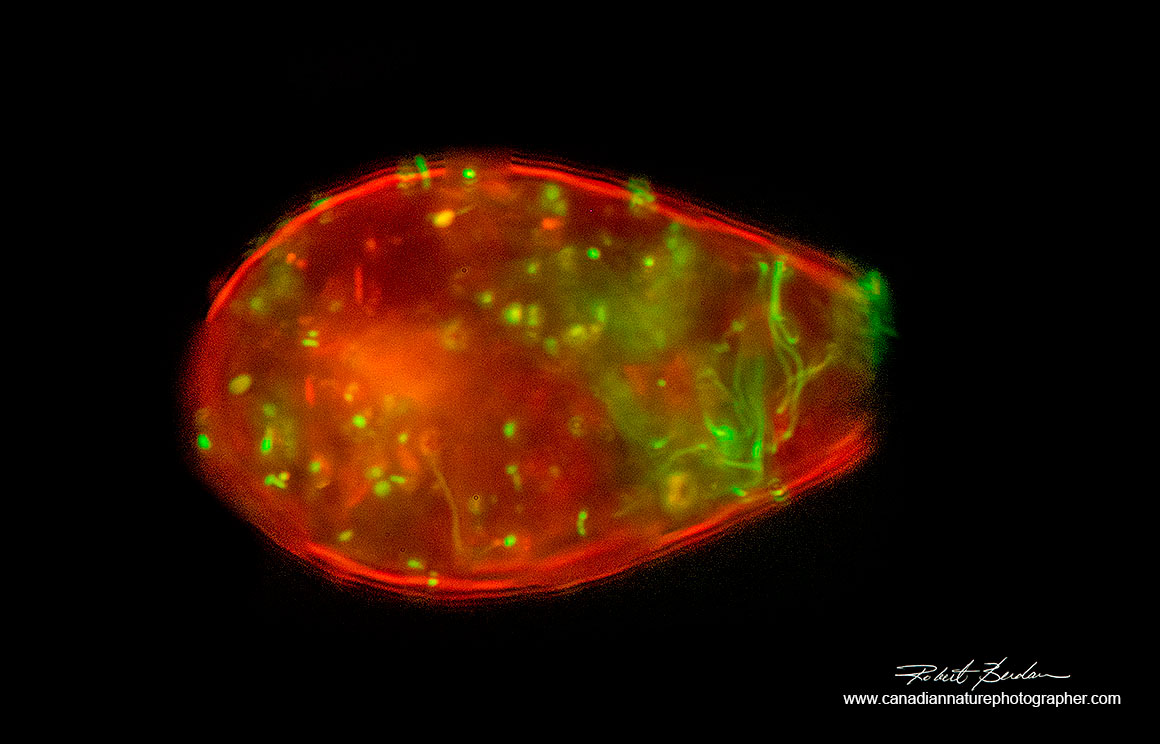
Nematode stained with Acridine orange 100X Fluorescence microscopy

Snail embryo Lymnaea stagnalis stained with Acridine orange 50X Fluorescence microscopy.
Aquatic earth worm (Oligochaeta) side view of anterior region stained with Acridine orange 100X Fluorescence microscopy. A feature of oligochaetes is the small bristles and hair-like projections from the body wall.

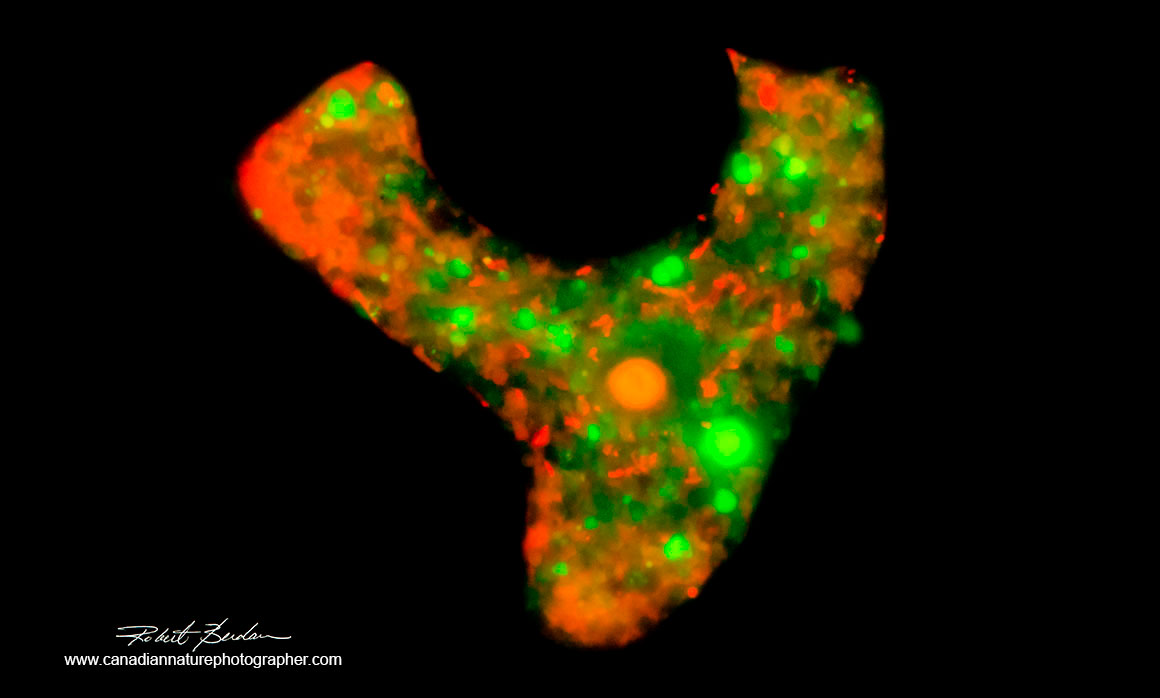
Chaetogaster worm (green) and paramecium (red) - Acridine orange 100X Fluorescence microscopy - composite image.

Aquatic worm stained with Acridine orange note the green nuclei 200X Fluorescence microscopy.

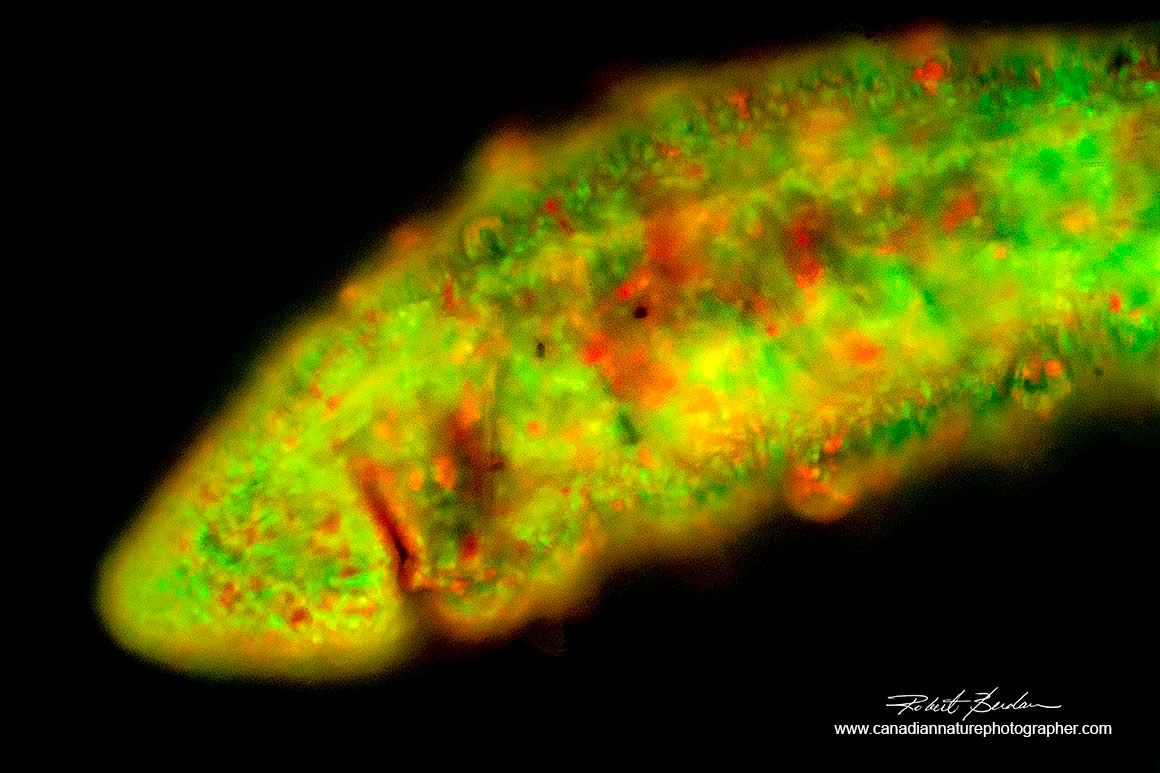
Posterior end of worm (Dero digitata - Naididae family) showing individual cells - stained with Acridine orange 200X Fluorescence microscopy - Photoshop Deconvolution.
Summary
Fluorescence microscopy is a sensitive technique for detecting different components in cells using various flourophores and can localize membrane receptors, nuclei, mitochondria, and lysosomes. In fact super resolution microscopy is a form of fluorescence microscopy that can even detect single molecules within or on cells. On October 8, 2014, the Nobel Prize in Chemistry was awarded to three scientists: Eric Betzig, W.E. Moerner and Stefan Hell for "the development of super-resolved fluorescence microscopy," which brings "optical microscopy into the nanodimension".
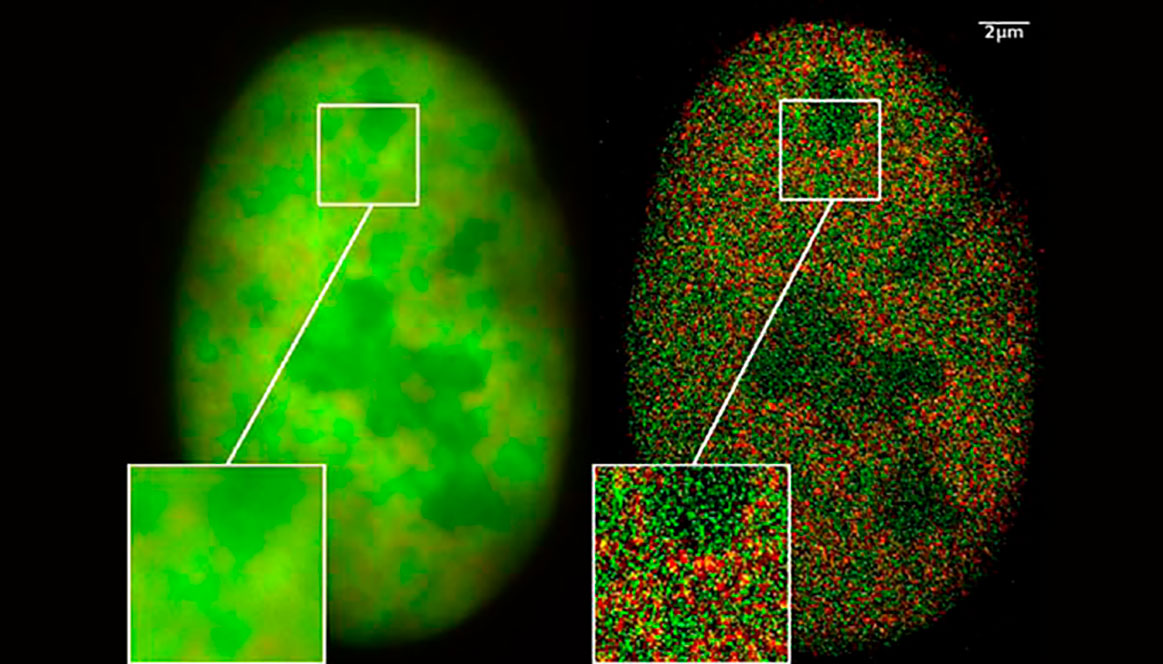
View of a nucleus of a cancer cell: Left using wide field fluorescence microscopy and Right using super resolution two Color Localization Microscopy. The right image shows individual histone molecules in the nucleus. Image by C. Cremer published in Biotechnology Journal, 2009, 4, 927-938. From Wikipedia commons.
Wide field flluorescent microscopes are ideal for specimens less than about 30 microns (0.030 mm) thick and with the use of specific fluorescent stains, antibodies and other probes can be used to localize small components within cells. The challenge in fluorescence microscopy is to remove out of focus blur and haze caused by the fluorescent probes and to mimimize noise due to the relatively low light. Some of this can be achieved using software such as Photoshop or special programs which are able to deconvolute and restore the orginal signal. The goal is to produce sharper images with greater clarity and different colours can be used to localize specific components in an organism or cell. I also find the fluorescent images to be artful. Acridine orange staining can reveal some new micro-organisms that might otherwise go undetected by bright field and other forms of light-microscopy and can be used to distinguish between live and dead cells. RB
Yeast cells (Saccharomyces cerevisiae) stained with Acridine orange 800X
Acknowledgments. I would like to thank Dr. Russel Shiel for informing me of some species corrections and updates on rotifer names.
References and Links for Hobbyists, Students and Teachers
Fluorescence microscope - Wikipedia - good introduction
M.W. Davidson and M. Abramowiz (2008) Optical Microscopy for Olympus - excellent overview and introduction to various kinds of microscopy - PDF
Z. Grier et. al. (2017) A low-cost do-it-yourself microscope kit for hands-on science education. SPIE Digital library - PDF
G.A. Babbitt et. al. (2013) Observing Flluorescent Probes in Living Cells using a Low-Cost LED Flshlight Retrofitted to a Common Vintage Light Microscope. J. Microbiology & Biology Education. May 2013: 121-124 - PDF
F. J. Siemensma Microworld - world of amoeboid organisms web site - Testate amoeba and many other amoeba types - excellent photography.
B. Taylor It Came from a Pond - a web site specializing in information about Ciliates.
Jbumsteadh Halfwave labs Low-cost Fluorescence and Brightfield Microscopes - video and PDF download.
M. Hasan et. al. (2016) A Low-Cost Digital Microscope with Real-Time Fluorescent Imaging Capability. PDF
C. Stewart and J. Giannini (2017) Introducing Students to Epifluorescence Microscopy Using the OPN Scope to Examine Leek Root Tips Stained with Acridine Orange - PDF
EPI Fluorescence Kits from Motic North America for BA410 microscope
EPI Fluorescence Microscopy Kit for Compound Microscopes AM systems
References for University students, Researchers and Microscopy enthusiasts
M. Sticker et. al. (2020) How to Get Better Fluorescence Images with your Widefield Microscope - A Methodology Review. Zeiss. Show results with Adobe Lightroom vs. Zen Lite Deconvolution software and discusses Pros and Cons - released June 4, 2020 - download PDF
V. A. Byvaltsev et. al. (2019) Acridine Orange: A Review of Applications for Surgical Cancer Imaging and Therapy. Front Oncol. 2019; 9: 925 - Mini review PDF
J. C. Stockert and A. Blázquez-Castro (2017) Fluorescence Microscopy in Life Science. Bentham Science Publishers Ltd. - Book available from Amazon ~$200 (reference book suitable for grad students and scientists).
A. Shatilovich et. al. (2015) Ciliates from ancient permafrost: Assessment of cold resistance of the resting cysts. Eurpoean J. of Protistology. 51 230-245. Used Propidium iodide and Acridine orange to assess ciliate cyst viability in permafrost - PDF
D.J. Webb and C.M. Brown (2013) Epi-Fluorescence Microscopy Methods in Mol Biol: 931: 29-59 - PDF (good overview).
The Molecular Probes Handbook - A Guide to Fluorescent Probes and Labeling Technologies 11th edition from Invitrogen\Thermo Fisher - free to researchers. In depth guide to different fluorescent probes.
J.B. Pawley ed. (2006) Handbook of Biological Confocal Microscopy 3rd edition. Springer Verlag - you can download chapters as PDFs for free. Book available from Amazon.ca from $159 and up (985 pages full colour - excellent reference book).
Fluorescent Proteins 101: A Desktop Resource - ebook free.
J. R. Swedlow and M. Platani (2002) Live Cell Imaging Using Wide-Field Microscopy and Deconvolution. Cell Structure and Function 27:335-341.
P. Wendykier (2009) Parallel Iterative Deconvolution 1.9 User Guide - and Image J Plugin.
Parallel Iterative Deconvolution plugin for Image J - ImageJ web site - free image processing software. Image J\Fiji image processing software - Free to download.
Fluorescence Microscopy at Nikon Microscopy U - see review articles and tutorials & Introduction to Fluorescence microscopy.
Nikon Epi-Fluorescence "TMD-EF" manual for Inverted Microscope Diaphot-TMD - PDF
Osram 100W/2 mercury short arc lamps - $190 each from BulbAmercia.com
H.Giloh and J. W. Sedat (1982) Fluorescence Microscopy: Reduced Photobleaching of Rhodamine and Fluorescein Protein Conjugates by n-Propyl Gallate, Science. Vol217: 1252-1255 - abstract and PDF.
Nikon NIS Elements software - free Online Deconvolution anyone can try
Autoquant Deconvolution software for 2D and 3D Blind Deconvolution - free trial
D. Sage et. a. (2017) DeconvolutionLab2: An open-source software for deconvolution microscopy. Methods 115, 28-41 - PDF
Blind Deconvolution with wide field microscopy - Leica web site
F Soulez et al (2012) Blind field Deconvolution of 3D data in wide field flourescence microscopy - PDF
F. Soulez (2013) A "Learn 2D, Apply 3D" Method for 3D Deconvolution Microscopy - PDF
Deconvolution with Image J - web site.
Testate Amoeba - composite image. These Amoeba were stained with Acridine orange and it shows variability in staining of testate amoebae 400X.
Note: Educators and students may use my images for reports and teaching, all other uses or for commercial use please contact me. I appreciate attribution and a link back to my web site. Note magnifications are approximate - 100X means taken with 10X objective, 200X with a 20X objective, 400X with a 40X objective.
Authors Biography & Contact Information
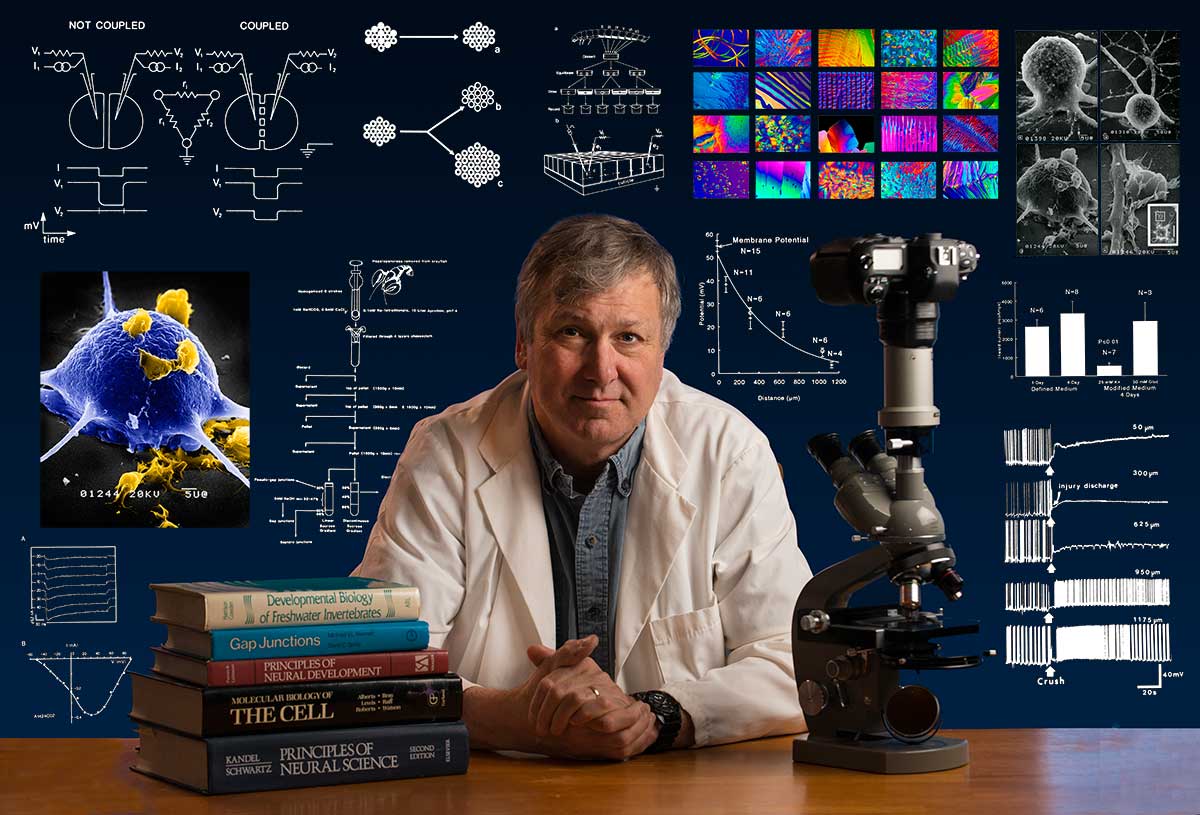
Bio: Robert Berdan is a professional nature photographer living in Calgary, AB specializing in nature, wildlife and science photography. Robert retired from Cell\Neurobiology research to pursue photography full time many years ago. Robert offers photo guiding and private instruction in all aspects of nature photography, Adobe Photoshop training, photomicrography and macro-photography. Portrait of Robert by Dr. Sharif Galal showing some examples of Robert's science research in the background.
Email at: rberdan@scienceandart.org
Web site: www.canadiannaturephotographer.com
Phone: MST 9am -7 pm (403) 247-2457.