Make New Photographs Look Old Using Adobe Photoshop
by Robert Berdan
(for experienced Photoshop users)
There is something about old photographs that has always attracted me. The torn edges, stained areas, scratches and faded look that contribute to their looking old. I am also fascinated with older photographic techniques using metal and glass plates, tin, copper, albumin paper and other substrates. Even the use of a pinhole camera with its dark edges and relatively soft images are intriguing. There are two approaches to making old images, you can get yourself a recipe book and try to locate the materials on the web (see references below) or you can simulate their appearance using photoshop. Obviously simulations will never look quite like images produced using older materials, but it's cheaper, faster and simpler in many cases and -hell its just plain fun. Below are some techniques I have been playing with in Adobe photoshop in an attempt to create some older looking photos. There is no single technique but a vareity of techniques that can be used all of them employ using layers and various blending modes in Adobe photoshop.
In order to simulate the effects of old photos it is imperative to view old photographs, if you can't view originals look at old photographs on the web or in books.
How to Simulate a Daguerreotype or photograph on a metal surface
The Dagguerrotype was the first commercial type of photograph produced by Louis Dagguerre and with Joseph Nicéphore Niépce circa 1830. The image was created on a copper metal plate with a thin coat of silver which is sensitized with iodine and then developed with mercury vapour.
The technique below is based on images and step by step instructions described by Jonathan Penney on his blog at: http://jonathanpenney.blogspot.com/2008/04/creating-your-own-distressed-image.html

1. Use the patch and clone tools in photoshop to replicate the blank background and remove the subjects.

2. Next take the metal photograph and drag it over top of another black and white photograph and change the blend mode on the top layer to hard light. Feel free to experiment with different blending modes.

Layer the metal on top of your picture and change the blending mode in the layers palette to hard light.

Color photograph of waterfalls converted to Sepia print with scratches, fingerprints and polaroid mask.
The steps below are for experienced photoshop users who understand how to use layers, blending modes, masks and how to load new brushes. (For those not familiar these techniques are described in detail in the Online photoshop courses).
For the waterfall photograph above- the original colour image is opened in Adobe Photoshop. Then the following procedures are added.
1. Using an Adjustment layer the image is converted into Black and white and then Sepia color tone selected (Black & White Layer ) .
2. The tones in the photo are optimized using the levels adjustment layer (Levels 1 Layer).
3. A curves adjustment lavyer is added to increase the overall contrast of the photo (Curves 1 Layer ).
4. A polaroid mask photograph (either purchased or created using a scanner) is dragged overtop of the image and the blend mode changed to Lighter color or Lighten (Polaroid mask layer).
5. A new layer is created and using photoshop brushes downloaded from Deviant Art web site. - scratches are painted on this layer using black paint. (Scratches Layer)
6. Another layer is created and finger prints are painted using downloadable fingerprint brushes again from Deviant Art web site. (Layer finger prints).
7. Another layer is created and a photograph of metal with scratches is dragged on top of the image and the blend mode changed to color (Layer Metal texture)
8. Finally a scanned signature is dragged onto the top layer and the signature moved to the bottom corner of the print.
Most of the techiques used to make your images look older involve layering various textures on top of your photos, reducing the colour saturation or converting to black and white or sepia. Also you can add a wide variety of edge effects in photoshop by painting behind the image or inserting your images inside a mask - which can be a polaroid photo, polaroid mask or a mask of a negative or slide.
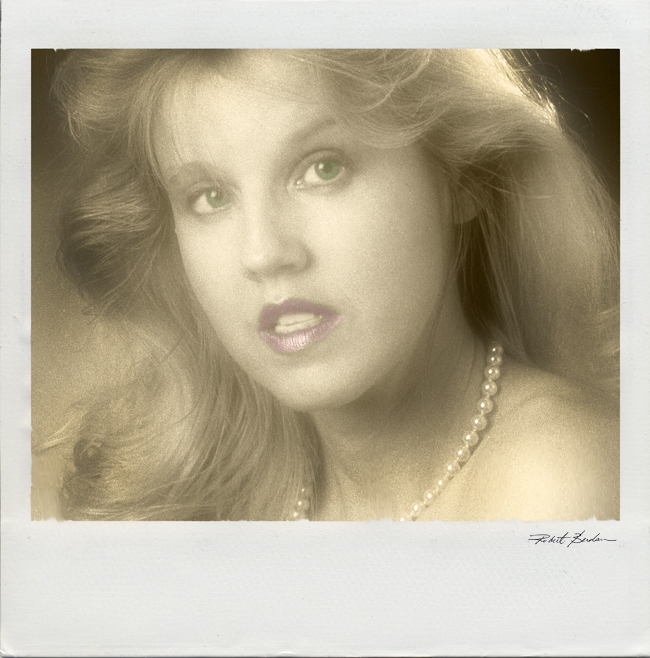
In this photograph I put the model inside the polaroid frame which I scanned from an old polaroid photo. I toned the print brown, added some grain using the noise filter in photoshop then added two layers which I painted (blend mode color) with green for the eyes and pink for the lips.
Hog Bay Trestle 1972 by Robert Berdan - originally photographed on BW Tri-X IS0 400 film. I created a brown background fill with using paper texture, painted a black around the photo on the layer below using a black rough paint brush and then used a grunge brush to add the brown stains in Adobe Photoshop.
Links to additional resources
- Jonathan Penney - Creating your own Distresssed Image Effects
- Fine Art Effects Cookbook - sample chapter -Daguerre Effect
- Photo Transfer Edge Effect
- Deviant Art - source of inspiration and photoshop brushes
- Dan Burkholder - creates artistic images using his iPhone and Adobe Photoshop
- Creating old looking photographs in Photoshop 7
- FREE - Grunge texture photographs you can use to layer onto your photographs
- Alternative photographic processes and techniques
- ChristoperJames web site - alternative photographic processes
Recommended Books showing old photographs and describing techniques to create them


Photoshop book
[ Top ]