
Tips on How to Take Better Pictures with a Microscope - Photomicrography
Dr. Robert Berdan
June 6, 2018
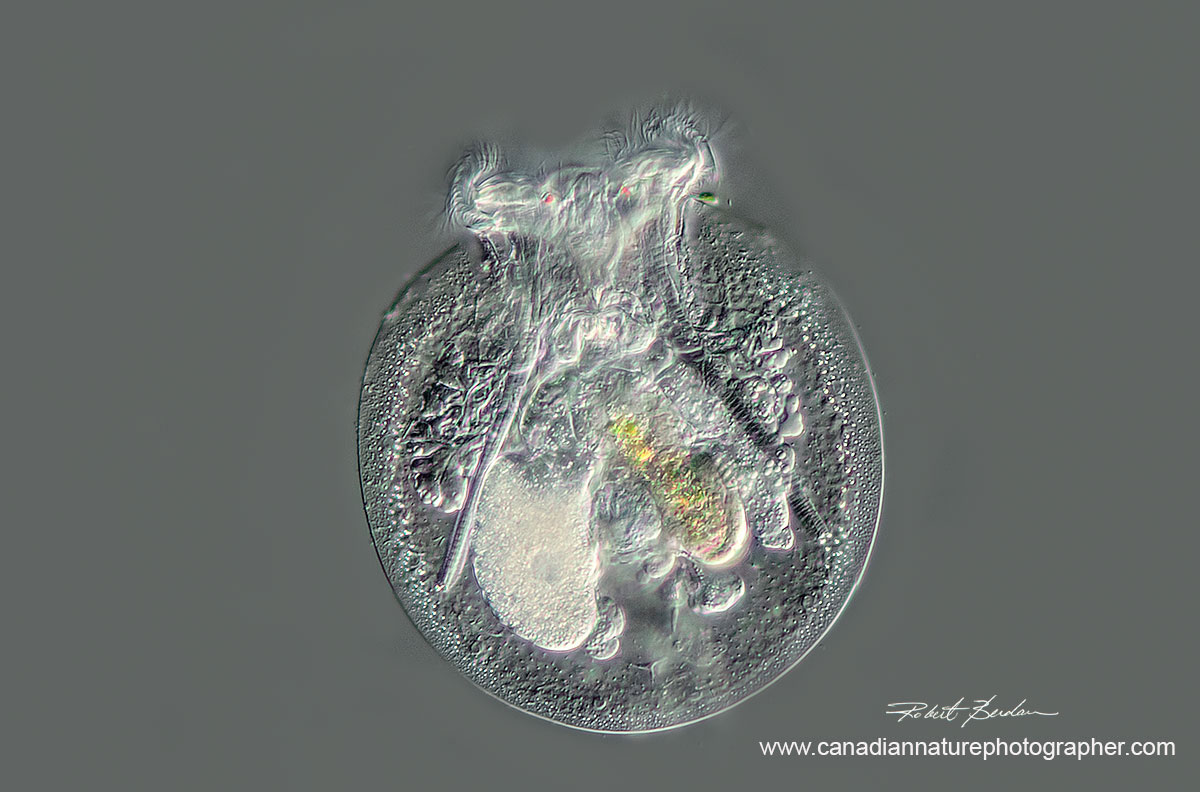
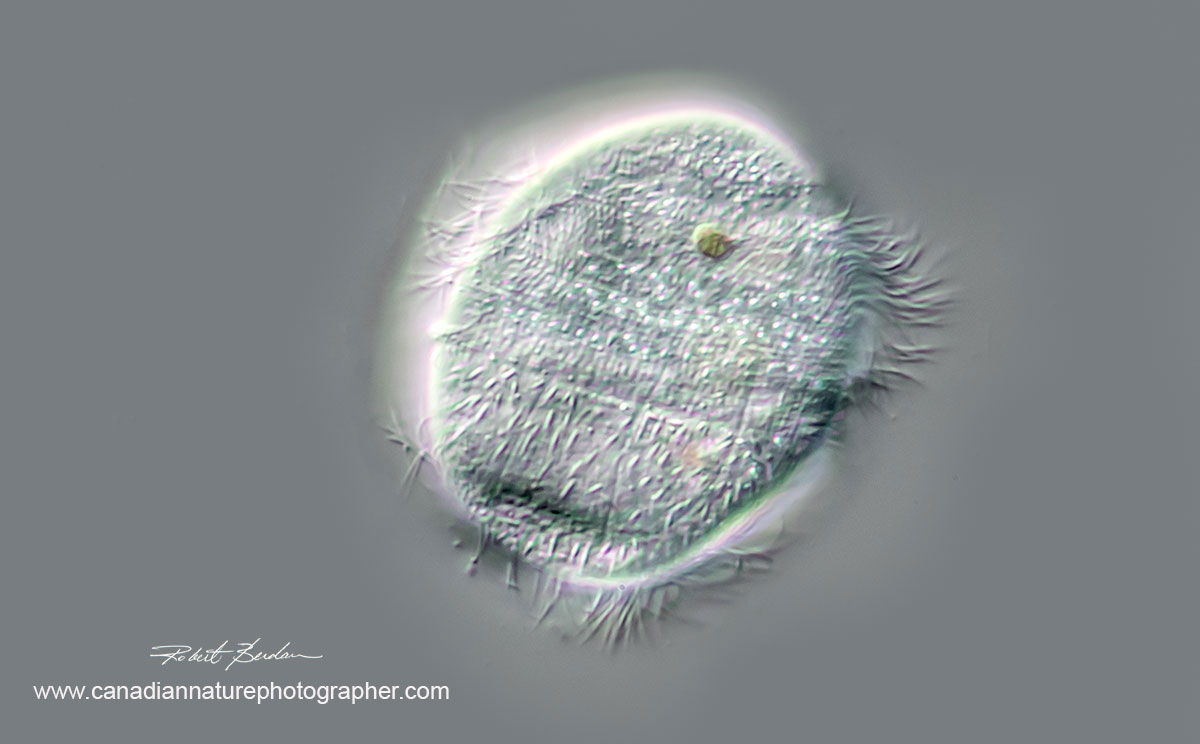
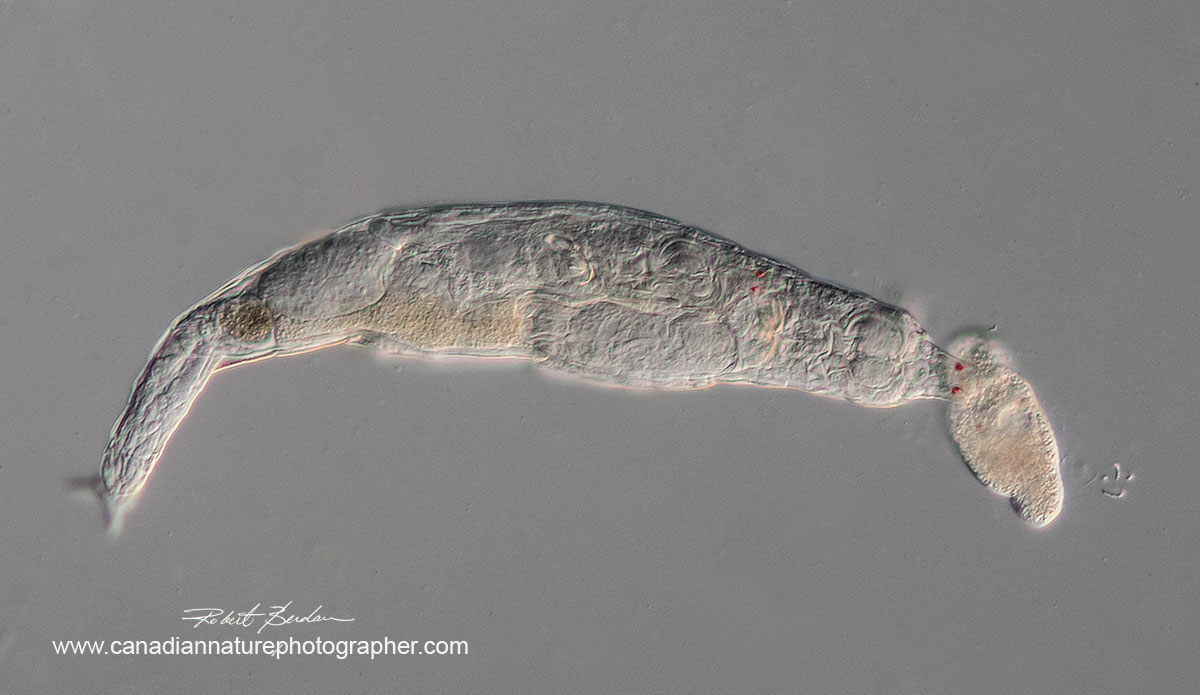
Rotifer Testudinella patina ventral view (turtle rotifer) - 200X DIC microscopy
stack of 4 images.
Watch video of this Rotifer by Dr. Ralf Wagner on YouTube.
In this article I share some tips on how to take better photomicrographs with a light microscope. A light microscope can magnify specimens 10 to 1500X but beyond that the wavelength of light limits the resolution. Most microscopes with good optics are able to resolve objects down to about 0.2 microns or 0.0002 mm (about half the wavelength of green light). That's good enough to see and photograph cells and bacteria but not viruses. There are new super resolution light microscopes that can resolve objects smaller than this, but these microscopes are only available at research institutions and cost more then a house. Affordable light microscopes can be purchased between $100 to $1500. Microscope camera adapters start at $20 and go up to about $1000 and there are also adapters for cell phones. Amazon sells an iPhone adapter for $20.
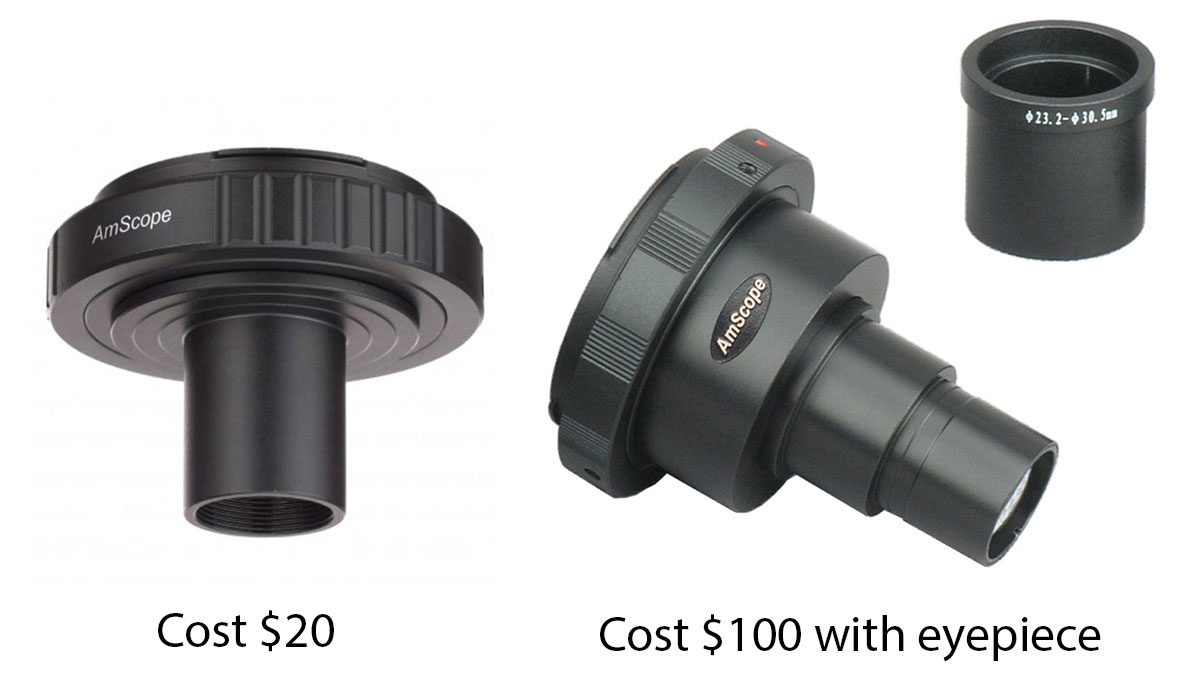
Above are two microscope adapters to attach your digital SLR camera to a microscope - both are available from AM microscopes in California. The adapter on the left works without an eyepiece, but it usually produces some vignetting (darkening) around the edge of the picture especially with full frame digital cameras. These dark areas can be cropped using an image editor. The adapter on the right provides full frame images and better quality.
I also use Olympus camera adapters which you can see and read about on Alan Wood's web site. Be sure to check that the tube diameter will fit what ever your microscope you might have as some microscope tubes have larger diameters than others. There are also many other suppliers of photo tubes.
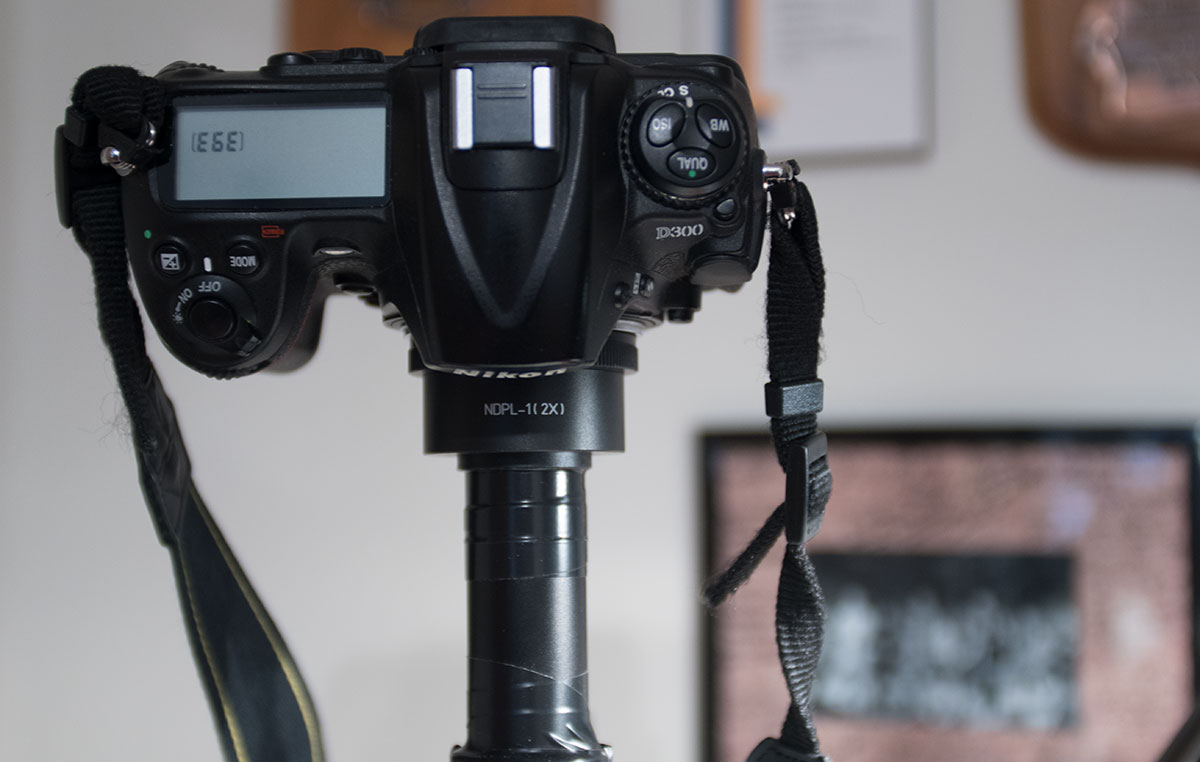
Above is my Nikon D300 camera attached to one of my stereo microscopes using the AM systems adapter, note the black electrician tape on the tube which I use to attach extension tubes and other accessories when needed.
Things you need to take pictures or movies through a microscope
1. Microscope
2. Digital camera - preferably a digital single lens reflex camera (DSLR)
3. A method to attach the camera to the microscope - see adapters shown above
4. Some knowledge of photography, microscopy and the specimens you are viewing
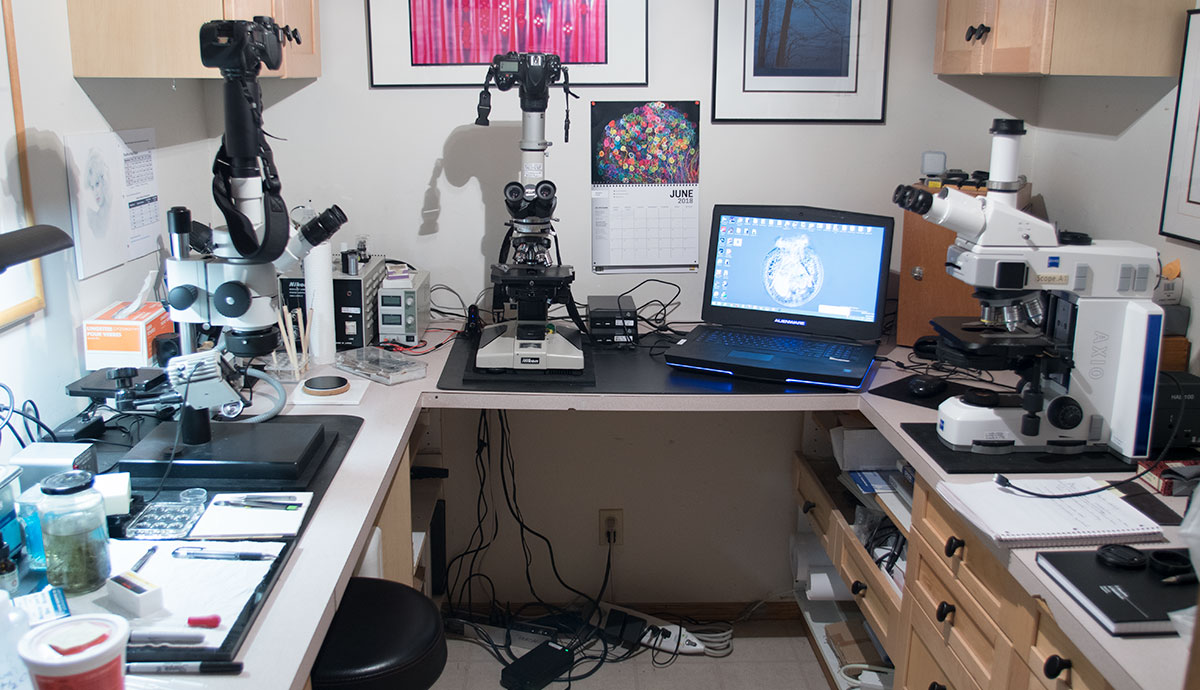
This photo shows what used to be my photography darkroom, but now has been converted into a microscopy work area with several microscopes each having photo-tube attachments. On my laptop I have Digicam control software installed to record images directly via USB connection to the cameras. Each microscope has a different photo tube adapter. On the left is my sample preparation area with a jar filled with pond water.
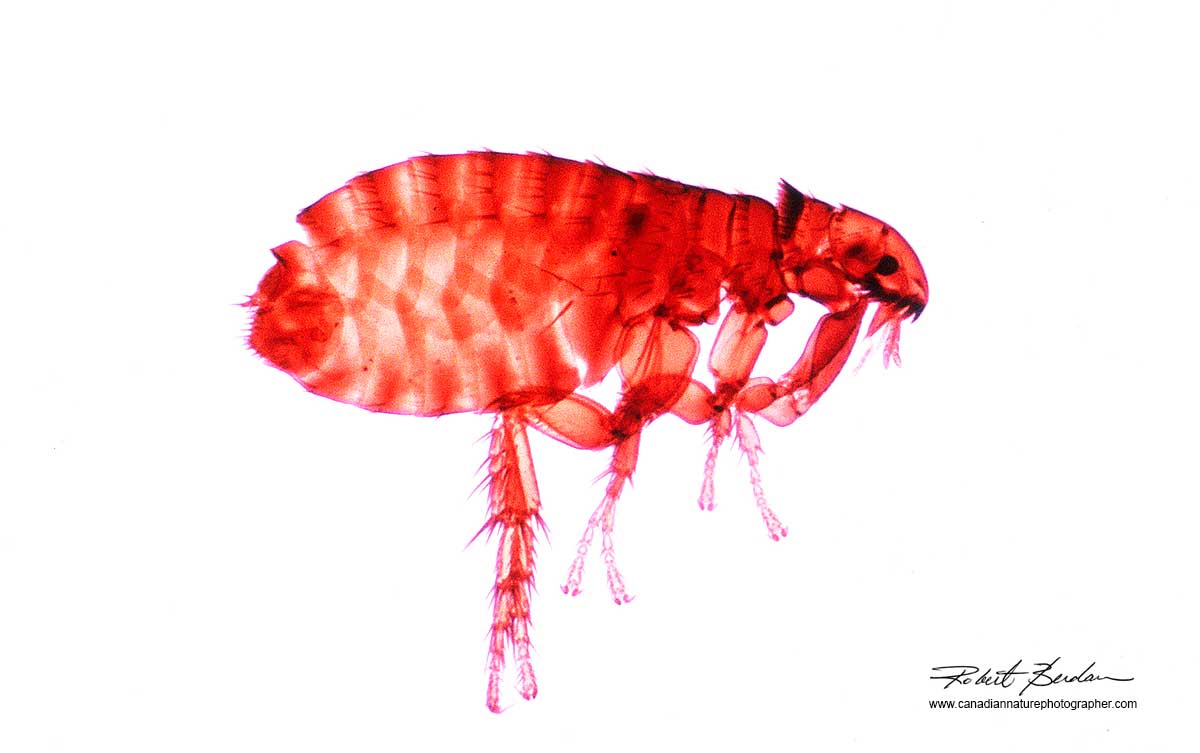
Above is a photomicrograph of a Dog Flea (Ctenocephalides canis) taken with bright field microscopy at 50X - bright field microscopes are good for subjects like this with high contrast. Also note the background lighting is even. If you have dirt and spots on the photo these can be easily removed using an image editor, but be sure not to alter the biological integrity of your specimen.
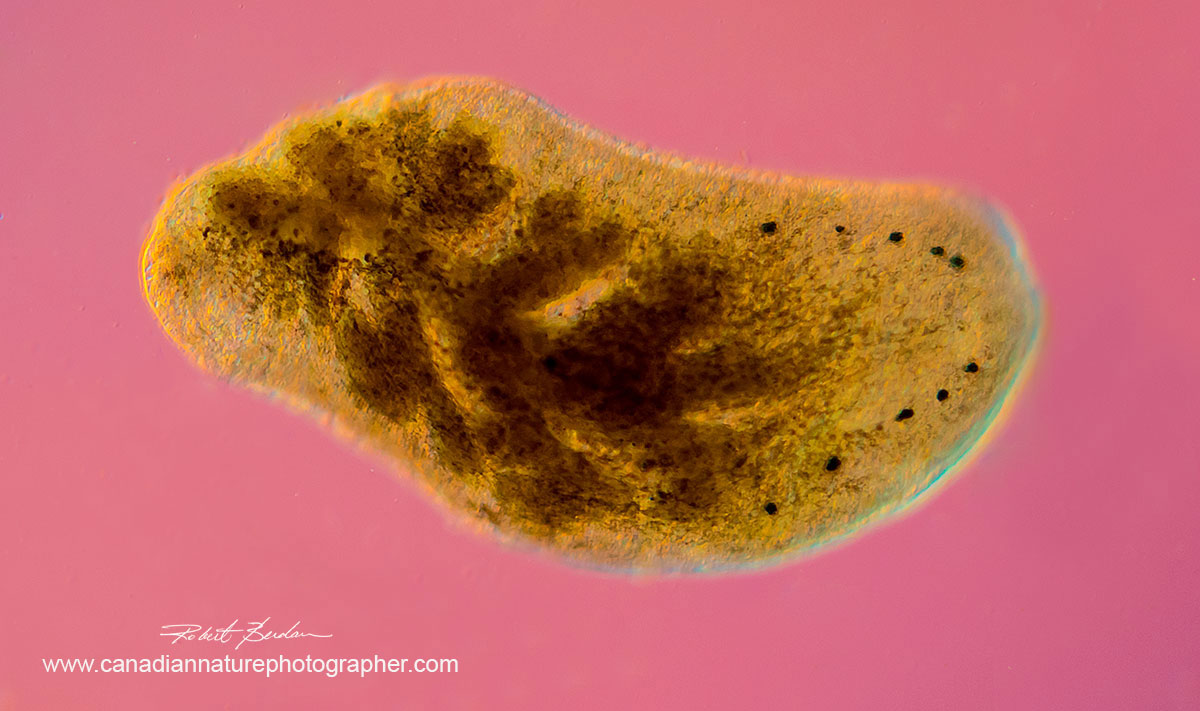
Phylum Platyhelminthe, OrderTricladia (Planarians) also called Flatworms 50X showing 5 pairs of eyes on the right side possibly Polycelis coronata. I found this unusual species living in moss. DIC microscopy, Zeiss Axioscope.
Taking pictures through a microscope requires that you have a basic understanding of how to use a microscope - the basics are easily learned. There are also several different kinds of illumination you can use. The most common is called bright field where white light is used to illuminate the specimen. Bright field microscopes are fine for viewing histology slides, brewers yeast, and insect parts or fleas (shown above). It's not good for looking at most living cells or most pond organisms because they (e.g. cheek cells and protozoa) are essentially bags of water and appear translucent. You can stain the cells, but then you end up looking at dead cells most of the time. Fortunately there are techniques that you can purchase or add to your microscope to make transparent objects like cells more visible or colourful.
A simple technique is to use two polarizing filters, add Darkfield microscopy (special filters or you can simply put a coin on the light source), oblique illumination (put the filter tray half way in), Rheinberg filters, Phase contrast, Hoffman modulation, Fluorescence illumination and Differential interference optics (DIC). Some of these techniques are simple and cheap, others like the last two mentioned are expensive options.
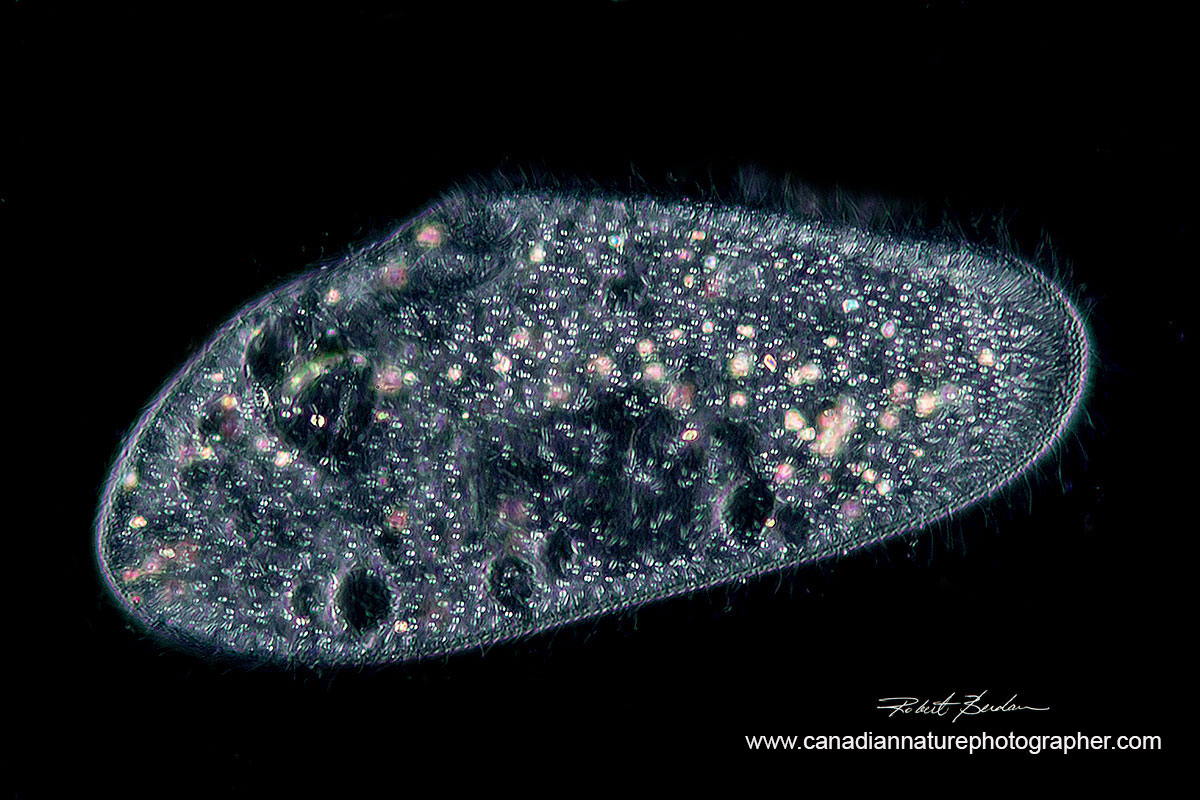
Paramecium caudatum photographed with Darkfield microscopy 400X. There are special microscope condensers that produce this type of light, but you can often mimic it with a coin or other small object placed on a filter or light source. Watch this YouTube video on Darkfield condensers and see links below to an article on how to make your own darkfield filters.
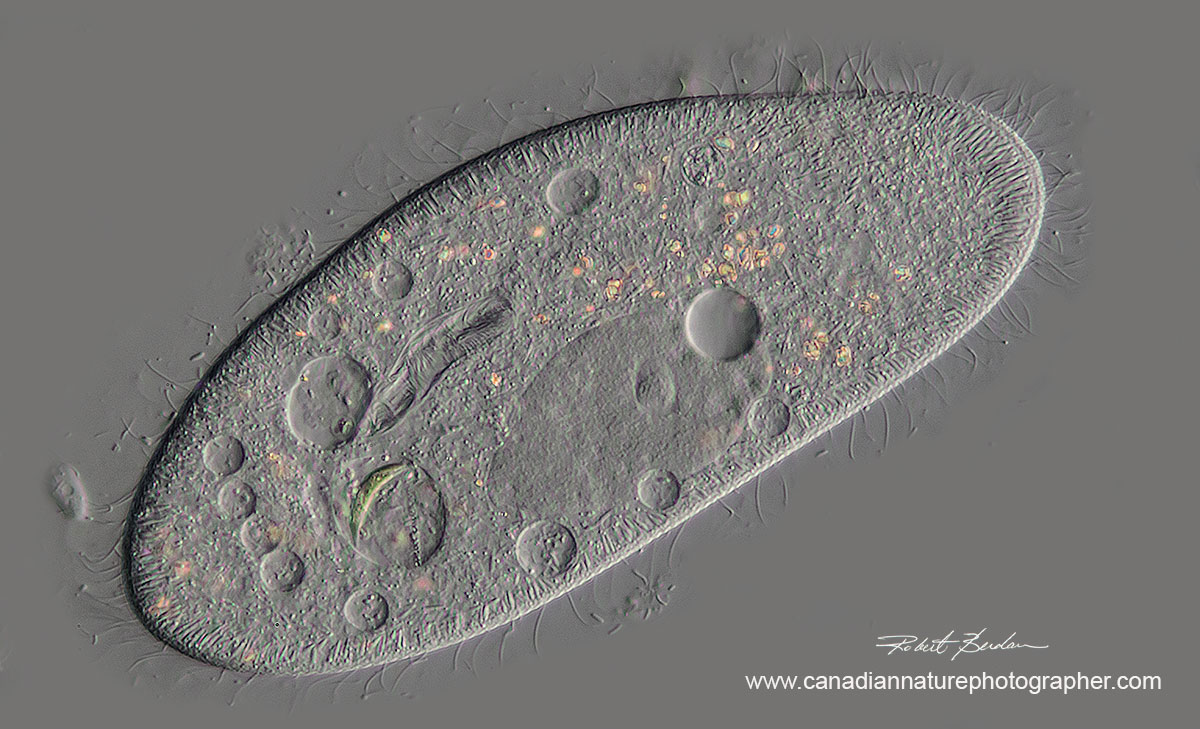
Paramecium caudatum photographed with Differential Interference microscopy 400X DIC lets you see incredible detail with a 3D appearance, unfortunately DIC optics are expensive > $10,000. There is a researcher from Australia who claims to be able to simulate the DIC effect using software, but so far he has not responded to my emails. In the future it may be possible to produce images like those shown above using software. Another simple technique is oblique illumination which can also produce an effect similar to DIC microscopy (see below).

Oblique illumination created by having the filter tray below the condenser partially blocking the light source. The effect is similar to DIC microscopy, can be produced with almost any microscope - and it's free. Bdelloid rotifer and filament of algae - Spirogyra 400X.
Köhler Illumination for even lighting
An important factor in getting good photomicrographs is having even illumination. If you don't you will have uneven lighting around the edges or on one side of the image. This can be fixed afterwards in Photoshop (see how to correct of uneven illumination in digital microscopy images but it's easier and better to just set up the light correctly (see links below for the steps to do this). Some microscopes use built in light sources, others have a mirror that reflects light up to the specimen. Both can be effective provided they offer a bright light source and the microscope has a good condenser. Using a blue frosted filter can also often help even out the illumination as well.
Many new microscopes now use LED illumination because its bright, economical and they last for thousands of hours. On eBay you can have one built for your older microscope - they cost between $150-$500 (see link below) and it's a great way to revive an old microscope. I had one made for my Nikon Optiphot microscope and it works well for photomicrography.
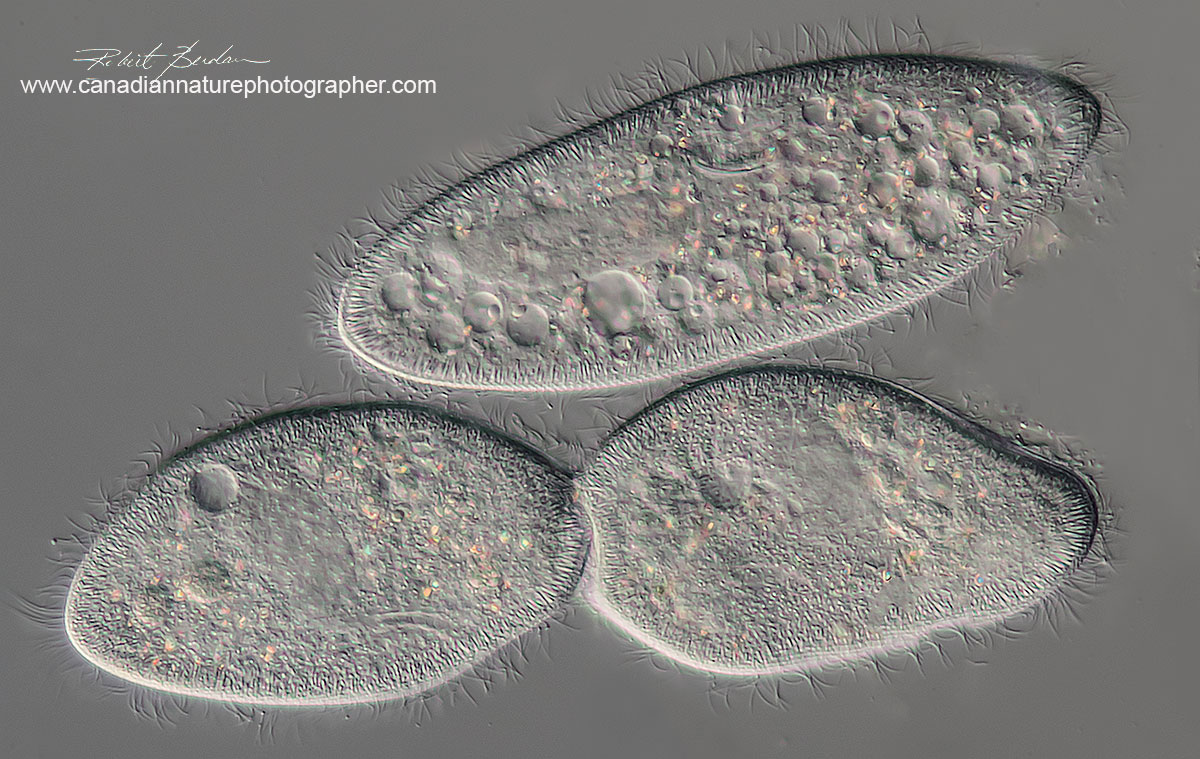
At the top of the photo is a single Paramecium caudatum and below are two Paramecium dividing - DIC microscopy 400X. Note how clearly you can see the cilia.
Light sources
A bright light isn't required for viewing but it is for using a high shutter speed for photography. A high shutter speed can stop fast moving protozoa, and it reduces the loss of sharpness due to vibrations introduced by the camera mirror movement. Some photomicrographers use an afocal method to attach their camera to the microscope. Essentially the camera is positioned above the microscope trinocular tube so that camera does not touch the microscope. It can be used with compact cameras, phone cameras and even DSLR cameras. Photographers sometimes use a copy stand or other support to hold the camera steady e.g. see Charles Krebs article on Photomicrography.
I don't use the afocal method, I prefer to attach my camera directly to the microscope using an adapter. Another technique to improve sharpness is to use a high speed flash as the light source. Some photographers have built a flash into their light source. Others place a flat flash unit below the specimen stage or put the flash to one side and use a beam splitter. See links to articles below by David Walker on how he attaches a flash to a microscope. David describes one technique using a cover slip or microscope slide at a 45 degree angle above the light source to allow light from below to shine through and also reflect an electronic flash light up to the specimen.
Ideally you want to have the flash connected by a cable to your camera and be able to use the TTL (through the lens) flash metering. I tried reflecting a flash using a glass microscope slide and it worked, but there is fair bit of light lost during the reflection off normal glass so I have ordered a 50\50 beam splitter form China on E-bay and once it arrives will test again. My goal is be able to use 1\8000 of second sync with my Nikon D500 camera.
The Illumination produced by 100W tungsten light source on my Zeiss Axioscope microscope is very bright and I can achieve 1\8000 of a second at ISO 800, but would like to be able to achieve this at ISO 100 or 200 if possible so I can get finer grain on my digital images using DIC. My other microscopes have built in light sources that are suitable for viewing but don't allow high shutter speeds. If you add a couple of polarizing filters, and a wave plate this really cuts down the light and how fast a shutter speed one can use.
I used to use an old Kodak slide projector as a light source for many years and reflected the light off the microscope mirror onto the specimen. More recently I found a brighter light source by purchasing a 2800 lumen Nite core flash lights (be sure to use only their batteries - also note they are cheaper if you order from the US not Canada). These new high intensity flash lites allow me to vary the intensity of light and I use it with my stereoscopes as well. I mount the flash lites on a $15 table top microphone stand (see below).
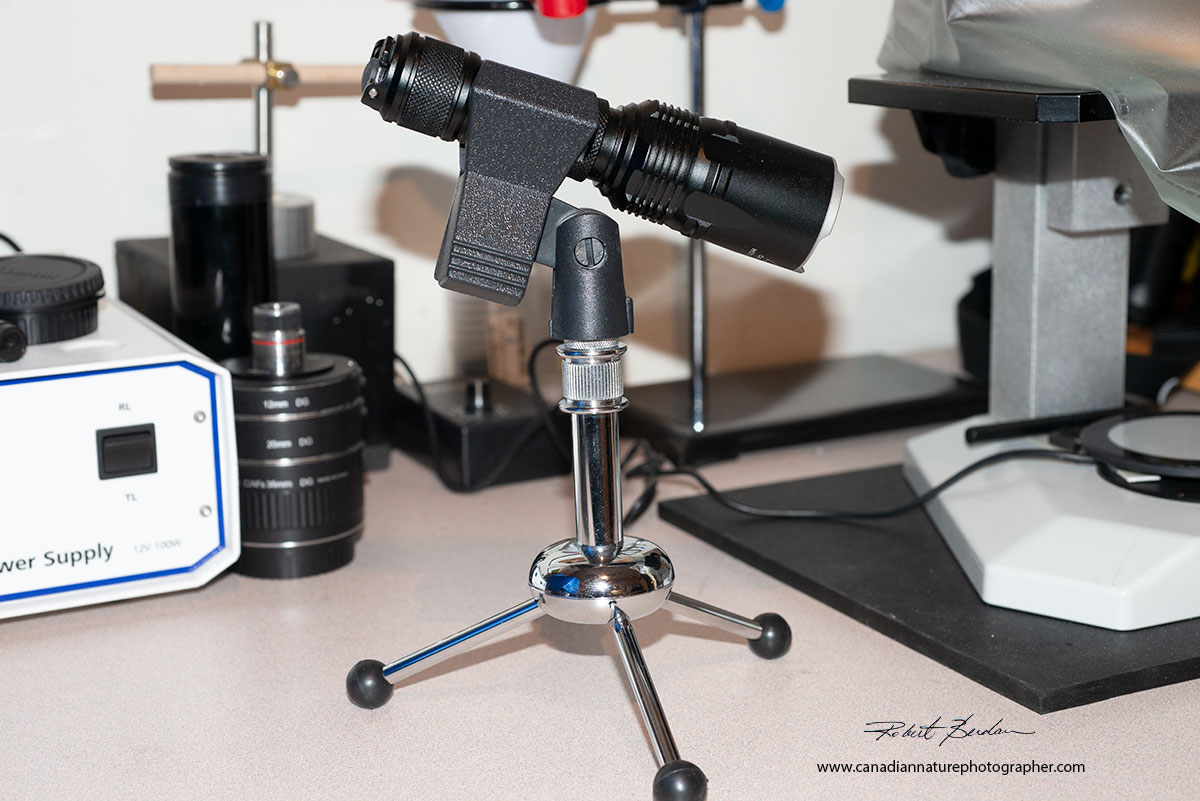
Nitecore LED flash light capable of up to 2800 lumen and has variable light intensity output. When the light is attached to a portable desktop microphone stand it is small and portable.
In short, it is important to set up your microscope lighting so its even across the specimen and it's bright enough for photography allowing short exposure of moving specimens. With prepared or histological slides the subject doesn't move so one does not need a bright light source, just even illumination - take the time to set up your lighting as it is one of the most important components of getting better photomicrographs.
White balance
With colour film it was important to use special film with tungsten illumination or use colour correcting filters (blue) to raise the apparent light temperature to about 6500 K. With digital cameras you can either set the white balance on the camera, or shoot RAW files and adjust the white balance during processing. I normally photograph with RAW files and correct white balance during processing in Adobe Photoshop Camera RAW.
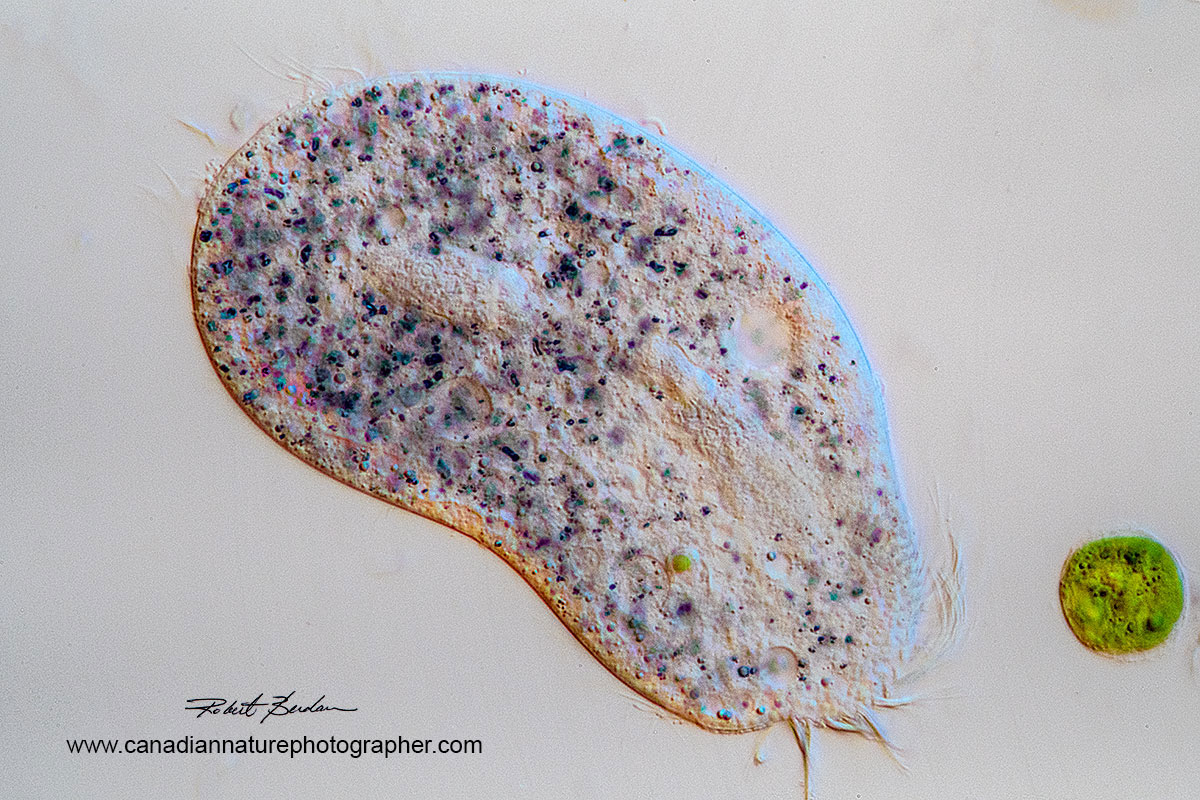
Above photos Ciliate, Family Parameciidae possibly Uroncentrum turbo 400X DIC microscopy. These ciliates move very quickly. They are elongated ovate and rounded on either end with a single large cilium or cirri extending from the bottom (not shown - these ciliates are 75 microns in height).
Reducing Vibration induced blurring
A heavy sturdy microscope will have fewer vibrations then a light weight scope on a flimsy base. To test for vibrations gently tap your attached camera on the microscope - does it vibrate easily? I also use the same technique to determine which tripods are steady. Blur due to vibration is a common problem. Using fast shutter speeds or an electronic flash will help reduce blur.
Another simple thing that can help reduce vibrations is using an anti-vibration pads under the microscope. Some dealers sell anti-vibration pads, and there are also expensive anti-vibration tables that float on air, but these cost thousands of dollars. I used an air table in my research when I made electrical recordings from brain cells years ago, and they are super, but mine cost close to $7000! You can also use a sturdy base made of marble under the microscope and make sure you have sturdy table to support the microscope. One of the best solutions I found is to buy 1\4 inch thick rubber pads used in gymnasiums or weight room floors. These heavy rubber pads cost about $18.00 for 2 foot square pad and can be cut to size using an X-acto knife. I liked them so much I made a pad for all my microscopes (see below). They make a significant difference and cost less then any other solution I found so far.
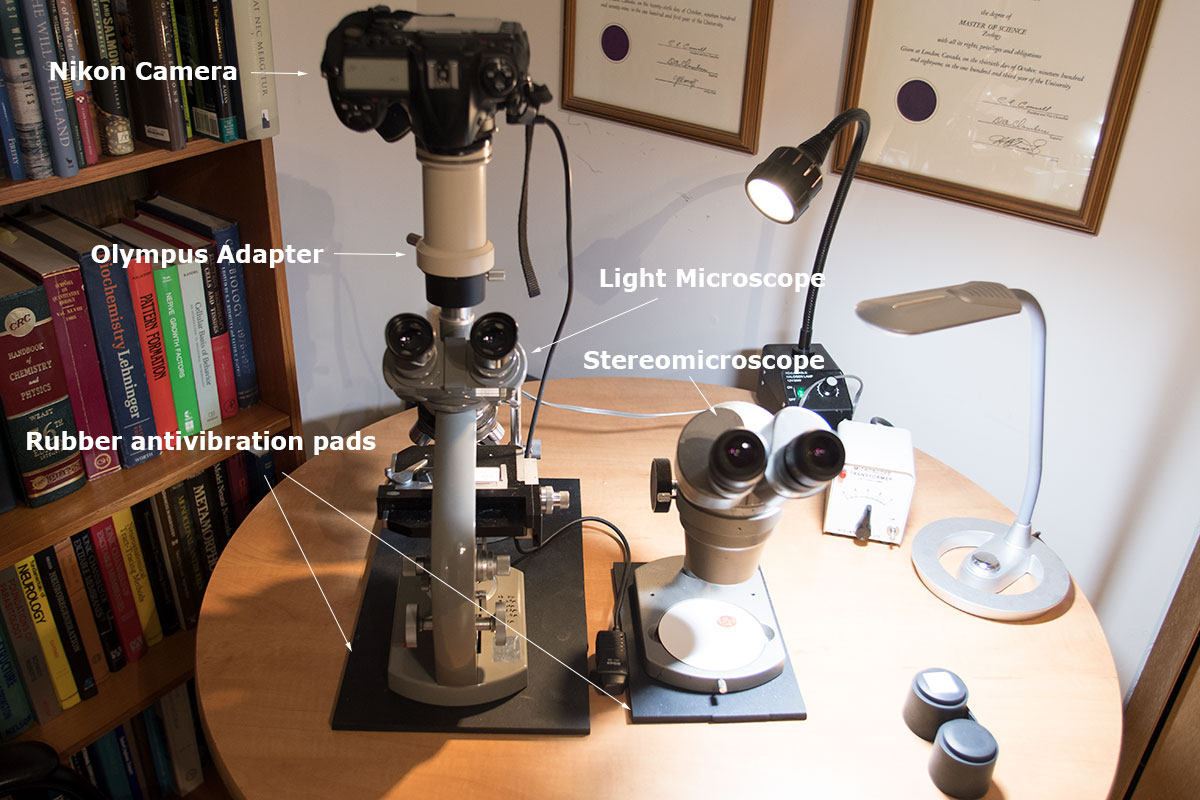
Left my old Olympus E microscope which I have owned for 45 years and on top is an adapter to attach a Nikon D300 camera. The camera also has cable release to further reduce shutter vibration. On the right is an Olympus Zoom Stereoscope which provides up to 50X that is used as a dissection microscope. Note the anti-vibration pads beneath each scope cut from 1\4 inch thick rubber floor matting. This is a simple set up for taking light microscope pictures. The rubber pads are available from some hardware stores.
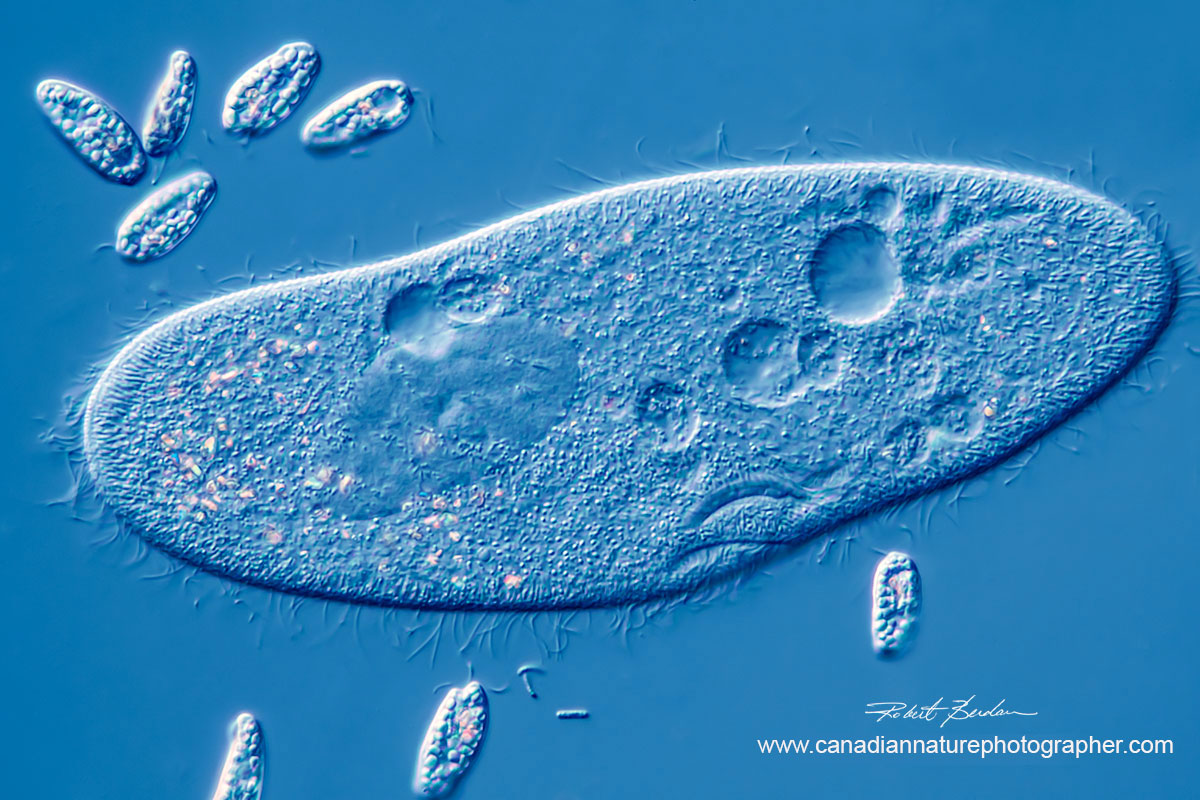
Paramecium caudatum surrounded by smaller euglenoids, 400X DIC microscopy.
The microscope
The most important factor in getting good pictures, other then the skill of the photographer, is the optics of the microscope. The final image is a combination of the images produced by the objectives and the eyepiece. Of these, the objectives are the most important. Microscope objectives come in a variety of types: Achromat, Plan Achromat, Fluorite (semi-apochromats) and Apochromats. If your goal is photography, I would strive to purchase Plan Achromat objectives or better. Plan Achromats are corrected for spherical aberration and offer a flat viewing field. Achromats objectives are only sharp in the center of the field of view and this can not be corrected with an image editor. Plan Achromats provide a flat field field that is sharp to the edge - these objectives may exhibit some Chromatic aberrations (colour fringing) but this can be corrected in an image editor, or you can use light of a single colour (green), or convert your photos to black and white. Most of my photographs are taken with Plan Achromat objectives which are relatively affordable. If you can get your hands on a Fluorite or Apochromat objectives they are better corrected optically but can cost 10-20X more then an Plan Achromat objective. I have a two Apochromats objectives but can't afford to buy more right now. (Note older objectives had a fixed focal length usually 160 mm, whereas newer objectives are infinity corrected - you can't interchange the two without a loss in image quality - I use both types on different microscopes).
Bright field and oblique illumination of Holotrich ciliate 400X Zeiss Axioscope.
Eyepieces for Photomicrography
The eyepiece used for photomicrography is important. For years I have used Olympus FK photo eyepieces which provide a flat projection for photography (available 2.5, 3.3 and 5X - there is 1.6X but rare and very costly). Other manufacturers also offer special eyepieces designed for photomicrography. If possible try to use one of these for best results and not the general eyepieces used for viewing through the microscope. The microscope adapter I purchased from AM systems for about $100 seems to work reasonably well. Also when attaching your camera to the microscope if your microscope adapter doesn't fit your camera lens mount what I do is attach a short extension tube to the adapter using black electrician tape and then attach that to my DSLR (digital single lens reflex camera). You can use a Nikon extension tube adapter for Nikon and Canon adapter for Canon DSLR. For more information about Olympus FK photo eyepieces see the article by Charles Krebs. My Zeiss Axioscope Photo-tube came with a lens inside but the tube alone cost about $1000 and adapters for Nikon or Canon cost $75 each.
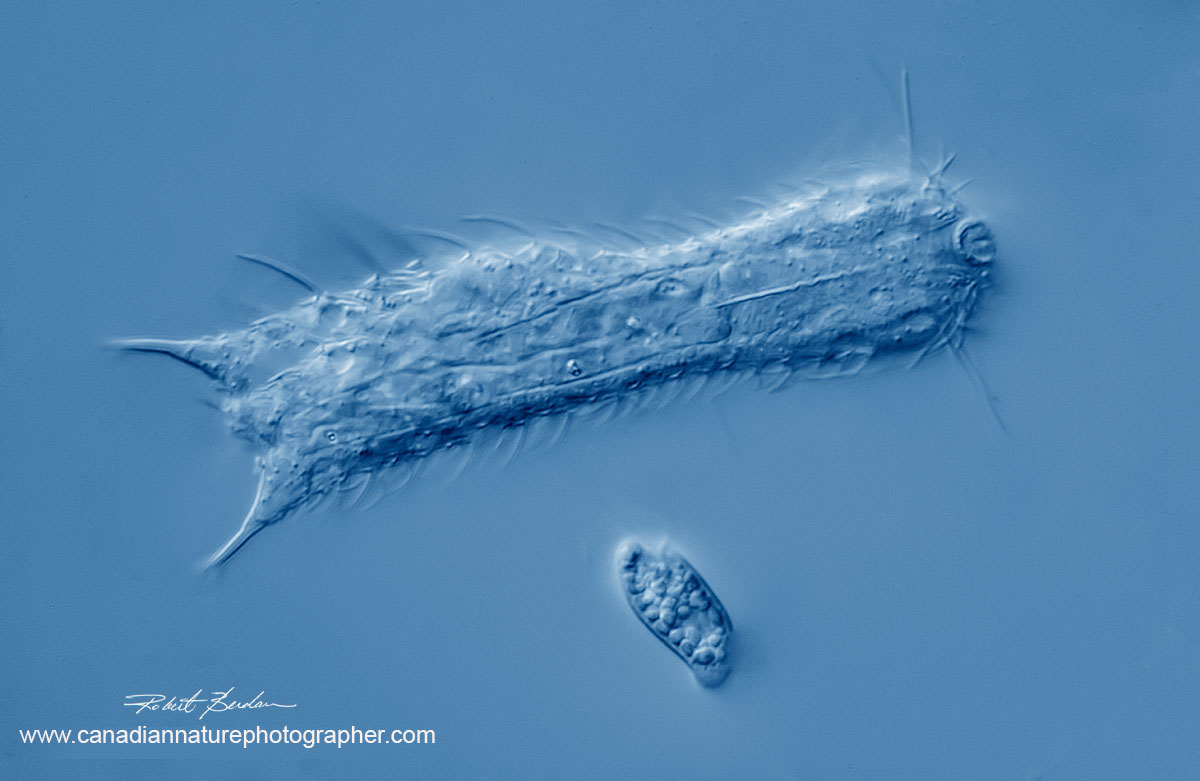
Gastrotricha note the caudal prongs and whiskers. Sometimes referred to as the "cats" of the microworld. Chaetonotus similis 400X DIC microscopy. Small euglenod below.
Bdelloid rotifer encountering a ciliate. Note the red eyes on the anterior end of the rotifer and another pair inside presumably of a young animal in development. 200X DIC microsopy.
Ideally if you are planning to do photography with your microscope I recommend that you purchase a trinocular head. You can attach cameras to a monocular microscope or even binocular heads but it makes viewing through the microscope simultaneously difficult. One option that can be helpful is to connect your Digital SLR camera via a USB port to a computer and view the image on screen while your photograph. There are several programs that do this. The one I use is Digicam control, the software is free and supports all my Nikon and Canon Cameras. You can even connect several cameras and use it for making movies or for time lapse photography. It's also easy to learn and has a special feature that turns the screen red for those who want to use it with astrophotography. It's only available for Microsoft based computers at the moment. You can Download Digicam control software free from here. By using this software you can view the image on the laptop, which requires the camera to be in Live View where it has the mirror locked up and therefore there is no vibration caused by mirror "slap" when taking the picture. Anyone taking pictures with a microscope should look at this software. The software also allows you to zoom in on the screen to achieve better focus. The downside is that using your camera in Live View tends to wear down the battery more quickly so have spare batteries charged and ready. I get about 1-2 hours out of my batteries in Live View. Another is that the field of view is often smaller then when looking through a pair of binocular eyepieces and it's not easy to follow fast moving specimens.

Large contractile ciliate over several hundred microns long. Has a distinct multilobed macronucleus and long cilia (oral polykinetids) on one side of the anterior end - possibly Spirostomum minus. 200X DIC microscopy.

Spirostomum minus 200X DIC microscopy.

Picture showing how this large ciliate Spirostmum minus compares to a paramecium whose length is 120 microns.
Focus Stacking
With high magnification macrophotography and photomicrography the depth of focus is very shallow. The higher the magnification the shallower the depth of field. At high magnification using a 40X, 63X and 100X objectives your depth of field can be a micron or less. To compensate for this I often take a series of photographs at different focus points and then combine the images by stacking them into one. I have seen some photomicrographers use as many as 160 images to stack, in general I use between 3-40 most of the time. The technique is simple to do in Photoshop or you can use a dedicated focus stacking program e.g. Helicon Focus. I recently reviewed three software programs for focus stacking for photomicrography - read about it here if you want to see what it can do. Focus stacking is essential with many specimens viewed using objectives 20X or higher in my opinion and produces superior photographs.
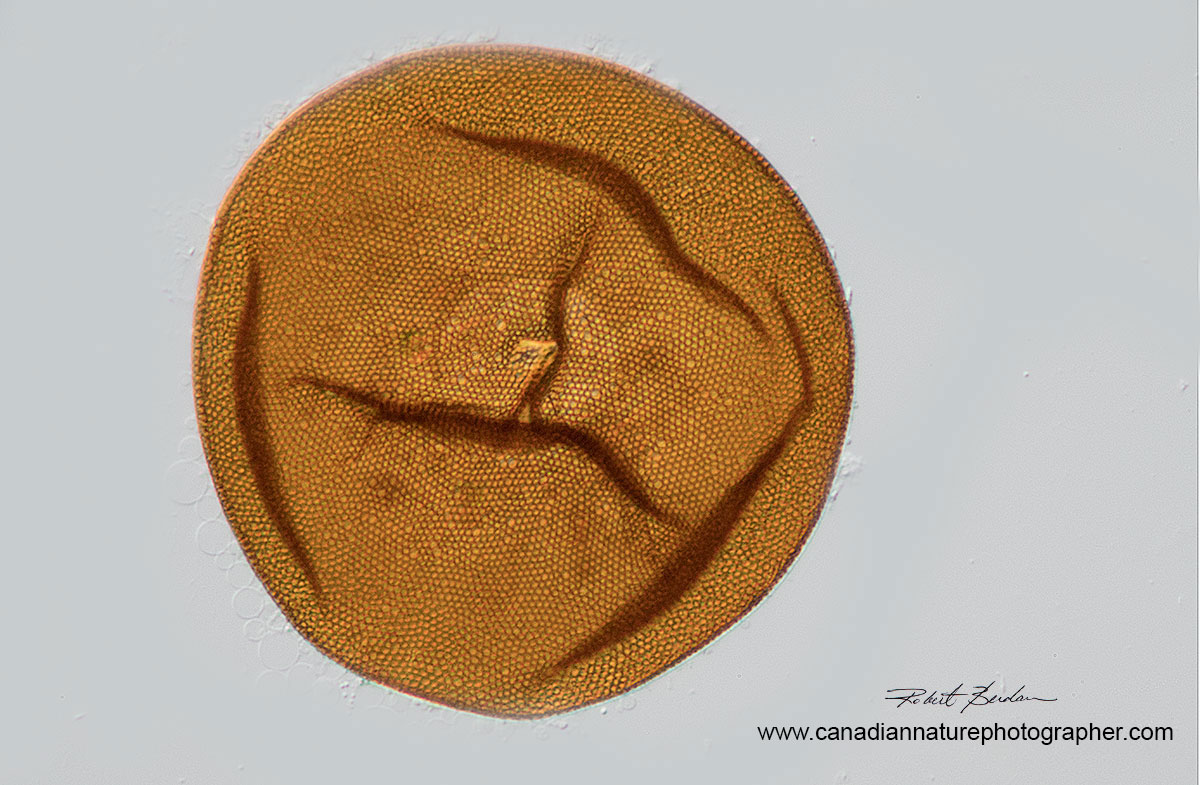
Amoeba Test or shell belonging to an Arcella sp. (Order Arcellinida). Some amoebas live inside shells they make and have only their pseudopods extending outside the bottom. You can see the circular hole near the middle where the amoeba could extend out. This amoeba shell was empty. I stacked 6 photos to create this image 200X.
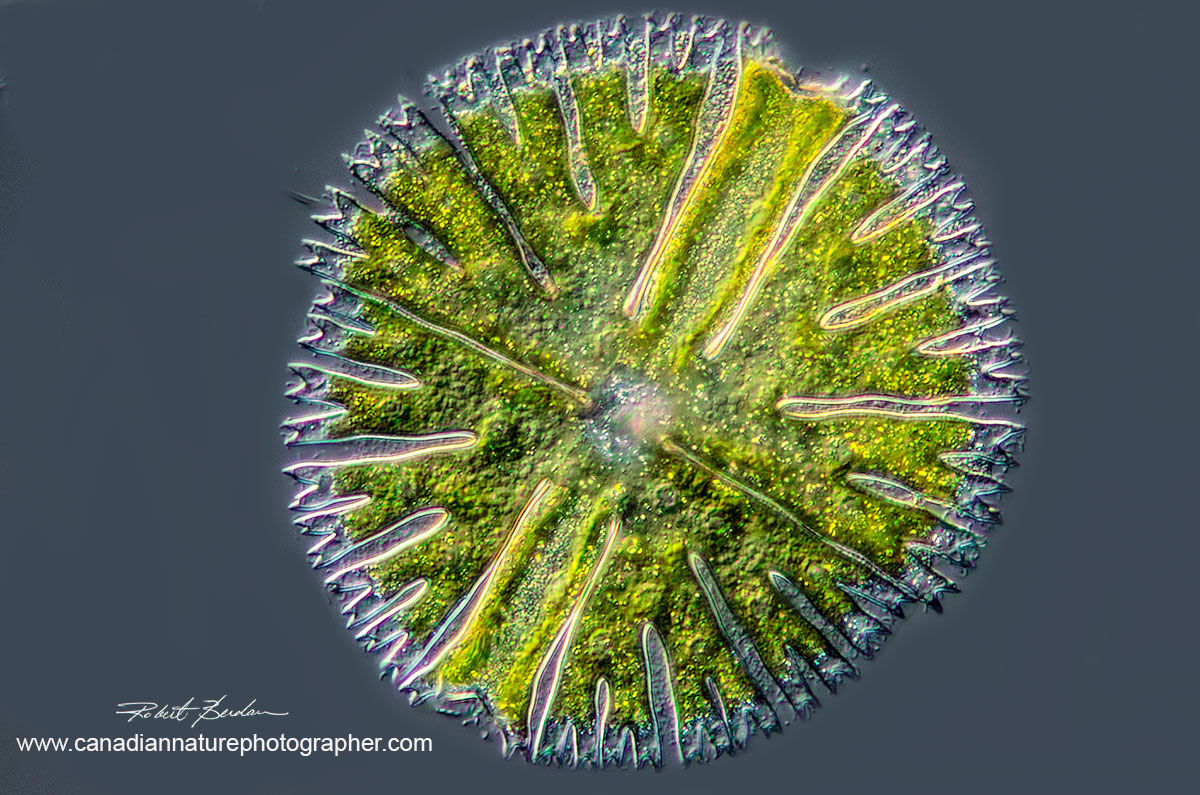
Micrasterius is a Desmid, single celled algae that forms ornate patterns. To get this one in focus I used 15 images and stacked them. 400X DIC microscopy (143 microns in diameter).

Cosmarium sp of Desmid - I stacked 6 images to create this photograph - 400X DIC microscopy (50 microns in diameter not including outer mucilage sheath Cosmarium contractum?)
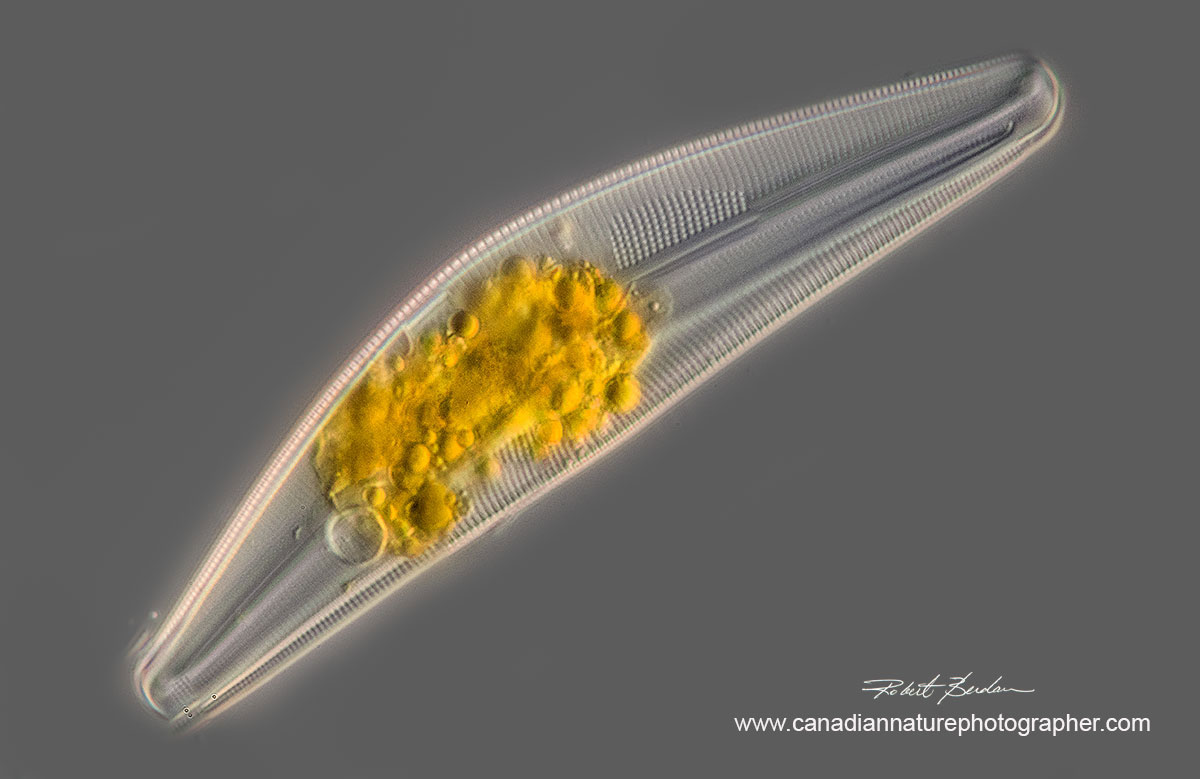
Cymbella species of Diatom - I stacked 12 images to create this photograph, 400X DIC microscopy (85 microns long).
Proper Cover glass (Cover slip) Thickness is Critical
A cover glass is usually a small square or round thin piece of glass that is used to cover specimens mounted on microscope slides. Most microscope objectives are corrected for use with No 1.5 cover glasses which are on average 0.17 mm thick. A few microscope objectives have special collars that can be turned to correct for cover glasses of different thickness, and some objectives are designed to work without a cover glass e.g. metallurgical microscopes. The interesting thing is that some microscopists use No. 1 cover glasses which are thinner - they state that it's the total thickness of the specimen and cover glass that is important. It's also noteworthy that in any box of cover glasses there is always some variation in thickness, but for best results for most specimens I recommend the use of No. 1.5 or No 1.0 cover glass. See this article by Nikon showing an image with correct and incorrect cover glass thickness. Also the medium used to view specimens can be important - the greater the difference in refractive index of the medium and the specimen the greater the contrast which is important when mounting Diatoms permanently.
Slowing down Protozoa and other freshwater Invertebrates.
Another tip that I use to get high quality images of protozoa is to flatten the cover glass on the specimen by drawing water out with a paper towel or piece of filter paper. This does 2 things, it traps large microorganisms so they can't zip around, and it flattens their bodies somewhat allowing me to focus on one part of the organism or take a series of photos and then focus stack the images. In the early days microscopists used special devices called compressoriums. Even modern scientists use variations of these compressoriums for making photographs and movies of cells - e.g. JA Zinskie et al 2015. I am in the process of making and testing some of these devices, but for now the filter paper technique seems to work well for most small subjects.
Hands Free Triggering of the camera
Another feature I am playing with that sometimes is helpful is using a USB foot pedal for triggering my camera shutter. This leaves both my hands free so I can follow moving specimens using the microscope stage translation and change the focus. These triggers are available from Amazon.ca for about $20 and plug into your laptop, you can set up them up using Digicam control software and the drivers they provide.

Hypotrich ciliates that are attached end to end with distinct membranelles around oral region. This pair of ciliates were 225 microns long in total length.
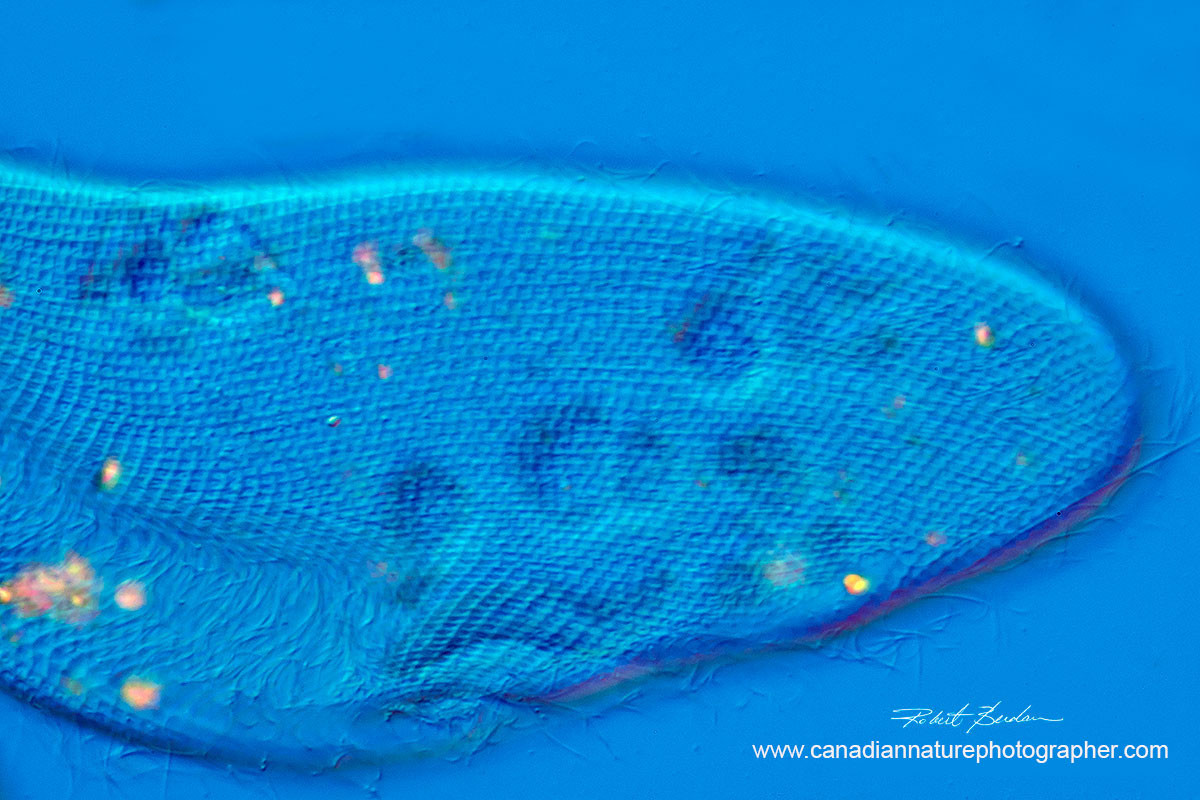
Pellicle of a Paramecium 600X using DIC microscopy. I had to flatten and trap the Paramecium to see and photograph this delicate pattern on the Paramecium's surface.
There are many techniques for slowing down and Preserving aquatic microorganisms - for a good review see the article by John Delly.
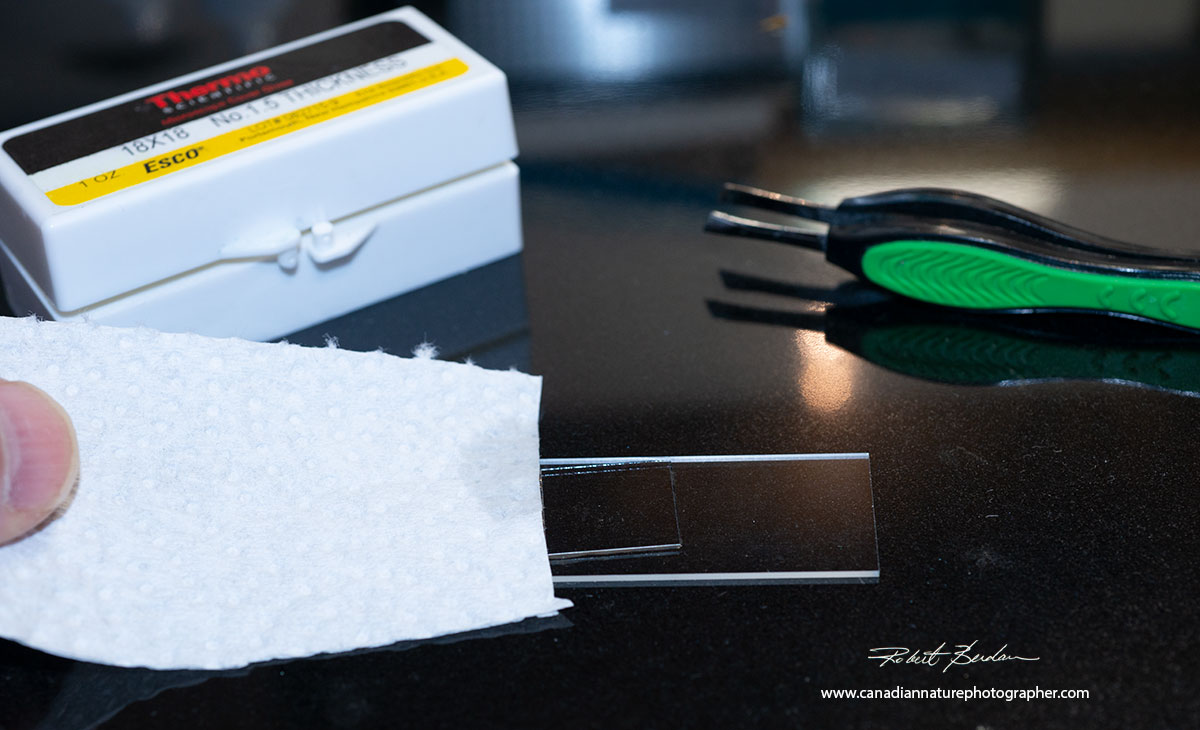
By using a piece of paper towel or filter paper I touch the edge of the paper to the edge of the cover glass to suck out excess water which then flattens the cover glass down on the specimens. This often imobilizes the larger microorganisms making their photography easier - it's easy, simple and works. Also avoid plastic cover slips they are not as optically clear as glass.
Achieving good pictures in photography and photomicrography is often about taking care of small details. Little things like the cover glass thickness, vibrational dampening, using Live view, using a high shutter speed, using clean optics and clean glass slides, high light intensity and even the thickness of the specimen are important.

Ciliate showing Diatom inside 400X DIC microscopy and focus stack. Total length of ciliate was 310 microns. Unknown species - Loxodes sp?
If you are not getting sharp pictures then you have to systematically try to identify the causes and make corrective adjustments. I am always trying to tweak my equipment so I can get photos just a little bit sharper. In microscopy, equipment and technique matters. How one processes the digital images can also make a significant difference - I use unsharp mask and the clarity feature in Adobe Camera RAW to try and squeeze as much sharpness as I can from a photo. Note that microscopists in the past have been able to create stunning images with film cameras and older microscopes - for inspiration see the photomicrographs of Diatoms by John Redmayne taken in 1877.
In summary taking good photomicrographs is a combination of knowledge and practice. Knowledge of microscopy, photography, image editing and specimen preparation are important. Fortunately there is a wealth of information on-line and experts willing to provide advice. If you are looking to try photomicrography I am happy to provide free advice and I also offer custom training in my studio to anyone interested. RB
Related Article Links
Optical Microscopy by MW Davidson and M. Abramowitz - Excellent review - free PDF
Microscopy from the beginning - a good overview of microscopy by Zeiss - free PDF
UK microscopy - web site on all aspects of light microscopy
Quality Microscopes in Calgary
Zeiss instructions for setting up Kohler illumination.
Set up Kohler Illumination on a Zeiss Research Microscope - video
Quick'n easy flash photomicrography on a microscope with a built-in lamp - David Walker
A simple flash/tungsten lighting setup for a microscope with built in base lamp - David Walker
Narcotizing, Slowing Down, and Preserving Microscopic and other Aquatic Animals - J. Delly.
Immobilization of living specimens for microscope observation - free PDF
AM microscope Adapters for attaching cameras to your microscope
Reviving and Old microscope
Easy to make contrast enhance filters including darkfield filters
How to Take Digital Photos Through a Microscope Without Any Special Lens
How to use a Microscope and Take a Photomicrograph - Nikon PDF
Microscope Image Photography Techniques of the Past, Present and Future - PDF
Reference: The Illustrated Guide to the Protozoa 2nd Edition (2000) Society of Protozoologists.
Related Microscopy Articles by Robert Berdan on this web site
1. Microscopic Pond Organisms from Silver Springs Calgary
2. Microscopic Life in Ponds and Rainwater - Pond Scum I
3. Photographing Microscopic Plant and Animal Life - Pond Scum II
4. Photomicrography and Video of Protozoa, Volvox and Rotifers
5. Home Microscopy Laboratory for Photomicrography
6. The Art & Science of Photomicrography with Polarized Light
7. Photographing Through a Microscope Photomicrography - Inner Space
8. Focus Stacking comparing Photoshop, Helicon Focus and Zerene
9. Rheinberg Filters for Photomicrography
10. Scanning Electron Microscopy - Photography
11. Photomicrographs of Diatoms from 1877 by John T. Redmayne
Authors Biography & Contact Information

Robert Berdan is a professional nature photographer living in Calgary, AB specializing in nature, wildlife and science photography. Robert retired from Cell\Neurobiology research to take up Photography full time years ago. Robert offers photo guiding and private instruction in all aspects of nature photography and Adobe Photoshop training.
Email at: rberdan@scienceandart.org
Web site: www.canadiannaturephotographer.com
Phone: MST 9am -7 pm (403) 247-2457.
Click on the buttons below and share this site with your friends