The Magic of Black and White Photographyby Robert Berdan
When was the last time you took a black and white picture? It seems that most of my photography friends rarely if ever shoot in black and white. When I started photography about 35 years ago I could not afford to shoot with colour film very often so I shot Black and white film, mostly Kodak Tri-X 400, Plus -X and various Ilfopan films. The reason being that I could develop the film myself and print my own pictures saving lots of money. I learned by studying the works of Ansel Adams, Bruce Barnbaum, Michael Kenna, John Sexton, Elliot Porter and Jerry Ulsemann and various Kodak publications that Black and white photography has a magic all of its own. Sometimes portraits, landscapes and even wildlife can appear more interesting in black and white and some feel that black and white prints are more "artistic". Shooting for black and white is different and involves some changes in how you see and approach photography. Generally you want to look for scenes that have strong shape and form where colour is lacking or would otherwise be a distraction. In the past when I shot film, I would often have one camera loaded with black and white film and the other with colour film. Today of course with digital cameras you simply set you camera to colour mode then do the conversion in a program like photoshop. Converting your colour images in photoshop to black and white gives you many advantages and you can intrepret you colour image many ways. In the past if we wanted to darken the sky we would add a red or yellow filter in front of the lens. Using photoshop we can simulate the affect of any coloured filter during the conversion afterwards. So if you use a digital camera, always shoot in colour and then convert the image to black and white in photoshop or other image editing program.
Aspens in snow storm, horse creek road, Alberta Fred Picker used to sell a green filter which when you looked through it would simulate what your tones might look like in black and white photo. I jused to shoot so much black and white film when I started out that I can still visualize what a picturewill look like in black and white. Of course the tones and contrast will depend on how you exposed your picture, how you developed the film and then how you printed the pictures in the darkroom. Ansel Adams created what we call today the zone system where he could control the tones in a picture through exposure, development and printing. However, a photographer still had to learn how to previsualize what the final print might look like.
In Ansel Adam's Zone system he would break up the scene into 11 zones from 0 to X. These zones are shown above along with their digital values as determined in photoshop on a sc ale from 0 to 256. Zone V for instance in the middle is equal to a pixel value of 128 - halfway between 0 and 256. You can determine the numbers by using the eye dropper tool and info palette in Adobe Photoshop. Photographwas taken at Amphritie Point, Vancouver Island at sunrise in colour and converted to BW.
Same image in colour and after conversion to black and white, I applied red filtetration in Photoshop to darken the sky. Photoshop allows you to see changes in the tones when you convert the image by modifying the various colour sliders.
Photographer at Spirit Island Jasper National Park before sunrise. I underexposed the picture to create the silhoutte.
The Common loon has such strong patterns on its neck and back that it makes a good subject for black and white photography
Cold winter day with hoarfost on trees, Kananaskis provincial Park in February.
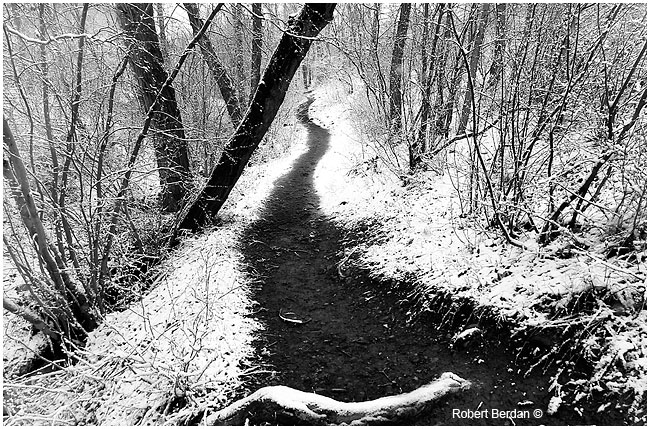
Path near my home after fresh snowfall - there was little of any colour to begin with. Note how the converging lines
Prairie scene, above Writing-on-Stone with late evening light that emphasizes texture of the gravel road and adjacent grass.
Red Winged Blackbird - the photo was converted to black and white and the colour on the wings was returned with a history brush in Photoshop - see my tutorial on how to do this.
Wolf (captive, Wolf Center in Blaeberry, near Golden) I converted the picture to Black and white and then returned the colour in the eyes only. I also darkened the background with the burn tool in photoshop. Burning (darkening) and dodging (lightening) black and white prints was a technique used frequently in the darkroom before the advent of digital manipulation. Of course there is more to Black and White photography - you can tone your prints, brown, blue or you can add a combination of Black and white with colour. You can also hand colour black and white prints easily in photoshop to create a variety of effects in your pictures. If you have never shot black and white you might consider a self an assignment to go out with the intention that all the images you take will be converted to black and white. You will learn to see differently. Alternatively go through some of your current digital images and convert them to black and white and play with different settings. If you don't own an image editing program like photoshop you can experiment by downloading free programs like Picasa from Google or GIMP. Of course you can also switch your camera to Black and white or Sepia mode as a last resort, but then you lose flexibility of converting your colour image. Bottom line is if you are getting bored with taking the same old photos - try black and white. Need some inspiration take a look at the photographers links below some specialize in black and white and that's all they will shoot.
[ Top ] |


