Nature Photographers Checklist
by Robert Berdan
August 10, 2010

White tailed-deer, Bragg Creek, AB
I am sometimes asked what do I check on my camera gear before I go out and shoot? This made me realize that I automatically run through a series of checks the day or night before so that when an opportunity presents itself I just need to reach for my camera, turn it on, and start shooting. The only thing I am thinking about is the subject, where to place the most important element and if its wid life I try to make sure the animals is in focus and sharp. I usually have the camera set to Aperture priority mode and the lens at it's widest aperture. If I am anticipating wildlife I have a telephoto lens attached to my camera so I can shoot quickly. I set the ISO speed dependent on the existing lighting conditions. If I am alone in my jeep, my camera bag is usually on the front seat beside me, the bag is open so I can grab my camera quickly and start shooting.
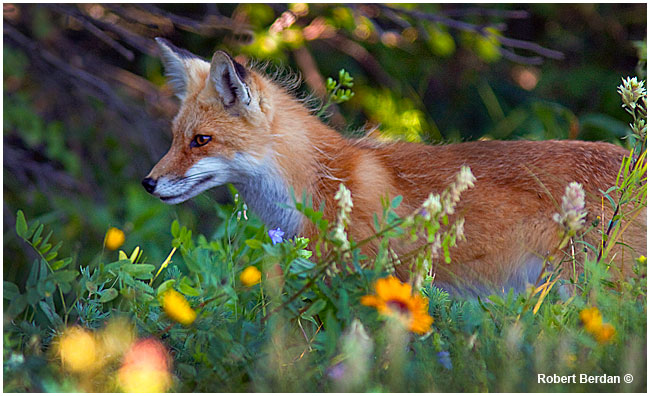
Red Fox along side of the road in Waterton National Park , Canon D50 300 mm + 1.4 X teleconverter
Usually the day or evening before a photo shoot, I run through a check list on my gear that has now become automatic for me. I check that all my gear is set to my default settings. It's easy to modify a setting like the ISO speed or exposure compensation and forget to change it back the last time I was out, so I want make sure everything is ready to shoot so I get the results I expect. Also I never want to run out of battery power or flash cards when I am in the field as great opportunities don't come that often and when they do - sometimes they only last a few seconds. If you are fumbling with your camera when something exciting does come along then you need to be better prepared if you are to have a chance at capturing it. Many of the folks I take out are not ready to shoot wildlife and by the time they have their camera ready the wolf, bear or bird has long disappeared.

Great Horned Owl next to highway, Alberta. 300 mm F4 + 1.4 X teleconverter Canon D50 camera ISO 200
Below are some of the things I check the day before a shoot . These checks are not limited to nature photography but anytime you are getting ready to take important shots like at a wedding, graduation or traveling to an exotic location. If you are being paid to take photos it is even more important that you be prepared and have backup equipment should anything fail.
This check list might seem like a lot of things, but in practice it only takes me a few minutes and when I get sloppy or forget some of them I sometimes miss and opportunity and its like getting a slap on the side of the head as a reminder to be better prepared!
The Night or Day Before Check list
- Check Batteries – charge them if necessary and bring spare batteries (at least one).

- Check storage cards, check amount of space, clear or back images on your card and always have spare cards.
- Check camera file shooting mode. I usually have my camera set to record . RAW files as they provide the best quality and flexibility; use JPG (set to highest quality mode) if you are not going to edit your pictures in a computer.
- Check camera color space – if shooting RAW set to Adobe RGB, if shooting JPG set to sRGB color space - for best results.
- Check your camera white balance, with RAW files I have it set to auto (you can override in the field if shooting .jpgs)
- Set camera to A (aperture priority mode), this is most useful shooting mode the majority of the time.
- Check camera ISO speed is set to 100 or 200 (increase in the field if required in low light)
- Check lens and camera that auto focus is turned on, you can turn it off in the field if necessary.
- Check exposure value (EV control) is set to +\- 0 i.e. no exposure compensation, compensate as necessary.
- Check exposure meter system set to Matrix (Nikon) or Evaluative (Cannon) cameras (not centered weighted or spot mode) - if not sure check your camera manual.
- Check camera, lens, filters and sensor are clean - if not clean as required.
- Take a few test shots to make sure camera is operating OK – know how to turn your LCD histogram function on and off during image preview so you can verify good exposures.
- Filters to bring along include: circular polarizer and neutral density grads.
- If you own a tripod, check tripod, legs, and head are OK – if not tighten or adjust.
- Bring your camera manual in case you need to check some function in the field (digital cameras can have complex functions or settings that differ on various camera models).
- If you might use a flash make sure it has fresh batteries and that you have a spare set.

Golden Eagle along side the highway east of Kamloops, BC
300 mm F2.8 lens & 1.5X teleconverter Nikon D2X ISO 200
Shooting Check list in the Field - Things can change in the field. The shooting mode dial on my Canon Cameras often changes just by simply putting my camera back in the bag so the next time I grab the camera it might accidently be set to shutter priority mode (This has never happened with my Nikons but something to watch for if you shoot with Canon).
With practice the steps below will become automatic so you can concentrate on seeing.
- Turn camera on.
- Verify ISO setting, adjust if necessary (increase in low light if you don’t have a tripod) – generally when hand holding your camera do not use shutter speeds below 1\60 second or follow 1\focal length rule e.g. 300 mm lens use 1\300 sec or faster.
- Check shooting mode set to A - Aperture priority mode most of the time.
- Look through camera – verify auto-focus mode is working, if not check lens or camera for A\M i.e. automatic or manual setting mode. It is with wide angles lenses that I sometimes forget that I turned autofocus off and because of the depth of tield is so great don't always notice right way that autofocus is off.
- If you have multiple lenses – choose appropriate lens for the situation and attach them to your camera (e.g. wide angle zoom for landscapes, telephoto for wildlife, macro for close-ups).
- Determine if you need a filter or lens hood – polarizer can be used almost anytime for landscapes; for wildlife – do not attach any filters so you have maximum shutter speed. For sunrises, sunsets consider using graduated neutral density filters.
- Explore the scene while looking through your camera, try zooming in and out, vary your viewpoint i.e. get low to the ground, or high on a hill or rock looking down, vary your vantage point.
- Once you discover an appropriate spot to shoot from – if landscape attach your camera to a tripod & fine tune your composition while looking through the viewfinder – move the tripod around if scene does not look good to you.
- Try both horizontal (landscape) and vertical compositions.
- For landscapes set lens Aperture to F11-F22 to maximize the depth of field, for wildlife set to F2.8 –5.6 – open lens to its widest aperture so camera will use fast shutter speed.
- Adjust polarizer filter for best effect – look through the viewfinder while turning filter (if photographing a landscape).
- Determine the focus point, generally focus about 1\3 up into the frame (approx hyperfocal distance) or focus on your main subject.
- Before you press the shutter check the edges of the frame and if necessary move the camera to eliminate components in your viewfinder you don’t want in the picture.
- Press the depth of field button on you lens to see what will be in focus and also look for the appearance of distracting elements that might appear when you stop the lens down.
- Determine if you need to use exposure compensation. e.g. if subject very light like snow increase EV to +1 to +2, if subject very dark, decrease EV to –1 or –2 or modify for artistic reasons i.e. decrease to create silhouette when shooting into the sun.
- Press shutter button gently (to reduce vibration even more for telephoto lenses or night photograhy use a self timer or cable release).
- Work the scene in front of you - try both vertical and landscape compositions, vary your point of view – take at least a half dozen shots of each scene or wildlife opportunity – more is better! Consider compositional guidelines rule of thirds, use lines to direct viewpoint and influence how a viewer might “see” the scene.
- Check your exposures using the histogram function on your LCD monitor - modify if necessary using exposure compensation EV control.

Sandhill Crane family along Highway north of Fort providence on the way to Yellowknife, Nikon D2X 300 mm F2.8 lens
Note: These steps are a general checklist and will vary with different users. Camera settings, filters etc can very widely depending on the photographer’s intentions – these are meant to a starting point only. Some cameras may not have some controls e.g. EV control – you can vary the ISO setting instead – work with what you have. You are the most important part of the photography process – a good photographer can take exciting pictures with any camera – you, not the camera, limit what you can see and photograph. Taking photographs is both challenging and rewarding – it requires no great feat of mental or physical skill. Use it to nurture your imagination and creativity and you will be rewarded.
If you are traveling by car you can have a bean bag or window mount ready (see article on window mounts) so you can shoot from the car window. All of the photos above were photographed along the side of the road so it pays to be prepared and ready to shoot when you travel.
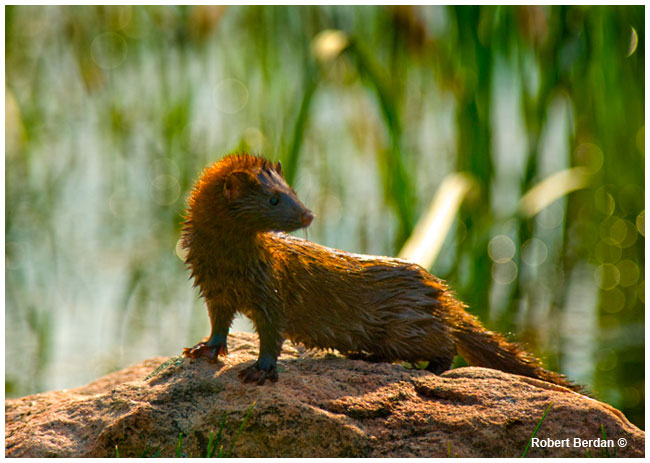
American Mink. While at my brothers house at Port Severn attending a barbeque, this mink appeared. My camera bag was open, my telephoto lens was on my camera and it was ready to shoot. I ran down toward the animal, with my brother's dog trailing behind me and managed to grab 4 good shots before the mink disappeared. If I had not had my camera ready I would never had the opportunity to photograph the mink.
[ Top ]
|
