How to Use Neutral Density Graduated Filters
by Robert Berdan
August 12, 2010

Sunrise Tonquin Valley - a 0.6 neutral density hard edged grad filter was used at the top of the picture to darken the sky and open up (lighten) the foreground so you can see details in the rocks and vegetation. Without the grad filter the foreground would be almost totally black.
One of the most useful filters in landscape photography are neutral density graduated or grad filters. These filters are usually used to darken the sky and lighten the foreground. They can be used to add drama to a sky especially those with dark clouds or a storm. These filters are most useful at the times around sunrise or sunset. They come in a variety of sizes and costs. Most of them are made out of acrylic or plastic though it is possible to purchase higher quality glass graduated filters from Tiffen. The cheapest filters cost about $60-75 from Cokin, next up are graduated filters from Lee and Singh-Ray at about $150-$200 each, and then glass neutral density filters are about $300 each. I own a set of Lee and Tiffen filters. The Tiffen are the best and also used in the movie industry. The glass filters are thick and heavy and if I should drop one they would likely break, but they are more scratch resistant then the acrylic filters and more transparent.
The main disadvantage I find with using acrylic filters is that they scratch easily and need to be replaced every few years - good for the company making them, but not the photographers. The acrylic or plastic filers are also prone to flare when I shoot into the sun and become even more so once you get scratches and nicks on them. Grad filters are available as squares, rectangles and as circular screw in filters. I don't recomend the scree in type of grad filters as you will only be able to use them when the horizon is in the middle of your picture. The rectangular filters can be moved up and down so you can move and adjust the edge transition. The good news is that even if you don't own a set of neutral density grad filters if you use Adobe Photoshop it is possible to simulate neutral density grad and even coloured grad filters digitally. However, I still recommend using the filters in the field when you can and using Photoshopwhen you couldn't use the real thing for a number of reasons (see movie below).
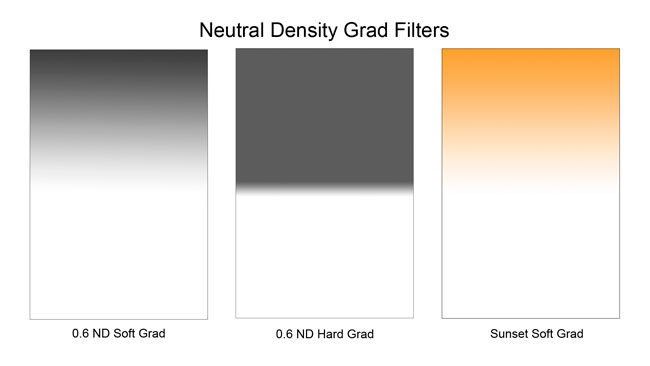
Above are three grad filters, On the left is a a soft grad, the transition from dark to light occurs gradually, in the middle is what we call a hard edge grad and on the right a sunset or coloured grad filter. The Number 0.6 refers to the maximum density of the filter in the gray or coloured area. 0.6 is equivalent to 2 F-stops. Grad filters are also available as 0.3 (1 F-stop) and 0.9 (3 F-stops). I find the 0.6 grad filters to be the most useful. I don't recommend using coloured grads as they appear gimmicky in my opinion and if I really want a coloured grad they are easy to add using Adobe photoshop.

How To Use a Grad Filter
When I photograph landscapes I almost always use a tripod to set up my camera. Then I simply hold the filter in front of my lens and move it up and down slightly so I can see where the edge of the grad starts - position the filter and take the shot. Generally if the scene includes a lake or large body of water in the foreground, or if I am shooting a prairie landscape where there is a distinct boundary separating the sky from the ground, I reach for a hard edge grad filter. For other scenes in the mountains around sunrise or sunset I usually select a soft graduated filter. With a little bit of experience you will know which filter works best. I simply hold the filter in front of my camera which is mounted on a tripod and I press the shutter button with my other hand. A filter holder will free both of your hands hands, but when using acrylic grad filters I found that I often have to tilt the filter to avoid lens flare so I use the hand held technique most of the time. Some other photographers like Tim Fitzharris uses gaffer tape to attach his grad filters to the front of the lens, but I wouldn't dare do this with glass grad filters. The most important thing is to move the filter up and down so you can see the edge of the grad and then position the eboundary between the land and sky - then hold it still if hand holding and take the picture. Also be sure to check the edges of your viewfinder to make sure you have the entire lens covered. For this reason the larger filters are easier to work with and can be used with different sized lenses. I would recommend using a filter holder if you have purchased smaller grads. In practice I only use grad filters with my wide angle lenses for landscape photography. Lee offers a deluxe filter holder with a lens shade which I have used with my 4 x 5 camera and it does reduce the flare caused by their acrylic filters. When you look at you pictures after using a grad filter if you can see a distinct line separating the top and bottom of the picture then you should have used a soft grad filter or perhaps no filter at all. If the use of a grad filter is clearly visible in the picture then the technique was not executed well.
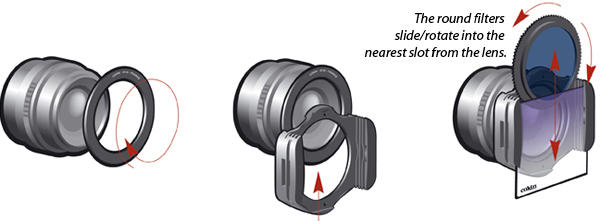
Cokin filter system consists of a ring that screws into the front of your lens and then you slide a plastic holder over it. The holder has grooves that you can slide in a polarizing filter or square neutral density grad filters. (From Cokin Website)

The rainbow was enhanced with a polarizer filter and a 2 F-stop hard edge grad filter was used to darken the sky.
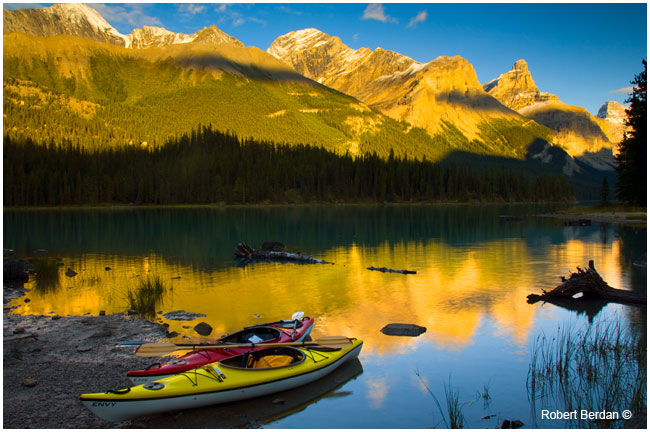
I used a 2 F-stop soft edge grad filter to darken the mountains in the background and lighten the foreground in this picture taken at Spirit Island, Jasper National Park. Using the Grad filter lightened the foreground.
ADDING GRADUATED FILTERS USING ADOBE PHOTOSHOP
Above is a movie from my Photoshop I online course showing how to apply Netural density grad filters with Camera RAW and
also using layers to any .JPG or .TIF file.
HDR IMAGING CAN SOMETIMES BE USED IN PLACE OF GRAD FILTERS
Another alternative technique to using to Grad Filters in the field is that one can take several pictures of varying exposure and combine them into a High Dynamic Range Photo - or HDR image using software like Adobe Photoshop. The effect of HDR imaging can sometimes be superior to using a Grad filter (see below). See featured photography acticle on HDR imaging by Wayne Bennett for more about this technique. The technique is also covered in my Photoshop II online course.

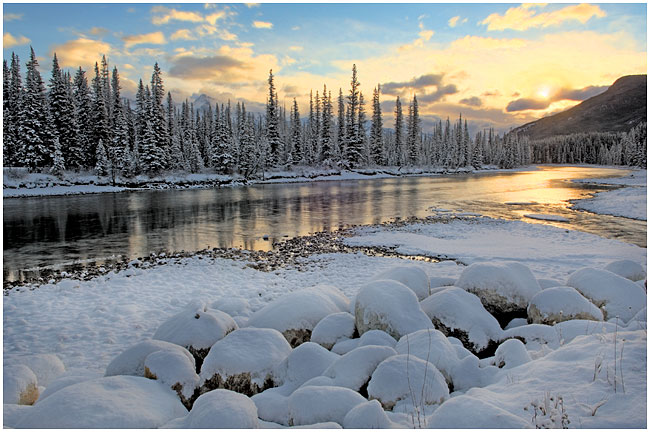
Winter Scene at sunrise shooting into the sun, a grad filter was helpful but still did not reduce the flare off the river
or reveal fine detail close to the sun.
Combination of 9 separate exposures combined into an HDR image with no filters used. I was able to capture
some detail around the sun and on the Bow river. I provide step by step instructions on how to create HDR images in my Photoshop II online course.
Other types of Grad Filters include reverse grads and strip grad filters. These filters have been used successfuly by many different photographers. Choosing which filters to use is like everything else in photography there are many different approaches and opinions. Some photographers avoid using any type of filters. I used to carry warming filters, cooling filters, a Blue-yellow polarizer etc (see below) but have found that Adobe Photoshop can simulate coloured filter effects with more control. The exception is the polarizing filter and though there are are tutorials on the web describing how to simulate a polarizer using Photoshop (see below) most of them simply increase colour saturation.. Perhaps in the future there will be a digital polarizer, but for now I still use one and I use the grad filters in the field when ever I can.
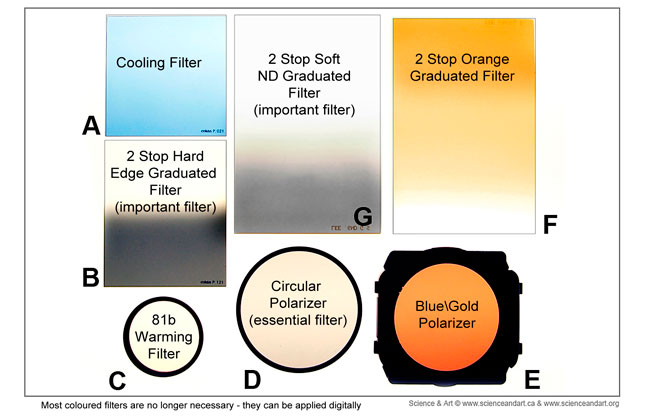
Different types of filters - for the most part I have narrowed down my use to a circular polarizer (both neutral and warm) and neutral density grad filtes. If I want to simulate the effect of coloured filters I can do this using Adobe Photoshop.
The Tiffen neutral density glass grad filters are the best quality grad filters I have found, but they are expensive almost the cost of a lens (so are some of the BW polarizers!). The Lee and Sing-Ray Filters are of good quality and reasonable in price, but because they are made of acrylic they will deform and scratch easily and if you use them often you will need to replace them every couple of years.The Cokin filters are the cheaptest grad filters available and I recommend them for those just learning how to use grad filters - if you find you use them a lot then you might consider upgrading. For those that use Adobe CS4 or CS5 photoshop you can alwasy a add a graduated density filter afterwards. For serious landscape photographers I recommend owning a 0.6 neutral density soft grad and 0.6 hard grad. Forget the coloured grad filers if you want to avoid gimmicky looking imges and if you can see the edge of the grad in your pictures or even if the demarcation is so distinct as to appear unrealistic rethink and try again. Different photographers will have different opinions on the use of filters. After 35 years of shooting I find my bag is now limited to 1) Sky light filter for use when I am kayaking to keep salt spray off the lens otherwise I don't find any benefit and if anything these filters degrade the image quality slightly. 2) I always have circular polarizer filters in my bag and use them primarily with my wide angle lenses for landscapes and waterfalls on both sunny and overcast days 3) I always have a soft and hard edge 2 F-stop neutral density grad filters in my bag for landscapes. When you are learning photography I believe it is important to play with and experiment with many different techniques and then make up your own mind what is useful and helps create the kind of images that you envision.
Links and Resources
TIP some photographers store their filters in soft zippered CD cases so they are protected and it is easy to quickly sort through them. Of all the photographers I have ever met, Daryl Benson has the widest range of filters with him for shooting and his photographs speak for themselves. Daryl is also a master of using Photoshop to enhance his images you can visit his web site for inspiration.
[ Top ]
|
