Introduction to High Dynamic Range Photography (HDR)
by Dr. Robert Berdan
August 5, 2013

Sunrise at Castle Junction in Banff National Park. I created a "realistic tone mapped photo " using Adobe Photoshop
HDR by combining 9 different exposures. EV -4, -3, -2, -1, 0, +1, +2, +3, +4 - this is my first HDR tone mapped image.
Surrealistic tone mapped photo created from a single image using Photomatix - contrast has been exaggerated.
HDR photography has two main purposes 1) to produce an image that captures a greater dynamic range of light and 2) to create images that exaggerate contrast for artistic effect. Many photographers do not realize that shooting HDR can result in images that simulate what we see with our eyes. The problem has always been that processes in photography including digital photography limit the range of tones we can capture when the dynamic range of a scene is very high such as shooting an interior with window light or in a canyon on a sunny day. In high contrast situations a single photo is rarely able to capture detail in both the shadows and highlights. There are many methods to compress the tonal range and produce better dynamic range photographs. In this article I touch on the history of HDR (high dynamic range) photography and describe some of the methods used to convert high dynamic scenes into LDR (low dynamic range images) for display. At the bottom of the page I provide a list of links to additonal resources including websites, video tutorials, free software downloads and books that deal with HDR photography in more depth.
Early HDR photographs
In the early days of photography film had a very narrow dynamic range and film was more sensitive to blue ligh then all other colours t and as a result the skies in early photographs are often totally white with no visible clouds - see photograph by Roger Fenton below (Shadow of the Valley of Death from 1855).

Shadow of the Valley of Death by Roger Fenton (source Wikipedia commons) Note the blank white sky typical of early photographs that were more sensitive to blue light resulting in overexposed skies. The round objects are canon balls.
Jean-Baptiste Gustave LeGray (1820 - 1884) a french photographer appears to have made the first HDR images using combination printing. He created one negative exposed for the water and another negative exposed for the sky and combined them during printing. At the time it was impossible to capture detail in both the sky and water in one shot (see below).

Gustave LeGray - Brig upon the Water - Albumen print 1856 (source Wikipedia commons). Early HDR image created by
printing two differently exposed negatives, one exposed for the sky and the other for the water. This is a simple form of tonal mapping - which is a process by which the photographer can reduce the dynamic range or contrast ratio of the entire image so it is visible in a single print.
In the mid twentieth century Ansel Adams pioneered tonal mapping through use of exposure, film development, dodging (lightening) and burning (darkening) his images during enlargement and printing. This system he developed along with Fred Archer became known as the zone system.
Another technique widely used by landscape photographers to reduce the dynamic range of a photo is to use a neutral density graduated filter in front of the lens to cover the sky in order to darken it and also lighten the exposure of the foreground. I use neutral density grad filters regularly (see my article on grad filters) for landscape photography. Photoshop introduced an easy way to add a neutral density graduated filter in Adobe Camera RAW. It's also possible to add graduated neutral density filters to .jpg or scanned slide images using a black and white gradient over the photo in a separate layer and then blending the gradient using overlay blending mode (see my Photoshop II tutorials on how to do this). The goal is to reduce the dynamic range of the image and bring out detail in the sky and clouds and\or brighten the foreground. .
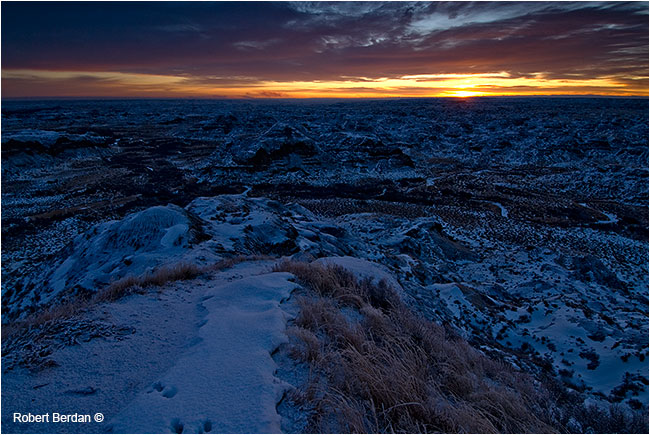
Sunrise at Dinosaur provincial park in winter - straight image no manipulation. .
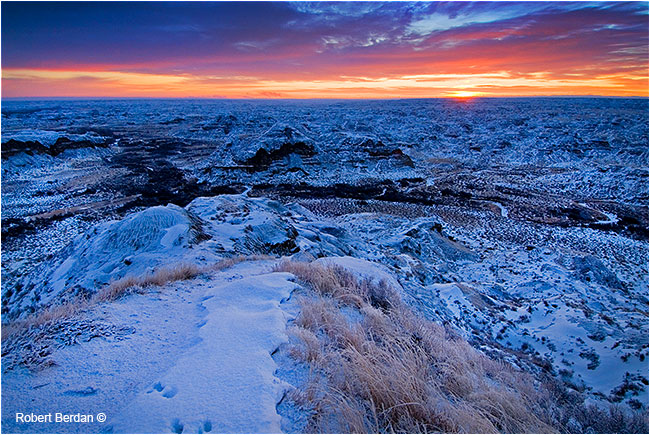
Same image after processing in Adobe Camera RAW after adding a graduated neutral density filter to the top and after brigntening up the shadows. The image above is closer to what I actually saw with my eyes. It also demonstrates the importance of post processing RAW files and how an image can be vastly improved using Adobe Photoshop or other image editing software.
In addition to being able to add a neutral density grad filter in Photoshop, the software also offers burning and dodging tools to darken and lighten areas and a shadow highlight tool that can lighten the shadows and darken the highlights (see fisherman below). One of the consequences of making a shadow area lighter in tone is that there will also be an increase in digital noise. Over exposed areas of an image are the most difficult to fix as there may not be any information to recover especially if one is dealing with .jpg files. When we shoot RAW files we can sometimes recover slightly overexposed highlights by reducing the overall exposure and using the highlight recovery tool in Adobe Camera RAW. RAW files in general provide a greater margin for exposure error and the overall exposure can be tweaked by as much as 1-2 EV - a good reason to shoot RAW files instead of .jpg.
 |
 |
|
Original photograph was underexposed due to the strong backlight - Joe's trout photo by Chad Peterson |
After bringing the photo into Photoshop and applying the Shadow highlight tool I am able to lighten the dark areas. |
Combining Multiple Exposures to achieve a lower dynamic Range or LDR image
Another way to increase the dynamic range and reduce the overall contrast in an image is to take several differently exposed images and combine them into an HDR image like LeGray did in the 1800's. The resulting HDR image can not be displayed properly because its tonal range exceeds that of most computer monitors which have a dynamic range of about 9.5 EV (EV exposure value). EV can be described as changes in exposure in a camera either in f-stop or shutter speeds. A single EV is equivalent to a change in either 1 f/stop or 1 change in shutter speed by doubling it or cutting it in half e.g. 1|60 sec to 1|30 sec. Using EV values we don't specify whether the change is in the f-stop or shutter speed as it could be either.
Generally in HDR photography we keep the f-stop constant and make changes in exposure by changing the shutter speed, this prevents changes to the depth of field in the image. When we take several exposures and combine them we can extend the dynamic range.
The dynamic range of a scene can vary extensively and refers to the difference in exposure between the darkest region with detail to the lightest region that contains detail. If the dynamic range is below 9 EV then taking multiple exposures isn't usually necessary. Below are some typical EV values in different types of lighting.
- Sunny day the dynamic range is about 13-14 EV
- Foggy day the dynamic range between 4-5 EV
- Overcast sky with shade 6 EV
- Sun overhead with some shade 8 EV
- Night scene with street lights 12 EV
- Photographing inside a room with windows can exceed a dynamic range of 14 EV
- Photographing in a forest or canyon on a sunny day can exceed a dynamic range of 14 EV
When bracketing exposures it is best to use A or Aperture priority mode, hold the f-stop constant and vary the shutter speeds. You can easily use the autoexposure compensation button if your camera has one to vary the exposure in aperture priority mode. My Nikon camera bodies allow ±5 EV compensation, while other camera only allow ± 2 EV or less. To ensure the images are perfectly aligned always use a tripod. If your camera doesn't offer exposure compensation, you can put your camera in M or manual mode and vary the exposures times manually.
By bracketing ±2EV and if the camera has a conservative 6 EV dynamic range we can extend the dynamic range of the camera to 10EV by taking a -2 EV and +2 EV exposure, further EV bracketing can extend the dynamic range even more.
The human retina has a dynamic range of about 6.5 EV, but by changing the diameter of the iris which regulates the size of our pupil we can see a dynamic range of between 20-24 EV. This is why we can see in bright sunlight and we can also see dimly lit subjects under moonlight.
In comparison most digital camera sensors have a dynamic range of about 6-9 EV when shooting .JPG files and up to 10-11 EV when shooting RAW files. What this means is that when the dynamic range of a scene is high most digital cameras can't capture detail in both the highlights and shadows. Usually an experienced digital photographer will expose for the highlights (brightest) areas to make sure these regions are not overexposed. If the dynamic range is high exposing for the highlights can result in blocking up of the shadows so they turn completely black with no detail (see -3 EV photo below). To extend the dynamic range to include both the highlights and shadow detail in a high dynamic range situation a photographer can take several exposures and combine them into an HDR image, which must then be tone mapped to display properly on our monitors or a print. A LCD monitor can display a dynamic range of about 6-9 EV. How the HDR images are compressed i.e. tone mapped, determines the overall appearance of the final image which can appear realistic or surrealistic. The end result is determined by the photographers workflow and the software they use. Generally I prefer more realistic looking images, but I am open to experimenting and trying different HDR presentation styles as shown below.
Bayshore Inn Restaurant - my goal was to capture the scene outside and inside of the restaurant in one image. To do this I combined 2 exposures one exposed for highlights in the window and the other for the interior of the restaurant.
 |
 |
|
-3 EV exposed image to show details in the window - exposed for the highlights |
+1 EV exposed image to show the interior - exposed for the shadows |
The simplest way to create an HDR image is to combine two exposures. Below I did this two ways, the first method I combined them in Photomatix then tone mapped the photo and did some final retouching in Photoshop.
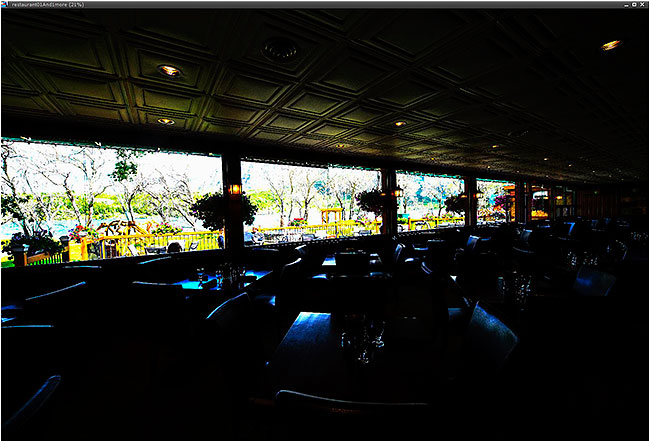
True HDR image after combining the two exposures above cannot be displayed properly - it must be toned
mapped first to compress the tonal range.
Above is a screen shot of true HDR image before it's tone mapped. A normal computer monitor is not able to display the wide dynamic range so the tones must be mapped to fit into a LDR (low dynamic range) image (below). The LDR images are often referred to as HDR, but they are really HDR images that have been remapped into LDR images so we can see them properly. The appearance of the final tone mapped image depends greatly on the software and how the tone mapping is applied. Images can appear realistic or they can have exaggerated contrast, halos and\or an overall grungy look to them. How the images are output depends on the photographers vision and software they use to do the tone mapping. Different HDR software programs use different algorithms to process the images. So far I have experimented with only a few HDR programs including: Photoshop HDR Pro, Photomatix, Picturenaut and PTGui.
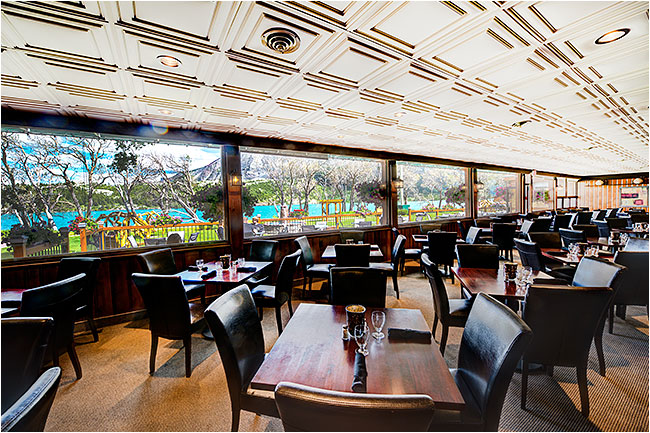
Tone mapped LDR image created in Photomatix using photo realistic mapping. Technically this is not an HDR image,
but it was created using HDR techniques and is now a LDR image.
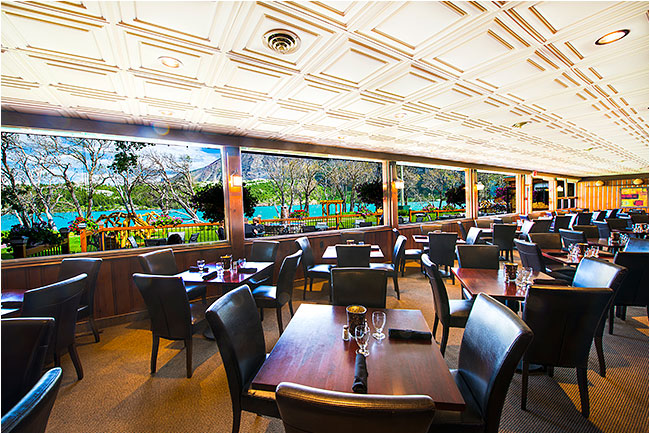
The photograph above involved combining two different exposures into separate layers using Photoshop with the underexposed image at the bottom and the lighter exposure on a top layer. I then added a layer mask to the top layer and painted the windows with black so the the underexposed image showed through. I describe how to work with masks in my free Photoshop II online course. Personally I prefer this version over the HDR image created above with Photomatix (Bayshore Inn restaurant Waterton).
My first HDR image is shown at the top of the page and the image resulted from combining 9 different exposures EV -5, -4, -3, -2, -1, 0, +1, +2+ 3, +4 on my Nikon camera. In fact I had tried using grad filters on this scene, but the filters only covered the top of the picture and the bright sun reflecting off the Bow river continued to be overexposed. By combining the different exposures I was able to achieve an image that appears similar to what I actually saw with my eyes..
Exploring HDR photography further I began to wonder how many exposures is enough and what is the optimum amount of bracketing? Most of the books suggest for outdoor photography to start with 3 exposures, EV -2, 0, and + 2 - and this seems to work for most scenes with a dynamic range of about 13 EV or less (sunny day),
If we assume the digital camera has a dynamic range of about 6-9 EV then combining an 2 EV overexposed image and -2 EV underexposed image will capture about 9 + 4 = EV 12 dynamic range. On a sunny day in my backyard I measure the dynamic range to be about EV 13. Some HDR book authors suggest taking two additional bracketed exposures EV -4, EV+4 because by overshooting the range you can achieve better noise free shadows (Bloch 2007). However he goes on to say and show that blending more images generally results in softer images, whereas fewer images result in crisper lines in the picture - so where detail is important its better to use fewer images.
What is the optimum exposure interval one should use?
Some authors of HDR books suggest using ±1 EV bracketing and others suggest ±2 EV. Combining more images tends to reduce noise, but can also reduce the sharpness of an image. More images also means more work, more processing time and therefore I favour using ± 2 EV increments most of the time. Whether Ii use 3, 5 or 7 bracketed exposures depends on the overall dynamic range of the scene and I always use a tripod when shooting for HDR photography.
The only way to be sure you have enough photos is 1) through experience or 2) by measuring the dynamic range of the scene and inspecting your exposure histograms.
A simple way to measure the dynamic range with your camera is to use your cameras spot meter, point the camera at a shadow area where you want to see detail and note the exposure setting. Then point at a highlight where you want to see detail (e.g. a cloud) note the exposure setting (or write it down). Now count the EV values between the two exposures either the number of f-stops or shutter speeds. This will provide you with a measurement of the dynamic range of the scene. Never point the spot meter directly at the sun as it will almost always be beyond the dynamic range of the camera unless the sun is hidden behind clouds. If you knowthat the dynamic range of your camera, and the dynamic range of the scene exceed it then start bracketing in 2 EV steps until you cover the entire dynamic range. It doesn't hurt to take extra shots to extend further, but you can determine if you have all the information by inspecting your exposure histograms. The website www.dpreview.com often publishes the dynamic range of digital cameras in their reveiws, if you can't find yours assume it has a dynamic range of about 8.5 EV typical of most digital SLR cameras (e.g. Nikon 510 at dpreview.com).
Histogram Analysis
 |
 |
|
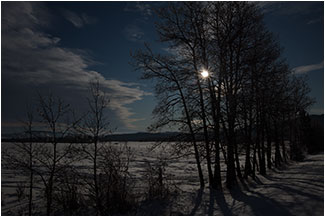
EV - 2 Exposure |
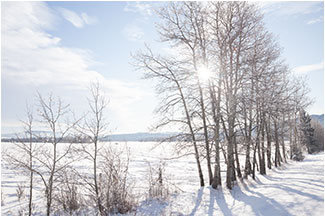
+2 EV exposure |
|
|
|
|
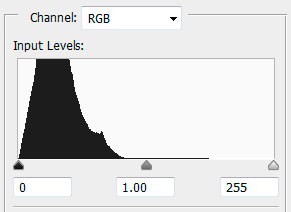
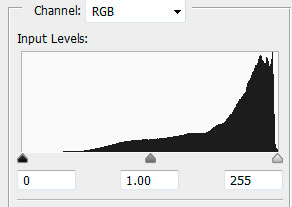
Histogram of -2 EV exposure showsthe right tip of the data moved away from the right margin indicating that all the highlights have been captured in the photo - no need to reduce the exposure any further. |
|
Histogram for +2 EV exposure shows that all the shadow information is contained on the left side and none of the shadows are black. There is no need to take another backeted over exposed image. |
Histogram analysis will tell you whether you have captured all the information in a scene. In some cases you might have to take an extra over or underexposed bracket in order to capture the highlights or shadow detail.

If the histogram for the scene looks like the one above - there is no need to take multiple exposures as all the highlight and shadow detail are contained within a single shot. Bracketing exposures will not reveal further information.
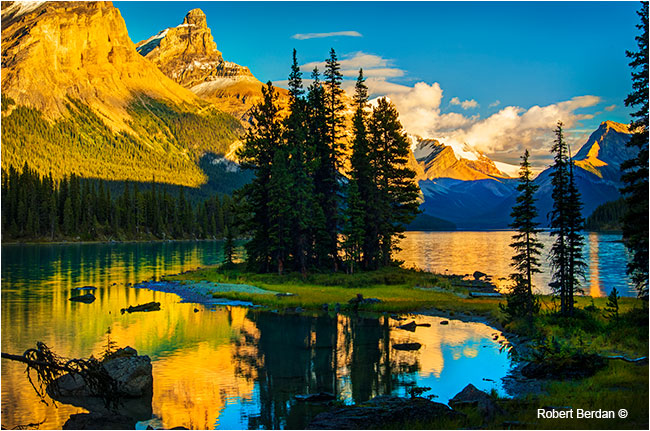
Ultimately with some experience shooting and processing your bracketed series of images you will become more aware of the scene dynamic range and know when to shoot more or less images. Sometimes you only need 2 exposures to capture the scene dynamic range (see Spirit Island photo below).
Combination of 2 exposures 0 and -2 EV using Photomatix natural tone mapping preset - using HDR and tone mapping I am able to open up the shadows and keep detailsi n the highlights (snow) on the mountain tops for an image that more closely resembles what I saw with my eyes. .
Merging with too many bracketed images will slow down image processing and may result in lower quality HDR image if there was movement in the scene - creating "ghosts". Merging images when the EV differential value is too great (i.e. more then 2 EV) can result in blotchy areas and added noise in the combined picture. Getting everything just right involves some practice and experimentation.
Tone mapping of single images to produce simulated HDR-like photographs
Single image tone mapping is possible with JPG, TIF and RAW files and although the images are not created from true HDR images, their appearance can look remarkably similar. I have used Photomatix and Photoshop to experiment with some of my images shown below.
Single image tone mapping has some advantages in that you can apply it to any image, it's faster to process and it will be free of ghosts caused by movement of subjects in multiple exposures. The main disadvantage is that it only works on some images and it also tends to enhance noise in the image. But it's fun to play with and below I show examples I produced by tone-mapping single images using Photomatix software.
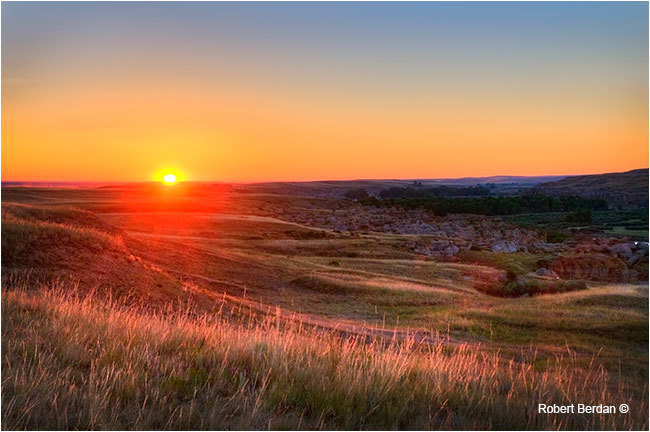
Original exposure of sunrise over Writing-on-stone - this RAW image is vastly underexposed. I took this single image and tone mapped it using Photomatix to create the image below and was surprised to discover the the information that was hiding in the shadows.
Above is a single image tone mapped with a natural photo preset in Photomatix and the tone mapping has brought out detail in the lower valley that was present in the RAW file but not visible. If this image had been a .jpg I doubt this would have been possible. Another reason to shoot with RAW files.
Moraine Lake in Banff National Park HDR single tone mapped image using a surreal preset in Photomatix.
Single tone mapped photo of the tundra in the Northwest Territories - the sky was darkened and colours in the foreground were increased leading to a more "artistic" impression.
Sunrise in a forest near Port Severn Ontario. Single tone mapped photo in Photomatix using a painterly preset.
Surrealistic tone-mapped single image using Photomatix - the image shows a fair bit of glow and appears surrealistic.
Waterton - single image tone mapped in Photomatix with a more realistic intrepretation. Detail in the clouds was enhanced.
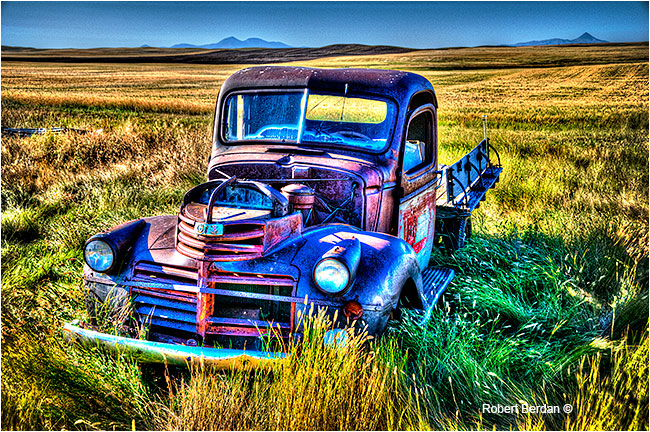
Old truck in Yellowknife outdoor mining museum - tone mapped in Photomatix to give it a more painterly appearance.
HDR Software
There are a variety of software programs that are designed to create HDR images and the features of many are compared in the books I have listed below for those that want more information. I started with Photoshop's HDR pro feature and I describe how to use this tool in my Photoshop II online tutorials. Photoshop offers the basics and does a pretty good job creating photo realistic tone mapped photos.
Above a screen shot of Photoshop CS6 HDR pro containing 9 differently exposed images. The software offers a variety of tone mapping options which requires some experimentation to get the best results. There are no presets like in Photomatix Pro.
Photomatix Pro
Photomatix pro is the easiest software program to create HDR images that I have worked with. It offers a wide variety of presets which can be fine tuned and you can save and make your own presets. Presets include painterly, surreal and even black and white effects. The software is reasonably priced - about $100 to purchase online. The company also offers a free trial version of the software you can download and play with - the trial versions leaves a watermark on your images.
Screen shot of Photomatix Pro software - this software is specifically designed for HDR imaging and costs about $100. If you purchase the software you can install it on two computers. It is easy to use and learn and it supports the latest RAW files.
Picturenaut
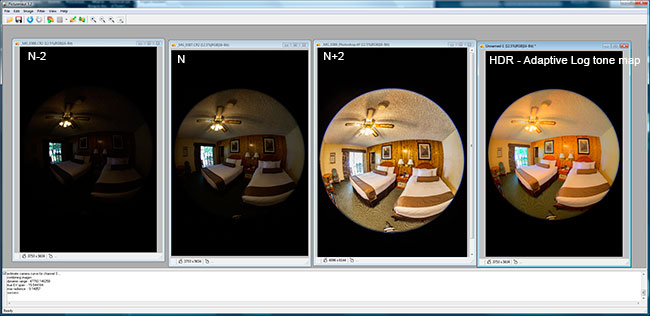
Picturenaut is a free HDR software program. Above I show several exposures taken with a fisheye lens. I use fisheye images to create spherical panoramas from the HDR images.
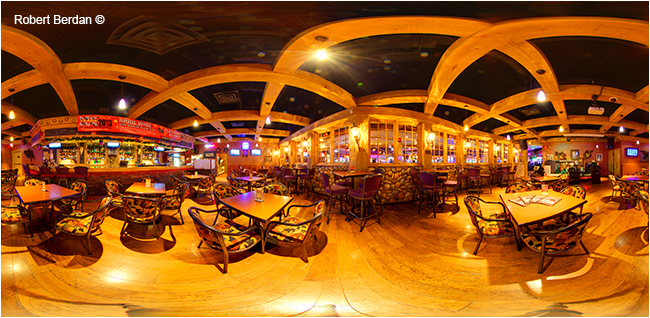
HDR Panorama created using PTGui, the images were exposed using auto exposure bracketing with my Canon 5D Mark II, 8-15 mm fisheye lens using EV -2, 0, +2. The panorama is then converted into spherical 360 vr movie as shown in some of my other articles.
In Camera HDR
Some cameras offer the ability to combine several bracketed exposures into a single HDR photo that is tone mapped right in the camera. Some cameras allow you to combine only 2 images others up to 3 images and in my experience DSLR cameras can only combine JPG files and do not support combining RAW files into an HDR image. My Nikon 5100 allows me to combine 2 JPG images with an exposure difference of 1-3 EV. On my Canon 5D Mark II I can use auto bracketing to create -2, 0 and +2 EV exposures which I must then combine manually, though the new Canon Mark III will combine JPG files in the camera. It would be nice if it were possible to combine 5 or more exposures and be able to use RAW images in the camera, but for now most types of HDR processing needs to be done on your computer using software.
Summary and Conclusions
The early HDR images by LeGray demonstrate that the process of combining differently exposed images has been around for almost as long as photography has been practiced. Today it is easier then ever to combine multiple exposures and the resulting tone mapped images can look very painterly or realistic depending on the photographers workflow and software. The main advantage of HDR is that it allows us to capture scenes with a very large dynamic range and in this way pictures can appear very close to what we see with our eyes. To get started in HDR the basic process is begin with a set of 3 images -2, 0, +2 EV and then combine them with HDR software. For scenes with very high dynamic range it's important to actually measure the dynamic range and review the exposure histograms to ensure all of the information is acquired. For best results always use a tripod.
Below is a list of a few web sites on HDR, books and video for those that want to learn more about this type of photography. I plan to spend more time exploring HDR photography in the future as I consider it another tool I can employ to make my photographs more interesting. RB

