Create Impressionistic Photographic Images Digitally (Digital Ortons)
by Dr. Robert Berdan

Painting by Claude Monet, April 1873 - Called Impression, Sunrise
Other impressionist painters included: Camille Pissaro, Edgar Degas, Pierre-August Renoir, Freder Bazille,
Paul Cezanne, Alfred Sisley, and Berthe Morisot.
Impressionism is characterised by the use of short, bright, colorful strokes of paint that tried to simulate reflected light. The technique originated n France in the 1870's. This image is in the public domain because its copyright has expired.
Introduction
Impressionism first referred to a style of painting originating in France around 1870’s and was characterized by the use of unmixed primary colors and small strokes to simulate reflected light. The objective of the style was to attempt to capture the subjective impression of light in a scene.
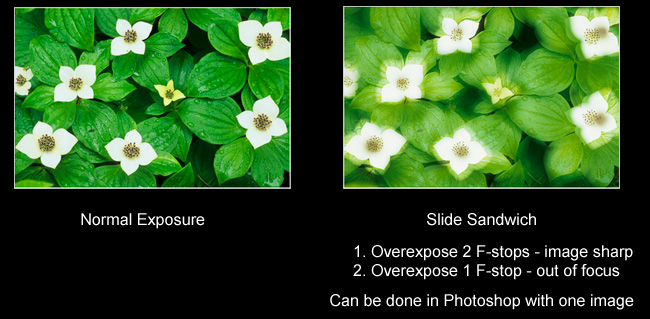
Originally developed using slide film one would sandwhich two slides together as described by Michael Orton.
A similar effect can be achieved in photography by combining two images to form a slide sandwich, where one image is over exposed by 2 F-stops and sharp and the other is over exposed by 1-Fstop and out of focus or blurred. This technique was first described by Michael Orton in 1992 and 1994 and recently popularized by Freeman Patterson and André Gallant. After I played with this technique using film I found that I was wasting a lot of film and after switching to digital thought there must be a way to create a similar effect using only one image and an image editing program like Photoshop.
The advantage of using a computer and image editing program is that the effects of any type of manipulation on the image can be seen instantly, each procedure can be controlled precisely, and one only needs to start with a single properly exposed image – a scanned slide, negative or digital file. Using RAW digital files is even better as it will allow you to import and mimic an over and underexposed image from the same file. Below I describe a simple procedure that anyone can use to create what I like to call “Digital Ortons” using an image editing program and a computer. The resulting digital files can be printed directly form the file or made into a slide on a digital film recorder at a professional photo service center.

To start you with you will need to open an image in Adobe Photoshop (any version from 4 and up should work fine), you can also use any other image editing program provided it supports multiple layers, a blur filter and blending modes.
-
Open your image in Adobe Photoshop, set the resolution depending on whether you going to use the image on the World Wide Web (72 dpi) or to make a print (300 dpi). Select Image>image size – set the image dimensions and resolution.
-
Select Window>Layers to open the layers palette
-
In the layers palette select the first layer with your mouse pointer and duplicate the layer (right click and select duplicate from the pop up box or select the arrow on the top right of the layers palette and select duplicate layer from the pop out box).
-
Select the bottom layer, then select Image>Adjustments>Brightness and Contrast and adjust the brightness to +100 to simulate a 2 F-stop over exposure. (You could also use the levels to increase the mid tone exposure level if you prefer – the results are similar).
-
Select the top layer, set opacity to 50% and set the blending mode to multiply. Then select Filter>Guassion blur and try values between +10 to +30 – the amount of blur you add is a personal decision and will also depend on the resolution of the image, but you can see the effects instantly on your screen.
-
With the top layer selected, re-adjust the opacity slider in the layers palette to obtain the desired image density; good values appear to be between 60 to 80% (make sure you have layer 2 selected when you do this). You can also experiment with different blending modes in the layers palette - I like to use Multiply blend mode.
-
Flatten the image, select the right arrow on the top right of the layers palette and from the pop up side menu select flatten image.
-
Select Image>adjustments>Hue & Saturation and increase the saturation +10 to +30 to obtain the amount of color saturation you desire. You may also want to adjust the overall image contrast using the levels and curves feature to “optimize” the image, as there will be some loss in image contrast when you combine them. Finally I also add a bit of sharpening by applying the unsharp mask filter in photoshop.
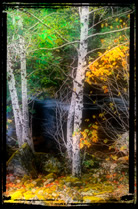 You can experiment with different blending modes (soft light, hard light etc), adding Guassian blur to the bottom layer, adjusting levels instead of brightness, taking the blurred layer and scaling its dimensions larger to more closely simulate out of focus effect in the camera. It’s also possible to use more then two layers in Photoshop just as it possible to combine more then two slide transparencies. You can repeat the entire process on the same image several times to exaggerate the effects. The main advantage is that you can use your existing image files and you only need a single image to create “Digital Ortons” and you can vary the amount of blur and amount of over exposure. If you would like to experiment with an impressionistic form of photographic imagery and own a computer with image editing software then this is a quick and simple way to achieve it. Other forms of multiple exposure imagery can also be simulated using a digital darkroom - something to consider when it’s cold and dark outside. The procedure described above and several variations have been available on the Internet for some time prior to writing this article and this is not the first and only way to create Digital Ortons. I believe credit and inspiration for developing the technique using film is owed primarily to Michael Orton hence the name “Digital Ortons”. You can experiment with different blending modes (soft light, hard light etc), adding Guassian blur to the bottom layer, adjusting levels instead of brightness, taking the blurred layer and scaling its dimensions larger to more closely simulate out of focus effect in the camera. It’s also possible to use more then two layers in Photoshop just as it possible to combine more then two slide transparencies. You can repeat the entire process on the same image several times to exaggerate the effects. The main advantage is that you can use your existing image files and you only need a single image to create “Digital Ortons” and you can vary the amount of blur and amount of over exposure. If you would like to experiment with an impressionistic form of photographic imagery and own a computer with image editing software then this is a quick and simple way to achieve it. Other forms of multiple exposure imagery can also be simulated using a digital darkroom - something to consider when it’s cold and dark outside. The procedure described above and several variations have been available on the Internet for some time prior to writing this article and this is not the first and only way to create Digital Ortons. I believe credit and inspiration for developing the technique using film is owed primarily to Michael Orton hence the name “Digital Ortons”.
References
- Michael Orton, (1992) Once upon an Island – out of print. Michael Orton, (1994) Popular photography, September issue, page 52. Michael also describes the use of this technique in his book “Photographing Creative Landscapes “ Amherst Media, 2001.
- Freeman Patterson and Andre Gallant (2001) Photo Impressionism and the subjective image, Key Porter Books Ltd, Toronto, Ontario, page 26-28, 2001.
- Darwin Wiggetts' version of Orton Imagery at Nature Photographers Online
- Michael Orton's new web site: www.michaelortonphotography.com
[ Top ]
|
