
Large Panoramic Images taken with a
Light-Microscope of Aspen and Elodea Leaves
Dr. Robert Berdan
January 22, 2023

Aspen leaf panorama stitched from several hundred images, each image photographed with a 20X objective. View interactive zoomable image on Motic's server.
In 2022, I was contacted and asked if I could produce a picture of an aspen leaf enlarged to 40 feet tall. The image was to be a photographed with a light microscope at 200X so that the individual cells and organelles with the leaf could be seen when standing close to the enlarged image. Many images would need to be taken of the leaf and then stitched together to form a giant panorama. This seemed like it should be straight forward, but it wasn’t.

Aspen leaves were collected in September around Calgary with the help of my father and wife.
I have made many large panoramas before some of them 10 feet tall and 30 feet wide with no problem using Photoshop. But these photos were all landscape panoramic images or pictures of the night sky and aurora. I have also taken thousands of photomicrographs and with several kinds of light microscopes and all of my microscopes had attached high resolution Nikon or Canon digital single lens reflex cameras (DSLRs).
Here I describe methods I used to make a large panorama of a leaf and some of the challenges I had to overcome in doing so. I also show one system by Motic that automatically stitches images from prepared specimens on microscope slides. The use of digital images taken with a microscope is referred to as virtual microscopy. An automatic scanning system is more costly, but it saves a tremendous amount of time when compared to stitching images manually. I also found one free software program that could handle large numbers of images and also produce panoramic images from a video taken of the specimen (Microsoft ICE – image composite editor). Eventually, I was able to produce a large image 40 feet tall at 300 dpi (dots per inch) using a combination of Adobe Photoshop CS2023 and Topaz Gigapixel.
To make large panoramas with a light microscope a mechanical stage with XY translation is necessary to move the microscope slide. Smaller pans of 20-30 images can be made by moving the slide by hand, but it is easier with a mechanical stage. It is important that adjacent images overlap on all four sides by 25-30%. I used a software program to capture images from my cameras called Digicam control which is free. The program offers a viewing grid to ensure that each photo I took had sufficient overlap. It took me several hours to capture images of a single leaf. I first began by doing some preliminary tests on only part of the leaf.
Image Capture
I captured RAW image files primarily using a Nikon D500 at IS0 200 using a Zeiss Axioscope microscope with bright field and DIC (Differential Interference Contrast optics). I kept the microscope light constant and the microscope was set up for Köhler illumination (R. Berdan 2022). I tried several different software programs to stitch the images. My computer was a Windows 10 PC, with 64 GB RAM and a 4 TB solid state drive, AMD Ryzen 2700X 3.7 GHz, 8 core processor.

Microscopes I use in my home laboratory with DSLR cameras connected to a computer

Screen capture of Digicam control software showing an aspen leaf at 200X. This software is used to capture images from my Nikon D500 camera attached to my microscope while viewing the image live on a computer screen. Using live view I avoid vibration from the camera mirror “slap” while making exposures. For critical focus the software allows me to zoom in on the screen.

Above is a screen capture of Digicam control with the image of an Aspen leaf at 200X. A grid can be turned on and off to ensure adequate overlap of adjacent images. The lighter regions of the images above shows how adjacent regions need overlap by about 25-30% on all sides to guarantee a good blending of the images. The white overlay is just a graphic representation of the amount of overlap needed between adjacent images you can also see the light gray grid.
I tried several panoramic stitching programs: Photoshop, Microsoft ICE (Image Composite Editor), Autopano giga, and PTGui. Motic also scanned some Aspen and Elodea leaves for me using their automated turn-key stitching microscope and software that permits taking a focus stack of each image and then stitching them (see below).
Aspen Leaves

After collecting leaves I flattened them for several days between glass microscope slides using a paper clip.
I began collecting aspen leaves in September when they began to change colour. Aspen leaves vary in size from about 1\2 inch to several inches. I selected the smallest leaves I could find. I first stitched a leaf taken at 50X, then 100X and finally 200X. The leaves were not as flat as I hoped. At high magnifications the small depth of field made blending the images more difficult. I tried flattening the leaves between two microscope slides with large paper clips. On top of this problem, aspen leaves turned out to be several cell layers thick making it difficult to see the individual cells and organelles clearly.
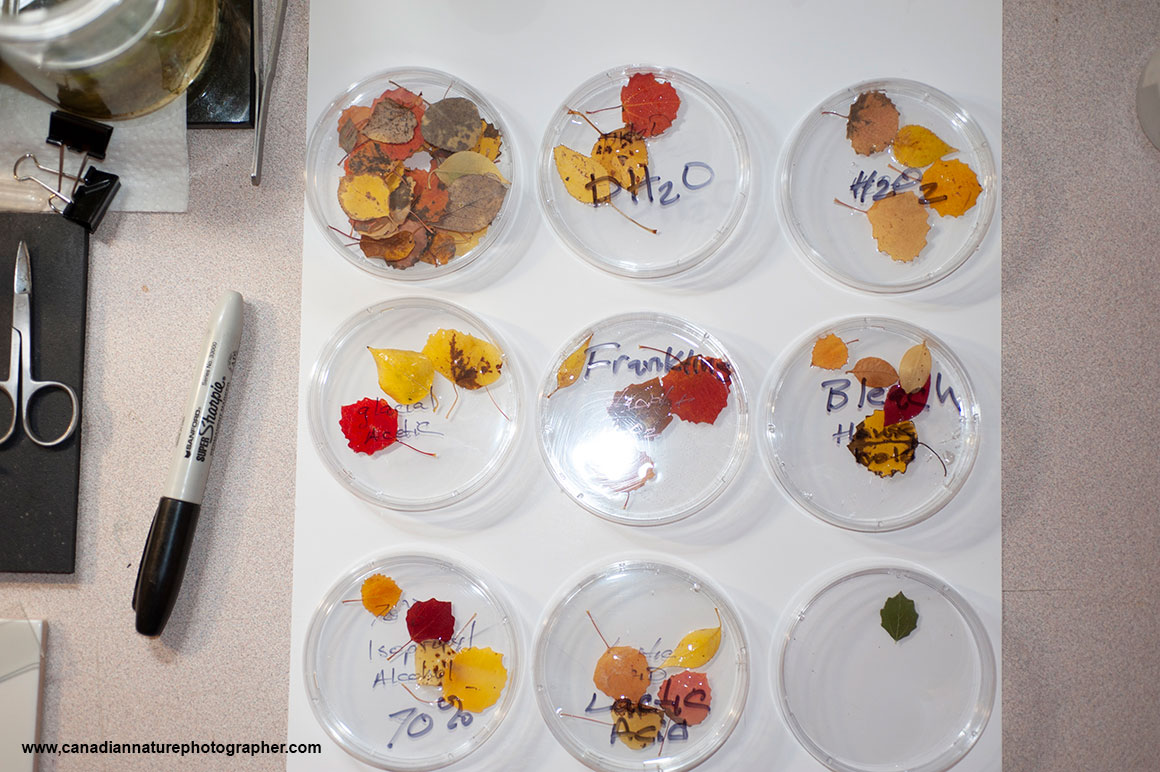
In order to make the aspen leaves transparent I soaked them in various solutions, and also boiled them in water.
I tried clearing the leaves using several solvents e.g. distilled water (control), Hydrogen peroxide 30%, Glacial acetic acid and hydrogen peroxide 1:1 (Franklin’s solution), glacial acetic acid, household bleach (5% sodium hypochlorite), 70% isopropyl alcohol, lactic acid, and methyl salicylate. These chemicals were chosen on the basis of previous studies describing clearing methods for plant leaves (J.M Heer, 1993, E Garcia–Gutierrez et al. 2020).
Some methods I used on the leaves required fixing them first – I tried both Bouin’s fixative and 2.5% glutaraldehyde. I left the leaves for several days in the clearing solutions. Franklin’s solution worked the best and resulted in white leaves with a mesh network but most of the cellular components were extracted (E. Garcia-Gutierrez etal., 2020).

Aspen leaves mounted on microscope slides. I selected the smallest leaves I could find, about 1\2 an inch in size. The aspen leaves turned out to be too thick (about 6 cells deep) and their lack of leaf transparency made the observation of intracellular details difficult.
Clearing the aspen leaves was not helpful for making panoramic photos as no cellular detail was visible. Therefore I then began to explore the use of smaller thinner leaves from a water plant Elodea.
Manual panoramic images of Elodea

Above image shows the tip of a live Elodea canadensis leaf taken with differential interference contrast (DIC) microscopy (panorama). This plant leaf is only two cell layers thick and intracellular organelles and chloroplasts are visible - 200X.
I recalled studying Elodea leaves in a first year university biology lab. Elodea is a common fresh water plant found in ponds in North America. The large size of the cells makes this plant ideal for studying cytoplasmic streaming of chloroplasts which can be seen moving around the edges of the cells – see movie below. Unfortunately in October I was not able to collect any Elodea plants in ponds around Calgary.

Two species of Elodea I ordered from Carolina Biological - Elodea canadensis and Elodea densa
I visited an aquarium store in Calgary called Pet Emporium. Unfortunately they told me that Elodea was no longer allowed to be sold in Canada because it is considered an invasive plant (see Wikipedia). I contacted Boreal labs in Ontario which provides science supplies for educational use in schools and they also told me they were not allowed to sell Elodea. I then contacted Carolina Biological in the US via Merlin.ca located in Toronto and ordered Elodea. I ordered two species of Elodea, and had to pay $100 extra for inspection at the US border. I received Elodea plants about a week later and they are still living in my aquarium (in January 2023). I cut off small leaves where they are attached to the stem and began photographing them. I placed the live leaves in water under a coverslip. I sometimes sealed the coverslip with clear nail polish so that water would not evaporate while taking the pictures. Light and heat from the microscope light stimulated more movement of chloroplasts around the cells. The smaller size of the Elodea canadensis leaves made it the better choice.
Cytoplasmic streaming in Elodea 200X DIC Microscopy
Watch movie on YouTube: https://youtu.be/p9-Ob9M6LX4

Elodea canadensis leaf panorama, the leaf was photographed by moving the leaf with a mechanical stage, and photographing them by DIC microscopy and stitching the individual images.

Elodea canadensis leaf panorama, the leaf was photographed manually by bright-field microscopy. Using Photoshop and Topaz Gigapixel I was able to make several panoramic images 40 feet tall at 300 dpi.
Photographing Panoramic Images
When photographing panoramas of landscapes I use a special tripod which allows me to rotate my camera 360 degrees at specific intervals and I orient my camera in the vertical position. This keeps the camera and lens level, and it ensures I get about 30% overlap between frames. The camera is focused to infinity and I use a small F-stop (e.g. F11 or F16) to maximize the depth of field. I set the camera to M or manual shooting mode so the exposure does not change as the camera is rotated 360 degrees. The initial exposure should be based on the scene in the direction away from the sun. I do not use a polarizing filter on a sunny day, because it makes the sky difficult to blend evenly. I also make spherical panoramas with PTGui software - if interested you can view some of my spherical pans.
In microscopy, to photograph a panorama you set the camera to manual mode, lock the exposure, and white balance so all exposures are the same. You usually choose one focus point and keep it. It is possible to focus stack the adjacent images manually if you are only working on a few images .e.g. a dozen, but if you are going to try to stitch 500 or more images, focus stacking isn’t practical unless you use an automated stacking solution.
Some panoramic software requires more computer memory than others, e.g. Photoshop only allows stitching images of a certain size depending on the file type you use e.g. .jpg vs .tif vs RAW etc. If you are not trying to make really large panoramic images, you shouldn’t have problems, but when I tried to stitch more than 500 raw files Photoshop would lock up. Older versions of Photoshop could handle files up to 2 GB and newer versions up to 4 GB. Photoshop’s PSD files are limited in size to 30,000 x 30,000 pixels (2GB). The .psb file format by adobe will support up to about 300,000 x 300,000 pixels. I have been able to save files up to about 50 GB with the .PSB format.
There are dozens of software programs that can stitch images together including several free programs. See software reviews on panoramic software if you are considering a stitching program (e.g. P. Skidmore 2022 , D. Coleman, 2022, Wikipedia). I have used Photoshop for over 25 years so this was my first choice. Unfortunately Photoshop has some limitations when it comes to making very large panoramic images. In the end I used Microsoft ICE and also a combination of Photoshop and Gigapixel to achieve 40 foot tall images. One program I tested, Autopano giga was easy to use, and it stitched images quickly without having to make any input changes. Unfortunately I learned that this excellent program was discontinued in 2015 after it was purchased by GoPro. I used a free trial version still available for download. Another program called Microsoft ICE (ICE – Image Composite Editor) can stitch very large images and was free. I was pleasantly surprised how well this program worked stitching a large number of images. PTGui is a popular and relatively inexpensive program I tried, but with the default settings it failed to stitch the leaves properly. I have since found an instructional PDF that describes how to configure PTGui to stitch photomicrographs and the best settings to use for making panoramas of wood sections taken with a microscope (G. on Arx, 2017).
Most stitching software can process a few dozen images without any problems – it’s when you exceed a certain size that issues arise. Sometimes images fail to stitch because of insufficient overlap of the images, or there wasn’t sufficient information in the images to blend them e.g. clear skies or sold coloured backgrounds.
Photoshop offers the ability to save very large files in a large file format with the extension .PSB which has a maximum size of 300,000 pixels in one dimension (File Format). PSB files can be converted to other file formats .TIF, .JPG, though some of these file formats have maximum dimensions e.g. JPG JPEG/JFIF supports a maximum image size of 65,535×65,535 pixels, hence up to 4 gigapixels for an aspect ratio of 1:1 (Wikipedia). The largest files I could save on my computer were about 50GB. To make larger files I combined the use of Topaz Gigapixel with Photoshop. This versatile software program seems to work well with both low and high resolution images. This software, however is not good for enlarging images containing text (e.g. maps).
When I first started stitching images with Photoshop I tried parts of leaves to see if the software was working. I occasionally missed some sections, but after a bit of practice and using a grid I began to get better results. I attempted whole leaves with 500 to 1000 images but Photoshop would lock up when stitching more than 500 images. I had set Photoshop to use 75 – 80% of my computer's memory (64 GB) and it still locked up. I also configured my computer to use virtual space on another hard drive containing several terabytes of free space but this did not seem to help.
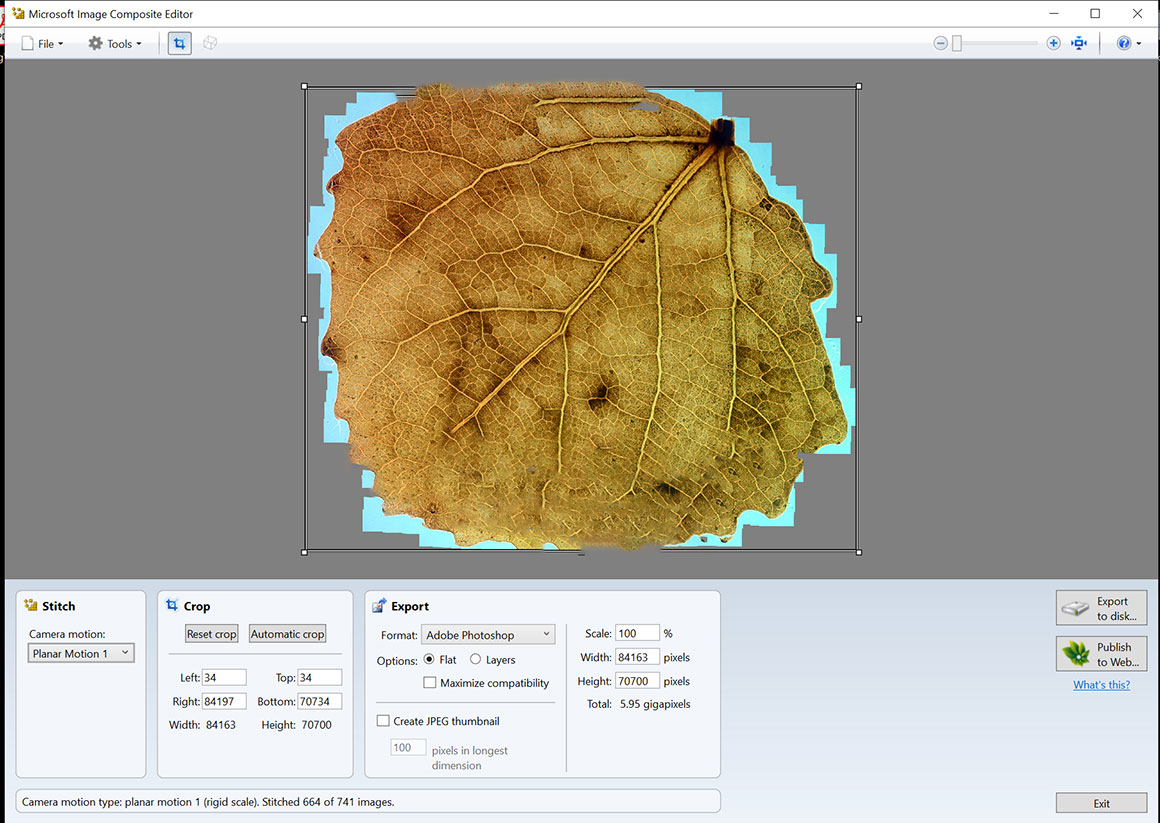
Above is a stitch of an aspen leaf using Microsoft ICE – it did a nice job, and the software is easy to use, and can be downloaded for free. MS ICE can also make panoramas from a video of the specimen – move the slide while taking a video. Be sure to move the slide slowly and then import the video or drag it into the main window.

Low resolution image of Elodea stitched using a trial version of Autopano giga software. The inset on the lower right corner shows a higher magnification of the image and the green water marks left by the trial version.
Summary for making panoramas with a microscope manually
Making panoramas with a microscope using less than 50 images is simple provided you follow a few guidelines below. When using a large number of images (hundreds) you need more patience and concentration and it can take several hours to take all the images required.
1. The microscope field should be illuminated evenly (Köhler illumination), don’t change the intensity of the illumination or the white balance while making exposures.
2. Set the camera to manual exposure mode, use a constant shutter speed and white balance so the images blend evenly.
3. You need to ensure that the images overlap by 25 to 30% on all edges (top, bottom and sides). I use a grid on my free Digicam control software to ensure this. If small areas are missed they can sometimes be repaired using Photoshop’s content aware fill.4. An XY mechanical stage to move the slides makes it easier to maintain image overlap. A grid on your computer monitor or in your eyepiece will also make it easier to ensure you have sufficient image overlap.
5. Make sure your specimen is flat. Prepared specimens mounted in Canada balsam or other mounting media should work nicely. It is only practical to do focus stacking on adjacent images if you are using a small number of images. Alternatively use an automated stacking system like that described below by Motic.
6. For large panoramas, ensure your computer has sufficient random access memory (RAM) and hard drive space. An SSD (solid state drive) will speed up image processing.
Stitching panoramas on a microscope works well for small insects, crystals and histology slides. Specimens need to be stationary while you are taking pictures.
Automated Microscope Slide Scanning by Motic
There are several companies that offer microscopes that will automatically scan and digitize microscope slides. These microscopes are used in histopathology, teaching, virtual microscopy and biomedical research. These microscopes use a motorized XY microscope stage and some include a motorized Z stacking option (vertical movement). Z stacking permits the investigator to view different layers and focus on a specific layer in the specimen to view (provides depth in the image).
An automatic stitching system is useful for scanning large numbers of slides and it saves time. The higher cost of these systems is targeted at hospitals, universities and research labs However, Motic also offers stand-alone scanning software that stitches large panoramas without the requirement of automated scanning stage and it is available for use on other microscopes but requires the use of their digital cameras (Motic Analysis software). I asked Motic microscopy in Vancouver if they could scan some prepared leaf samples for me with their automated microscope system.
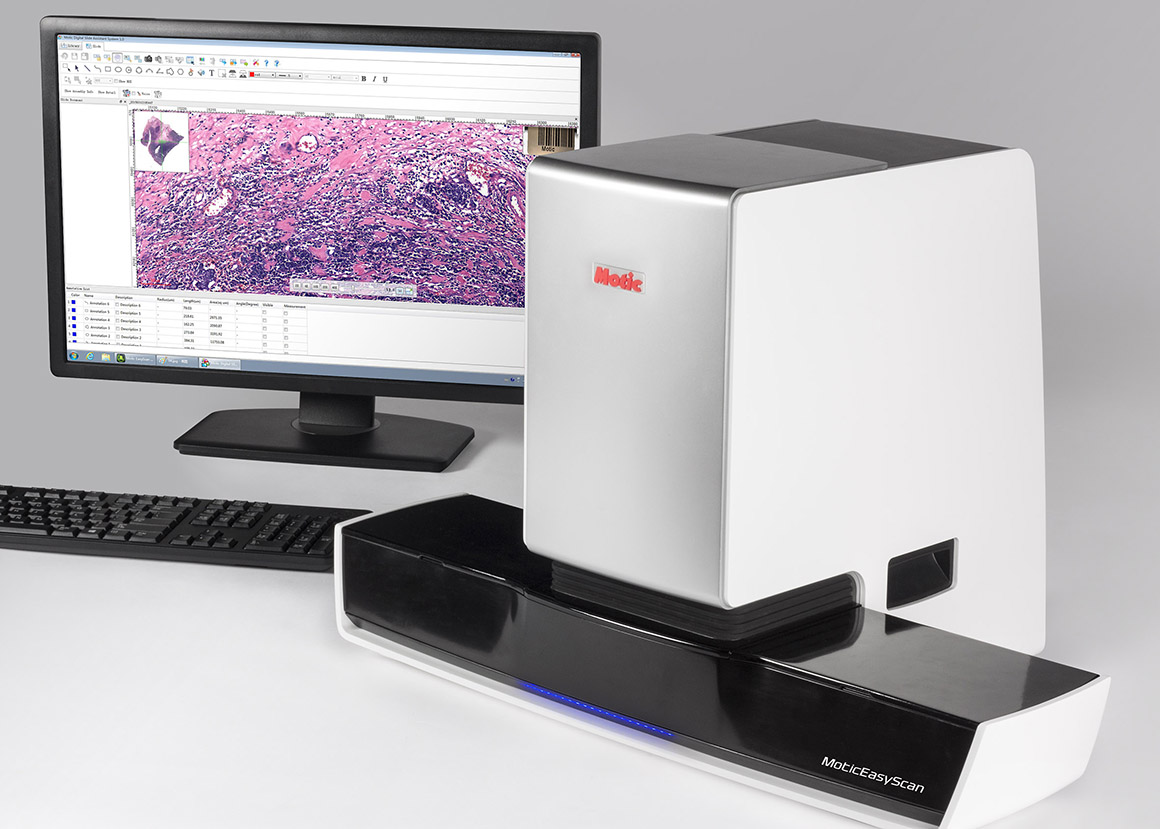
Motic Easy scan microscope for automated panoramic stitching
Motic easy scan slide scanner offers automated XY scanning and Z stacking – Download Motic PDF. They offer several slide scanning solutions. For pricing and more information contact Motic Microscopy. Below I show a few images from Motic’s scanning microscope. The interactive images can be viewed directly by clicking on the links below.
Motic's digital images are stored in a secure database which can be linked to for observation by other doctors and researchers via the internet. The images can also be viewed from a desk top computer using their viewing software.
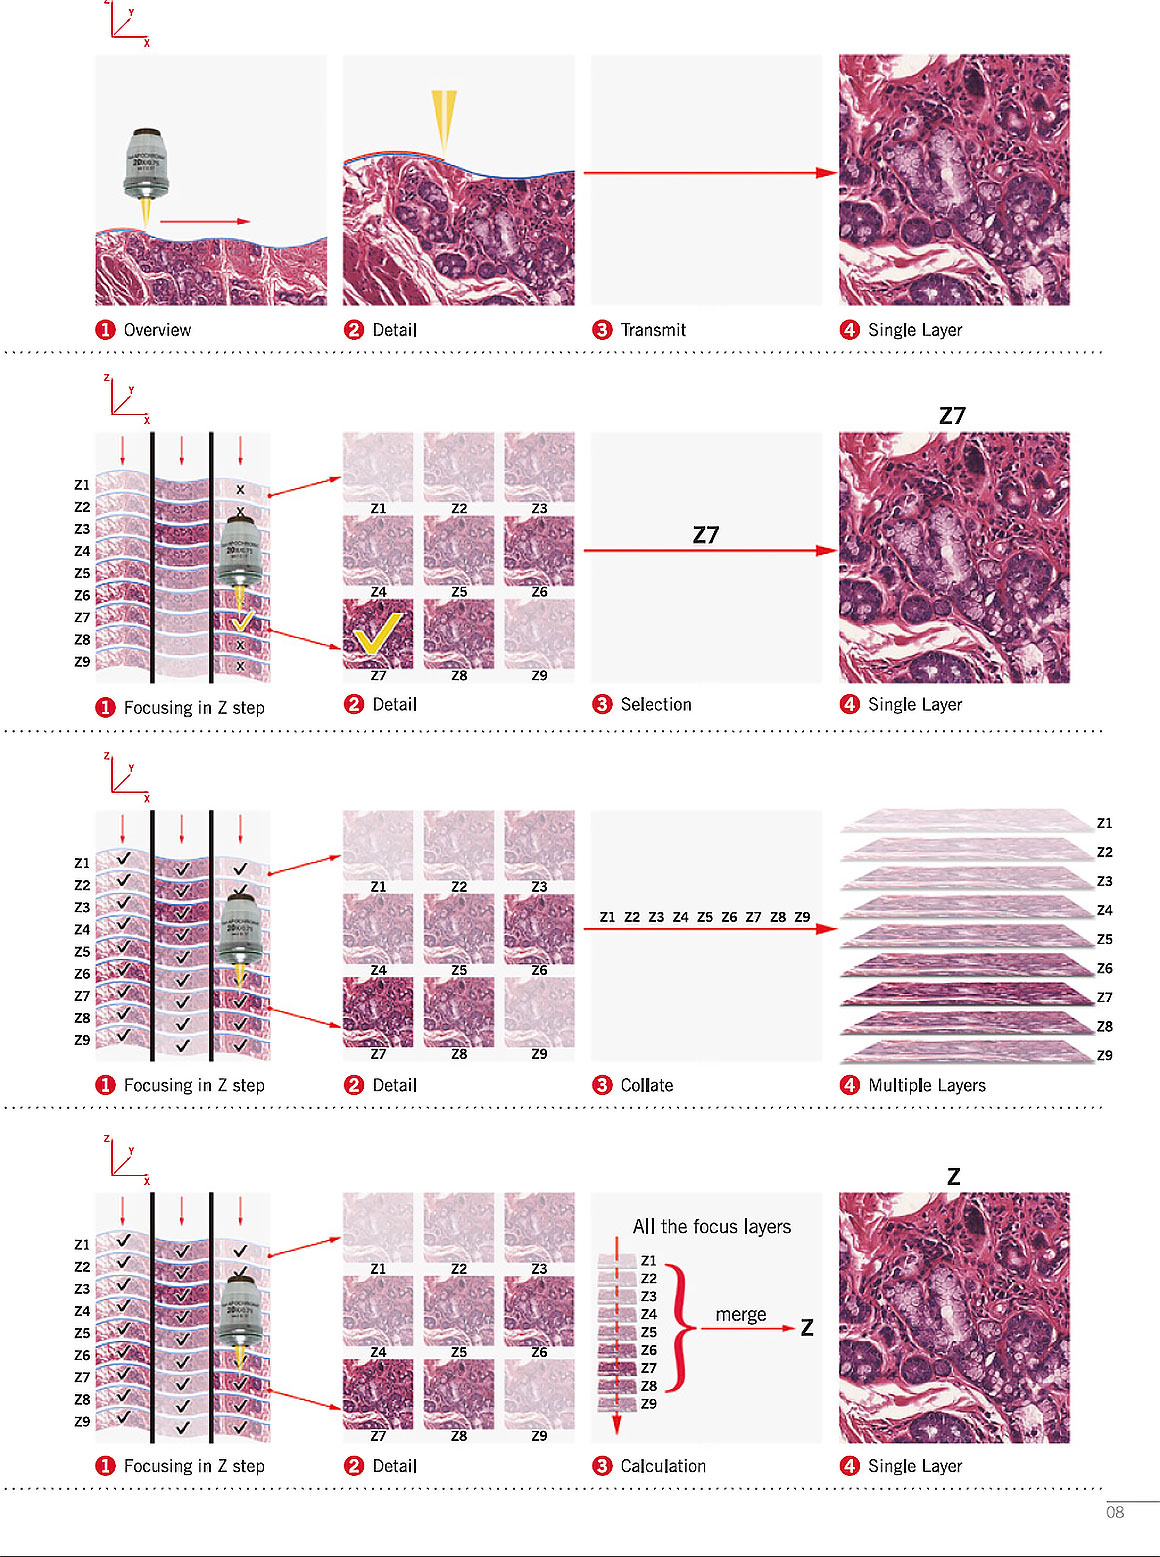
Above image from Motic Easy scan brochure (by permission) showing their set up can scan slides in different modes and then merge the layers into one final, fully in focus image.
Motic Easy stitch Pro software demonstration see - YouTube. Their scanning software requires the use of a Motic camera and software – download Easy stitch software PDF. The image files are proprietary .mdsx. These files can only be opened by Motic DSA software, though you can export images in JPEG format with DSA software. Easy Stitch software does not have a limitation in size or number of images that can be stitched. Images produced with Easy Stitch software do not need DSA software which only applies to the scanner images.
Below I show a prepared slide of an aspen leaf I prepared. Motic kindly scanned the aspen leaf and a few other slides for me with their automated slide scanning microscope.

Small aspen leaf fixed and mounted as a permanent slide in Canada balsam.
Below are screen captures of the Aspen and Elodea leaves as viewed in Motic’s turn-key solution. Below that are links to the interactive images on Motic’s image database. You can view these images in your browser, change the magnification, rotate the specimens and view different focus levels (Z stack) in the leaves. Institutions and researchers can share images like this of various pathology slides with other doctors, researchers and students.
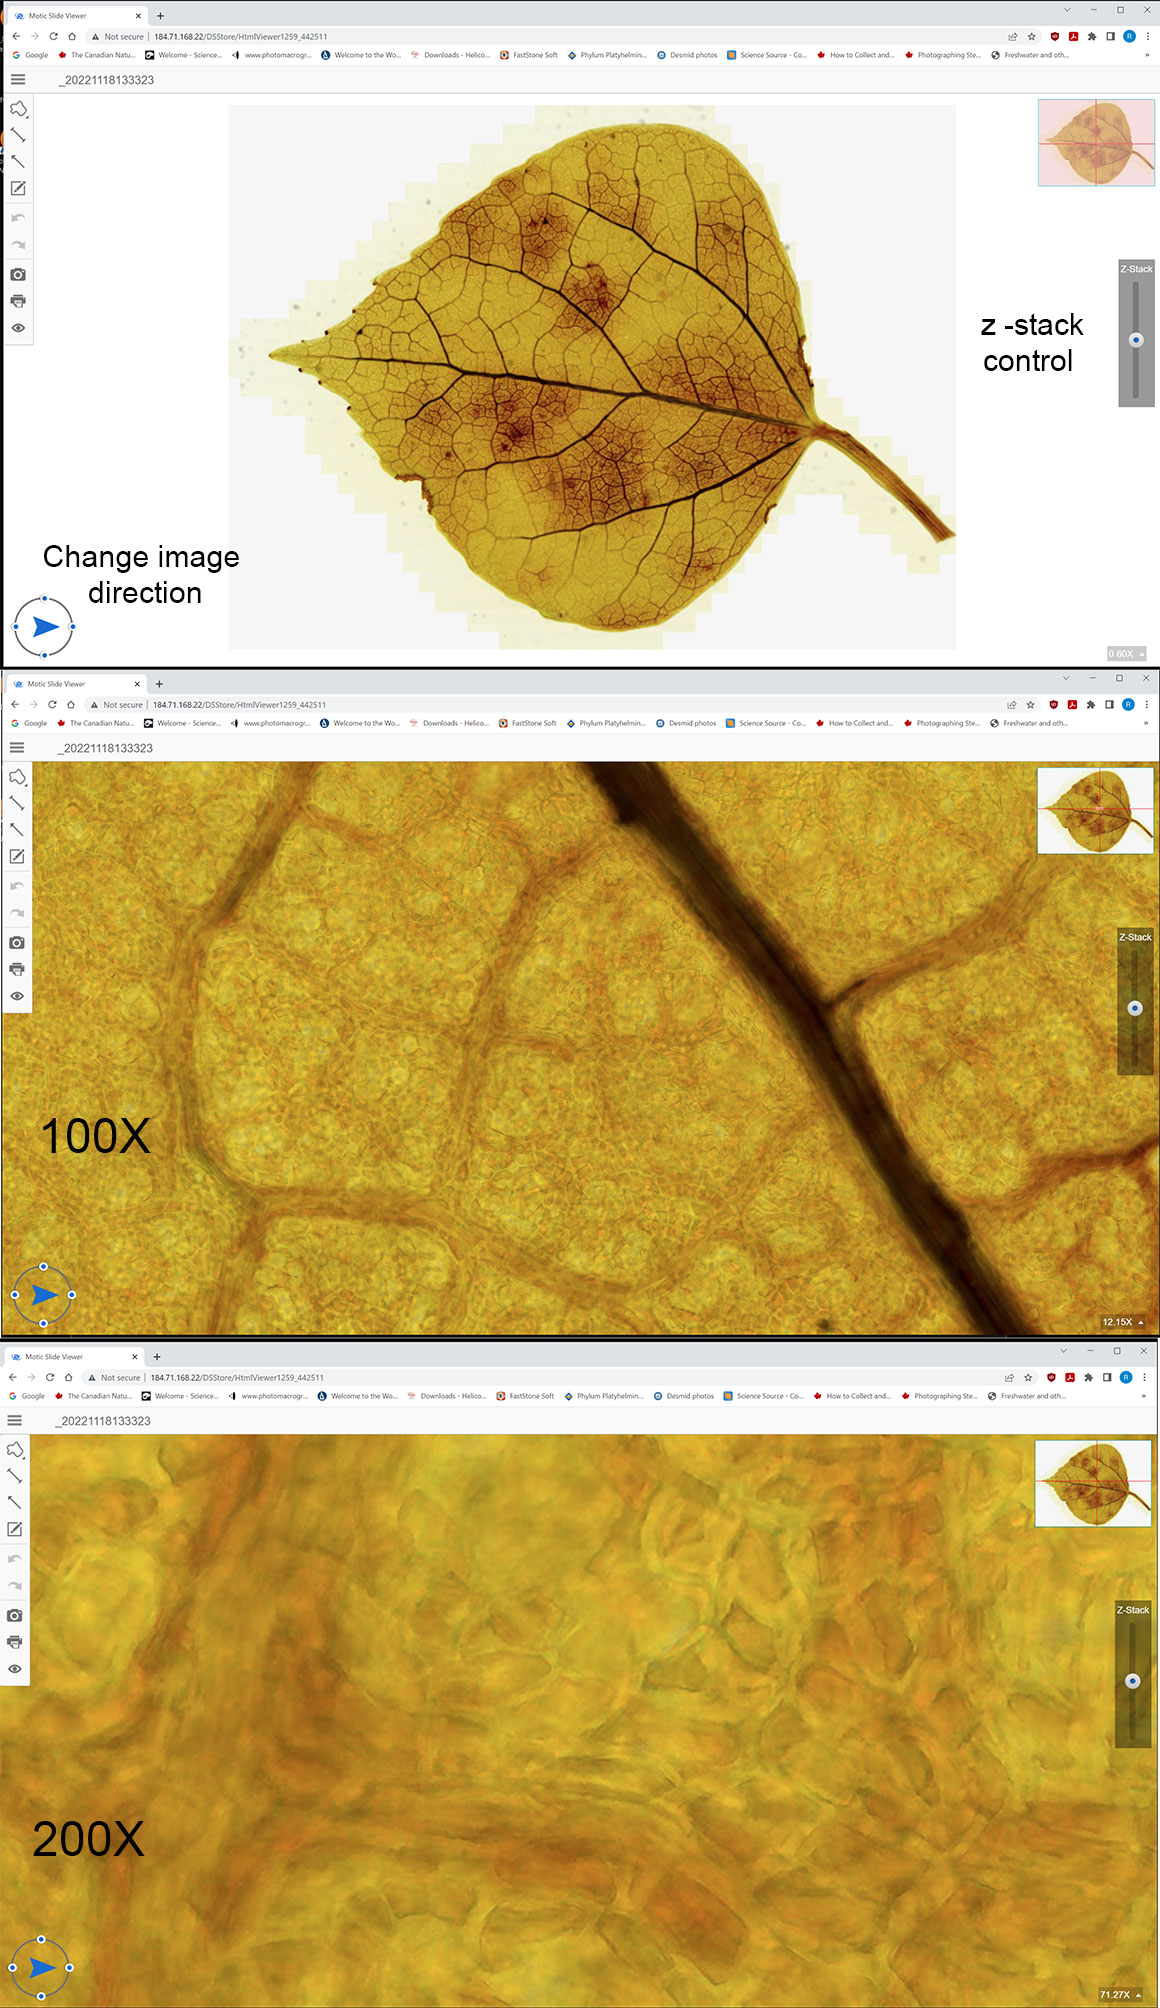
Screen captures of an Aspen leaf as viewed on the Motic online database, showing them at different magnifications. You can move up and down through the leaf using the Z stack control on the right side of image. Interactive demonstrations are below - click on the links to view.

Above are screen captures of images of a live Elodea leaf scanned with Motic’s automated scanner at 100X and 200X. Scanning and Z stack photography is done automatically by their software.
You can view the interactive microscope images online in your browser by clicking on the links below – they will open in a new browser window. You can zoom into the image using your mouse wheel and also vary the z stack with the slider on the right side of the image.
Elodea - http://184.71.168.22/DSStore/Slide/F9C5F10C-22D5-431B-828E-D3712A84F69D_ver=574251
Elodea - http://184.71.168.22/DSStore/Slide/26D58DC6-5D8E-49E2-A0B4-6CFBE637EE76_ver=271924
Aspen - http://184.71.168.22/DSStore/Slide/5DB89937-D89D-45F0-828F-F5106AFA5267_ver=442511
Fruit - http://184.71.168.22/DSStore/Slide/7B480EA1-7F57-4BBC-AAA8-91E7C6EAAEEB_ver=487910
You can also view interactive images like this on a desktop computer with Motic's viewing software and then export them as .jpg files for making prints. The exported images are 96 dpi, but can be resized to 300 dpi for publication with Photoshop or Topaz gigapixel software. If you are interested in learning more about Motic’s automated slide scanning hardware and software contact Motic.
Zoomify
Zoomify is a program that allows photographers to insert large high resolution images in a web page. The zoomify export module was installed in earlier versions of Photoshop and it exported files in Flash format for web pages. Flash was an animation program that was discontinued in 2022. It originally supported large zoomable images. Since then zoomify now makes a version that uses javascript and it does not require a plugin. Zoomify is an excellent way to show large images embedded in a web page. They also offer a free version of their software with basic features like that below. Additional features, including the ability to zoom to full screen can be purchased on their web site Zoomify.com.
Zoomify Image of Elodea leaf - zoom in and move the image with your mouse
Summary
I describe methods and software for making large panoramic images using a light microscope, software and a digital camera. Some software allows you to make large panoramas, but the process for large files requires lots of computer memory, and time to photograph the images. Image size is limited by the software and hardware. Most subjects must be thin, flat, stationary and require an XY translation control to move slides on the microscope stage. Adjacent images need to overlap by about 25-30% with most stitching software. Some of the largest panoramas made can involve over 1000 images and reach 365 megapixels in size (NASA 2009, 2019, Zang, 2015). Zoomify permits the insertion of large high resolution images in a web page for viewing, and this only requires knowledge of a little bit of coding.
Acknowledgements
I would like to thank Renzo Gavilanez, Alex Lobozar and Joe Wu at Motic Microscopy in Vancouver for providng panoramic images made with their Motic Easy scan and the links to their interactive images in their database. I would also like to thank Stephan van der Mersch for suggesting this project and financial assistance. Donna and Brandon Berdan for proof reading.
References
B. Ma et al. (2007) Use of Autostich for automatic stitching of microscope images. Micron 38: 492-499. https://www.sciencedirect.com/science/article/abs/pii/S0968432806001648
J. Chappelow et al. (2011) Histosticher ©: An Interactive Program for Accurate and Rapid Reconstruction of Digitized Whole Histological Sections from Tissue Fragments. Comput. Med. Imaging Graph 35: 587-567. https://pubmed.ncbi.nlm.nih.gov/21397459/
E. Garcia-Gutierrez et.al, 2020 A novel, rapid-technique for clearing leaf tissues. Applications in Plant Sciences. They used Franklin’s solution.
(https://bsapubs.onlinelibrary.wiley.com/doi/pdf/10.1002/aps3.11391 - PDF
(2009) NASA launched the Lunar Reconnaissance Orbiter (LRO) to map the surface of the Moon. Lunar photograph consisting of 866,891,344,900 (867 billion) pixels, 10,581 images. http://lroc.sese.asu.edu/posts/gigapan
(2019) NASA > 1000 images stitched of the Martian surface. https://www.nasa.gov/feature/jpl/nasas-curiosity-mars-rover-snaps-its-highest-resolution-panorama-yet
M. Zang (2015) 365-Gigapixel Panorama of Mont Blanc Becomes the World’s Largest Panoramic Photo
https://petapixel.com/2015/05/24/365-gigapixel-panorama-of-mont-blanc-becomes-the-worlds-largest-photo/ |
Wikipedia – Elodea (2022) https://en.wikipedia.org/wiki/Elodea
(2023) Making photomicrographic panoramas. https://www.quekett.org/resources/stacking-stitching/stitching#top
YouTube Videos – how to make panoramas
The Microbe hunter - How to make large pictures with a Microscope – includes a demonstration of Microsoft ICE. https://youtu.be/XipXRo7iftg
Pathobin – using Microsoft ICE software to make panoramas. https://www.youtube.com/watch?v=BPDAtOPtcWU&t=162s
E.Y. Berry learning center Creating Panoramas with Autopano Giga
Panoramic image stitcher https://www.youtube.com/watch?v=OUtFmot44iM
Elder Fox Documentary - New Mars in 4K - high resolution panoramas of Mars
https://www.youtube.com/watch?v=ZEyAs3NWH4A
Software
Wikipedia (2014) Comparison of Photo stitching software – good overview, but out of date. https://en.wikipedia.org/wiki/Comparison_of_photo_stitching_software
Adobe Photoshop 2023 - https://www.adobe.com/ca/products/photoshop.html
Topaz Gigapixel - https://www.topazlabs.com/gigapixel-ai
PTGui panoramic software (Panorama Tools Graphic User interface) - https://ptgui.com/
G. von Arx (2017) PTGui quick guide by G. von Arx – Stitching distorsion-free mosaic images for microscopy with PTGui - PDF
Microsoft ICE – for making large panoramas – download software free. https://download.cnet.com/Image-Composite-Editor-64-Bit/3000-2192_4-75207152.html
Motic Digital Pathology https://moticdigitalpathology.com
Motic Easy scan Infinity – movie and stats - https://moticdigitalpathology.com/Newinfinity
Autopanogiga – no longer sold – company purchased by GoPro – who shelved the software in 2015.. https://panosociety.com/products/kolor-autopano-giga and https://www.digitalcameraworld.com/features/autopano-giga-4-by-kolor
Gigapan Stitch – Free trial version download https://www.gigapan.com/cms/shop/download-the-gigapan-stitch-software
Photostitcher - How to Seamlessly Stitch Microscope Images Together - https://www.photostitcher.com/how-to-stitch-microscope-images.html
(2021) Image stitching while focus stacking https://www.lumenera.com/blog/images-processing-for-microscopy-with-focus-stacking-and-image-stitching
C. Shumate (2018) Stitching Images from your manual microscope. https://www.linkedin.com/pulse/stitching-images-from-your-manual-microscope-chris-shumate
J. Sedwich (2003) Image stitching using Photoshop for microscopy – Univ. Ottawa download PDF
D. Coleman Best photo stitching software for making panoramas - review
Zoomify – makes large images zoomable on the web. Export feature was available in some earlier versions of Photoshop and used Flash. Software now uses javascript to embed images in web pages – free version available http://www.zoomify.com/
Digicam control capture software – free for Windows PC and allows you to view the image on a computer screen when the camera is in Live view. It also provides a grid, and you can zoom in to check focus. http://digicamcontrol.com/
Authors Biography & Contact Information
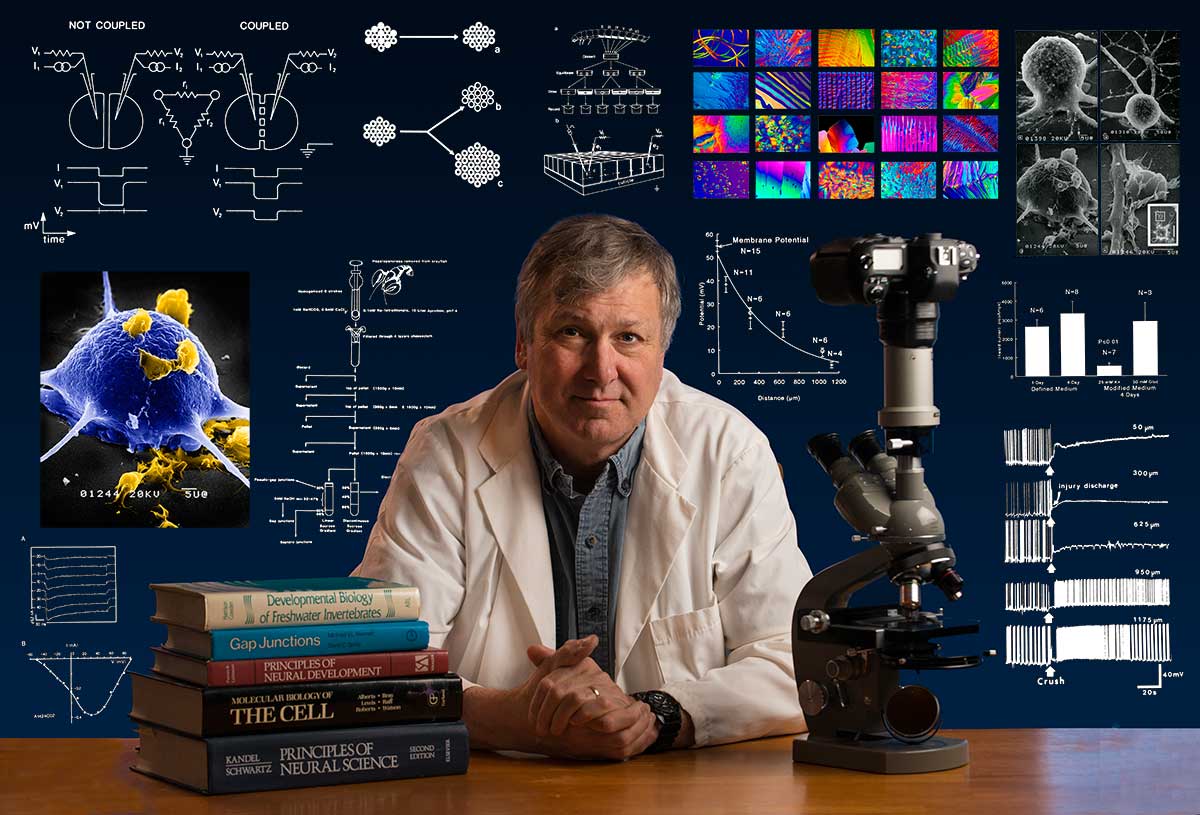
Bio: Robert Berdan is a professional nature photographer living in Calgary, AB specializing in nature, wildlife and science photography. Robert retired from Cell\Neurobiology research to pursue photography full time many years ago. Robert offers photo guiding and private instruction in all aspects of nature photography, Adobe Photoshop training, photomicrography and macro-photography. Portrait of Robert by Dr. Sharif Galal showing some examples of Robert's science research in the background.
Email at: rberdan@scienceandart.org
Web sites: www.canadiannaturephotographer.com
www.scienceandart.org
Phone: MST 9 am -7 pm (403) 247-2457.