
The Microscopic Beauty of Plants and Trees
How to prepare and photograph plant sections for viewing with a microscope
by Dr. Robert Berdan
January 19, 2020

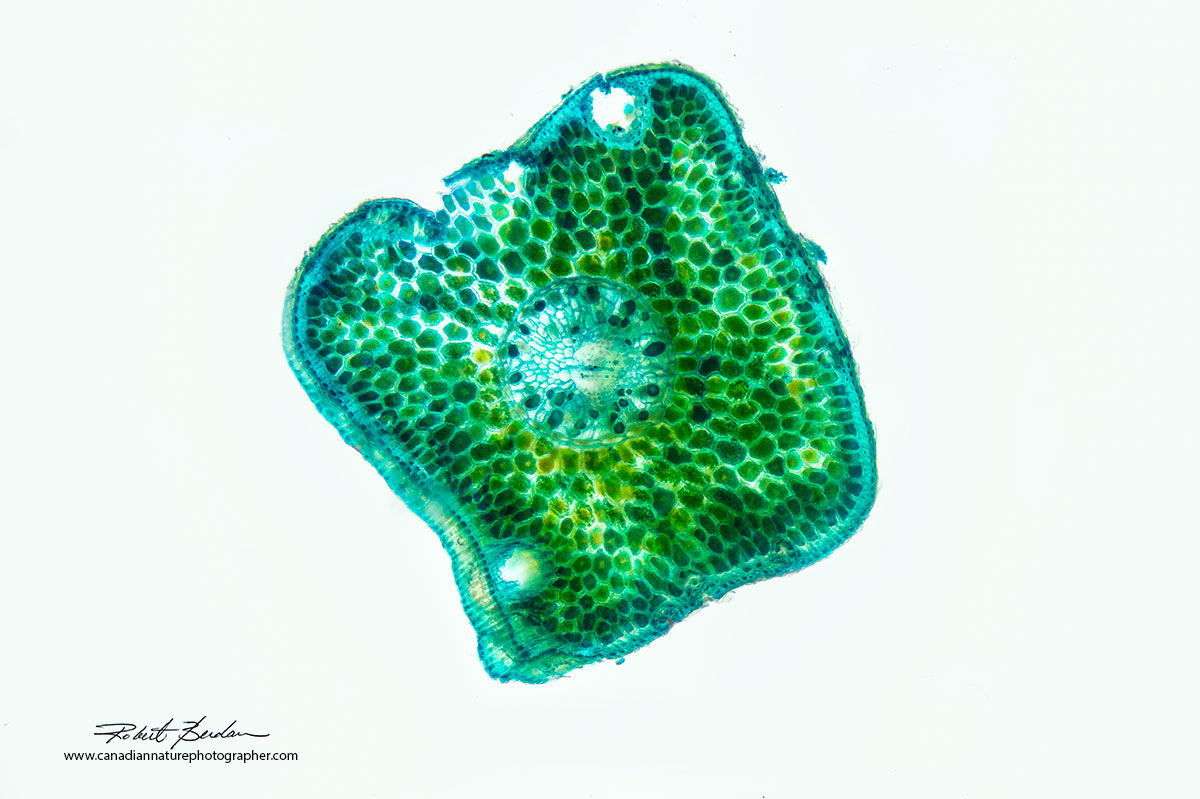
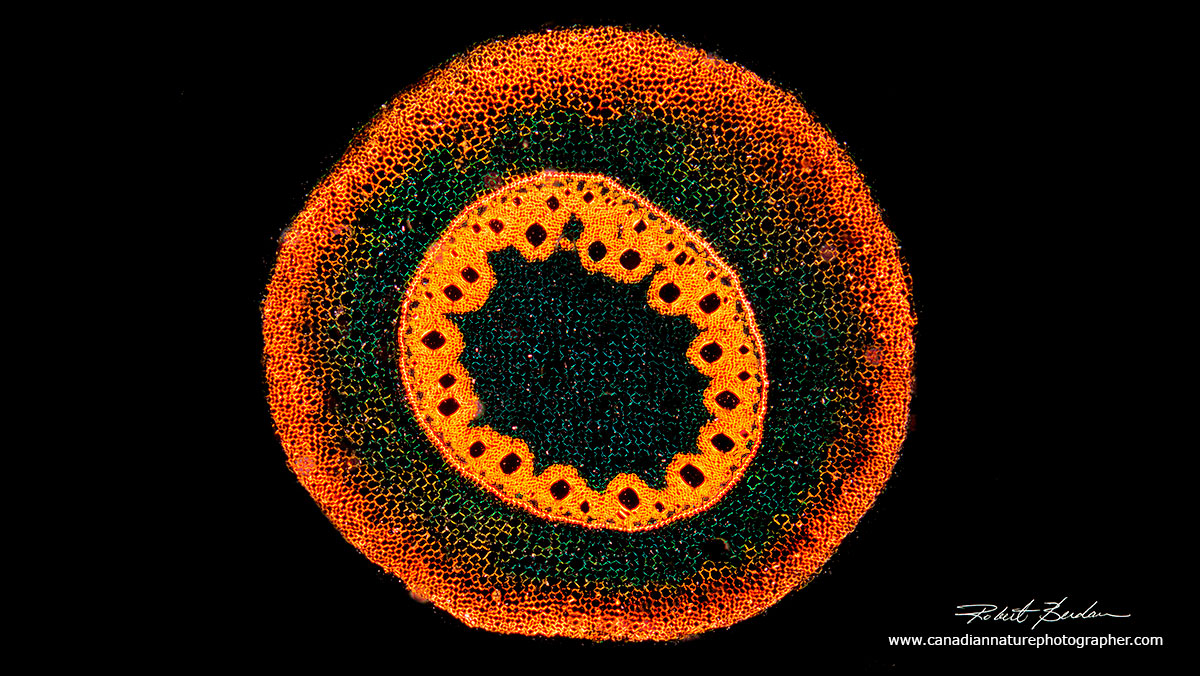
Cross section through a celery stick stem from my fridge. The section was stained with Toludine blue (1% w/v in water) and examined by a microscope using DIC optics, but any microscope with polarizing filters can produce a similar image. Preparing sections like this of soft plants is easy using a razor blade to cut thin sections.
Introduction
Many of us find plants, trees and flowers beautiful just as they are found in nature. I am attracted to living things especially those coloured green like lichens, moss, bryophytes and trees. The microscopic beauty of plants only reveals itself to those that have access to a light microscope. It turns out the plants are more complicated than most of us imagine. Some plants are able to store information (e.g. some can count - read about Venus Flytrap) and they communicate using chemical and electrical signals. Electrical signals (e.g. action potentials) similar to those used by animal neurons can signal other parts of the plant that they have been injured. The inner workings of plants and trees have specialized tissues (xylem) that transfer water and (phloem) that transport nutrients. Plants make sugar by Photosynthesis and store it as starch. Wood is largely made of up of dead cells that function to support the tree and transport water from the roots to the leaves.

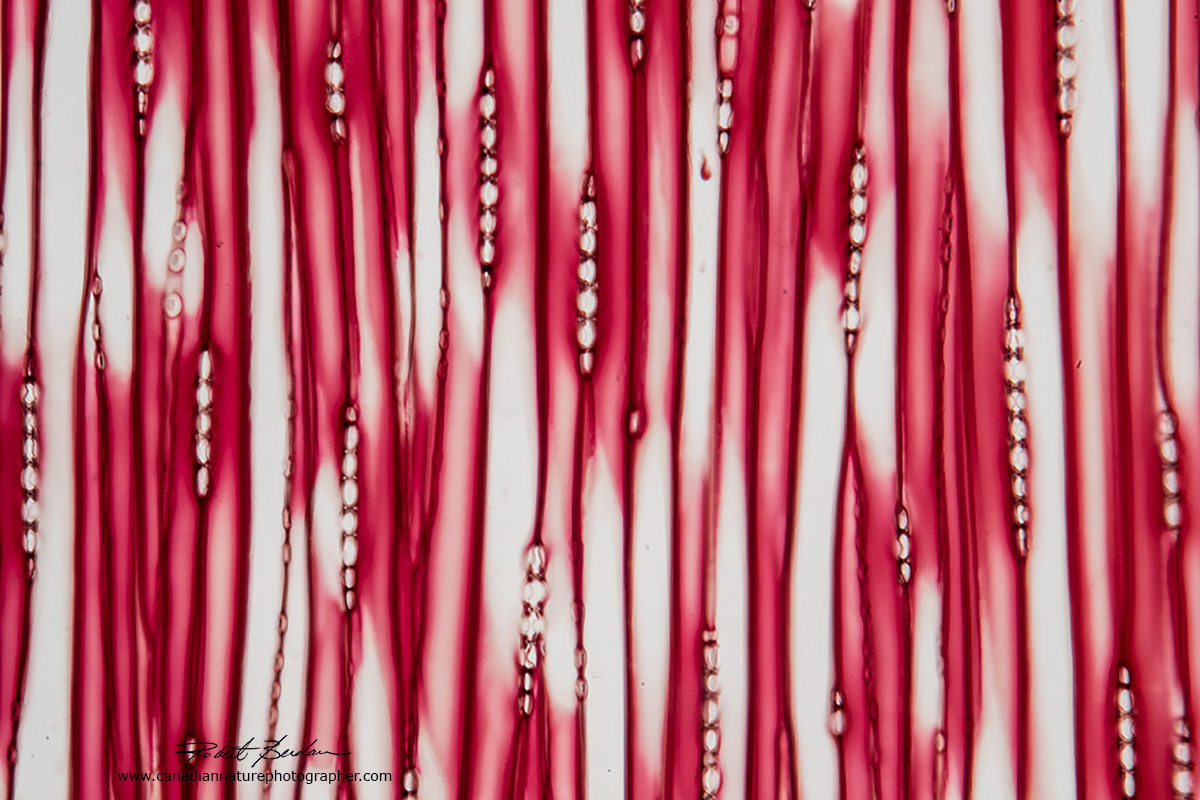
Longitudinal section through Pine wood viewed by polarizing light microscopy 400X. The vertical cells are tracheids, the circular objects are pits that join these cells and the horizontal line is a ray (see diagram below).
The structure of plant cells is easy to examine in stems from celery, or the root of a carrot. It is possible to cut thin sections from almost any plant or tree including their stems, roots, seeds and leaves. Cutting thin sections requires skill and sometimes specialized equipment (a microtome or razor blade). Some thin sections of plants resemble abstract art. In this article I share some of the pictures I have taken with my microscope of plants taken from my fridge, yard and from prepared microscope slides. My goal is to make you think a little more about plants and maybe even want to examine them yourself with a microscope. A basic light microscope starts at about $100 - see my article Tips on Buying a Light Microscope if interested in acquiring one. I will gladly answer questions or share some advice if you are in the market for a new or used microscope. Alternatively students at most high schools will likely have access to light microscopes - ask your teacher.

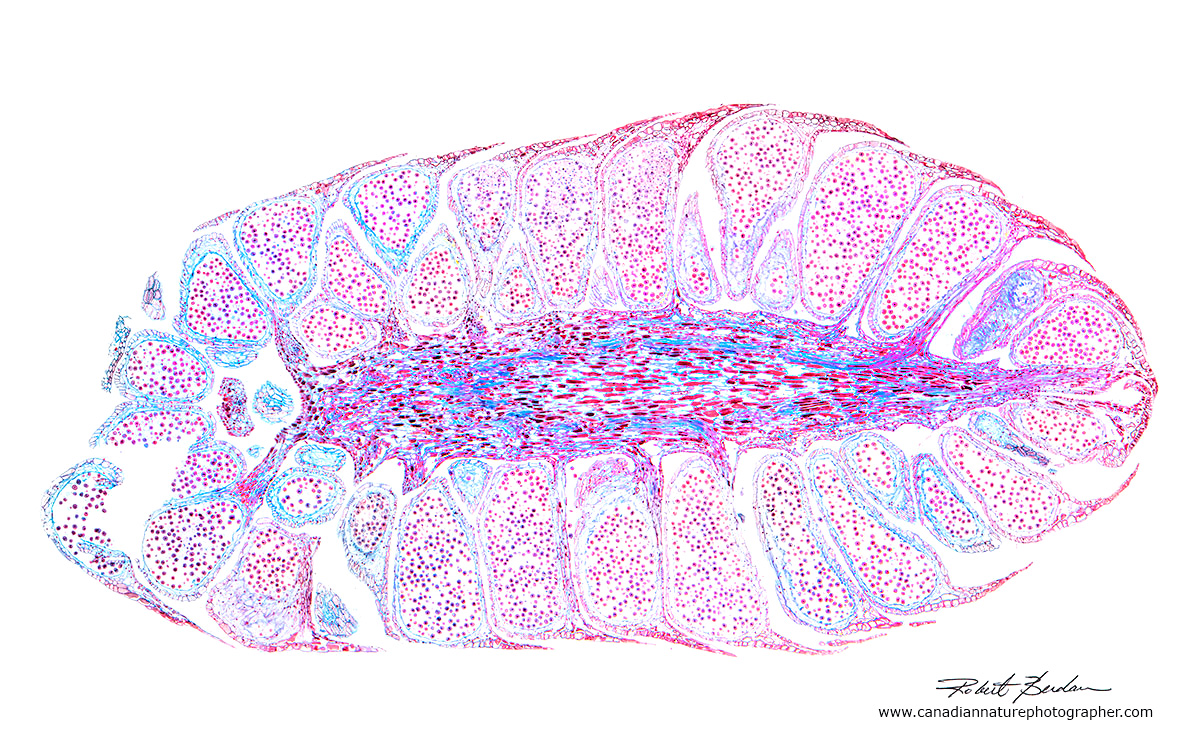
Lilium Brown ovary section from a prepared microscope slide, Bright-field microscopy 50X.
Many of the plant sections I cut by hand are not perfectly flat so I used the technique of photo-stacking (see my article on this site on how this done). In brief it involves photographing the sections at different focus levels maybe 5-20, then stacking the different photos into layers in Photoshop, aligning, and blending the images into one. I also use the software program Helicon Focus which offers more blending features. In the future I plan to purchase a sliding microtome to cut 10-15 micron thin sections. It is easier to see the cellular detail in thinner sections as shown in the picture above.

Spruce branch section that I cut from a tree from my front yard using a double edged razor blade and then stained with 0.1% Toludine blue in water. The section involved focus stacking then stitching different stacked regions into a panorama. The section was photographed by bright field microscopy. 50X
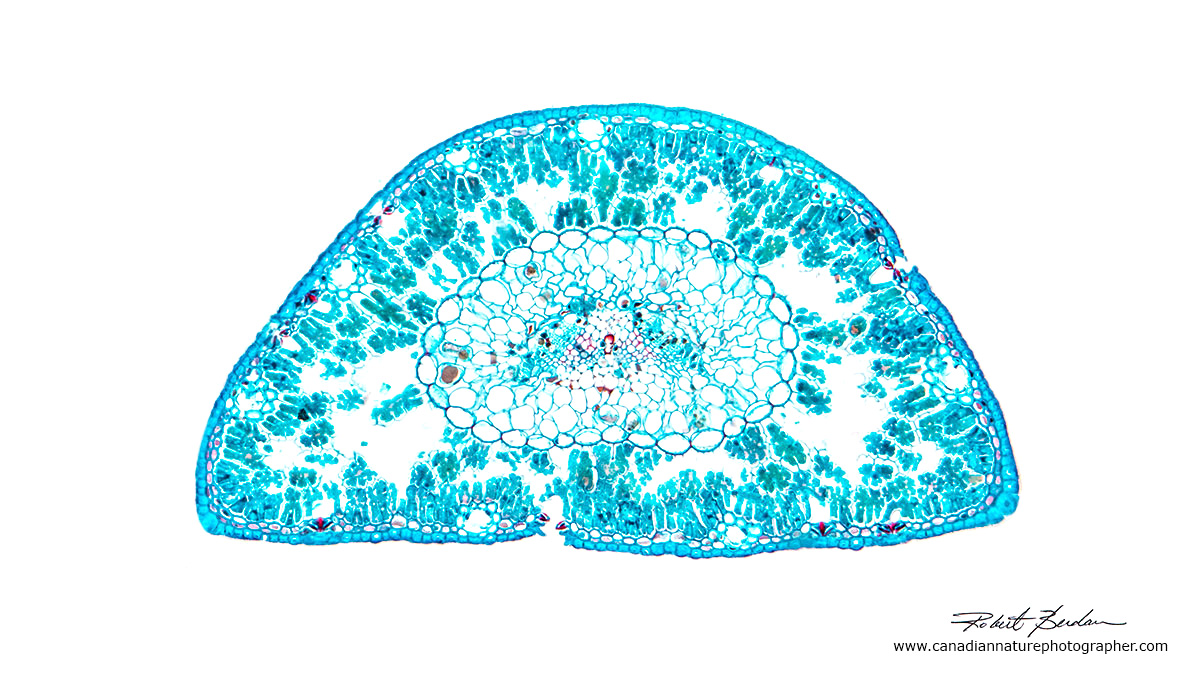
Spruce needle in cross section, focus-stacked, and stained with Toluidine blue. I measured the thickness of this section to be about 30-50 microns thick. 50X
Spruce needle cross section 200X by bright field microscopy - focus stack.
Pine needle in cross section from a prepared slide 100X
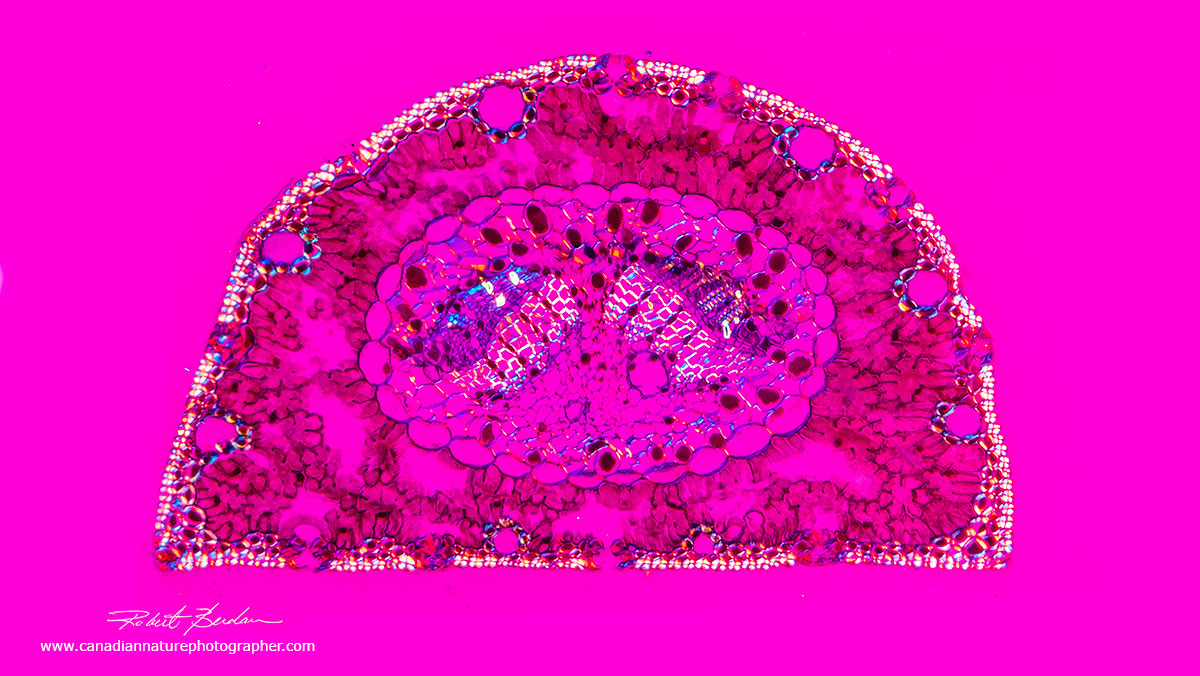
Pine needle in cross section from a prepared slide using a DIC microscopy 100X

Cross section of a poplar tree branch, stained with Toluidine blue and viewed by bright field microscopy. Section cut by hand with a razor blade. 50X
Higher magnification image of a popular tree stem 100X.
Poplar branch sectioned with the American Optical table top microtome shown below and stained with Safranin. Bright field microscopy 400X.

Longitudinal section from a popular tree stems stained with Toludine blue. The large empty cells are parenchyma cells. 400X Bright-field microscopy.
Trees and Stems

In the image above 4 distinct rings are visible in this section indicating the branch is 4 years old. Scientists are studying tree rings to learn about changes in climate over the past thousand years. The tree rings provide clues to changes in the earths climate while the plant was alive. This field of science is called dendroclimatology, the study of climate and atmospheric conditions during different periods in history from wood. Given the current concern over climate change this field is active at the present. Image above photographed is from a prepared slide and photographed via bright-field microscopy 50X.

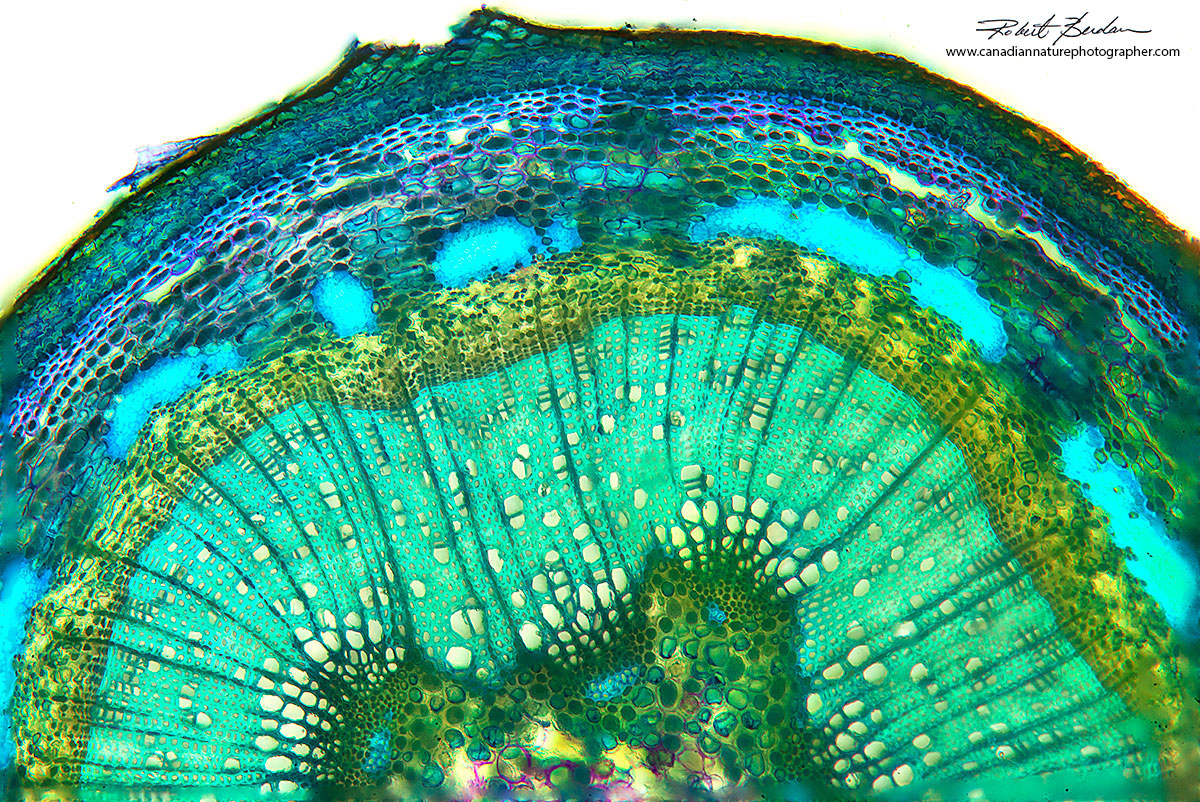
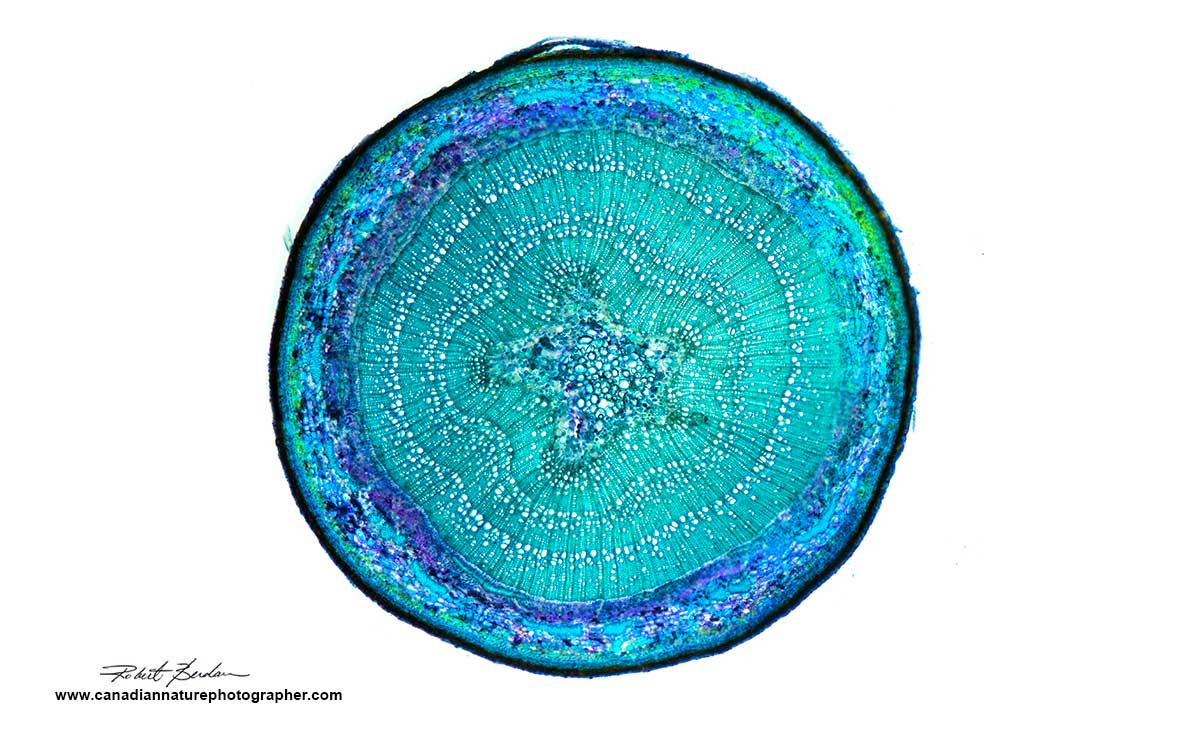
Pine stem cross section from a prepared slide photographed in polarized light 50X.
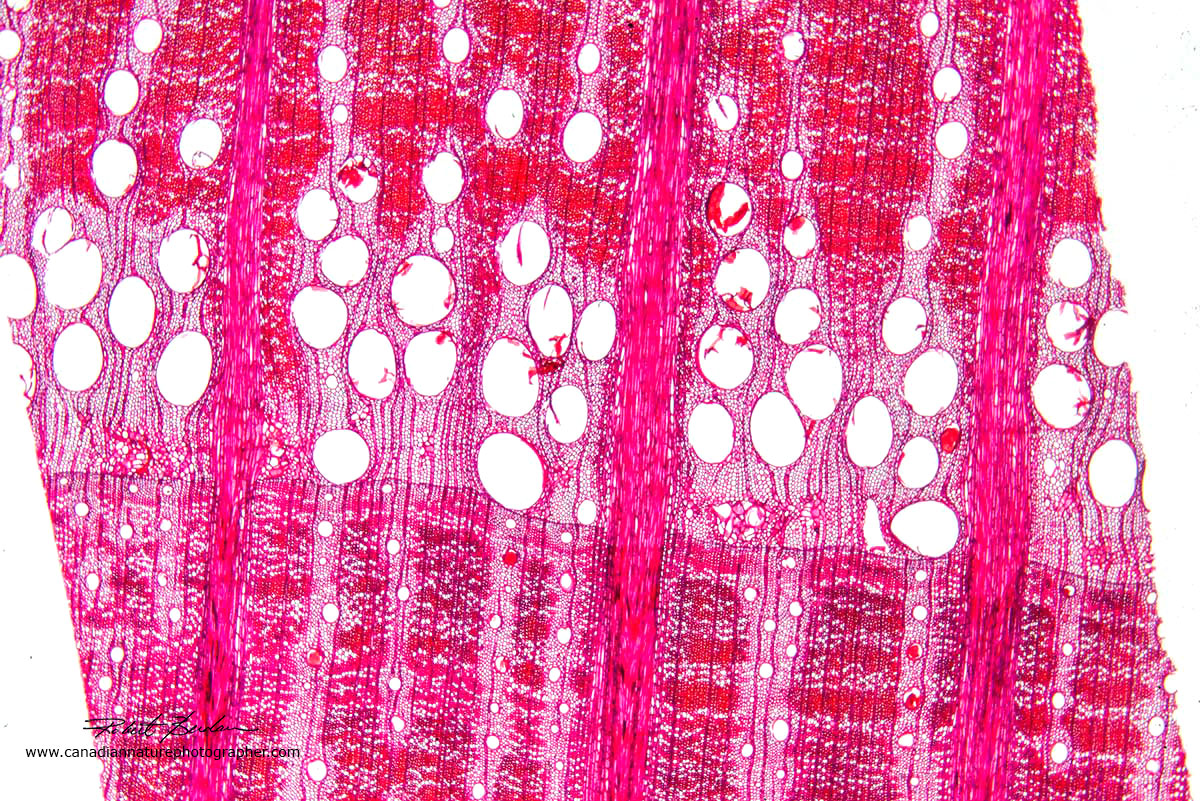
Cross section through pine wood showing the banding pattern (rings) that reflect the yearly growth of trees from temperate regions. Note the wood (xylem) cells have thicker cell walls near the bottom of the bands (also see photomicrograph below). These cells are called late wood that forms at the end of the growing season. The bands define one year of growth. The width of the band and the size and shape of the cell walls can be used to study changes in climate such as amount of rainfall. The larger openings in the wood are resin canals. Pine resin serves as defense against insects and other animals that bore into the conifer. The resins may disrupt the feeding, digestion or metabolic function of the attacker. The section was stained with Safranin and photographed by bright field microscopy 100X.


Diagram showing the 3D arrangement of wood cells.
Cross section of pine wood showing xylem cells which at the bottom of the picture are thicker since these cells are formed late in the season before the onset of winter. At the top are early cells that form in the spring and summer season.
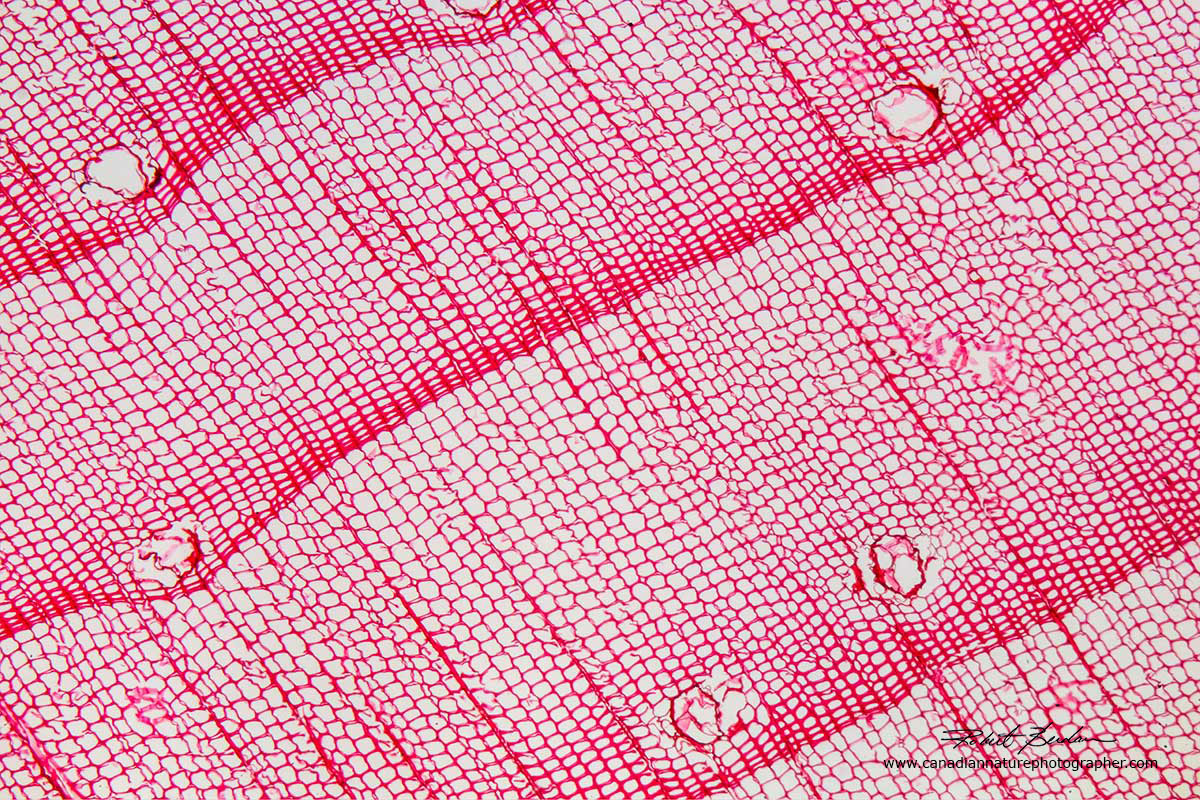
Radial section of pine wood, bright field microscopy. The rows of smaller "cells" are rays. The rays appear in the picture below as a horizontal layer and they are involved in the transport of nutrients from the center of stem to the outer layers. 200X Bright field microscopy.
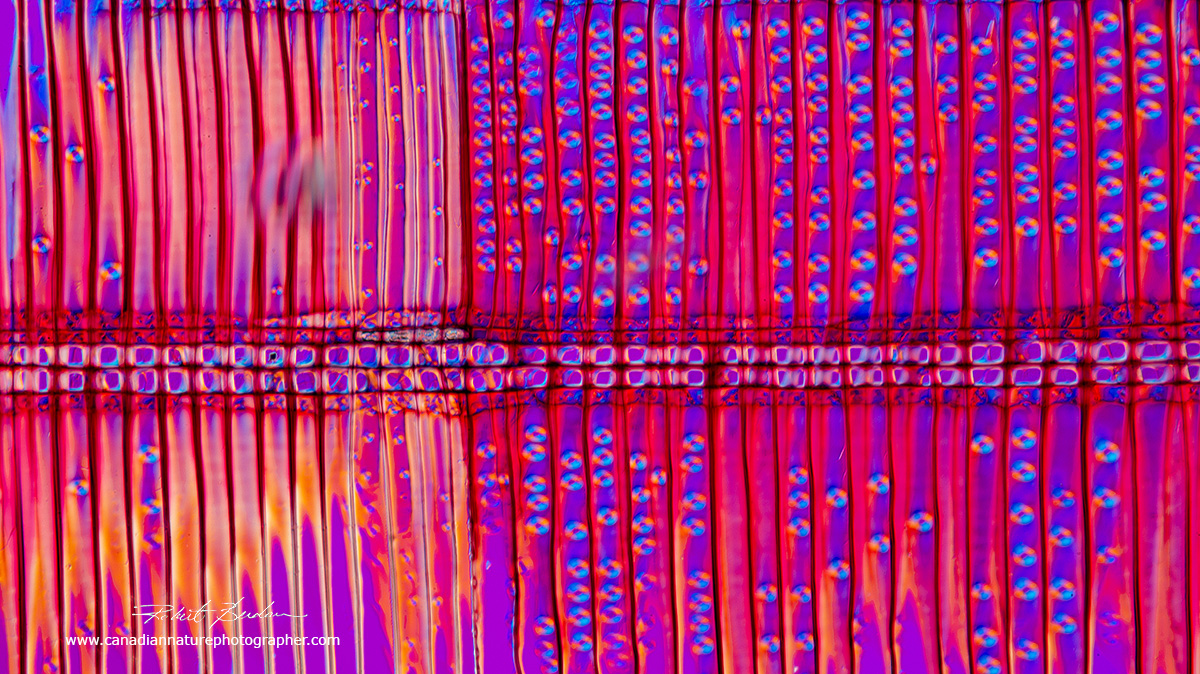
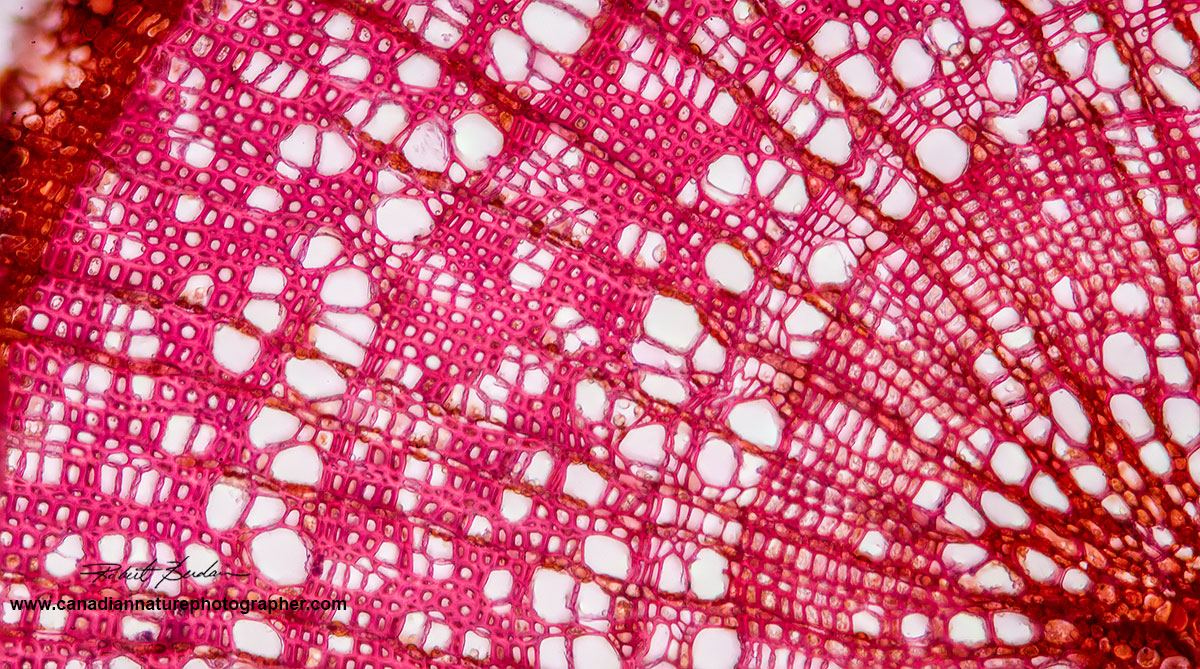
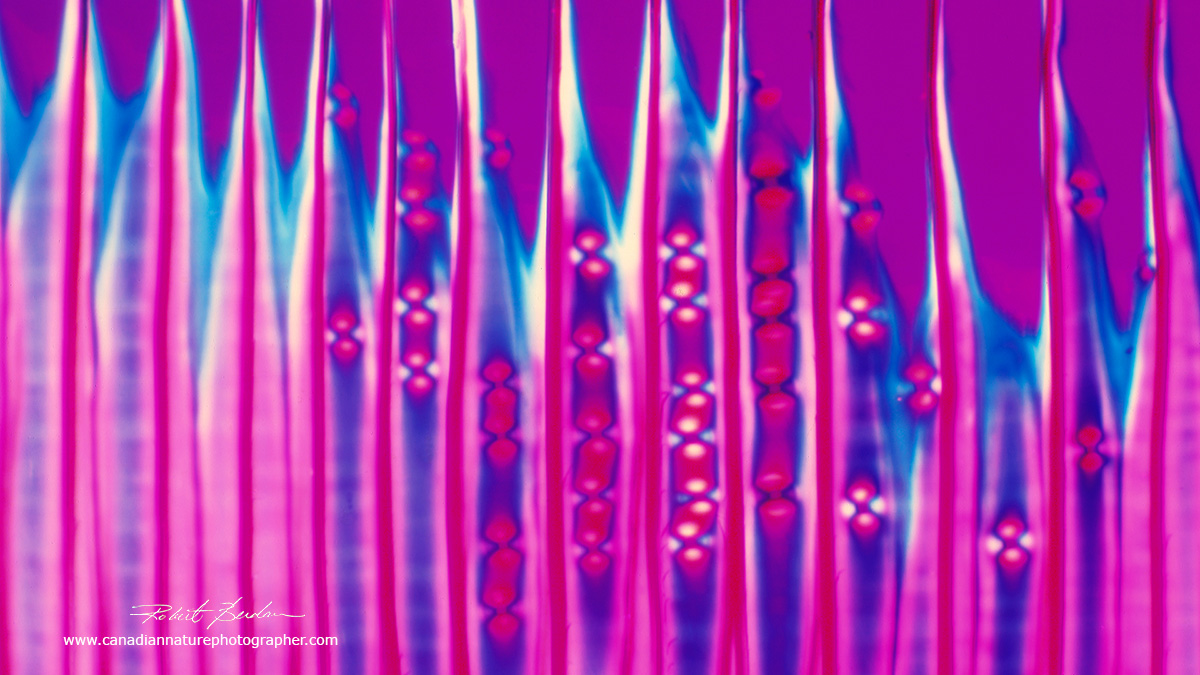
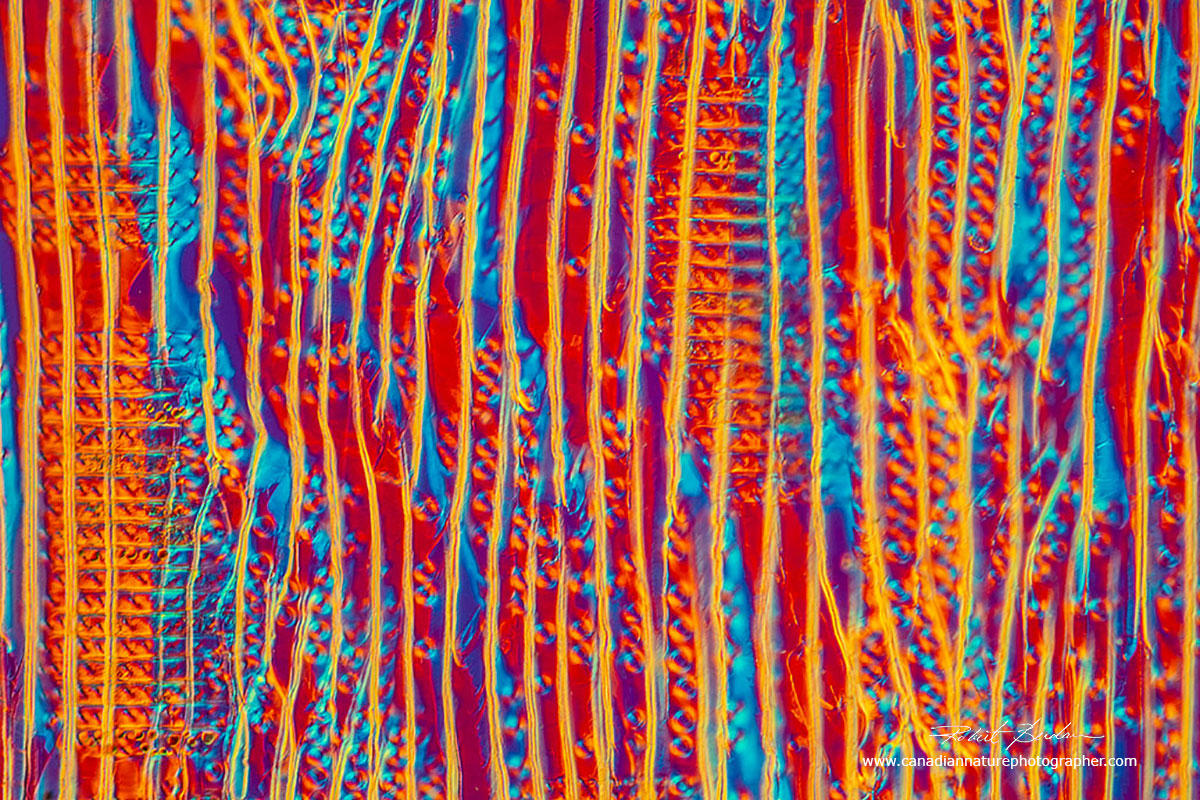
Radial section of pine wood photographed with a Polarizing microscope and a full wave plate which produces the pink background. The vertical cells are tracheids in the xylem, the round shaped components that appear inside the tracheids are pits that join adjacent tracheids allowing water to flow between them. 100X.

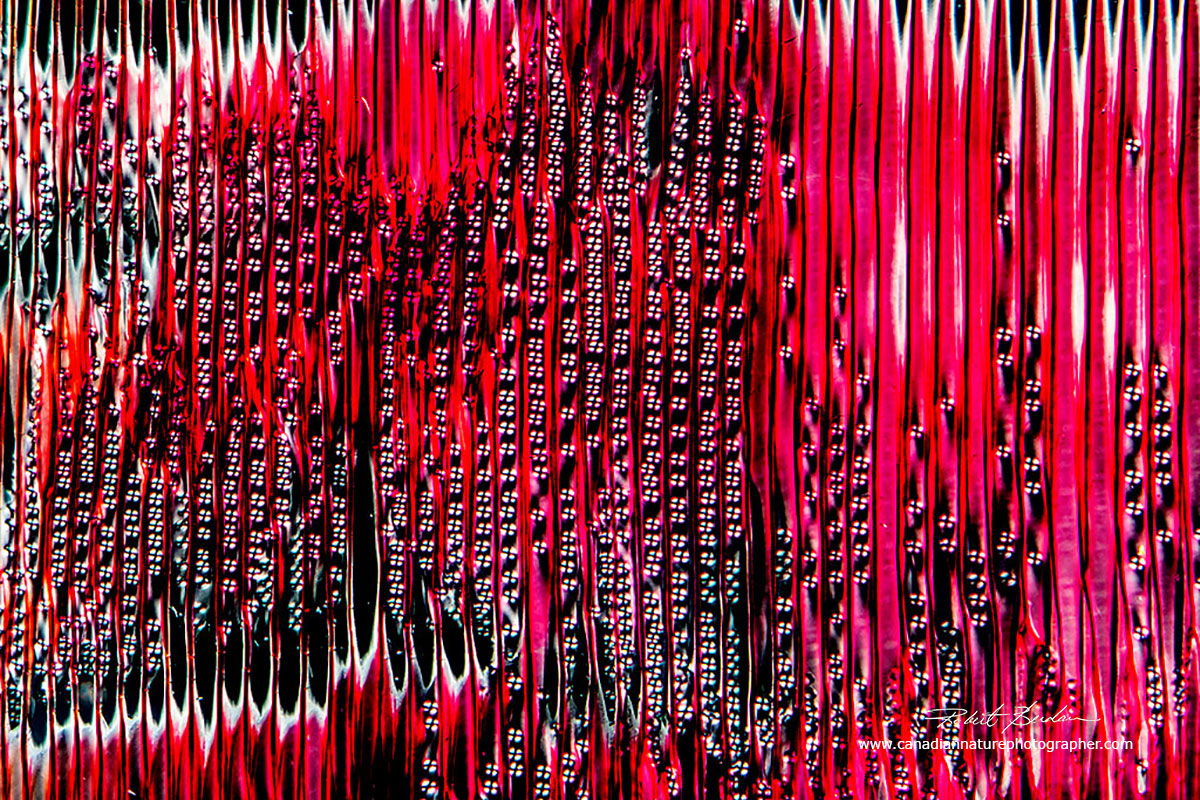
Pine wood radial section showing longitudinal cells (tracheids) and a ray. I deliberately photographed this section on an angle for "artistic" reasons - lines at an angle imply movement (see my article on composition on this site).
This is a photo of Pine xylem (tracheids) viewed with polarized light and a full wave plate. I took this photo with my Olympus E microscope 40 years ago from a prepared slide of Pine wood. I was using Kodak photomicrography slide film back then.
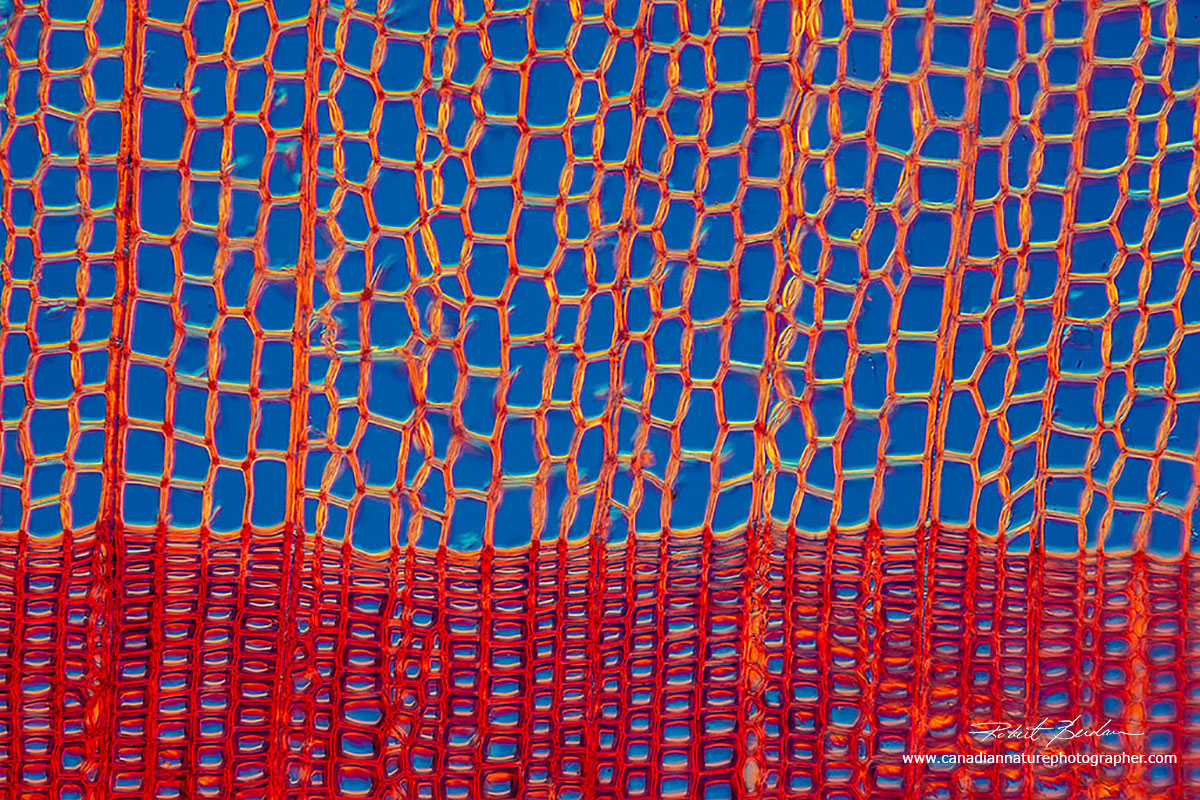
Longitudinal section through white pine wood showing the Tracheids which make up Xylem that transport water up the tree. The smaller round objects are pits that connect the adjacent tracheid cells. 100X Polarized light microscopy.
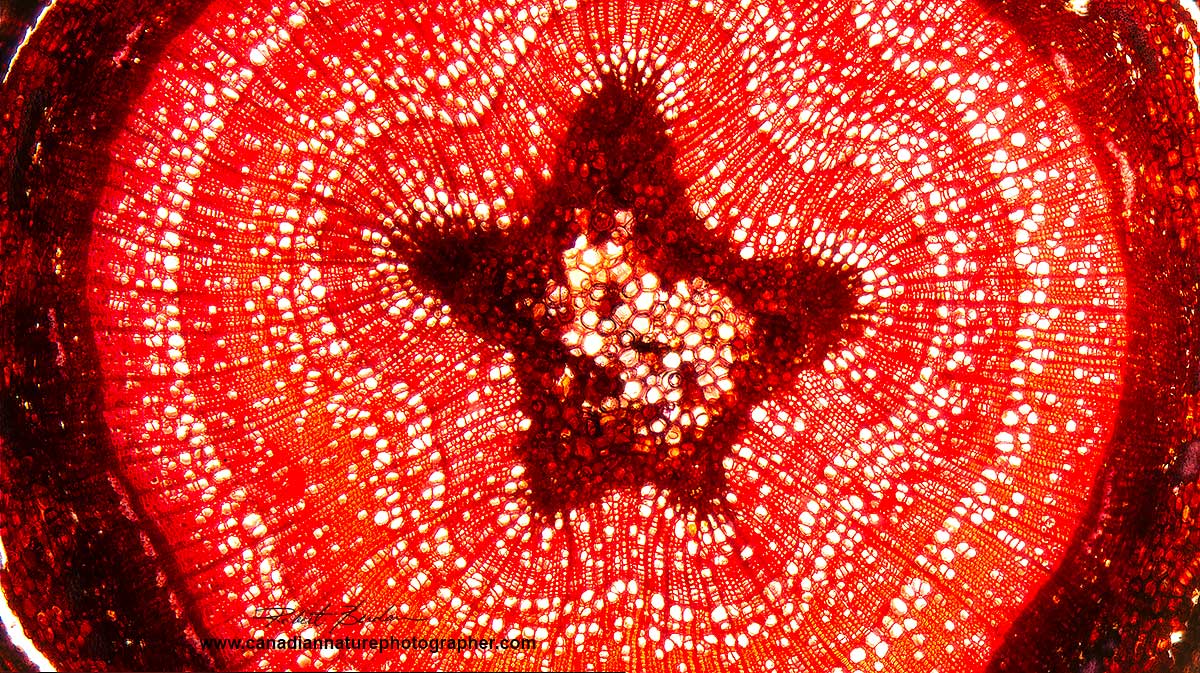
Section through a white-oak tree, stained with Safranin and viewed by bright field microscopy 40X.
Radial section of hard wood - Polarizing microscopy 100X.
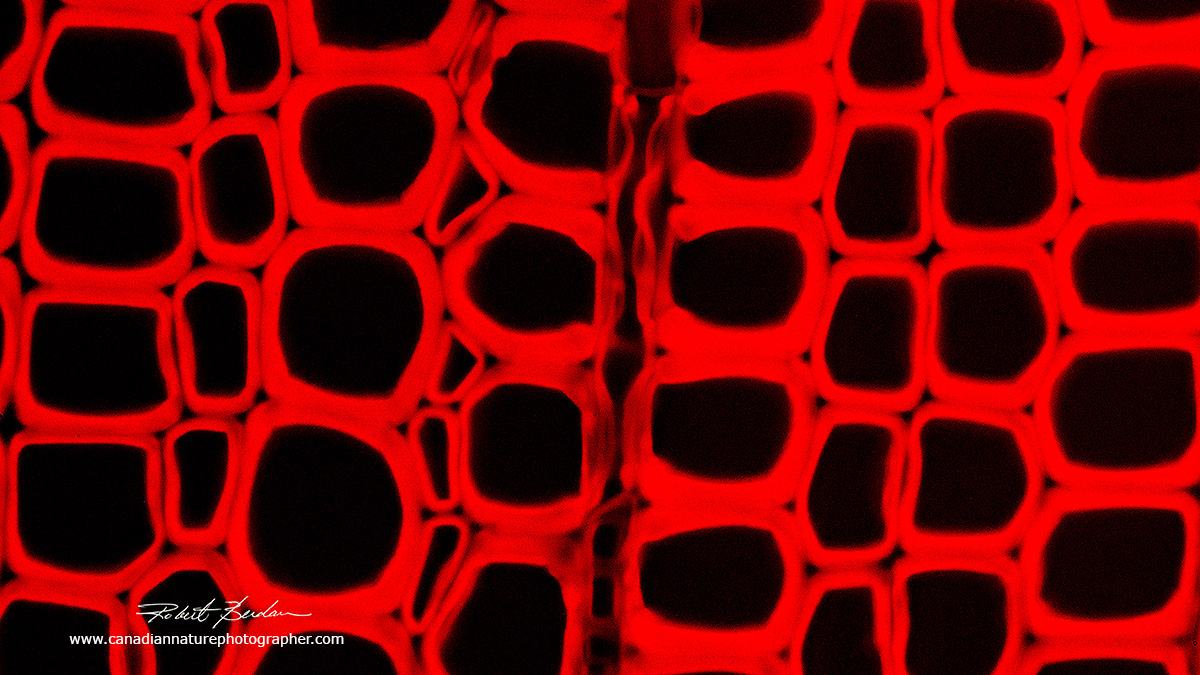
Cross section of Pine xylem (tracheids) viewed in a fluorescence microscope. The cells exhibit autofluorescence when viewed by UV excitation.
Xylem cells that transport water in the stem of plants contain lignin which strengthens the cell walls and also makes these cells auto-fluorescent when viewed by UV excitation 200X.
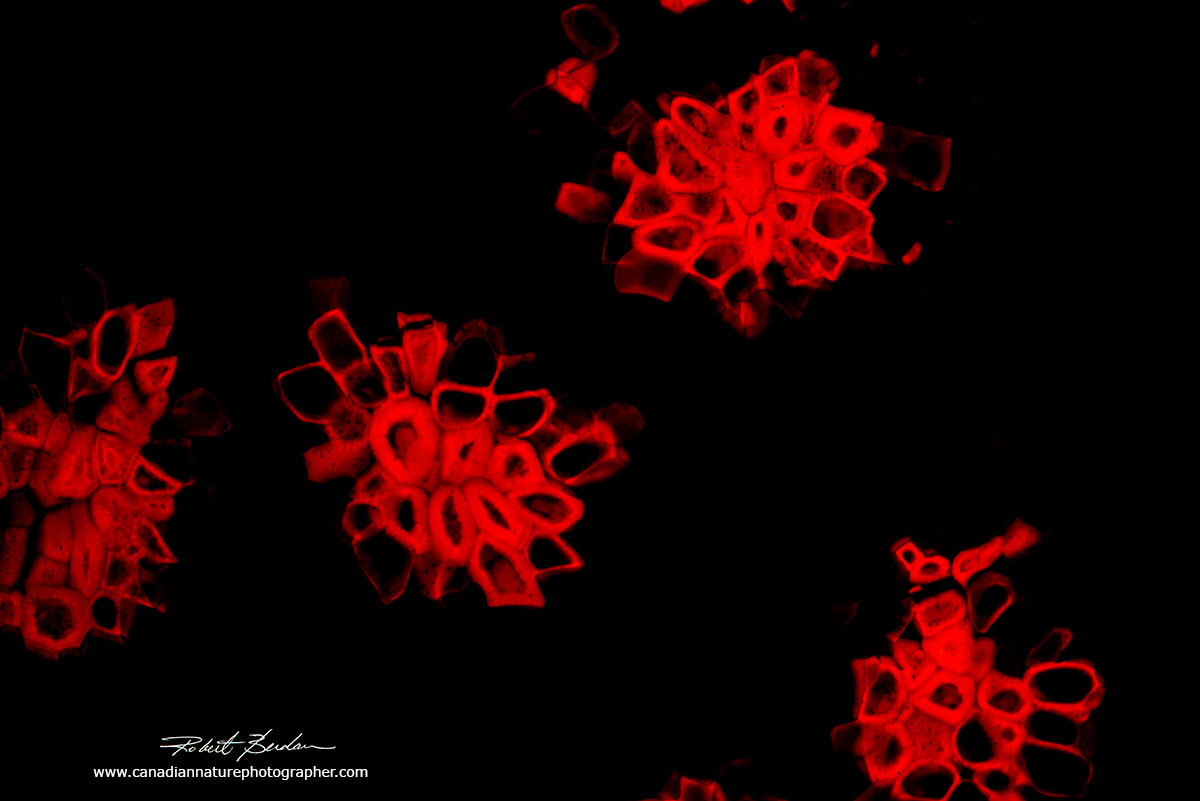
Cross section of a male pine cone from a prepared slide 20X.

Section through a hardwood tree from a prepared microscope slide. Polarized light microscopy 200X. Note the banding pattern.

Zea mays (maize) or Corn stem section. These belong to the group of Eudicots (formerly called Dicots). The term Eudicot was introduced in 1991 based on new molecular data which resulted in some taxonomic changes. Monocot refers to plants with a single cotyledon that appears from the seed. A Dicot now Eudicot, refers to plants that have two cotyledons. Molecular studies have shown the monocots form a monophyletic group or clade which are descendants of a common ancestor, the dicotyledons do not.
Monocots consist of about 60,000 species including orchids, true grasses, major grains (rice, wheat, maize, sugar cane and the bamboos). They also include bananas, plantains, gingers, asparagus, pineapple, leeks and onions. Eudicots include sunflowers, common dandelion, forget-me-nots, cabbage, apple, butter cup and Macadamia and includes mostly leafy trees.
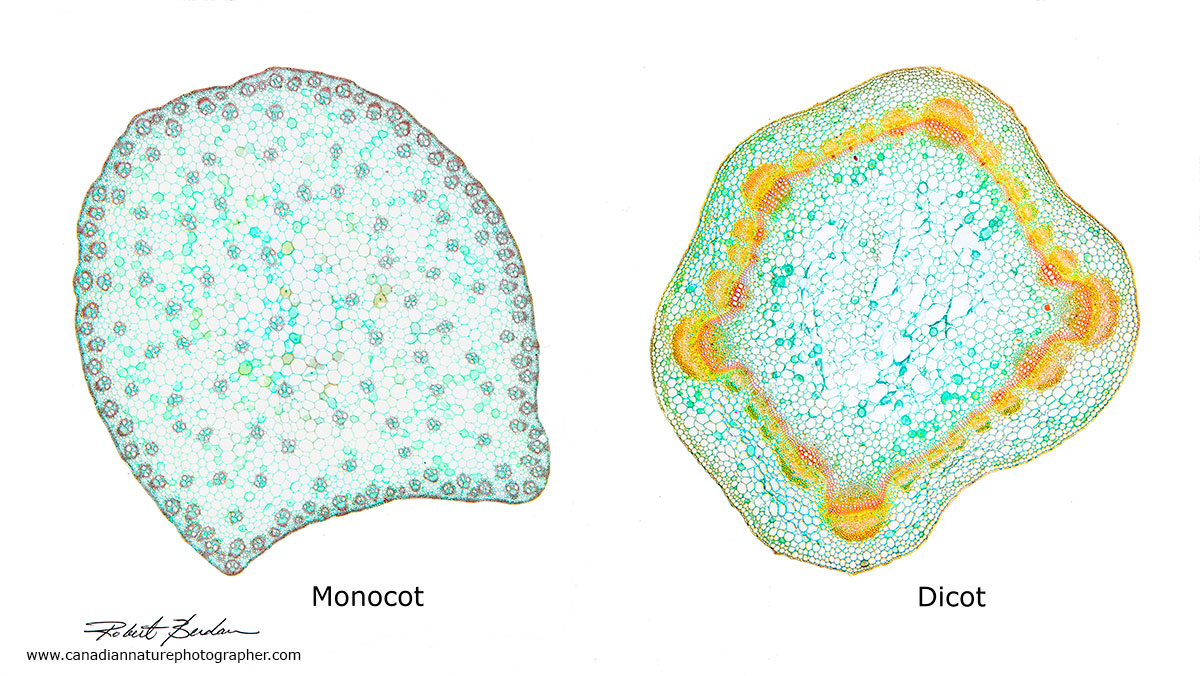
Above photomicrograph shows a section through a Monocot and and Dicot (Eudicot). Note that in monocots the vascular bundles are distributed throughout the stem whereas in Dicots the vascular bundles occur in a ring. An angiosperm (flowering plants) are divided into Magnoliids, Monocots and Eudicots.

Monocot cross section viewed by Darkfield microscopy. You can see the vascular bundles distributed throughout the plant stem. 100X.
Monocot stem viewed by Polarizing microscopy. The bright cells are lignified and appear brighter.
Roots
Root functions in plants:
1) provide water and inorganic nutrients to the plant
2) roots anchor and support the plant
3) roots store starch and nutrients for the plant
Small hairs on the roots increase the surface area for absorption. Potatoes usually grown in the ground are often thought of as roots but technically they are enlarged plant stems called tubers and store starch. Starch is a polysaccharide produced by most plants as a form of energy storage and it is common in our diets. You can easily obtain roots still attached to various vegetables like onions or grow them yourself by cutting the top of a carrot and placing it in a dish of water for a few days.
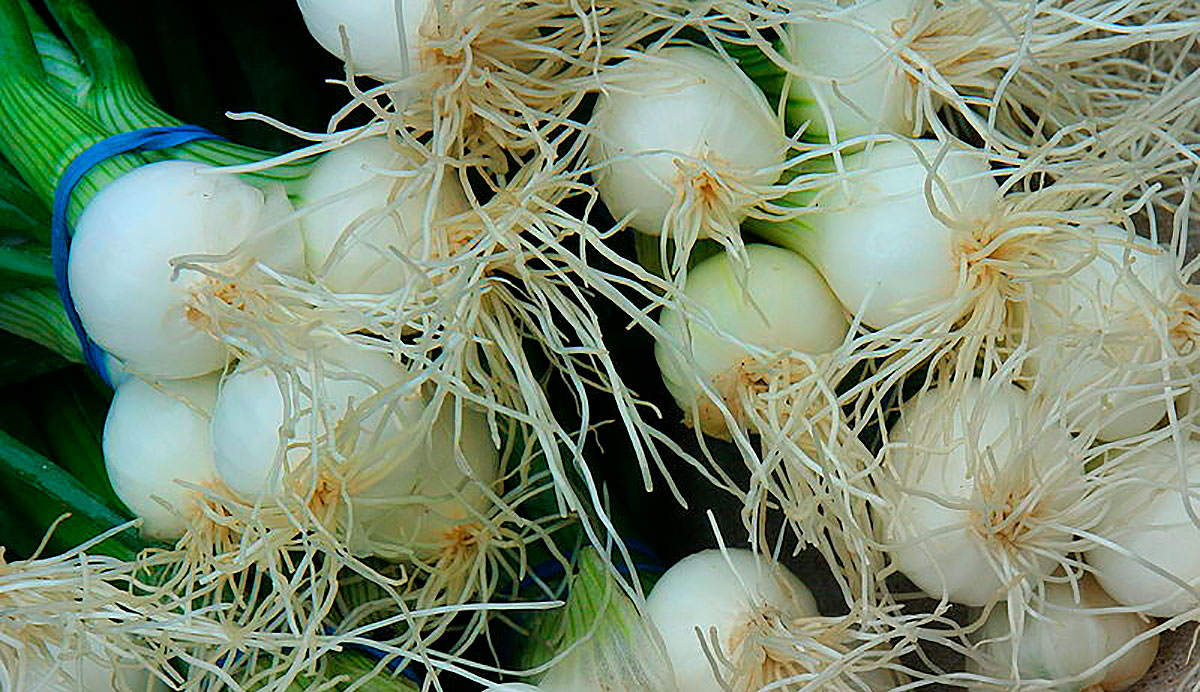
Onion bulb roots from whole onions on sale at an outdoor farmers' market - photo by Jonathunder - Wikipedia.

Shown above are root cross sections from Corn (Maize) viewed by bright-field microscopy (top) and dark-field microscopy(bottom). The vascular bundles are in a ring near the center of the stem. 100X.

Left Confocal microscope image of the root of a barley plant root (Hordeum vulgare) by Mark Talbot, Right is Ranunculus (Buttercup) root a eudicot by Sadierath - from Wikipedia - showing some of the inner vessel elements of a root viewed by bright field microscopy.
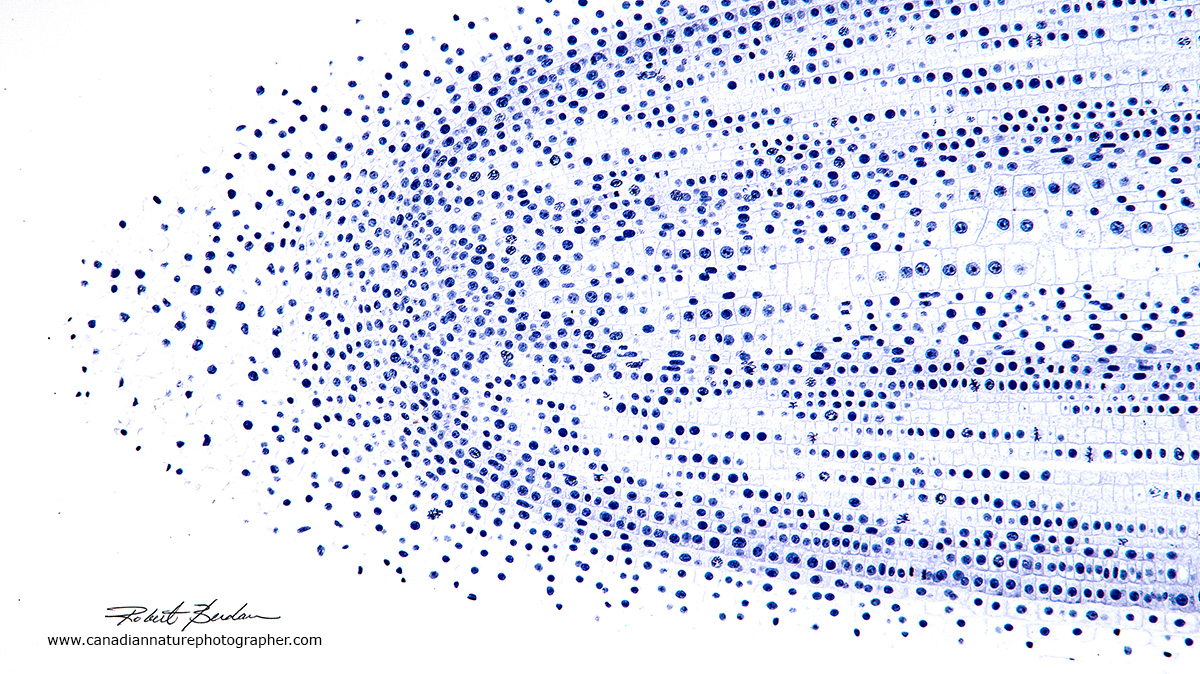
Lateral section of an onion root tip from a prepared microscope slide. At higher magnification (below) you can see chromosomes and the dividing cells in different stages of mitosis. 50X Bright field microscopy.
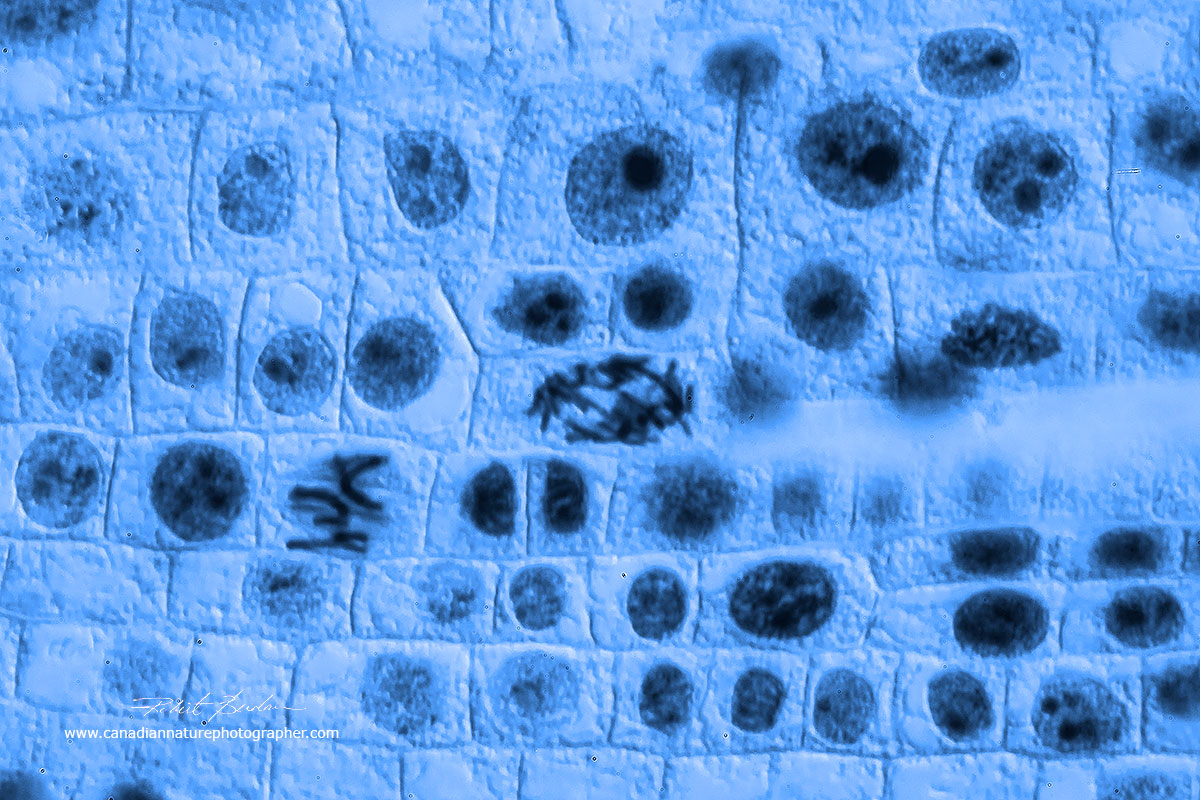
Onion root tip from a prepared slide showing cells dividing at different stages of the cell cycle. Several of the cells show the chromosomes. Root and apical tips have cells that are dividing rapidly. 400X Bright field microscopy.

One of the simplest plant preparations involves viewing a piece of onion skin by mounting it on a microscope slide. In this picture the cell walls are stained blue and the nuclei red - viewed with a polarizing microscope and wave plate. 400X.
Starch Grains
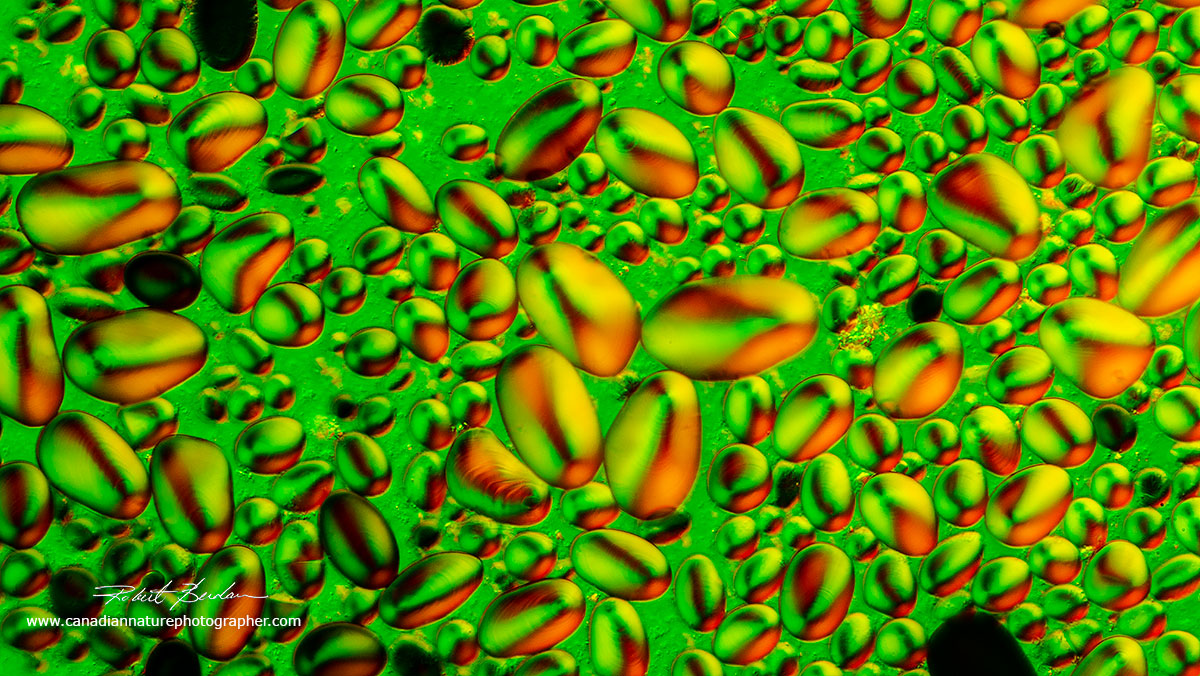
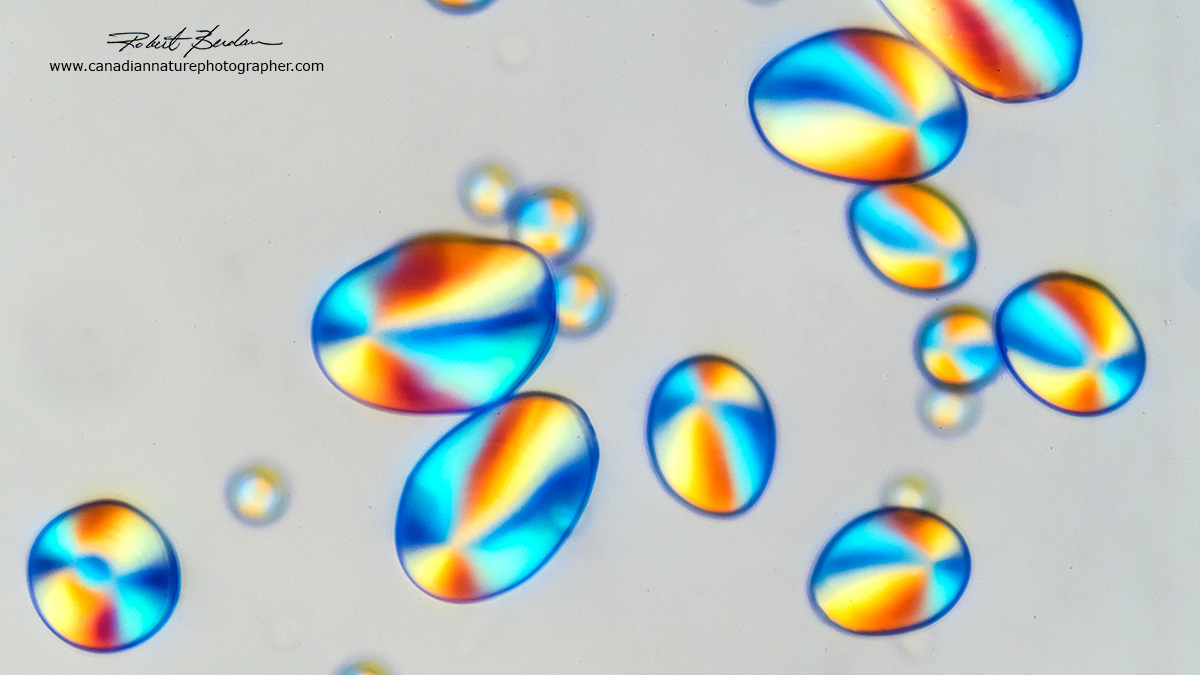
When plants undergo photosynthesis they store the food they make as starch which can readily be seen in sections of plants. Two ways to determine if they are starch is to stain them with Lugol's iodine, the starch granules turn a dark blue colour. Alternatively we can view them with a microscope through polarizing filters where the starch grains exhibit a Maltese cross. See my article on crystals to learn more about the Maltese cross. The shape of the starch grains are different in various species of plants. Archaeologists examine the starch grains to study how ancient cultures made different types of beer. Starch grains are easy to prepare and you can view them in sections of vegetables or fruits or simply make a squash preparation on a microscope slide. The Maltese cross pattern viewed in crossed polarizers can also be used to detect if there is starch in a substance e.g. in forensic science.
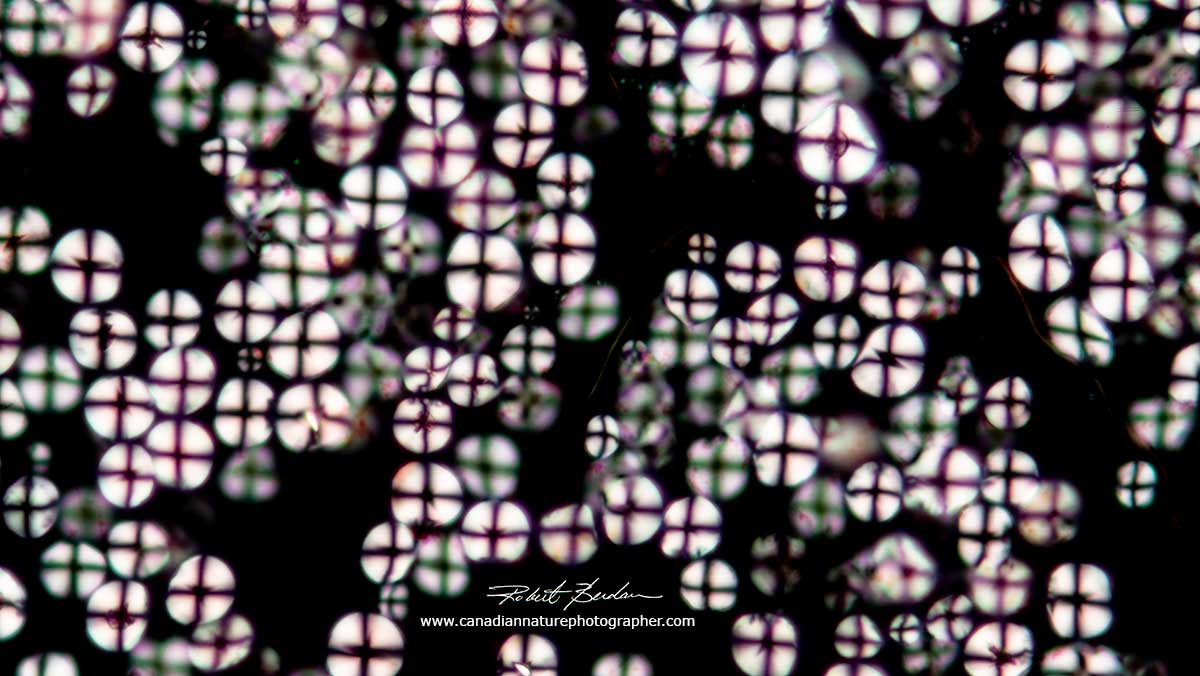
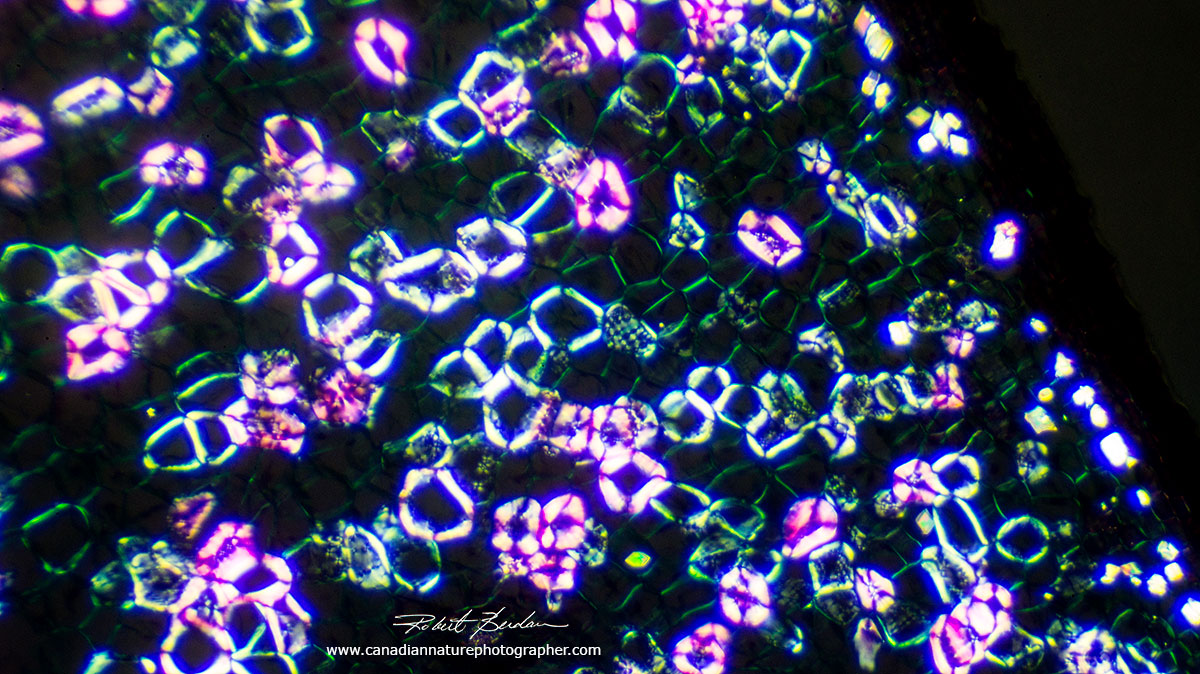
Above corn starch granules viewed in polarized light. 100X
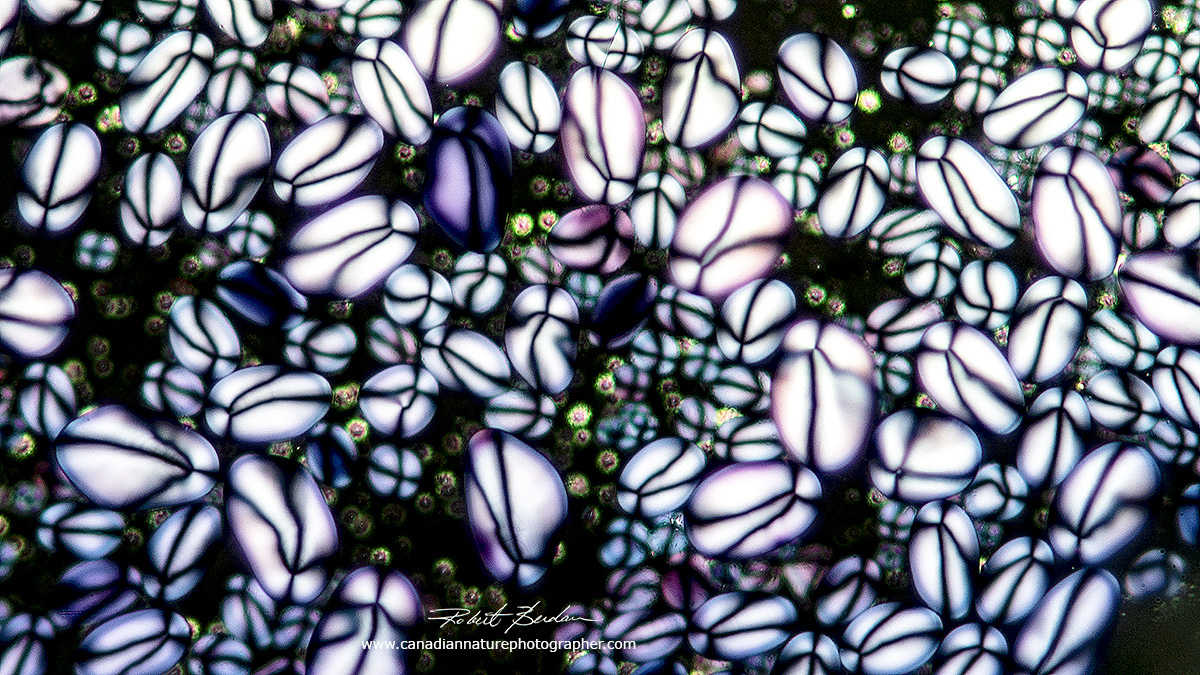
Potato starch grains by polarized light microscopy. To view starch grains simply take a small piece of fresh potato (1-2 mm) and squash it on a microscope slide add water and view the grains through crossed polarizers in the microscope. Note the Maltese cross represents regions where the polarized light passes straight through the grains without being bent or having undergone destructive interference. See K.A. McMahon 2004 PDF for more details on to make squash preparations.
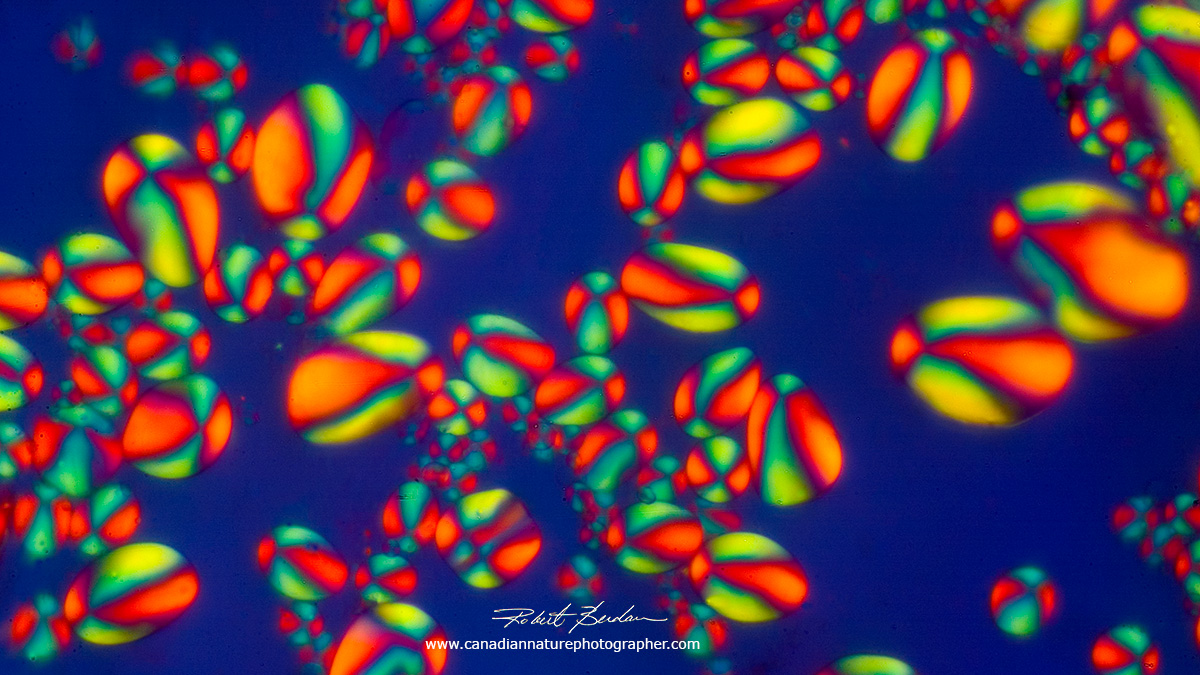
Potato starch grains viewed with a Polarizing microscope and a full wave plate. Wave plates rotate the polarized so that certain wavelengths (colours) interfere. The background colour depends on which wavelengths are eliminated by destructive interference. A wave plate, also called a retardation plate can be made by applying a layer of transparent scotch tape on a microscope slide or the filters can be purchased from science stores (e.g. Edmund Optics). For more information see my article about polarized light microscopy and also see the reference section of that article. I first photographed potato starch grains in my garage laboratory with my Olympus E microscope when I was 16 years old.
Depending on the plant, starch contains about 20-25% amylose and 75-80% amylopectin. Glycogen is the glucose storage form in animals and it is composed of more highly branched amylopectin. Starch sugars are converted by malting and fermented to produce ethanol, beer, whisky and biofuels.
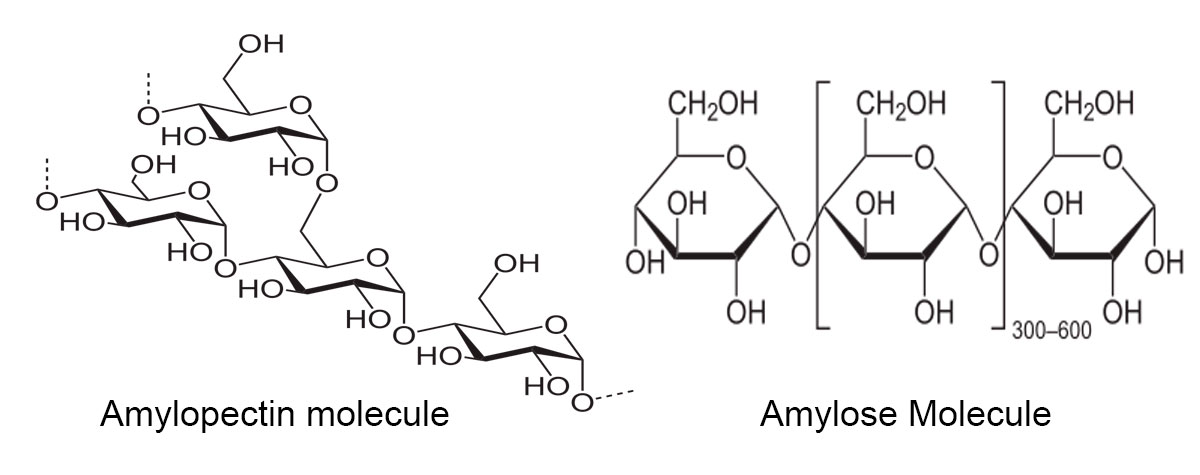
Pictures of starch molecules from Wikipedia
Potato starch grains by Dark-field microscopy, I closed the condenser diaphragm down and used polarized light to produce this abstract looking picture 50X

Potato starch grains stained with Lugol's iodine solution 100X Bright-field microscopy.
Potassium iodide (Lugol's iodine solution 0.3% w/v) is used to test for starch which turns a dark blue as shown above. The details of the reaction are not fully understood. The strength of the blue colour depends on the amount of amylose present and is one of the diagnostic tests for starch.
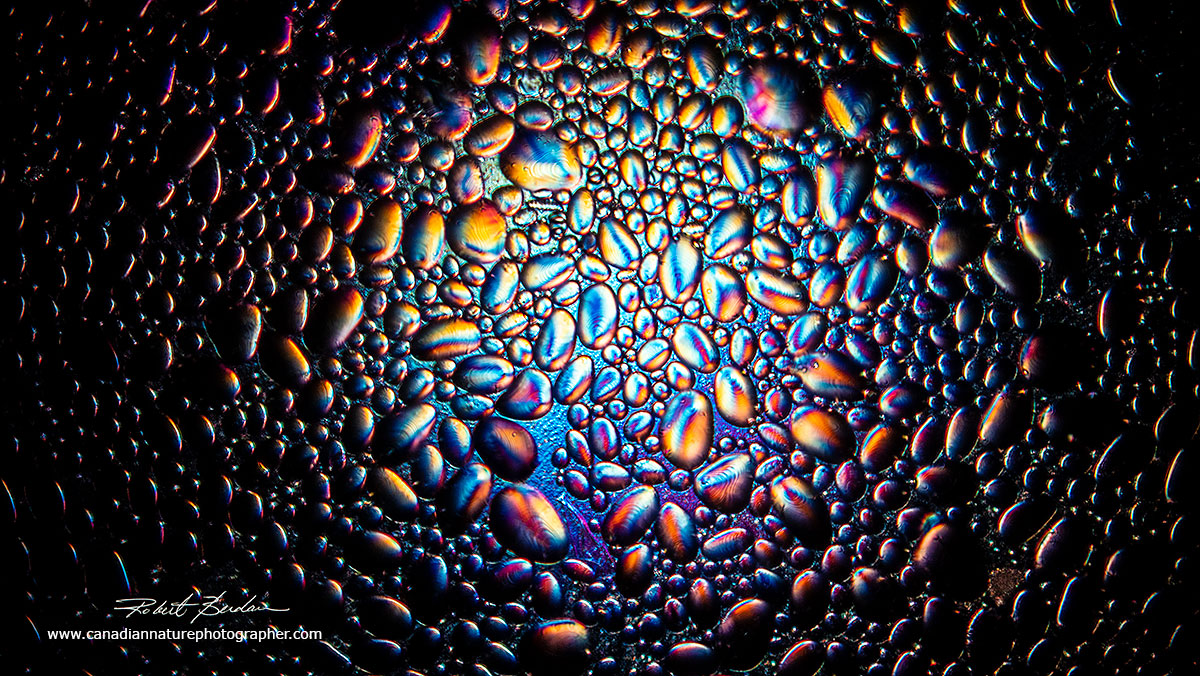
Potato Starch grains in Polarized light and Rheinberg lighting. To learn how to add Reinberg lighting to your microscope see my article Rheinberg Filters for Photomicrography - the filters can be easily made or a set can be purchased for about $30 on Ebay.
Potato starch grains in polarized light, the polarizers are not rotated into the extinction position which would result in a black background. 200X.
Mixing starch in warm water produces a paste which can be used to stiffen clothing or as a glue. Starch is also used to make paper. The starch in the plant is stored as semi-crystalline granules shown above. One of the reasons plants store their sugar in the form of starch is that starch is not soluble and therefore osmotically inactive. The starch grains consist of concentric layers (the thin layers are visible at higher magnification with the microscope) of amylose and amylopectin. The glucose molecules in starch are easily hydrolyzed to simple sugars which can then be transported through out the plant. Because the starch in grains form molecular arrays they appear birefringent when viewed in a polarized light microscope. Each plant species has characteristic starch granules which can be recognized with a microscope. Starch becomes soluble when heated (cooked) and the amylose molecules leach out increasing the mixtures viscosity. Certain starches (e.g. corn starch) when mixed with water form a non-Newtonian fluid where the viscosity can change under force. Some researchers apply a mixture of corn starch to the plant or wood before sectioning with a microtome to help "stiffen" the plant stem (L. Schneider and H. Gärtner, 2013). Also raw starch granules resist digestion by human enzymes in the small intestine so they move to the large intestine and function as dietary prebiotic fibre. To me the starch grains viewed with a polarizing microscope resemble jewels.
Leaves
Leaves are where photosynthesis occurs in a plant that results in the production of sugar which is then stored as starch and later distributed throughout the plant. The leaves also have special structures called stomata that allow the cells to "breath".
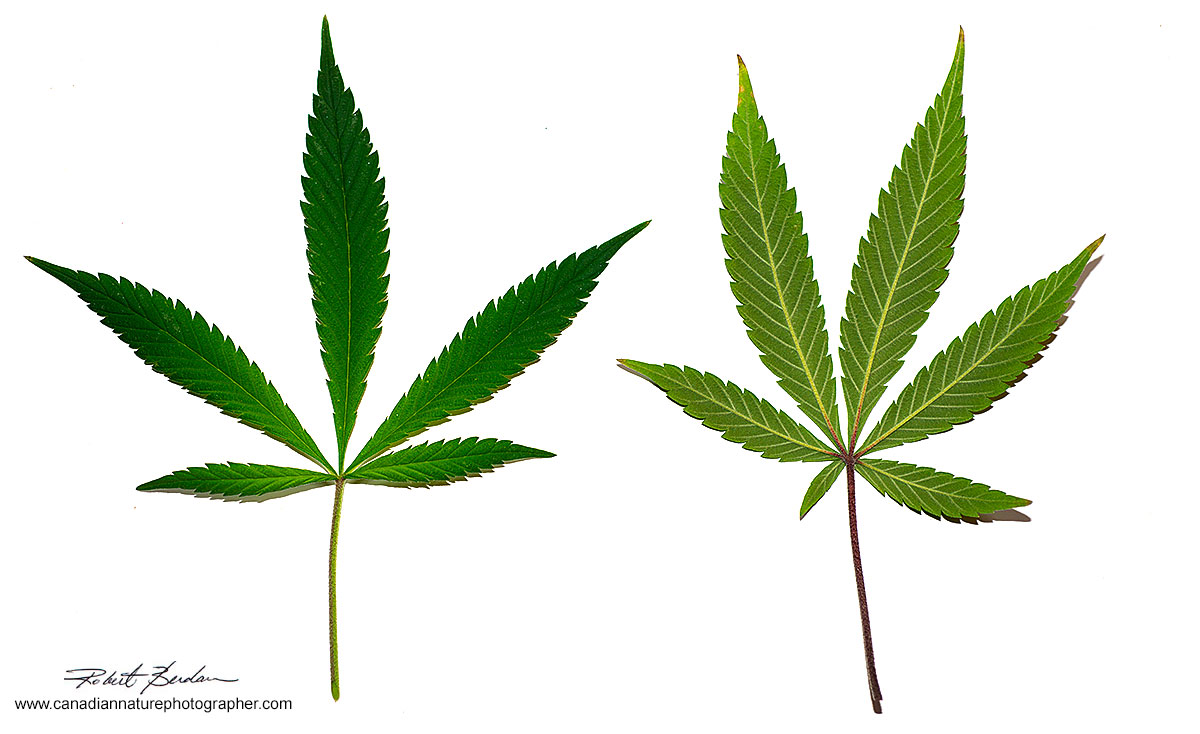
Above Cannabis sativa male leaves on the left is the top surface (adaxial) of the leaf, right the bottom surface (abaxial). Cannabis is legal in Canada and one can own 4 plants for personal use. I was interested in looking at some of the microscopic structure. The male plant has very low THC (Tetrahydrocannabinol) content which is primary compound responsible for the psychoactive effects. The male plant is mainly used for breeding (Srivastava and VK, 2013).
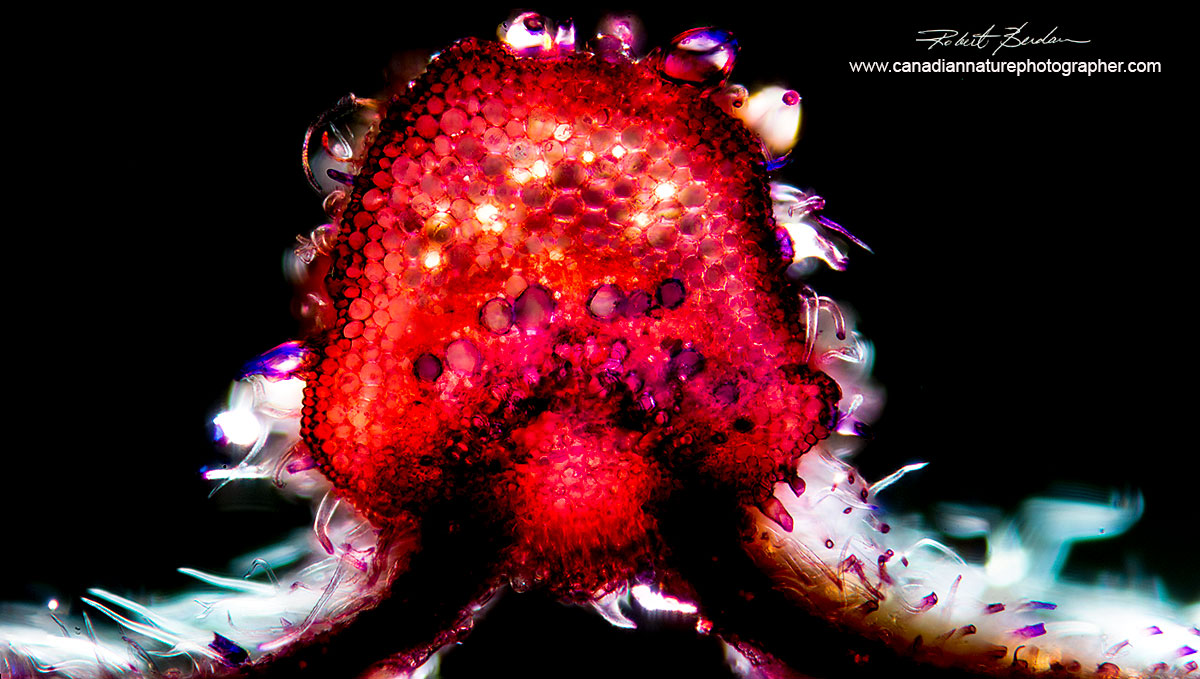
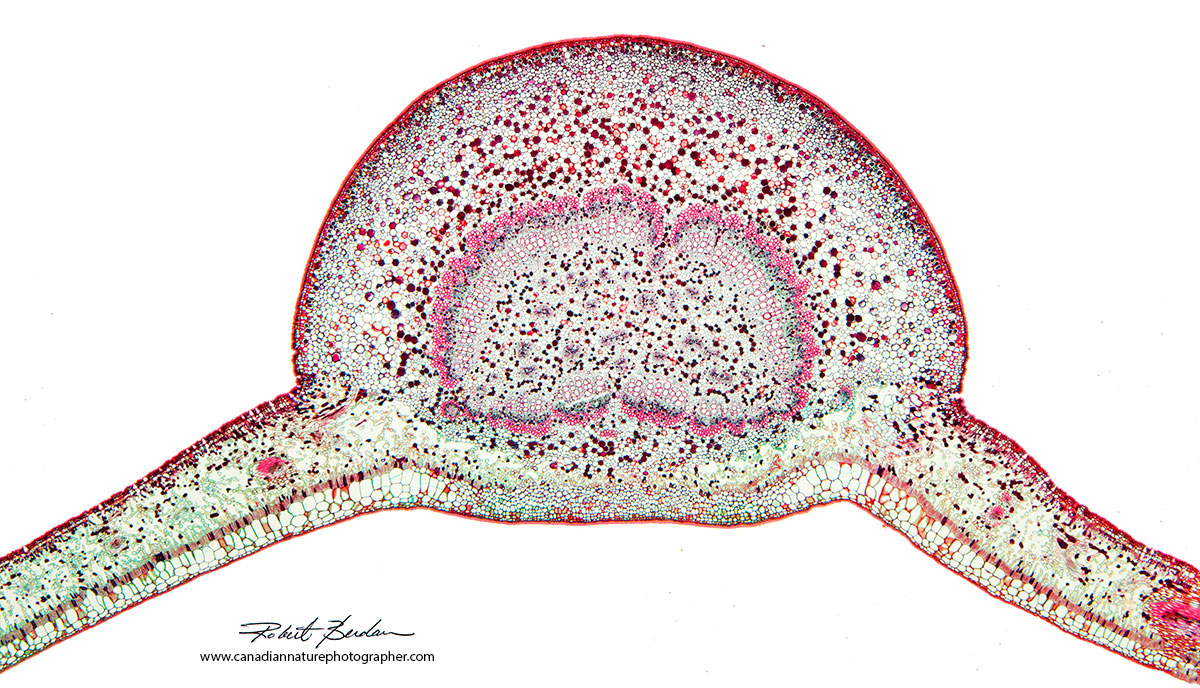
Hand cut cross section through a leaf vein from Cannabis sativa male 200X Dark-field microscopy.
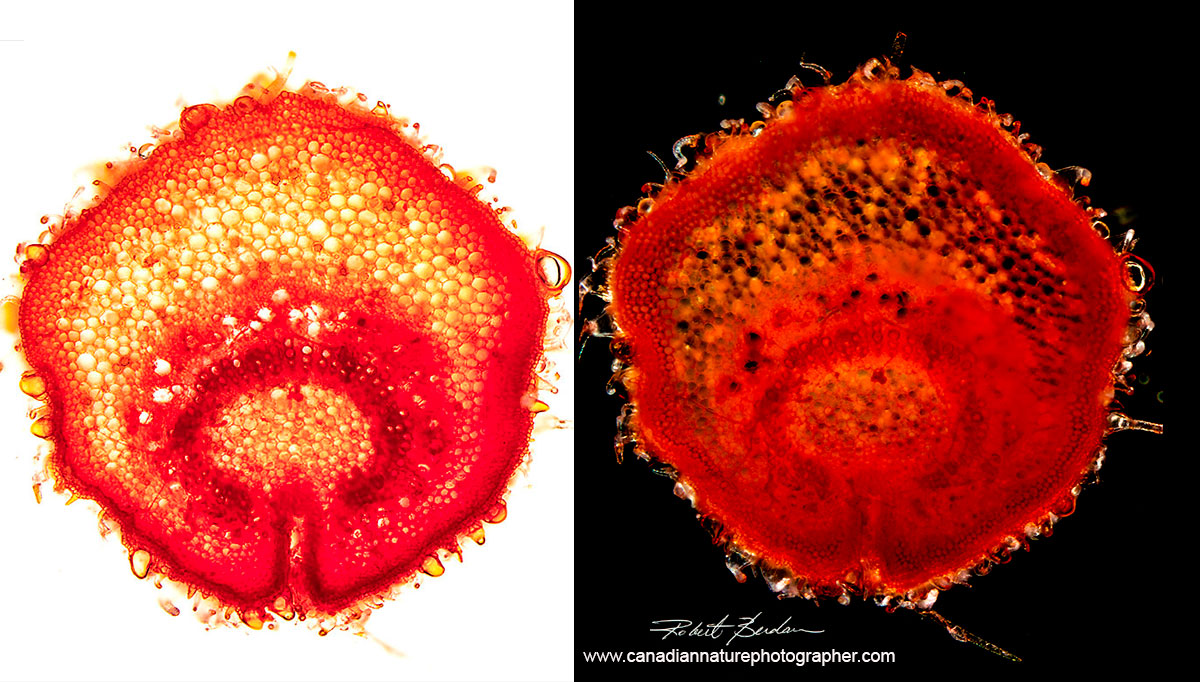
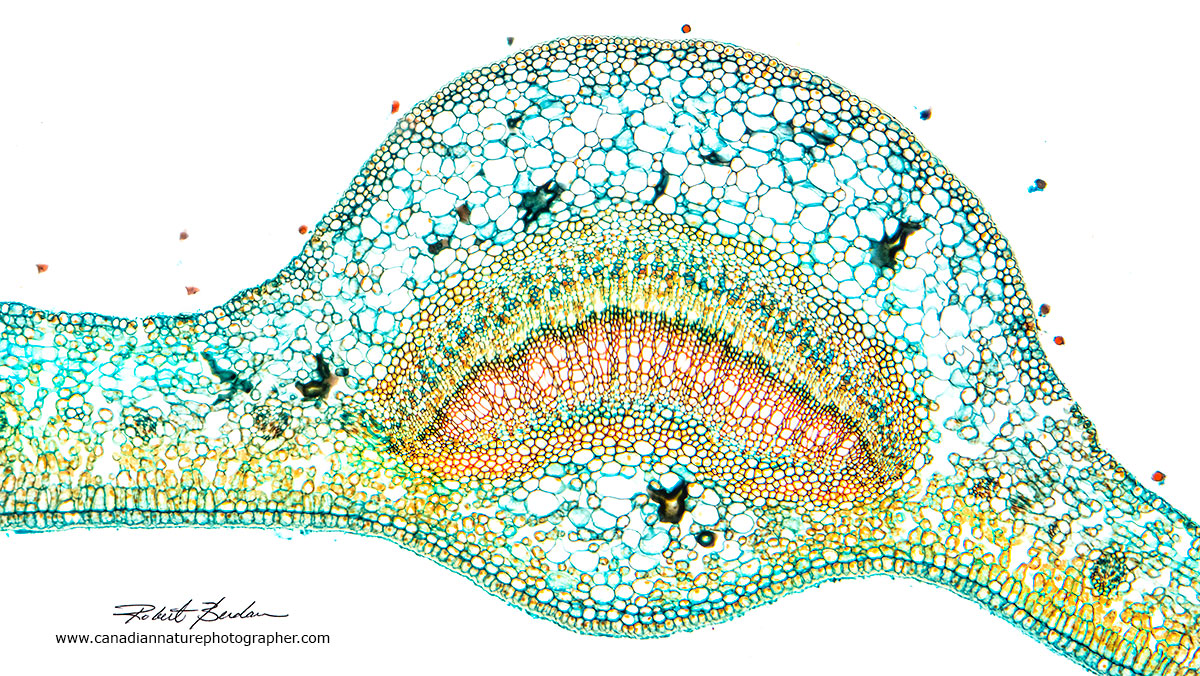
Cannabis sativa leaf stem in cross section cut by hand using a razor blade and stained with Safranin Left: Bright-field microscopy Right: Darkfield microscopy.
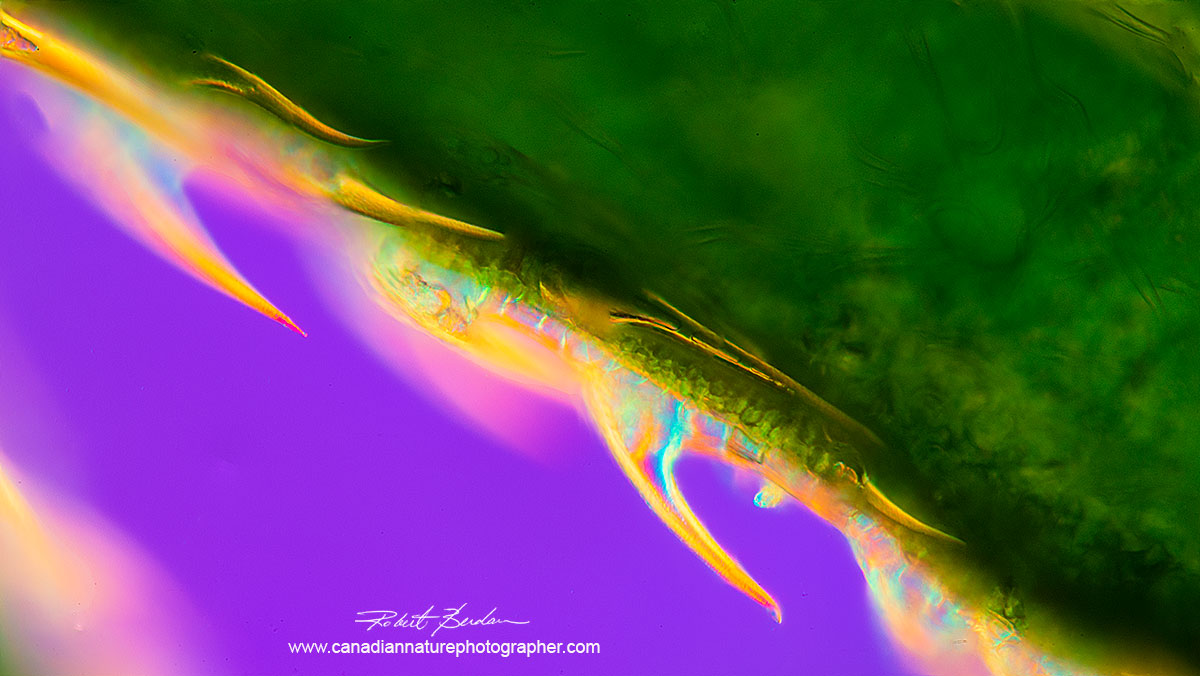
Leaf edge of Cannabis sativa showing spine like Trichomes. 100X DIC microscopy, focus stack. To learn more about Cannabis Trichomes see (P. Dayanandan & P. B. Kaufman, 1976).
 Cross section of a leaf (200X) from a prepared microscope slide. Prepared slides can be purchased from a variety of suppliers online (e.g.www.triarchincorporated.com). This section above was made using a microtome and then stained, dehydrated in a series of alcohols, then transferred to xylene before making a permanent slide in Canada Balsam (you can purchase synthetic Canada Balsam on Amazon). Microscope slides like this can be purchased for $1-10 each and amateurs can make their own slides which I like to do.
Above are leaf cross sections from prepared slides. The slides are stained with Fast green, Astra blue, and\or Safranin. The easiest stain to obtain is Toluidine blue. The thicker regions in the photos are veins in the leaf that provide support and transport nutrients to the stem.
Stomata
In botany, a stoma (plural "stomata"), also called a stomate (plural "stomates") is a pore found in the epidermis of leaves, stems, and other plant organs that facilitates gas exchange. The pore is bordered by a pair of specialized parenchyma cells known as guard cells that are responsible for regulating the size of the stomatal opening (Wikipedia). Stomata are found on the outer surface of the plants leaves and some stems. These specialized cells can open and close to control the uptake of air (carbon dioxide) and release of water vapour via transpiration. The three stomata shown below are in the closed state. To learn how to prepare stomata from leaf peels see this PDF and how to make stomata peels using clear nail polish - Microbehunter (2012)
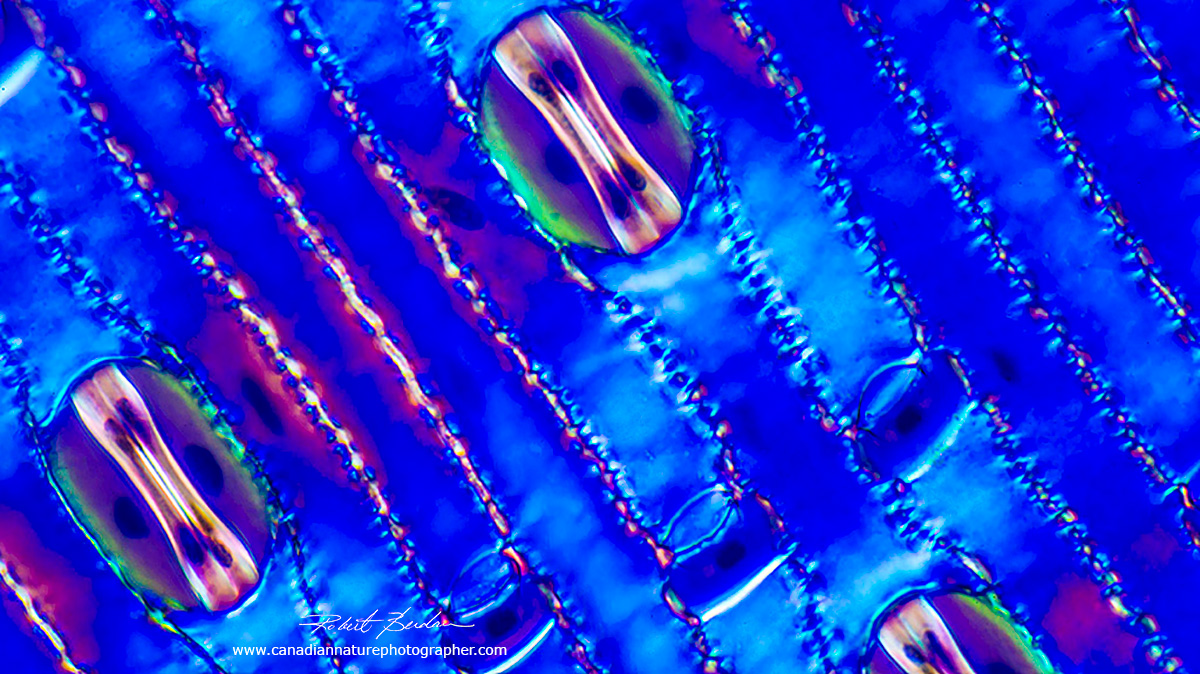
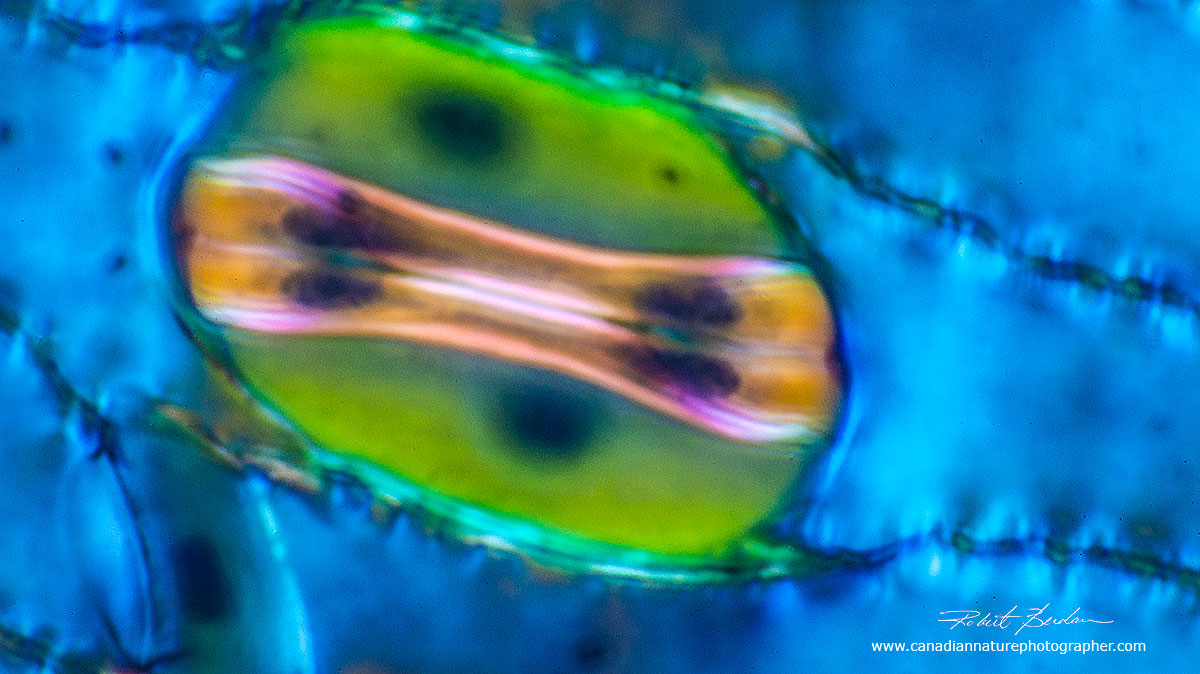
Above two photos show stomata via Polarized light microscopy top 200X and bottom 400X.

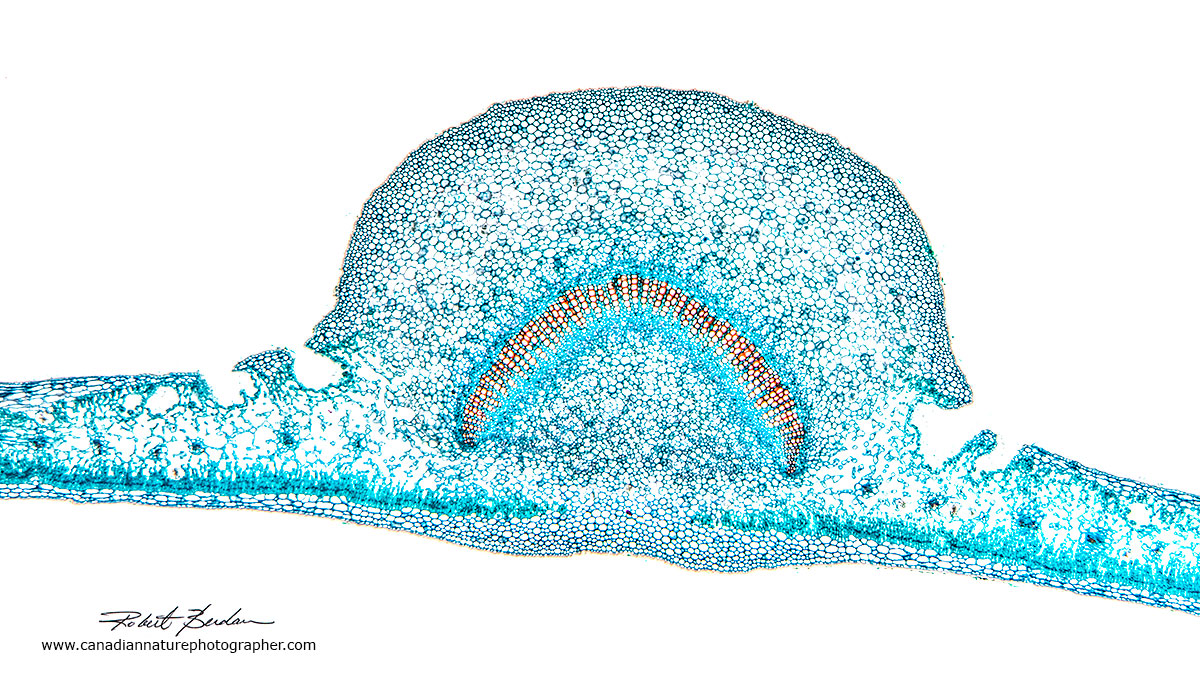
The last laugh - is a cross section from the petiole (leaf stem) from a Mountain ash tree growing in my backyard. It appears to have two eyes and a smiling face made out of vessel elements. DIC microscopy 50X.
Preparing plant sections for those that might like some hands on experience
Soft plant stems can be sectioned without fixing or embedding the tissue. Green branches and twigs are soft and can also be sectioned with a razer blade. Woody stems are more difficult, and some need to be softened first. There are several techniques to soften the wood, the easiest method is to boil the woody stems in 10% glycerol water mix for several hours or until the wood sinks. The glycerol acts as plasticizer (a substance typically a solvent added to promote plasticity and flexibility and to reduce brittleness). Some researchers immerse the woody stems in glacial acetic acid or stronger acids. One problem I found is that softening can make the outer bark separate from the stem when sectioning.
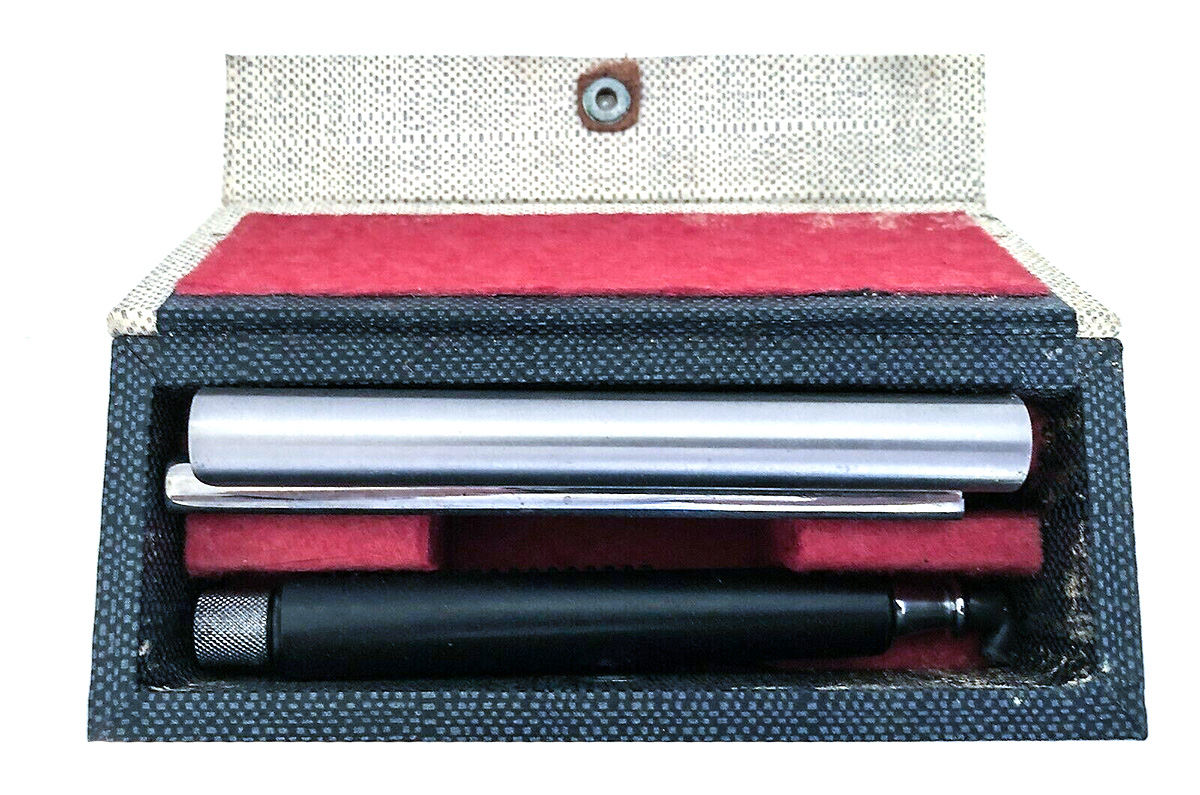
Cutting plant sections by hand - YouTube Video (Beyond the Bean Seed). This video provides a demonstration of making thin cross-sections by hand for plant material such as stems and roots; includes a demonstration of staining the material using TBO (toluidine blue O), a metachromatic stain useful for many plant materials by Melanie Link-Perez, Ph.D. Working by hand using sharp razor blades can result in cut fingers. Some botanists put band aids or use mole skin to protect their fingers while cutting. Alternatively use a razor blade holder - see photo below.
Woody stems can also be fixed in 50-70% ethanol which hardens the tissue and helps to hold it together. Some researchers use Formaldehyde, acetic acid, or Alcohol 50-70% (Isopropanol, Ethanol, or Methanol). I tried Bouin's fixative purchased from Amazon. Bouin's solution is composed of picric acid, acetic acid and formaldehyde in an aqueous solution (Wikipedia). I found this fixative good for animal tissues in the past so I thought I would try it with plants. It worked well and it resulted in better wood sections. I stained the sections in 1% Toluidine blue in water for 1-5 minutes, rinsed the sections and mounted them in water and photographed them with my light microscope. Fast green stain, and Safranin stains also worked well. I will be experimenting with Safranin and Astra blue in the future as it is commonly used in many science papers, but both of these chemicals are expensive and difficult to obtain and companies are reluctant to ship them to a residential address. Plant sections do not have to be stained and can be viewed directly using various microscopy techniques such as Dark-field, Bright-field, Phase contrast, Differential interference contrast (DIC) and polarizing microscopy. For more detailed methods on how to prepare and stain plant sections see some of the references at the end of this article.
Microtomes
A microtome is a tool used to cut very thin slices of tissues for examination with a light microscope. There are also ultra-microtomes which are used to cut thin plastic sections for light microscopy and electron microscopy and I have used them extensively. The first microtome was constructed in 1770 by George Adams and further developed by Alexander Cumming (Gärtner et.al. 2014). The first microtome for cutting serial sections from plants was constructed by Rudolf Jung in 1881 and further developed by C. Reichert in Austria. Microtomes can be small hand-held devices or large and heavy. I own several hand-held or table top microtomes shown below. They are OK for making sections of plants or paraffin embedded material for rapid examination. Typically I can achieve sections about 30-50 microns (0.030-0.050 mm) thick with the smaller table top microtomes or a razor Blade. Getting sections thinner than this is possible, with the older American optical table top microtome and using a Microtome disposable blade holder and blade I purchased on Ebay for $300 (see below). Rotary microtomes are commonly used for cutting soft tissues which requires fixing the tissue and embedding it in Paraffin wax or some other medium. Below I share my experience with various methods of producing plant sections using a variety of microtomes, razor blades or microtome knives.
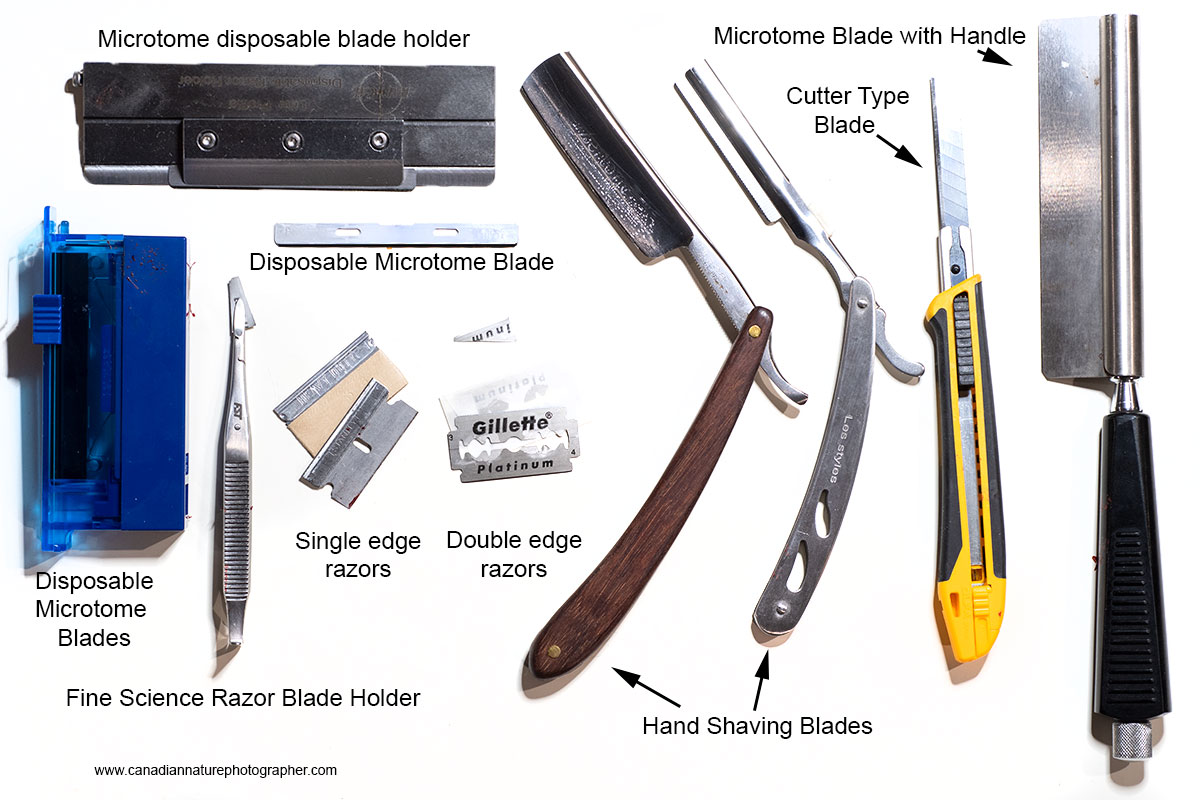
The above photo shows a wide variety of blades and tools that can be used to cut thin sections of plants. The disposable blade holder was purchased on Ebay from Radical in India for about $250 and can hold NT cutter blades or the Feather disposable blades. A box of disposable Feather Microtome blades S35 Low Profile type can be purchased from Amazon for $100 (50 blades). Single and double edge razor blades are available on Amazon. NT Cutter blades are designed to cut paper but are able to cut thin sections of plants and woody stems (Fuji 2003). These blades cost $26 CDN on Amazon.ca for 100 blade pack. Used Microtome knives are common on Ebay. The Fine Science tools razer blade holder costs $250 US. I have owned this tool for a long time as I used it in my research for dissecting animal tissue. There are a wide variety of other razor blade holders that can be used e.g. X-Acto Gripster Knife available on Amazon for $7. Anna S. Teetsov shows how to cut a double edge razor to create 4 smaller knife blades and hold them in an X-Acto knife holder.
CAUTION: Microtome and razor blades are sharp and potentially dangerous. I recommend having a first aid kit readily available when using them. Large microtome blades require regular sharpening so some researchers prefer to use the disposable cutting blades. I am still testing disposable microtome blades and also the NT cutter blades which are economical in price.
Below are various versions of Ranvier hand microtomes. On the right is the simplest version. You twist the bottom screw which moves the sample up and then you slice the plant with a single, double or hand shaving blade. You can make a hand microtome with a small board, a bolt and some nuts (M. Dingley and Q. Saville - Download PDF). Another home made microtome can be built with glass microscope slides and is described by J. Giannini (2017) called The OPN Microtome: An Inexpensive Open source Hand-Held Mini Microtome - Download PDF. Other researchers use a microscope slide to hold down the plant sections and then cut sections using a single or double edge razor blade. Some use their finger to hold a plant stem down and then run a razor blade down their finger nail (watch YouTube video Plant techniques). This technique works but requires some practice. I also find it helpful to cut the plant sections while viewing the sample under a stereo-microscope. I recommended cutting many sections and choosing the thinnest - it takes practice to get good thin sections.
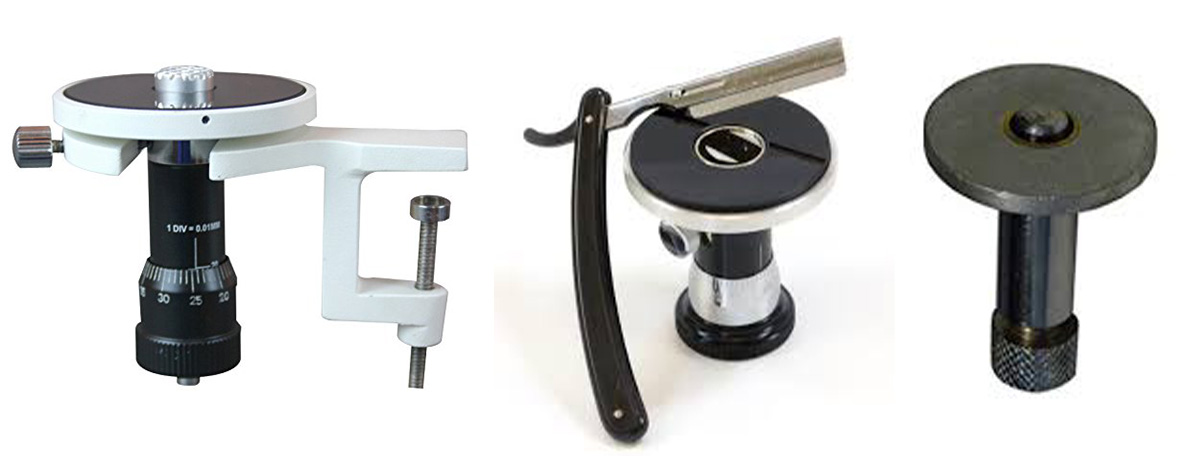
The middle hand microtome uses a disposable cutting blade and single edge razor blades will fit. The sample is clamped into the middle of the microtome and by rotating the base you can move it up in small increments. The microtome on the left has a clamp that allows it to be fixed to a table and works similarly. Samples are placed in the center and micrometer gear at the bottom is used to raise the sample in 5 micron increments. You can use a razor blade, single, double edged or the older shaving blades with a handle to cut sections. These microtomes cost from $50 to about $200 on Ebay and various other science supply stores. You can also find instructions on how to make one yourself. Watch the video by the Microbe Hunter on YouTube which shows how to use the Hand microtome and how to use carrots and other plant material as a support for smaller tissues (Microbe Hunter YouTube).
Who was Ranvier? Born in Lyon 1835, Ranvier was a prominent histologist of the late 19th century. He discovered the nodes of Ranvier, regularly spaced discontinuities of the myelin sheath, occurring at varying intervals along the length of a nerve fiber. Why is the hand microtome sometimes named after him - I am not sure perhaps he was one of the first to use one. One of the first devices for making cuts was invented in 1770 by George Adams, Jr. (1750–1795) and further developed by Alexander Cummings. The device was hand operated, and the sample held in a cylinder and sections created from the top of the sample using a hand crank. For more information about the history of the microtome see Wikipedia.
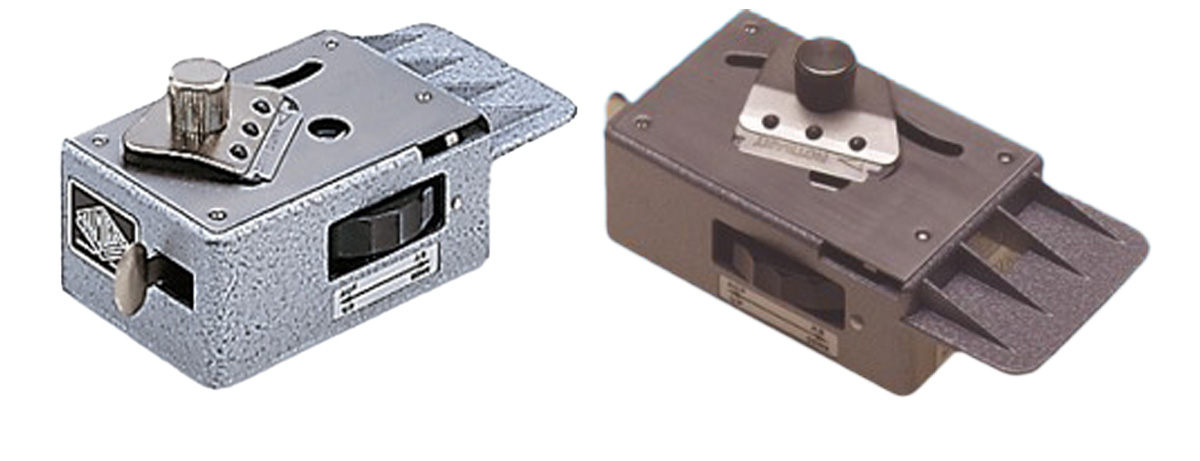
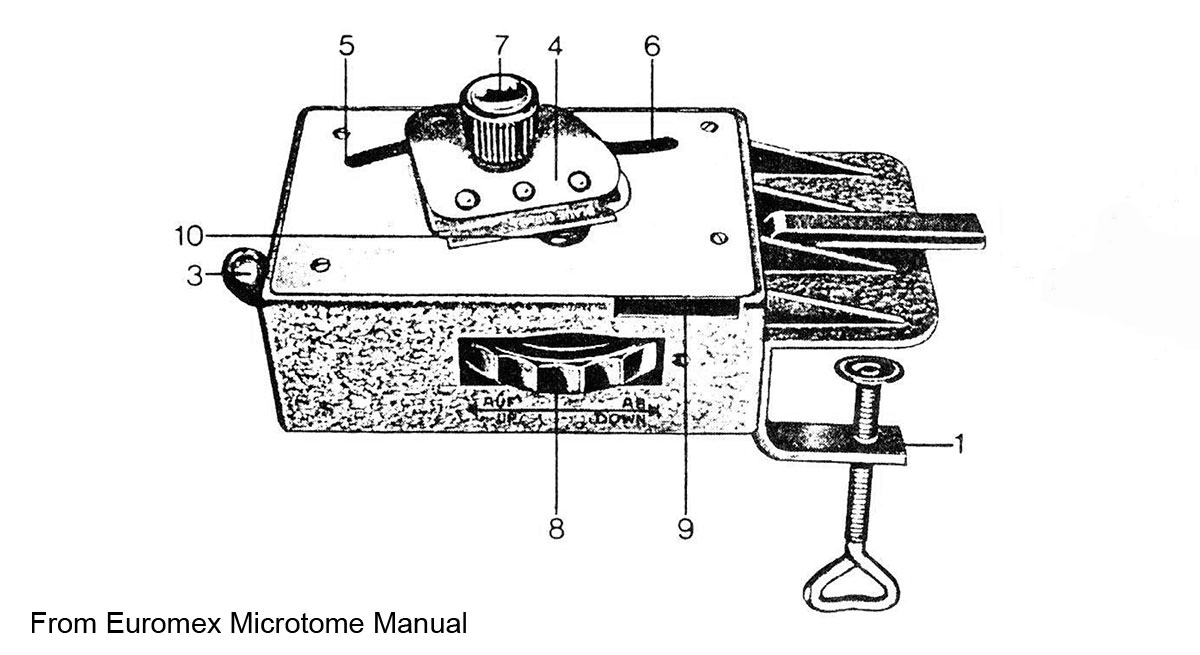
Diagram shows the Euromex microtome with a table clamp.
Euromex Microtome MT.5503 razor blade slicer can be used for soft plants (Download manual - PDF) and it is available from Phywe.com for about $500 CDN. The microtome is sold with and without a table clamp. The dial on the side pushes the plant stem up in small increments (full turn raises the sample 25 microns (0.025 mm) and the razer blade can be moved along a track to cut the plant stems. I have not used this device, it appears that it might work well for plant materials, but the cost seems high for this small device and I am able to cut 30 micron sections by hand. Watch the video by the Microbe hunter that demonstrates its use (Different types of microtomes for microscopy - The Microbehunter - YouTube). Also read: http://www.mikroskopie-bonn.de/bibliothek/botanische_mikrotechnik/161.html and translate to english. This web site also describes staining techniques for plants and includes beautiful photomicrographs. Also read D. Metusala (2016) paper on the use of this small microtome.
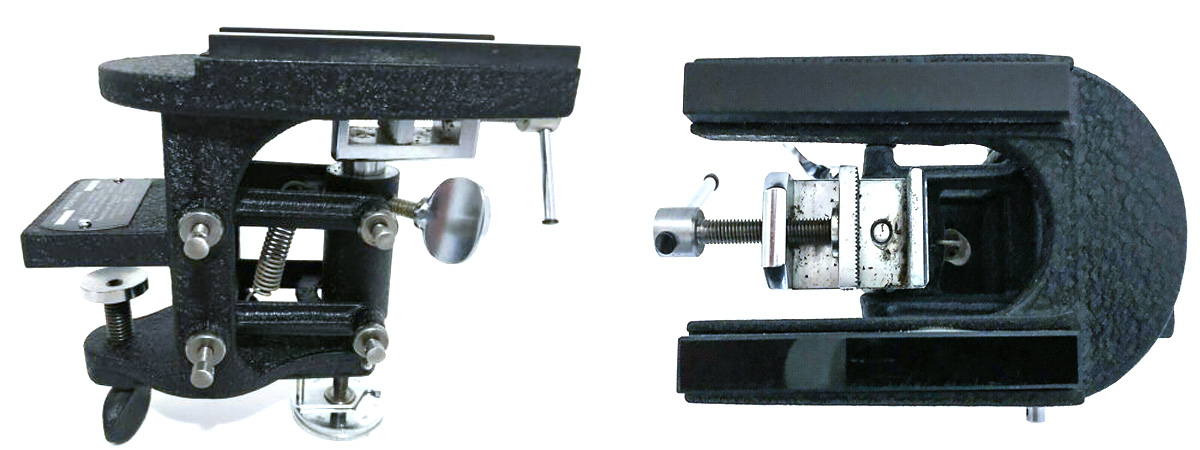
American Optical Hand Microtome circa 1950's from E-Bay. The sample is clamped down in the middle and microtome blade is slid across the top rails to cut the section. At the bottom of this hand microtome is a dial that moves the sample up in small increments of 5 microns. This one was made by American Optical in the 1950's for botany labs. I purchased it on Ebay for $300 US and was able to achieve 10-15 micron thick sections on my first trial using the disposable microtome blades and holder. Unfortunately these are not readily available anymore.
American Optical Microtome blade and Handle in the box I purchased from E-Bay - photo of this knife is also shown above with the handle. Below are example photos of tree sections I was able to make using this microtome and a disposable microtome blades. I am able to achieve 10-15 micron thick sections.
Fresh unfixed Popular tree branch sectioned with the table top microtome above and stained with Toluidine blue. 40X

Popular tree branch sectioned with the American optical microtome and stained with Toluidine blue. Focus stack Polarized light microscopy. 100X
Popular branch stained with Safranin, Bright field microscopy - sectioned with American Optical table top microtome shown above. 100X.

Popular branch sectioned with the Amercian Optical table top microtome and stained with Safranin, bright-field microscopy. 400X
I recommend watching some YouTube videos (see links below) on how various technicians use a carrot, cork, potato, elderberry pith, or Styrofoam to embed a plant stem or leaf and place this composite in the microtome in order to cut thin sections. The carrot provides a support and allows better sections to be made. Using single edge razor blades and hand microtomes I can cut sections about 30-50 microns thick. These sections are OK for some studies, but I find they are often too thick for good photomicrography. I also cut plant stem section on soft cork (cork coasters available from the dollar store for a few dollars), dental wax or Parafilm below the stem. Sliding microtomes (shown below) are designed to cut woody stems but they are expensive to purchase and ship. I might purchase one in the future.
Rotary and Sliding Microtomes
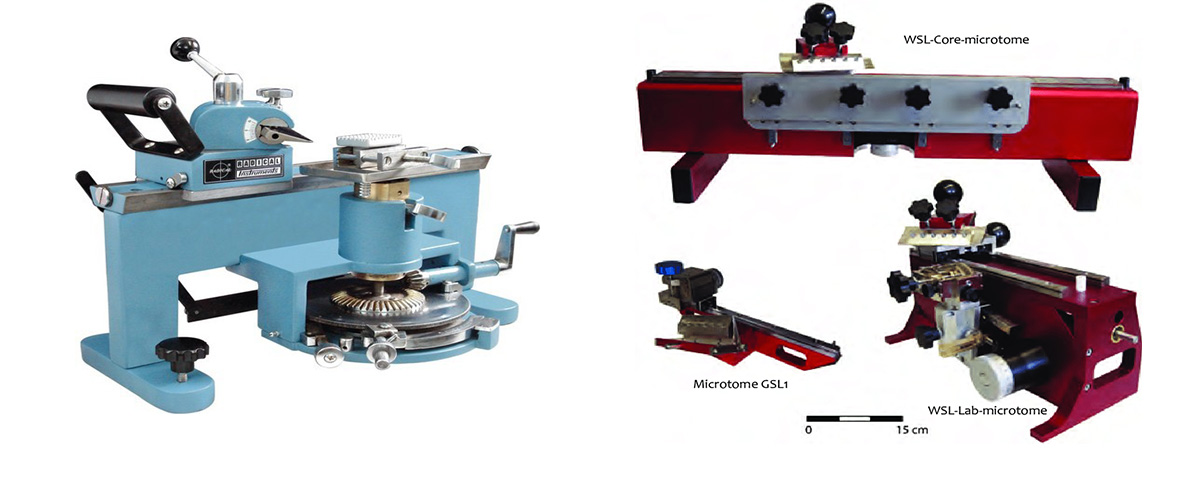 Sliding Micrtome made in India on left (~$1500 US), on the right are various sliding Microtomes from WSL made in Switzerland (~ $3000 to $10,000 CDN). These microtomes are primarily used to cut thin sections (5-20 microns thick) of plants and wood.
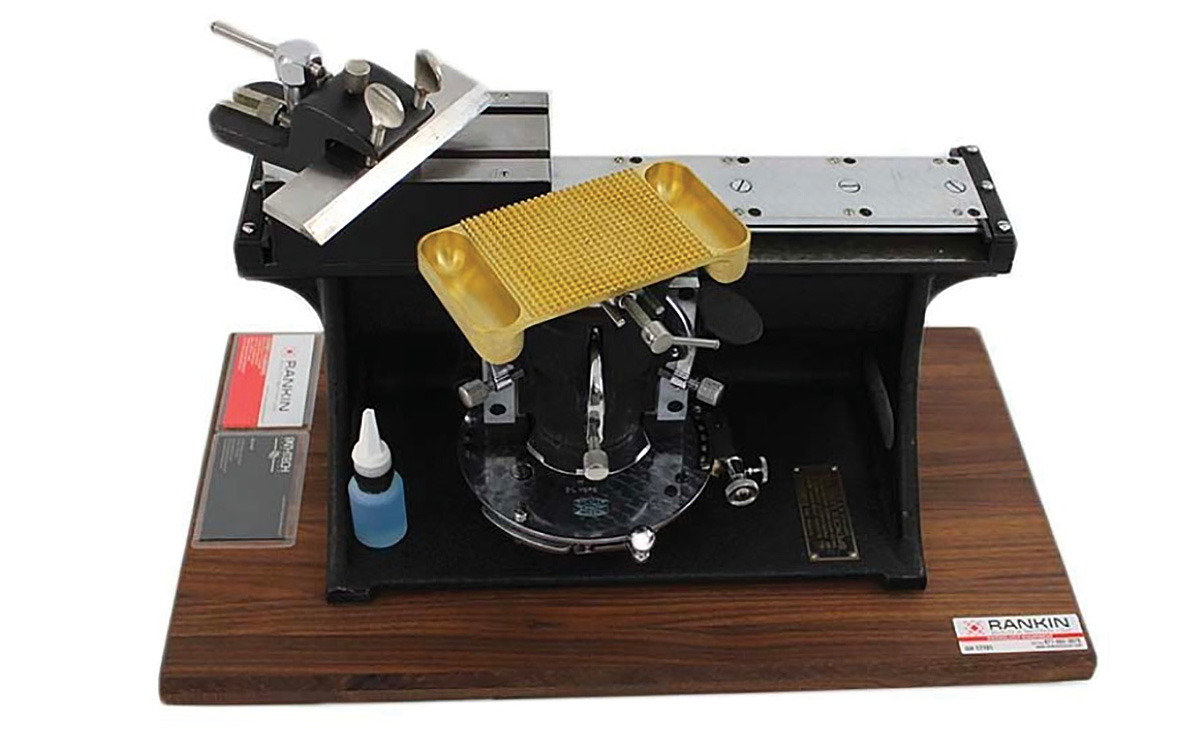
Rankin sliding microtome. Sliding microtomes offer the ability to vary the microtome blade angle which is better for cutting and slicing harder materials like woody stems, but can also be used to cut animal tissues embedded in paraffin wax (cost used for this micrtome about $7000 US).
Rotary Microtomes

Above are two manual rotary microtomes being sold on Ebay the one on the left cost about $1200 and the one on the right $2000 Canadian dollars. Some brands can cost up to $20,000. The crank on the side moves the embedded sample up and down and pushes the sample forward onto the microtome blade to form section in long ribbons.
Rotary microtomes are commonly used to section animal tissues though they can be used to prepare some of the softer plant tissues. The tissue is fixed, dehydrated in a series of alcohols, then cleared into xylene (or Limoneme a safer alternative to xylene) and embedded in molten paraffin. Once the paraffin blocks solidify they are trimmed and sectioned using a rotary microtome (see YouTube video links below). Sections are commonly cut 8-15 microns thick. The sections are then processed, stained and mounted in Canada Balsam or other mountant to make a permanent slide.
The Vibratome is a special microtome designed primarily for sectioning soft tissues in water using double edge razor blades. These can be used to cut brain slices and occasionally to cut botanical specimens.
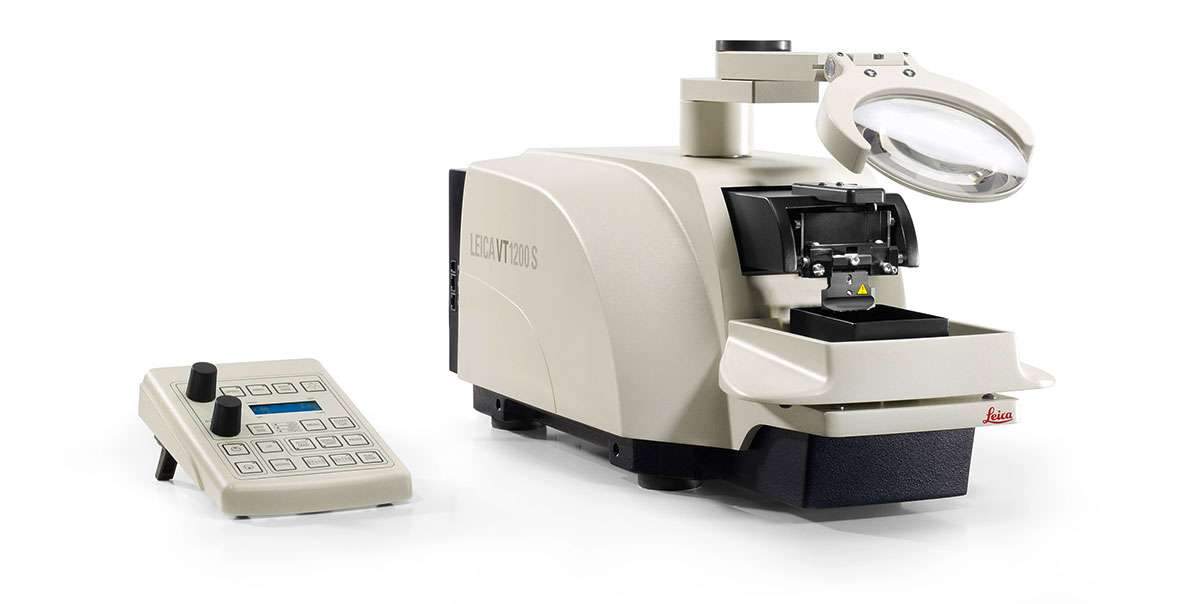
Vibratome Photo Courtesy Wikipedia and Leica
Other techniques to obtain thin sections of plants involves peeling their epidermis like you peel an onion skin. Some folks coat the leaves with nail polish then remove and examine the dried nail polish for stomata. Often algae and some water plants can be examined in the microscope without sectioning. Some single celled plants like Desmids can be examined directly in a drop of water. Some researchers treat the leaves or plant with clearing solutions like sodium hydroxide, lactic acid or household bleach to "clear" the tissues.
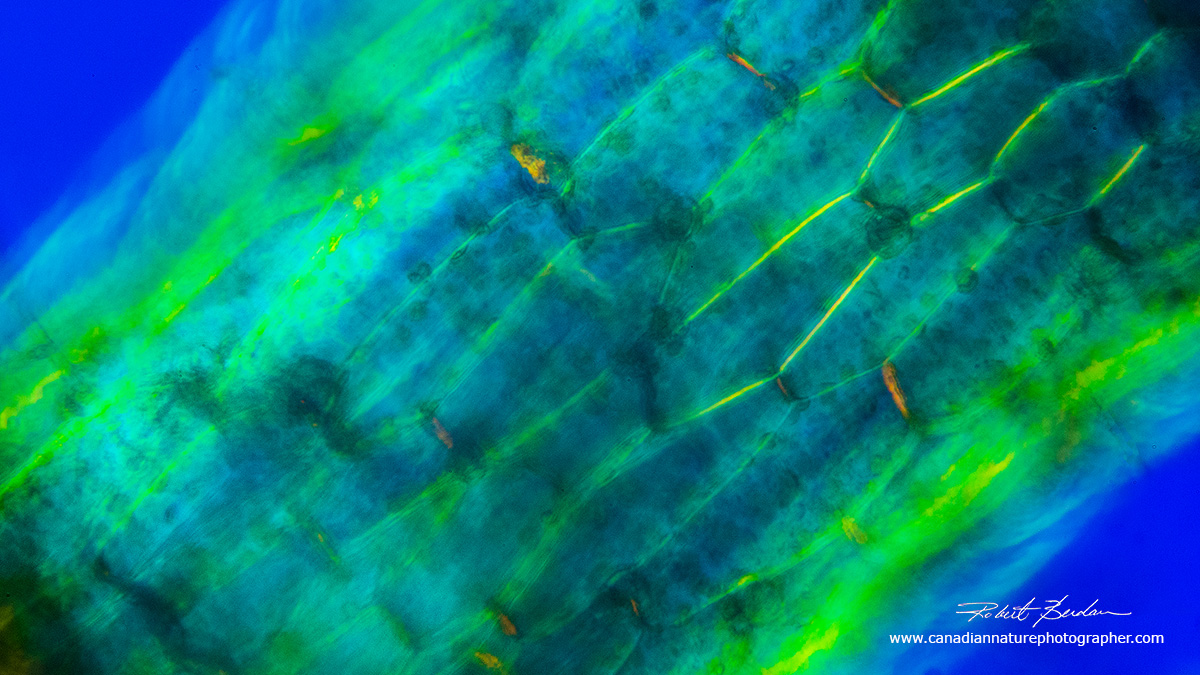
Algal stem from bladderwort in polarized light microscopy. The individual cells are visible along with some of the chloroplasts inside the cells. 100X using a full wave plate.


Above are Desmids single-celled algae considered to be one of the earliest evolved plants. Top Closterium sp DIC microscopy 400X and the bottom Micrasterias sp Dark-field microscopy.
Summary
In this article I have shown a variety of views of the microscopic structure of plants and trees. I also wanted to describe some of the methods for making plant sections. Starch grains are easy to prepare by making a squash preparation. They look best by examining them in a microscope with polarizing filters. It is easy to cut sections of celery, carrots and other vegetables that might already be in your fridge. The structure of the cells provides information about how plants distribute water, nutrients and send signals to other cells. Leaves produce sugar, starch and oxygen which we use as food and to breath. Trees provide a wide variety of chemicals and wood is widely used in construction. Plants are essential for life and they are all around us, the best way to learn more about plants is to touch, smell and examine them closely. I encourage anyone interested in biology and botany to view some plant tissues with a light microscope. RB

Composite image of four drawings from Nehemiah Grew's 1682 book The Anatomy of Plants. Grew's observations with an early light microscope acknowledged the complexity and three‐dimensional properties of xylem networks that we still struggle to understand - reproduced in New frontiers in the three-dimensional visualization of plant structure and function by C. R. Brodersen and A. B. Roddy (2016).
References & Recommended Books
Mike Dingley and Quentin Saville - Home Made Hand Microtomes - requires a wooden board, nut, and bolt - a better version uses an old micrometer measuring tool - PDF.
Kathy Willis (2018) Flora inside the secret world of Plants DK Penguin Random House. London.UK. One of the most beautiful books about plants I own - View preview of book.
Colin Salter (2018) Science is beautiful botanical life under the microscope. Batsford, London - the pictures are spectacular and are largely from the Science Photo Library by various photomicrographers. Available from a variety of book sellers.
John Gianni (2017) The OPN Microtome: An Inexpensive, Open Source Hand-Held Mini Microtome - PDF - Interesting, low cost, uses a few glass slides, some glue and razor blades.
J.M. Glime and D.H.Wagner (2017) Chapter 2-2 Laboratory Techniques: slide preparation and stains. Bryophyte ecology - PDF check out the other chapters they are all free to download.
L. Prange et. al. (2017) Microscopy in the Industrial Use of Starch by Zeiss - PDF
C. R. Brodersen and A. B. Roddy (2016) New frontiers in the three-dimensional visualization of plant structure and function American J. of Botany 1 03 (2): 184 – 188. - PDF
Holger Gärtner et. al. (2014) New Perspectives for wood anatomical analysis in dendrosciences: The GSL1-microtome. Dendrochronologia 32: 47-51.
L. Schneider and H. Gärtner (2013) The advantage of using a starch based non-Newtonian fluid to prepare micro-sections. Dendrochronologia 31: 175-178.
H. Gärtner and F. H. Schweingruber (2013) Microscopic Preparation Techniques for Plant Stem Analysis. Swiss Federal Research Institute WSL. Switzerland - PDF
D. Metusala (2013) An Alternative Simple Method for Preparing and Preserving Cross-section of Leaves and Roots in Herbaceious Plants: Cas Study in Orchidacea. AIP Conference Procedings - PDF Describes the use of the Euromex clamp-on hand sliding microtome shown above.
A. Srivastava and Y.VK (2003) Microscopical and Chemical Study of Cannabis sativa. J. Forensic Res. 5:210 - PDF
Sarah Limbless (2010) Botany for the Artist DK books, US - View preview of book.
Anna S. Teetsov Quarter-Razor Blade for Hand-Sectioning - she shows how to cut a double edge razor blade into smaller blades and mount them to cut tissues. The McCrone Group
Celery Lab - Structure and Function of a Plant - lab activity for classrooms - PDF
Planting Science Celery Challenge Toolkit (2013) - www.plantingscience.org - PDF
Nele Schmitz (2010) Sampling wood for microtomy. Research Gate - PDF
A. Lux et.al. (2005) An Improved Method for Clearing and Staining Free-hand Sections and whole mount Samples. Annals of Botany 96:989-996. PDF (they clear tissue in lactic acid).
W. Dioni (2004) A Cheap Precise Slicer for Teaching Botany. Micscape - shows how to use a paper clamp to hold razor blades for cutting plant sections.
K.A. McMahon (2004) Practical Botany - The Maltese Cross Volume 25: mini Workshops - PDF
T. Fujii (2003) Application of the "NT-Cutter" Knife Blade to Microtome Sectioning of Wood. IAWA Journal, 24: 241-245. I received a photocopy of this paper from the author on Research Gate.
S. E. Ruzin (1999) Plant Microtechnique and Microscopy. Oxford Univ. Press. NY - available on Amazon.
P. Dayanandan & P. B. Kaufman (1976) Trichomes of Cannabis sativa L.(Cannabaceae). Amer. J. Bot. 63: 578-591 - PDF
M.W. Frohlich (1984) Freehand Sectioning with Parafilm. Stain Tech. 59: 61-62. He cuts the woody stems with a razor blade between two pieces of Parafilm in a plastic Petri dish.
R.O. Gardner (1975) An overview of Botanical Clearing Technique. Stain Tech. 50:99-105 (paper requested on Research Gate).
Forest B.H. Brown (1919) The Preparation and Treatment of Woods for Microscopic Study. Bulletin of the Torry Botanical Club 46: 127-150.
Grew , N. (1682) The anatomy of plants with an idea of a philosophical history of plants. Rawlins, London, England. Holbrook , N. M. , E. T. Ahrens , M. J. Burns - has some amazing diagrams - view Book online or download PDF
The Microscopic College Bonn web site with numerous articles about plants and other microscopic topics - use Google translate to convert to english: www.mikroskopie-bonn.de/wir_ueber_uns_-_das_mkb_stellt_sich_vor/index.html
Selected Videos on Microtomy of Plants
A freehand sectioning technique using razor blades and your fingernail - YouTube
Thin Sectioning by hand - how to cut plant sections with a single edge razor - YouTube.
Different types of Microtomes by Microbe Hunter - YouTube
What do you get when buying a microtome - Using a Hand Microtome YouTube
Unique Microtome - Euromex Microtome MT.5503 razor blade slicer - YouTube
How to cut microscope sections using a carrot and hand microtome you will see why it helps to to use two hands to cut the sections - YouTube
Using a Hand microtome with Feather disposable microtome blades - YouTube.
Sliding Microtome for wood by Radical in India - cost about $1000 US - YouTube.
Cutting tangential plant sections by Hand - YouTube.
The Hidden World of Plants - how to section, stain and view plant sections - YouTube
Cutting a Microsection with the WSL lab microtome - Dr. Holger Gärtner WSL - YouTube
How I 3D printed a microtome to cut specimens for microscopy - MicrobeHunter - YouTube
Plant Microtechnique E-books Online
F.H. Schweingruber (2018) The Plant Stem A Microscopic Aspect Springer Verlag - Free Open Access Book in PDF format.
(2018) Bancroft's Theory and Practice of Histological Techniques 7th Edition. Elsevier Ltd. - PDF
(2010) Wood Handbook - Wood as an Engineering Material. US Department of Agriculture - PDF
D.F. Cutler et. al. (2007) Plant Anatomy An Applied Approach. Blackwell, UK - PDF
F.H. Schweingruber (2007 ) Wood Structure and Environment. Springer Verlag, Berlin - PDF
R. B. Hoadley (1990) Identifying Wood; Accurate results with simple tools. Tantum Press - PDF
B.G. Butterfield and B.A. Meylan (1980) Three-dimensional structure of wood. Chapman and Hall, NY - PDF
Note: Teachers you are welcome to use my online images for teaching purposes without requesting permission. All other uses please contact me at rberdan@scienceandart.org.
Authors Biography & Contact Information

Bio: Robert Berdan is a professional nature photographer living in Calgary, AB specializing in nature, wildlife and science photography. Robert retired from Cell\Neurobiology research to pursue photography full time many years ago. Robert offers photo guiding and private instruction in all aspects of nature photography, Adobe Photoshop training, photomicrography and macro-photography. Portrait of Robert by Dr. Sharif Galal showing some examples of Robert's science research in the background.
Email at: rberdan@scienceandart.org
Web site: www.canadiannaturephotographer.com
Phone: MST 9am -7 pm (403) 247-2457.
Click on the buttons below and share this site with your friends