
How to Make Panoramic Photographs
by Dr. Robert Berdan
May 25, 2010

Series of Pans created for the Bow Habitat museum - note that I am wearing bear spray in this river in Kananaskis.
Panoramic photography has been around for more then 10 years yet it seems to only be practiced by a few nature photographers and real estate agents. In the past we had to purchase special stitching software to combine the images together and I sometimes did this manually by using layer masks in Photoshop. There are a wide variety of programs that can be used to stitch images together the two most popular ones are Adobe Photoshop Elements and Adobe Photoshop. There are better programs and one that I use for large panoramas is Panorama Maker 4 Pro. This program gives me more options to rearrange the image order when making a panorama and is suited to working with RAW files. Photoshop's stitching program has improved tremendously and it usually does a pretty good job.
Moon rise over the Milk river in Writing on Stone Provincial Park was created by stitching 3 images together.
In 2008 I was commissioned by the Alberta Government to create a series of panoramic photos for the new Bow Habitat Museum in Calgary. The images were to be of river scenes in Alberta during different seasons and I was to be in the water for some of the panoramas. The final images were to be printed about 8 feet tall by 16-22 feet wide. This meant I needed really big files which ranged between 4-12 Gb. For me this was a dream job and after investing thousands of dollars in high tech pan rotating heads my equipment finally paid for itself. However, you don't need a special panoramic head to take panoramas - in fact if you have stitching software it's quite easy to make panoramas and I will describe some tips to help you make them.
Interactive panorama created using Flash and actionscript - if you know flash and can program see my flash tutorial at bottom of page. To move drag your mouse left or right to pan - demo for multimedia class at Red Deer College.
Equipment Required to make Panoramas
The basics elements you need are a camera, stitching software and a computer. It is possible to make panoramas using film but you need to digitize the files and it is frankly cheaper, faster and easier to use a digital camera. Even small compact digital cameras can be used. The first thing is to find a scene where you want to create the panorama. Unlike other forms of nature photography, the middle of the day is often the best time to shoot panoramas so you have even lighting in all direction - at least if you plan on making a 360 degree panorama. The second tip is to lock your exposure so the exposure does not change as your turn around. You can do this by shooting in M or Manual mode on your camera which is what I do or if you camera has an exposure lock or panorama mode turn these on. You don't want the exposure to change as your turn as it will make the stitching process more difficult and you will see tone variations. If it's a blue sky day, I recommend not using a polarizing filter as the sky polarization changes as you turn around making stitching uneven in the sky. If the sun appears in one of your frames you can reduce its intensity by placing it behind a tree or telephone pole to hide it. When you start to take a series of pictures, you need to overlap each frame by about 20-30%. If you use less then this, some stitching programs will not be able to put the files together or you may end up with gaps. The best lens to use for this is a wide angle lens anything from 10 mm to 35 mm works well. You can use any lens, but longer focal length lenses will have a narrower view point requiring more images to be taken. I usually use my 12-24 mm lens. If hand holding you want a shutter speed of at least 1\60 of a second so the images is sharp and an F-stop between 5.6 and 16 depending on how much light you have. Try to keep each picture at the same level, a small amount of variation will not matter.
Professional Panoramic head in foreground, in background is a smaller pan head for backpacking.
If you want to create professional results, there are a wide variety of panoramic tripods you can purchase starting at several hundred dollars. The panoramic tripods do several things to make your images better. 1) They offer click stops so that when you rotate the camera you get the same amount of overlap on each frame 2) They hold the camera level which improves your stitches 3) Most of them also allow you to orient your camera in a vertical format so you final pan is taller - though you can also hold your camera vertically when hand holding. Some of the panorama heads are light and compact so you can take them with you hiking and others can be large and bulky - I own both types. Another option that I use when I can't carry anything more in the field except my tripod is to buy a quick release L bracket for my camera from
the really right stuff company. This allows me to attach my camera to my ball head on my tripod and the ball rotates so I always have the option to take a panoramic photo. When making 360 panoramas I recommend you always turn in the same direction and count the number of images if you are unsure whether your covered the entire 360 pan take an extra shot or two - its better to have more images then have to return to the same spot again. If you use a tripod make sure the tripod is level, use F11-F22 for a large depth of field. I also recommend setting your camera to manual focus and generally focus on infinity to prevent the camera from changing the focal point.
Once you have a series of images then it's a simple matter to stitch them together using a variety of programs. I will describe the process I use to stitch images together using photoshop (CS2, CS3, CS4 and CS5), the steps are the same in each version.
1. Select File>Automate>Photomerge select Browse go to the folder called Kananaskis_pan and Shift-click on the images 01.jpg to 08.jpg. In the layout menu select cylindrical - this option is best most of the time. You can experiment with the other modes on the same photo series. Click OK and watch Photoshop stitch your images together.


2. Open the layers palette you will see that each photo has been placed on its own layer and Photoshop created a mask to blend each photo. Select the top right of the layers palette to display the pop out menu and select flatten image to combine all the layers into one.

3. The final step is to crop the image using either the crop tool or the marquee selection tool .

4. If the image needs further adjustments or modification make them - then save the image for printing or the web.

Repeat the steps again and try blending three JPG files that were hand held - road01.JPG, road02.JPG and road03.JPG. Experiment with the different merge modes if you like.
Another hint for taking panoramas is to try not to shoot directly into the sun - place the sun behind a tree or telephone pole. The best time of day to take panoramas is when the sun is overhead.
Once in a while Photoshop is unsuccessful in stitching images together this usually occurs if there is not enough overlap between the pictures. The images can still be stitched together manually using masks - a technique I describe in the Photoshop II workshop. Finally in order to stitch a series of RAW files into a panorama your computer will need a lot of memory so either convert your images in JPG files before you stitch them or be prepared to buy more memory for your computer!
View Movie how to Create Panoramas using Photoshop CS4
If you own photoshop you can download the files here to give the tutorial a try.
![]() Download Panoramic images for the tutorial above - zip file 80 MB
Download Panoramic images for the tutorial above - zip file 80 MB
More Examples of Panoramic photos from Alberta
Vernon Lake - Marsh in Southern Alberta created from 4 images hand held

Oldman river - 360 pan looking up and down the river created by stitching 12 photos

Oldman river and fly fisherman 360 pan

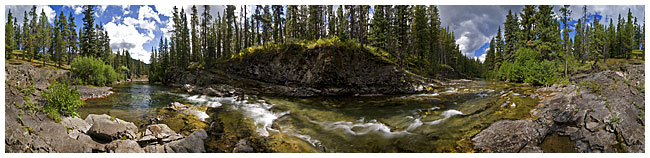
Kananaskis 360 panorama
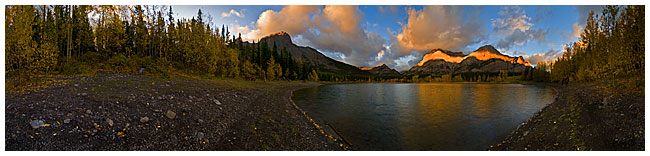
Wedge Pond Kananaskis 360 pan at sunrise
![]()
Click on the small picture Above to view VR movie of Wedge Pond in a pop up window - the movie can also be viewed full screen.
Links to Additional Panoramic Resources and tools
- Really right stuff - panoramic heads and tripod accessories reallyrightstuff.com
- Panoramaker 5 - software for stitching www.arcsoft.com
- Panoramic movies by Robert Berdan and more links to panorama sites
- Tutorial to create interactive panoramic movies - requires knowledge of Action sciprt 2.0 - MS word doc
- Panorama2Flash 1.0 - converts pans quickly and easily into Flash movies like the Wedge Pond movie above
- How to remove seams in panoramic movies - PDF from Panoscan
[ Top ]