Creating Star Trail Photomontages in Adobe Photoshop CS6
By Dr. Robert Berdan
October 20, 2012
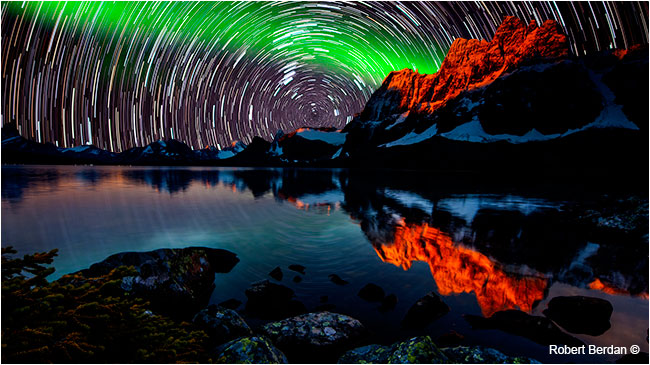
Star Trails, Aurora borealis over Amethyst Lake in the Tonquin Valley, Jasper National Park (DM)
I am fascinated by stars on a clear dark night so much so I purchased a Telescope many years back. But my real interest is photographing the star patterns, the milky way and the Aurora borealis. Most photographers know that if you point your camera at the north star and leave it open for several minutes to several hours, the stars will appear to rotate around the north star (in the northern hemisphere) and leave a curved trail of light. In the past photographs would set up their cameras on a tripod, set the camera to B or bulb exposure mode, and then lock the shutter open for several hours. Some photographers still use this technique (e.g. George Brybycin). One of the problems with digital cameras is that if you leave the camera open too long the chip overheats and the result is a badly over exposed image. Photographers can reduce their aperture to F8 or F11 to lengthen the exposure time before it "blows out" but there is a better method. You can use an intervalometer to set your camera to shoot at precise intervals and set the exposure to expose the night sky for 10 sec to 5 minutes depending on your ISO speed and f/stop setting. Then you take the images and stack them on top of each other and blend them together using software like Star Stax which is available for free. The image below of the Aurora and star trails was done this way and I describe this simple technique in a previous article " Star Trail Photography and Time Lapse Movies".
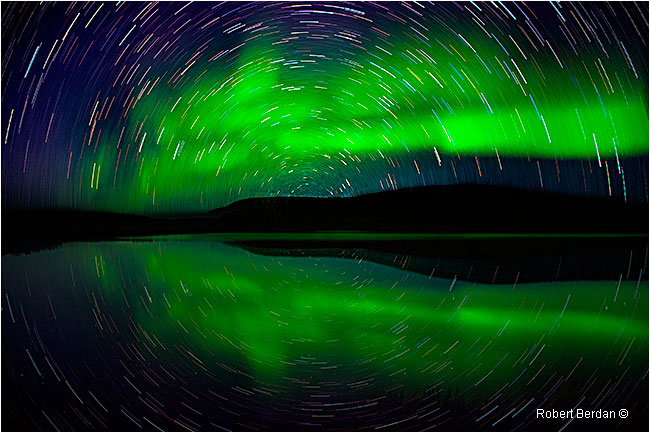
Star Trails and Aurora borealis over Prelude lake. This image was created by taking a series of exposures at 10 second intervals using an intervalometer and then stacking the images using a free program called Star Stax - for details on how this was done see my previous article on "Star Trail Photography and Time Lapse Movies".
Another way you can create star trails is to photograph the night sky and apply a "Star trail" action using Photoshop CS5 or CS6. Actions are simply a series of steps carried out in Photoshop that are recorded and then saved so they can be applied to many images quickly. The Star trail action comes as part of Photoshop CS5 and CS6 only, and you need to load it to see it as it is not loaded by default. To do so open the actions panel in Photoshop CS5 or CS6 and from the top right of the actions palette on the fly out menu - select Stars Trails to load the action. Then to apply the action open any image of the night sky and click on the Stars Trails action button. If you don't see the button you can change the view to button mode as shown below. The action will rotate your image 0.2 degrees, then blend the rotated image with the original image using a lighten blend mode which makes the dark areas (black sky) transparent and then it repeats these steps 60 more times. The process takes a few minutes and you can apply the technique several times to create even longer star trails. The finished result is an image were the stars will appear to rotate about the center of the image.
In Photoshop CS5 or CS6 load the Stars Tails action then open an image of stars in the night sky and click on the action. The resulting image will have star trails. In the northern hemisphere star trails occur around the north star after long exposures, however the action will create star trails about the center of any photograph of the night sky. If you want your images to be correct you should photograph the north star and try to place it in the center of your image. In most instances you can apply the effect to any photograph of stars and they will appear to rotate about the center. It is difficult to discern, unless you are an astute astronomer, whether or not the image was actually rotated around the north star or some other star.
Photograph of the night sky pointing at the north star - about which all other stars appear to rotate in the northern hemisphere due to the rotation of the earth. Exposure f/1.4 13 sec ISO 800 24 mm.
Stars Trail Action applied to the photograph above shows the stars rotating about the north star. Also note the many different colours associated with some of the stars. I boosted the colours here to emphasize the color differences but effect is real - stars have different colours. The bright stars on the left side of the picture are formed by the big dipper.
Above is a picture of the night sky taken above a warehouse near Fort McMurray and facing east. The constellation in the middle of the pictures is Orion though it maybe difficult to discern in this small image. Photographed on moonless night with a f/2.8 16-35 mm lens at ISO 800 for 10 seconds in the middle of January. I was waiting for the Aurora to make an appearance - and it did a few hours later.
This is a composite of the image above and a layer created with the Stars Trails action. I also layered the aurora above and used the lighten blend mode in Photoshop to blend the aurora into the night sky. To make the building visible on the bottom, I created a layer mask on the Stars Trails layer and painted the bottom of the mask with black o so the buildings show through the black regions of the mask.
The image above shows Photoshop layers on the right, the top layer which I applied the Stars Trail action also has a layer mask which I painted black on the bottom to reveal the underlying original photo. By using a layer mask it is possible to combine the star trail image with the original and reveal foreground elements such as the pine trees.
Finished image is combination of the original image and the rotated stars. The rotation point was not centered on the north star, so the image above is an artistic impression and not an accurate representation.
Here to Create yoru own Star Trail images using Photoshop CS5 or CS6.
(These instructions assume you understand Photoshop basics).
1. Open a picture of the night sky in Photoshop CS5 or CS6 and duplicate the image (Image>duplicate).
2. Select the duplicate image, open the actions palette (Window>actions) and select the Stars Trails action (must be loaded first as it is not a default action but it does comes with Photoshop CS5 or CS6 see above).
3. The action will take a few minutes to process depending on the size of the image and speed of your computer.
4. Select the move tool and drag the rotated star trail image over top of the original image.
5. Align the star trail image with the original mage in the bottom layer - you can reduce the opacity of the star trail image in the layers palette so you can see elements in the image beneath. You may have to transform the stars trail image using the command Ctrl-T to get a more precise alignment and fit as the rotated star image is slightly distorted.
6. If the night sky image had foreground elements they will appear blurred; you can hide them and reveal the original
foreground elements by applying a layer mask to the Stars Trails layer and then select a soft paintbrush and paint black on the bottom of the layer mask - you must have the layer mask selected. Regions you paint black will become transparent and reveal the elements in bottom layer picture.
7. If you want the star trails to be longer you can simply apply the Stars Trail action more then once to your image of the stars.
8. The circular star trails image can be combined with the original or image or you can combine it with any interesting foreground photo in your photo library. You can also combine the image with lightening, the aurora borealis or even fireworks if you like - use the lighten blend mode in the layers palette so black becomes transparent.
Note you can emphasize the stars by increasing the clarity slider in Adobe Camera RAW or increasing the radius when using unsharp mask. These procedures add a small white halo around each star that makes them more distinct and easier to see, but beware you don't over sharpen the image.
Here is an example of sandwiching a star trail image with the foreground (Osoyoos Astronomy Bed and Breakfast from the driveway - facing north), however the north star was actually a little bit higher then the rotation point in this image.
Starry trails at Waterton lake in this sandwhiched image, the central region faces east so this is not a "true" to life photo, but it can add impact and I would refer to such images as DM for digitally manipulated or a digital composite.
This picture is of lightening over Stoney trail in Calgary with the Aurora and star trails - definitely a DM image.
Point Lake NWT - facing east with the Pleiades star cluster on the left. Again because the middle star is not the north star it's not an accurate rendition of the scene, but rather an artistic impression. The aurora and stars are real, but the stars rotation is not centered on the north star.
Artistic impression of the Aurora borealis and star trails at Point Lake, NWT
Moonrise over cabin on Point Lake, NWT with star trails - artistic impression.
Moon, cabins, aurora and star trails at Point Lake, NWT (DM or artistic impression), Aurora is real.
Star trail composite of the Aurora borealis at Prelude Territorial Park, NWT 10.5 mm f2.8 fish-eye lens. ISO 1600, 10 seconds exposure.
Star trails and aurora over Vermilion lakes in Banff National Park. You are looking east so this image would never appear like this - it's an artistic impression only.
If you want images that are accurate representations with the stars trails you can either set up your camera and shoot for several hours or you can take a single shot of the night sky with the north star near the center, then apply a Stars Trails action in Photoshop and sandwich the resulting image with a photograph of the foreground. If you do so, try to choose an interesting foreground. If you provide a lake in the image you can duplicate the star trail layer, flip it over, then reduce the opacity and add a slight blur to show the stars reflected off the water.
Some photographers believe its taboo to manipulate their images in any significant way and I respect those who chose not to do so, however keep in mind that in fact everything a photographer does in the process of taking a picture manipulates the image in some way and that includes: choice of lens, the exposure time, choice of BW or color, use of filters, ISO speed etc - every photographic image is in essence manipulated in some way, some more than others.
We have come to accept certain manipulations such as conversion to Black and white, burning and dodging, color correction etc. I believe its Ok to manipulate images if the intention of the photographer is to create "ART". If the photographer wants images that are "true" to nature then the technique above can do so provided you point your camera at the north star and sandwhich star trails image with the same foreground. Sandwhiching star trails with other images as shown above with the Banff photo, however is only an artistic impression. If a photographer wishes to create art , then I believe any technique is Ok so long as there is no intention to dupe the viewer into believing the image is accurate or a true representaiton. Pictures taken of star trails can be beautiful, but lets not kid ourselves we could never see them in such a manner - so whether you create star trails in the camera or using Adobe photoshop, such images are manipulations of what we normally see with our eyes. Any exposure longer then about 1\30 of a second is different from the human eye sees and is also a manipulated image. This article simply describes another way you can create star trail images from pictures of the night sky - you still need to have some photographs of the stars and if accuracy is important to you then include the north star and position it near the center or you image and sandwhich it with the foreground you took that night. The main advantage is that you won't have to stay up all night to capture the star trails, but you will have to learn a few photoshop tricks to do so. RB