How to Photograph Waterfalls
by Dr. Robert Berdan
August 9, 2010

Wapta Falls with Rainbow, Yoho, National Park, BC - a polarizing filter can sometimes enhance the colour of the rainbow
Waterfalls Make us Feel Good
Being near a waterfall makes people feel good and even a picture of a waterfall can cause a sense of relaxation. Some studies suggest that moving water creates a build up of negative ions that in turn affect our brain. One hypothesis is that negative ions cause dust and pathogens to clump together and sink out of the air making the air easier to breathe. Around waterfalls there may be between 1,000 to 100,000 negative ions per cubic centimeter, whereas in many households there are only a few hundred ions per cubic centimeter. Dr. Albert Kreuger discovered that negative ions break down serotonin a neurotransmitter in our brain. Reduced serotonin levels are thought to promote a clear, alert outlook with a higher awareness function."Negative ions also promote alpha brain waves and increase brain wave amplitude, which translates to a higher awareness level. Those ion-induced alpha waves spread from the occipital areas to the parietal and temporal and even reach the frontal lobes, spreading evenly across the right and left brain hemispheres. All of this creates an overall clear and calming effect [increases hemispheric communication], benefiting meditation and concentration." These are all great reasons to seek out waterfalls and take pictures of them. I wonder if a cold shower accomplishes the same thing? A photograph of a water fall may not create negative ions, but they still make me feel good. Here are some tips on how to take better pictures of waterfalls where ever you may live.

Crescent Falls, AB about 45 Km east of Saskatchewan crossing - note the person off to the right of the picture near the rock.

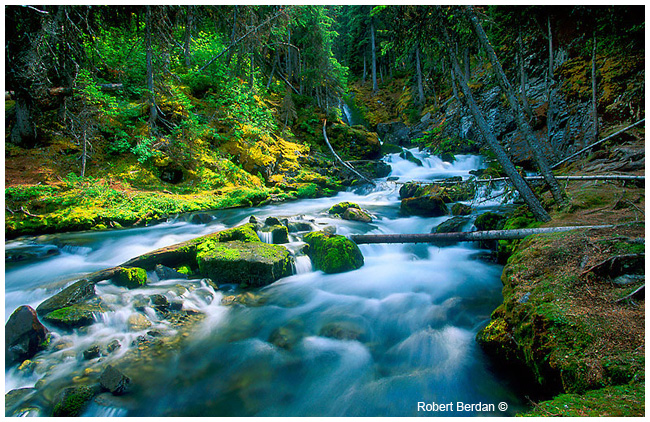
Blaeberry river and falls, near Golden, BC Waterfalls are ideal subjects to photograph in Black and white because
of the strong forms created by the rocks and moving water.
FIRST YOU MUST FIND THE WATER FALLS
The Canadian Rockies have an abundance of spectacular and smaller waterfall falls. Many can be located by searching maps of the parks. If you have access to topographic maps look for streams and creeks and places where the isotherms are close together suggesting rapid changes in elevation. Many maps will also indicate major water falls. Another thing you can do is search hiking and guide books, often they will describe if the trails encounters any. In the Rockies you don't have to go very far to find water falls. In Kananaskis sarrail falls is an easy 1 Km hike around the upper lakes, Elbow falls is a 20 minute drive from Bragg Creek and 5 minute walk from the parking lot. Once you find them then its a matter of returning to them over and over again until you get the best light - which is usually soft light. A tripod is essential if you want blurred water. When I ever I go on a driving trip I always research potential water fall sites. In some provinces you may even find books about waterfalls and their locations e.g. Waterfalls of Ontario by M Harris and G. Fisher. Also if you don't have topographic maps - try google earth and explore an area you intend to visit before hand. Some of the satellite images are very detailed and though its tough to see a water fall from above, I find the satellite images a great way to do some pre-exploring. Also it goes without saying that once you find a nice waterfall if you are able to get back there again to photograph the falls in different light, different seasons and different times of the day - until you get the shot you are after.
 . .
Alexandra Falls, NWT - person provides a sense of scale in the image
What makes a good waterfall photograph? The same elements that make any photo a good one. Light and its qualities of color and direction are key elements. Often soft light that accompanies over cast days is good for waterfall photography especially if the falls are found within forested regions or canyons. Bright sunlight in a canyon results in high contrast lighting that if not properly exposed results in dark shadows with no detail or burned out overexposed highlights. Side and back lighting can add interest, contrast or even color to the water and surrounding rocks. If you bring a tripod (and you should) then you can photograph in almost any type of lighting, even at night.

Cameron Falls, Waterton National Park, the Falls are located right inside the Town. I photographed at night using a tripod and set my lens wide open because it was dark, the camera determined the exposure automatically ( 13 seconds) and no filters were used. Don't be afraid to photograph under moonlight it might make for a great shot.

Above - the photograph on the left was taken in soft overcast light and the one on the right in bright sunlight. In bright sunlight the shadows have become dark and no detail is visible. Below I used a series of photographs to open up the shadows so you can see some detail by combing several photographs in a process called HDR (high dynamic range) imaging using software.

Sutherland creek waterfalls photographed in bright sunlight. To create the photo on the right I took one exposure 1 F-stop over and then another one F-stop Under and combined the image to create an HDR (high dynamic range) photo using PhotoMatrix.
Sarrail Creek in the Kananaskis – only a short hike from the Upper Kananaskis Lake parking lot. Soft light created by a cloud passing overhead allowed me to capture the more subtle tones in this scene.
FRAME ORIENTATION
Once you find a waterfall one of the first decisions is where to photograph it from and whether you are going to shoot vertically or horizontally. Smart photographers will try to shoot a combination of the two for maximum flexibility in sales or for making prints.

LENS SELECTION
The next decision you must make when photographing a waterfall is what lens should you select? Perspective and size of the waterfall are influenced by the focal length of the lens you choose to photograph it with. If you have a wide range zoom lens you can try several settings. I usually select my 20-35 mm Zoom lens and occasionally a telephoto. Your lens choice may also in part be determined by how close you are able to get to the waterfall. A wide-angle lens (12-35 mm focal length) will make the falls smaller in the frame and show more of the surrounding habitat. A long lens will compress perspective and can make the falls look bigger or bring a falls at a distance in closer to fill the frame. You should experiment with different lenses and focal lengths as with any subject – work it – try different lenses, different viewpoints and different lighting conditions. Try shooting the falls in the morning, afternoon or in evening – experiment until you find what you like best. A macro lens may be convenient for closer views or parts of a waterfall.

Cameron Falls in Waterton nation park. The falls was photographed with a wide angle lens and a telephoto lens from the same spot. Using different focal length lenses can give you different views of the Falls. If you have more then one lens or a zoom lens try different focal lengths.
CHOOSING THE BEST F-STOP
Your aperture or F-stop that you select will have two affects – it will affect the depth of field and the shutter speed. If you want a narrow depth of field choose a wide aperture such as F2.8-5.6. If you want to emphasize depth or have the foreground and background in focus and sharp use a small F-stop i.e. F11 to F22. The other affect of F-stops is that in order to properly expose your film or digital CCD – for every F-stop you open up you have to reduce the shutter speed accordingly by one click – i.e. 1\500 to 1\250 or 1\60 to 1\30 sec. The final appearance of the waterfall will depend on a combination of the F-stop and shutter speed – there is no right or wrong combination it depends on what you prefer. I personally like the water to look silky smooth due to movement during the exposure which means I often choose F22 and long exposures; usually 1\4 second or longer. If the light is still too bright I add a polarizing filter or neutral density filter. I even own a 2-8 F-stop vari-neutral density filter that I can use to really extend the shutter speed, but this filter alone is over $400! See section below on filters.
SHUTTER SPEED
The biggest influence that shutter speed has on moving water is that when the shutter speed is between 1\8 of a second to 10 seconds or more, moving water takes on a white silky appearance. I like this affect and often try to exaggerate it by selecting small apertures around F22. To use long shutter speeds greater then about 1\30 second requires a tripod. A cable release also helps reduce camera vibration when taking the photo, but you can use your self-timer to trigger the shutter release as well. Add a polarizer, neutral density or vari-neutral density filter to lengthen the exposures.

Shutter speeds of 1\60 second or faster stop the movement of water for the same reason if you are hand holding your camera you should always use a shutter speed of 1\60 second or faster to get sharp results. When you start to select longer shutter speeds by about 1\8 of a second and longer the water appears blurred and soft due to its movement during the exposure. Adding a polarizing filter will lengthen the shutter speed by 2 increments because polarzing filters reduce the light by about 2 F-stops or 2 shutter speeds no matter what the orientation of the filter is.
DETERMING THE BEST EXPOSURE
Exposing waterfalls is similar to metering for any landscape scene. If the scene is largely dark rocks you will need to underexpose or decrease the exposure. If you frame your picture so it includes mostly the moving water which you want to turn white in long exposures, you will need to increase the exposure. You can meter for the highlights (brightest areas) and then increase exposure if the water makes up a most of the scene. I usually use matrix metering and check the exposure histogram on my LCD screen and adjust accordingly.

Small Falls near Pemberton, BC.
FILTERS
One way to increase exposure time is simply to put on a polarizing filter in front of your lens. The polarizing filter will have two effects 1) your exposure time will increase by 1 and 2\3 to 2 equivalent F-stops (i.e. f2.8 to F5.6 or reduce your shutter speed from 1\4 sec to 1 sec). 2) The rocks reflecting light will become darker and the water often becomes clearer as it removes  reflections. Of course whether the reflections are removed will depend on how the polarizer is turned, but a reduction in light will occur regardless of its rotation. You could also use a neutral density filter, but most photographers have a polarizer and if they don’t, they should! If the shutter speed is still too high for your liking you can always wait for an overcast day, or come very early in the morning or late in the evening when the sun is low or even below the horizon. In addition to a neutral or warm toned polarizer, there are special colored polarizers. A blue/yellow polarizer can add a gold or blue cast to the reflected light off a waterfall or creek. This can often add impact, but if over used or if the effect is obvious it can also detract from the image and make it artificial looking. Any technique for that matter that detracts the viewer from the beauty inherent in the scene should be avoided in my opinion. But experiment for yourself and then edit later. I was initially intrigued with the blue/yellow polarizer and took many photographs, but now I feel that many of the images look unrealistic. I now reserve this filter for occasional use, preferring to use a warm or neutral toned polarizing filter instead and enhance color in Adobe Photoshop if required. A polarizing filter can also be used to enhance the colors in rainbows framed around waterfalls on sunny days. reflections. Of course whether the reflections are removed will depend on how the polarizer is turned, but a reduction in light will occur regardless of its rotation. You could also use a neutral density filter, but most photographers have a polarizer and if they don’t, they should! If the shutter speed is still too high for your liking you can always wait for an overcast day, or come very early in the morning or late in the evening when the sun is low or even below the horizon. In addition to a neutral or warm toned polarizer, there are special colored polarizers. A blue/yellow polarizer can add a gold or blue cast to the reflected light off a waterfall or creek. This can often add impact, but if over used or if the effect is obvious it can also detract from the image and make it artificial looking. Any technique for that matter that detracts the viewer from the beauty inherent in the scene should be avoided in my opinion. But experiment for yourself and then edit later. I was initially intrigued with the blue/yellow polarizer and took many photographs, but now I feel that many of the images look unrealistic. I now reserve this filter for occasional use, preferring to use a warm or neutral toned polarizing filter instead and enhance color in Adobe Photoshop if required. A polarizing filter can also be used to enhance the colors in rainbows framed around waterfalls on sunny days.
Elbow Falls, Kananaskis near Bragg Creek A polarizing filter can be used to darken rocks, or extend the exposure.
In this photo I I used a Blue\Yellow Polarizer to enhance the reflections off the water in the foreground.
TRIPOD AND LENS CLEANING MATERIALS ARE NECESSARY
A good tripod is essential for effective landscape photography whether  the scene includes a waterfall or not. A tripod will hold your camera steady on long exposures, it will force you to compose more carefully, and it will permit you to select any aperture on your camera without having to worry about the shutter speed. A tripod is essential for taking good photographs of waterfalls. To reduce an vibration to the camera when you press the shutter button you can use a cable release or simply use the self timer built into the camera. If you are close to the waterfalls it is inevitable that your lens will receive some spray so it's also a good idea to have lens paper or cloth with you and clean the front element before taking your pictures. Check the front of your lens frequently. The water drops will not harm your lens, but it will result in spots on your pictures which unlike dust spots are not easy to remove using photoshop afterwards. the scene includes a waterfall or not. A tripod will hold your camera steady on long exposures, it will force you to compose more carefully, and it will permit you to select any aperture on your camera without having to worry about the shutter speed. A tripod is essential for taking good photographs of waterfalls. To reduce an vibration to the camera when you press the shutter button you can use a cable release or simply use the self timer built into the camera. If you are close to the waterfalls it is inevitable that your lens will receive some spray so it's also a good idea to have lens paper or cloth with you and clean the front element before taking your pictures. Check the front of your lens frequently. The water drops will not harm your lens, but it will result in spots on your pictures which unlike dust spots are not easy to remove using photoshop afterwards.

Sheep River Falls taken with a wide angle lens and a low vantage point to emphasize the rocks in the foreground.
ADD A PERSON FOR SCALE
Of course wildlife, birds even a person near the falls can provide a sense of scale, perspective and interest to the image. Also try both horizontal and vertical compositions.

In these two photos of Gardner Creek water falls near Nakusp, BC the second picture has a person with a red jacket to give the picture a sense of scale. If I have someone with me I usually try to get a shot with and without them in the picture.

Sometimes photographing a creek or the top of the water falls can result in beautiful pictures. Explore the falls and shoot it from many different angles if you can. Any fast moving water if photographed with a slow shutter speed will result in a smooth white silky appearance.
DANGER WET ROCKS ARE SLIPPERY!
One of the hazards of photographing waterfalls is that they are often found in steep ravines and the water can make the surrounding rocks very slippery. Approach any edge near a cliff or ravine with extreme caution. Waterfalls and creeks are also areas in Alberta and BC where you might encounter wild animals, bears or cougars, and you should be alert if you are in a remote area as the animals may not hear you or you them because of the sound of the falls! Stay alert and be cautious next the edge of waterfalls or when traversing slippery rocks along any riverside.

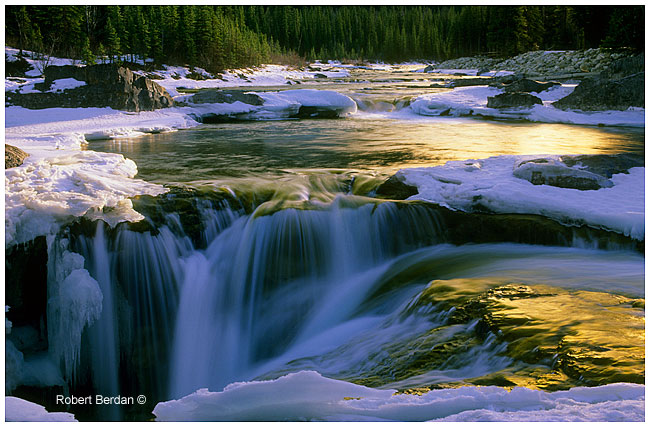
Paradise Creek on the left in Banff National Park and Blue Rock Canyon on the right in Kananaskis beside the road way - both photos were taken with 4 x 5 camera at F45, 4 seconds exposure on Velvia Film.
TIPS FOR FINDING WATERFALLS
Finding waterfalls to photograph is easier then you think. Here are 4 things I do to locate waterfalls for photography.
- Purchase a topographic map of the area your plan to visit. Look for creeks in steep terrain (where isobars are close together). Some topographic maps will mark major waterfalls, but many do not.
- When visiting a new area, visit bookshops, artist galleries or any store that sells postcards. Ask locals if they know of any waterfalls in the area. If heading to major parks stop in and ask the park staff – they may be able to direct you to some excellent locations. Don’t forget to check out the many excellent hiking books.
- Search the Internet, I have found many beautiful waterfall photographs and subsequently sought their location on the web. Check out nature photographers web sites from a region you will be visiting and if they provide a name for the waterfall in their photo – do a search on google to see if you can find the area or location of the falls.
- One of the best source of maps I have found and I take these books with me on most of my journeys are the Back road map books. These books offer the some of the most detailed maps I have found with trails, dirt roads, creeks and waterfalls.

Bighorn Sheep moves over to Tangle Falls to take a Drink - sometimes you just get lucky. Tangle Falls is along the highway on the trip up highway 93 from Lake Louise to Jasper - you can't miss it.
View Video of Water Falls in the Canadian Rockies - Select the First Movie
Links to Additional Resources
[ Top ]
|
