The Joy of Winter Photography“We Canadians are a Winter People – A WINTRY people some would say – frost of mien, cool of temperment,
Introduction Not everyone appreciates winter, it’s cold, daylight is short and it can be a treacherous time to travel. In fact many avid outdoor photographers give their cameras a vacation until spring. Those that do are missing the opportunity to take some compelling photos. I came to appreciate our snow filled Canadian winters after spending four years in graduate school in Houston, Texas. In most parts of Canada we have four distinct seasons that provide us with a variety of pictorial opportunities. Shooting outdoors in winter requires a few considerations. The most important one is the need to keep warm and comfortable. Second, photographers need to know the limitations of their camera equipment in the cold. Third, snow being light in tone requires that you over ride the exposure meter and increase exposure to avoid gray snow. If you love to take pictures, but rarely do so in winter, then here are few tips I hope will encourage you to keep the dust of your camera this winter and bring home some winners. Keeping Warm
Operating your camera in the cold Like people, different types of cameras vary in their sensitivity to cold. In really cold conditions (below -20°C) you probably want to consider using a mechanical camera (Nikon FM2, Olympus OM-1, Pentax K, Leica M4P). For instance these cameras are the best choice for recording the northern lights in winter. If you use a mechanical camera during the day and your meter fails you have several options if you wish to continue shooting: 1) start with the sunny F16 rule to estimate exposure, 2) bracket generously, 3) attach an external battery pack to the camera which you keep warm in your pocket, or 4) have plenty of warm spare batteries in your pocket. Photographers using small portable cameras can simply keep the camera in an inside coat pocket until they are ready to shoot.
Shooting film in really cold conditions also offers several challenges. Film can become brittle and tear in the camera and static marks can appear on the film during rewinding. In my experience in temperatures down to –20 °C, most slide films perform fine without any problems. Below this temperature rewinding the film slowly will help reduce the chances for tearing and static marks on the film. The biggest risk to operating your camera equipment in winter is condensation that forms when you bring a cold camera or lens into a warm moist room. If you then take the camera back into the cold the condensed water can freeze preventing your camera from operating or worse it can cause permanent damage. To reduce the possibility of condensation place your camera equipment into a plastic bag (garbage bags work fine), push out most of the air and then seal the bag with a tie before bringing into a warm room. Let your camera gear acclimate to room temperature slowly over several hours before opening the bag. Any condensation will form on the outside of the plastic bag and not on or in your camera. To summarize
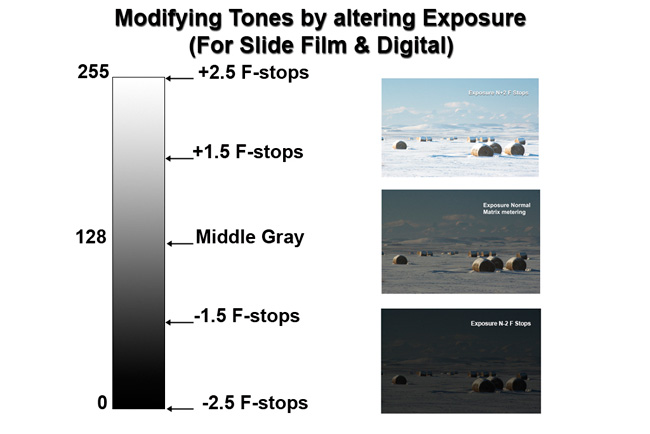
Sunset on the Rockies taken near Cochrane, AB. 20-35 mm zoom lens, Blue-Yellow Polarizer, +1 F-stop exposure compensation. Exposing Snow Properly For many photographers the biggest challenge shooting in winter is exposing snow properly. Experienced photographers know that the camera’s light meter is only a guide. If you point your camera at a dark toned subject you will need to underexpose, and if you point it a light toned object you need to overexpose to obtain the correct exposure – no matter what kind of metering system your camera uses. Given that snow is very light toned you will need to overexpose the snow or else the scene will appear gray. The tricky issue is deciding how much to over expose snow? The amount depends on how light toned you want the snow to appear in your pictures, the lighting conditions, and the type of film you are using. A little of bit experimentation is required to find out what works best with your equipment. I usually overexpose snow scenes from +1 stop up to + 2 1\3 stops with +1 2\3 F-stops being the most common meter compensation when shooting with Fuji Velvia fiom or one of my digital cameras. You can override your meter by modifying the film ISO speed (i.e. change it from ISO 100 to ISO 25 will result in a 2 stop over exposure) or use the exposure compensation dial if available. Sometimes I use a spot meter, I take the reading off the brightest area in the scene and adjust my meter to read 2 F-stops over exposure. If you have the option to shoot in RAW mode with a digital camera, this will give you the opportunity to adjust the exposure when you import the image into image editing program. When using a digital camera or shooting slide film it is critical that you not over expose the highlights since no amount of darkroom or computer work can ever bring back lost detail. You may want to start with overexposing snow scenes +1, +1.5 and +2 F-stops to find out what works best for you and your equipment.
Ideas for Winter Photography. Snow transforms the landscape making shapes and forms more pronounced. Trees are the most conspicuous subjects in the rural landscape and their shapes can be very appealing especially if you silhouette them against white snow or changing colors of the sky. In general color tends to be subtle in winter and can sometimes be absent all together. The absence of color is a great opportunity to try black and white photography. Those using a digital camera can set it to monochrome mode or you can continue to shoot in color and then convert the images later with an image-editing program.
When shooting winter landscapes my two favorite lenses are a 20-35 mm wide-angle zoom lens and my 80-200 mm zoom lens. The wide-angle lens allows me to exaggerate perspective and create the illusion of depth. I often search for farm fences, a path, an unfrozen stream or river, and I try to position these elements in my frame so they fade off into the distance. A telephoto lens has the opposite effect, in that it compresses the perspective creating a series of distinct layers in the landscape. This effect combined with aerial perspective can add a sense of mood and mystery to an image especially in a blizzard. During the summer of 2003, Kootenay National Park experienced a large forest fire. During the winter I drove through the park and was awestruck by the stark contrast of the black tree trunks against the white snow that transformed the forest into a scene resembling a high contrast lithograph. Winter is a time when shape and tone in a landscape is often exaggerated and this can make for some very graphic looking photos.
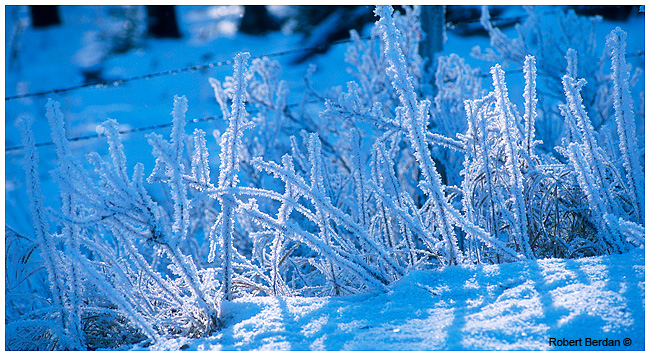
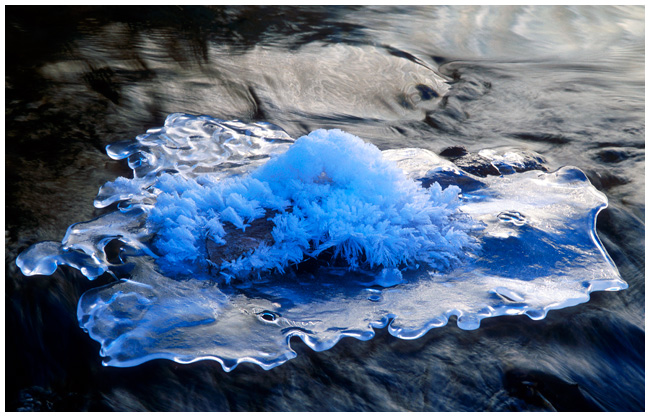
Hoar Frost on grass along side road, Water Valley, AB 80-200 mm Zoom Lens, +1 2\3 F stop compensation, Fuji Velvia In winter, nature sometimes provides us with a gift of hoar frost which can cover fences, grass, and trees with ice crystals that can extend several centimeters from whatever they might be attached to. In Calgary during the winter, hoar frost usually occurs in the morning if we have dense fog in the evening. Hoarfrost consists of crystalline structures that grow from water vapor evaporated from liquid droplets suspended in air. Other places to look for interesting ice formations are around the edges of creeks, waterfalls, ponds and lakes. As the water freezes it can create intricate patterns filled with bubbles and rings. A macro or close-focusing telephoto lens is ideal for shooting these ice formations. For those more socially inclined, winter festivals offer a variety of subject material including: sporting events, ice fishing contests, and ice sculptures. Whatever outdoor interests you might have this winter, don’t let your camera have a vacation and you may be pleasantly surprised with the images you make.
References:
[ Top ] |

 Serious photographers know that often we must stand and wait until the sun rises or an animal appears in the right location and in winter it can get mighty cold. Layering your clothing, wearing a hat and investing in good pair of gloves and boots will go a long way to making you comfortable. Keeping your hands warm is the biggest challenge especially if you have to take your gloves off to shoot and set up your camera on a tripod. There are several things you can do to keep you hands warm while shooting. If you need your fingers to operate the camera controls, you can purchase a pair of gloves that allow you to remove the fingertips – these are found in many hardware stores. Lowepro Company makes a pair of thin gloves with rubber grips for operating your camera in cold weather. In general these gloves are effective down to about 0°C. I use them primarily in the autumn or spring when there is frost in the morning. In the winter, I sometimes wear these gloves inside a larger pair of mitts and remove the mitts when shooting.
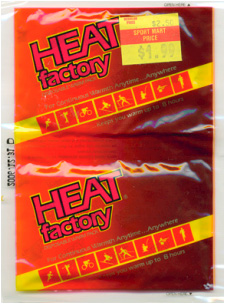
  Batteries are the Achilles heel of electronic cameras. The golden rule if you use a battery-powered camera is to always bring plenty of spare batteries and keep them warm. You can put a Heat pack beside your camera or batteries in an insulated camera bag. Some winter photographers tape the Heat Pack directly to the camera back (use gaffer tape) to prolong the life of their batteries in the cold. According to NASA Lithium and Nickel Metal Hydride batteries are best for operating in the cold and they should know since they send their cameras to Mars. The good news for digital camera users is that most compact flash cards and smart media cards seem to function fine down to about -20°C. One manufacturer I found (Rikaline) sells compact flash cards for GPS units rated to -40°C, and these can also be used in digital cameras. At those low temperatures most of us would head indoors anyway.