Photographing the Aurora Borealis " Northern Lights" with your Digital Cameraby Robert Berdan February 23, 2009
It was a hot August night as I headed for my hotel room in Yellowknife with my camera bag - the night clerk says to me as I pass by “ It might be a good night to photograph the Aurora”. I replied “Are you kidding in the summer?” I went to my room skeptical, but set the clock to 1:00 am – just in case. At the sound of my alarm I climbed over to the window and pulled open the drapes – the sky in front of me glowed with luminescent bands of green light that appeared to be dancing in the wind. I grabbed my camera, tripod and ran outside to the back of the hotel and starting taking pictures with my digital camera – 3 hours later, still in my PJ’s I returned to my room – I had just witnessed one of Nature’s most amazing displays.
Aurora outside the Explorer Hotel in Yellowknife, NWT August 2007 - Nikon D2X, 17-55 mm F2.8 lens 10 secs, ISO 400 Ever since that night I have been tracking the Aurora and have been trying to take every opportunity to and photograph her again. Calgary is at 51° latitude which is not bad, but auroral activity may only be visible a few days of the year here. In fact it can be visible even within the city during magnetic storms as shown below.
Aurora in my backyard in Calgary - the dipper is outlined, the aurora has to be very bright to see it with all the light pollution. Fuji S2 camera, 17-55 mm F2.8 at 16 seconds, ISO 1600. Opportunities to photograph the Aurora depend on your latitude and solar activity. Those that are fortunate to live within the Auroral oval (approx. 57-65° North in Canada ) can see it more then 100 days\year and its estimated that in Yellowknife you can view it one out of 3 days when the sky is dark. The auroral oval also expands and shrinks depending on the solar wind and geomagnetic activity and is present over both of earth's poles. The solar wind (mainly protons and electrons) is ejected from the sun more intensly by solar flares and sunspots. During intense solar storms the aruroa can expand and be seen as far south as the equator. The best place to view and photograph the aurora is in northern latitudes during the Spring and Fall in Alaska, Canada, and Scandinavia.
Auroral oval as viewed by satellite above the North Pole (courtesy NOAA - The National Oceanic and Atmospheric Administration is a federal agency focused on the condition of the oceans and the atmosphere.) The aurora becomes more active when there are more sunspots which contribute to the solar wind. Sunspot activity has been monitored closely for several hundred years and it's been determined that the number of sunspots follows an approximately 11 year cycle. When sunspot activity increases, so does the frequency and intensity of the Aurora. The good news is we are just beginning to enter solar cycle 24 and we should see an increase in auroral activity starting this year and reaching a peak in between October 2010 to August 2012 (see model projections below). Auroral activity also seems to peak in the Fall and Spring namely September, October and March, April. The reasons for this aren't quite clear but scientists believe there are "magnetic ropes" connecting the earth's atmosphere to the sun and these connections are stronger in the Fall and Spring. Geomagnetic disturbances are also twice as likely in Spring and Fall according to 75 years of historical records. What ever the reasons Spring and Fall are the best times of the year to view the Aurora and being between 57-65 degrees north latitude.
Dark Sky 10 pm - Anzac, Lake, AB - the glow on the horizon is from Fort McMurray to the North. On clear nights like
Around 1:00 am after several hours of waiting the Aurora appeared. The faint aurora was captured with a Canon 5D Mark II, 24 mm F1.4 lens, 6 seconds exposure at ISO 1600. The prediction for this night was for a faint aurora. The Aurora or Northern Lights occur between 80 to 500 Km high up in our atmosphere called the Ionosphere. The light comes from excited oxygen and nitrogen atoms that when bombarded by electrons and protons that make up the solar wind. The most common color observed for the Aurora is green, but it can include purple and red when the energy levels are particularly high.
This is a picture of the Aurora near Boyle, AB - Canon 5D Mark II, 24 mm F1.4 lens, 6 seconds exposure ISO 1600. the aurora shows some of the reds and purples. These colors did not show up when photographed with my Nikon D300 using a 17-55 mm F2.8 lens or my Canon 15-35 mm F2.8 lens. My more " faster" F1.4 lens lens was able to capture the more subtle colors and allowed me to use shorter exposure times.
Photograph taken same place and time as the picture above but using my Nikon D300, ISO 1600 with 17-55 mm F2.8 lens - 30 seconds exposure. Note the lack of reds and purples in this photograph. TIPS for Taking Aurora Photographs Location and Timing The most important thing is to be at the right place at the right time. If you live in Southern latitudes you will increase your chances by traveling North and into the auroral zone if possible. The Fall and Spring are the best seasons and of course I would recommend checking both the auroral forecast and the weather forecast online. Also if you can schedule your viewing during he new moon the skies will be darker. I spent 5 days this past summer in Yellowknife without a single clear night. I could see the Aurora behind the clouds but could not manage to take even a single good shot - it was a long way to travel and not bring home any good shots. Equipment A sturdy tripod is a must, I also recommend you have a small pen flashlight. The best are astronomers flashlights you can switch them between red and white light and vary the intensity of the output - they are available at most astronomy stores for about $20-25 (e.g. All star telescope). Although high ISO speed film works well, using a digital camera is much easier as you can see the results instantly and fine tune your exposures. . If you do plan to use film, use ISO 400-1600 film and bracket your exposures widely. Compact digital cameras can be used - if they have a night, fireworks or B (bulb) mode you can try them at those settings. Your best bet will be to use a digital single lens reflex camera (DSLR) as you can change the lenses. The best lenses to use are fast lenses that have an aperture of F2.8, F2, F1.8, F1.4. While its possible to use an F4 lens - your exposures will be longer. Shorter exposures can reveal more detail in rays and bands with less blurring. Shorter exposure also reduce the amount of star trailing. Prime lenses seem to be better then zoom lenses though I have gotten some excellent results using the Nikon 17-55 mm F2.8 lens and Canon's 16-35 mm F2.8 lens. Wide angle lenses that show a large part of the sky are preferred. The best lenses for Aurora photography are: 1) Canon 24 mm F1.4 lens
Aurora with full moon and reflections off the water - Yellowknife, 17-55 mm F2.8 Lens, Nikon D2X, ISO 800, 16 seconds. For best viewing of faint aurora - try to choose nights with a new moon. Focusing on the Stars First you should set your camera or lens to manual focusing. Second set the lens to infinity - on some lenses this may be sufficient - however other lenses like those mentioned above from Canon can focus past infinity and setting the lens on infinity may not give you the best results. Focusing on stars with a wide angle lens by looking through the viewfinder is near impossible because the pin point sources of light are simply too small. A couple of things you can do to improve focus so that the stars are small pin points is: 1) use Live view mode focus on a bright star then zoom in about 10X to be sure the star is as small as possible with no halos around it. 2) You can also take a few shots, zoom in preview the images and adjust focus until you get the smallest point sources. 3) If none of these things work try to focus on an object in your scene that is far way e.g. a radio tower, building or lamp post - the farther away the better. You can also walk a hundred yards from your car and focus on the parking lights. Focusing on stars can be tricky so check your images and zoom in to make sure your stars are as small pin points without halos. Stopping lens down one stop from its max will reduce stars near the edge of the field from being distorted. An electronic cable release is always a good idea to help reduce camera vibration. Your exposures will vary depending on the intensity of the aurora and how dark the skies are. A good starting point is F2.8 ISO 400 10-30 seconds. If the image is too dark increase the ISO speed or exposure time. Newer cameras like the Nikon D300 and the Canon D50, D5 are excellent at high ISO speeds though always try to use the lowest ISO speed you can - 400 is very good on most newer digital cameras. You can also turn on Noise reduction on your camera if it offers this feature and experiment with different settings.
These are suggested starting points as the correct exposure will vary depending on how dark the skies are, the phase of the moon, and the intensity of the aurora. Another factor to consider is that with longer exposures the stars will start to trail as the move around the North star Polaris. The time in seconds that you can expose a frame before start trailing becomes visible can be estimated using the formula below:
Filters - generally avoid using any filters on your lens. According to Dick Hutchison they may result in concentric circles on your pictures. I never use any filter while photographing the aurora. Also use your RAW file format so you have more options processing your image afterwards in Adobe Photoshop. Composition First try to find some possible locations during the daytime - it;s safer. Second look for locations that give you a big sky facing north - a lake is often a good spot. Bring a compass or GPS so you know which direction faces north. At night you can look for the North star. Including objects in the foreground such as fence, a small house with lights on, or a silhouette of a person or trees can all add to make the final image more interesting. Keep in mind that if you are using your lens wide open to photograph the aurora that you will have a very limited depth of field so don't have things in the foreground that are too close to the camera. You can even experiment with light painting using your flash light.
In this photo the fence, power poles and road go off into the distance to add a sense of perspective. I also positioned a friend of mine (David Lilly) in the photograph to a sense of scale and interest.. Exposure 6 seconds, Canon 5D Mark II, 24 mm F1.4 at ISO 800.
Peterson's Point Lake Lodge - the warm light coming from my cabin in the foreground adds interest to this photo of the Aurora taken in August. The lodge is located about 200 Km north of Yellowknife and sky during this time of the year does not get really dark.
In this photograph I pulled over to the side of the road in my jeep to photograph the house and aurora in the distance, the red color is from my parking lights. Canon 24 mm F1.4 lens, Canon 5D Mark II, ISO 1600, 6 seconds. Making Time Lapse Movies of the Aurora. Generally the aurora is not sufficiently bright to take a video of the aurora unless you have access to some very expensive image intensifiers. To make a movie you need to take a series of photos at various intervals and combine them into time lapse movie. To do this you need to see if your camera has an intervalometer (Nikon D300 has one built in) for Canon you can purchase Canon's TC-80N3 for a few hundred dollars and use it to shoot a series of photos. You might take a 15 second exposure every 30 seconds or shorter interval and then you combine them in a movie program like Quicktime Pro, Flash or Adobe Premiere to make a time lapse movie. Some of these movies can be spectacular - I have not had a chance try this yet but its at the top of my priority list. You can view this time lapse movie of the Aurora by Jeff Hapeman on his Flikr site. The University of Calgary and Astronomy North in Yellowknife recently announced that they will be offering live video broadcasts of the Aurora on a web site - (read news bulletin) - web address to be posted here as soon as its available! One last thing dress warmly in layers, bring a thermos of coffee or hot chocolate, bring along some hand warmers if you get cold easily, having a friend along is safer and you have someone to talk to while you wait, sometimes the aurora may not show up. Always carry extra camera batteries and storage cards so you don't run out! It's also a good idea to tell someone where you are going and when you might expect to be back. I am just beginning to collect and chase Auroras but the next few years should be promising.
If you are interested in photographing the Aurora starting sometime this year things should start to get exciting. If you want to increase your chances of success you may have to travel north and check out the aurora forecast and more information by clicking on the links below. I am just a beginner when it comes to Aurora photography but I hope to take a lot more pictures in the next couple of years in solar cycle 24. Also I am running a workshop north of Yellowknife where we will be looking to photograph the Aurora on most clear nights - read more here about the Workshop.
Panorama created from two photos of the Aurora taken in High Level, AB Sept 2010
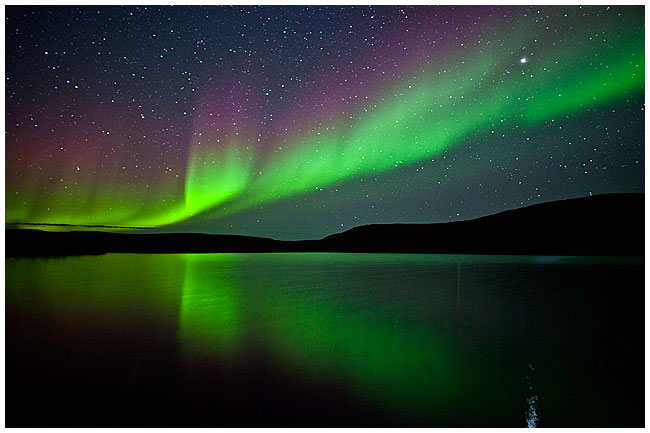
Reflection of Aurora at Peterson Point Lake Lodge in the North West Territories - Sept 10, 2010
Cabin at Peterson's Point Lake Lodge in the North West Territories, Sept 10, 2010
Aurora and car lights, High Level, AB Sept 4, 2010
Aurora, High Level, AB Sept 4, 2010 - taken from directly below
Aurora - High Level, Alberta Sept 4, 2010 (Canon 5D, 24 mm F1.4 lens, ISO 1600, 4 seconds)
September 04, 2009 Prosperous Lake, Yellowknife, NWT - exposure 4 seconds\10 seconds F1.4 Lens IS0 800 TIME LAPSE MOVIE OF AURORA USING CANON 5D MARKII - 24 MM f/1.4 LENS
Aurora Links
Other Aurora Photography sites
Miscellaneous ResourcesVideo and Time Lapse movies
|
|||||||||||||||||||||||||||||||||||