Spherical Panoramic Photography - The Basics
By Dr. Robert Berdan
February 18, 2013
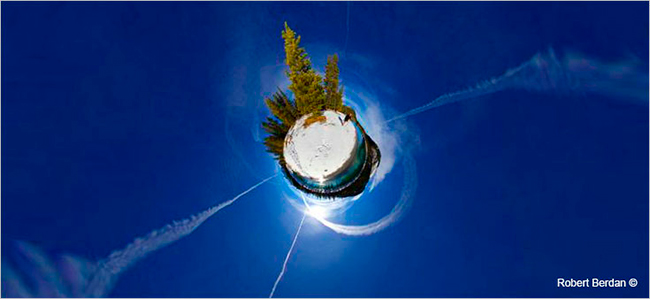
Wedge Pond - planet photograph showing the first frame of the panorama animation. View animation below.
To learn how to create planet photos from panoramas see article by RB
Watch animation and note it is snowing in the panorama. To view movie in full screen click here.
Spherical panorama photography involves stitching a series of images together to create an entire 360 sphere that with the right software can be converted into an interactive movie using QuickTime VR, Flash, Java or HTML 5 with Javascript. It's also possible to link one movie to another in order to create a virtual tour with hot spots and add music, narration, video, text, expandable maps, and animated radars that turn in the direction the movie is pointed. I have been photographing panoramas for over 10 years and making movies out of them, but my earlier movies were tubes that did not allow a visitor to look up at the sky or down at the ground (see my earlier article and tutorial on panorama photography). Back in the late 1990's there was a method to make spherical panoramas using proprietary software provided by IPIX, but the company charged a license fee to create each movie of $25-75 each. My first attempts were made with a compact Olympus digital camera and a small fish eye lens. Only two images were required. Unfortunately the high cost of making spherical movies, their poor quality and the aggressive marketing tactics used by IPIX lead many photographers (including myself) to avoid using their proprietary software. IPIX also sued Dr. Helmet Dersch who had created his own stitching software and released if for free, but had to take it down because of the high cost of defending himself and this created ill will in the VR community. In 2006, IPIX filed for bankruptcy, many of its patents were sold and this also allowed other companies to develop alternative spherical stitching software. PTGui is a stitching program built on the basis of Dr. Dersch's software and is now available commercially. There are also other programs available to stitch images into 360 panoramas (see links below). Google is also popularizing spherical imaging and has created virtual tours embedded within their street maps. In addition there is also a growing interest in moving 3D spherical movies - in these images a camera is pulled or moved through the scene to capture a real movie that you can turn around in while it travels.
360 panorama of the Castle Junction Bridge in Banff National Park, AB
Below I describe the basics steps for creating spherical panorama images and I have added links to other sites that include more detailed descriptions of the equipment, software and methods. The easiest method to capture 360 spherical pans is to take a series of photographs using a full-frame fish eye lens and stitch the images in software such as PTGui. Hugin is a free program that stitches spherical images, but I have not used it. Photoshop CS6 does not stitch 180 degree spherical images reliably, but is used to enhance the panoramas and fix the top (zenith) and bottom (nodal) regions of the images. PTgui can save the stitched panorama as a flash (.swf) movie, but there are several other programs that will also save spherical movies in HTML 5 format that does not require the Flash plug-in so they can viewed on mobile devices. Some programs also offer the ability to customize various interface features or add snow and rain.
Taking the photographs & Lens Choice
While almost any lens can be used to create spherical panoramas longer focal length lenses require more images to stitch them together. The easiest method to create a 360 spherical panorama is to use an 8 mm fish eye lens on a full frame camera and take 4 photographs at 90 degrees to each other, then one shot straight up (zenith) and one straight down (nadir). The zenith and nadir photos are sometimes not needed when photographing outdoor scenes, but are essential for indoor photography if the floor and ceiling include textures and patterns. For best results I use the camera in manual mode so the exposures are all identical and use f/8 or f/11 for good depth of field.
Four images of the McDougall church near Morely, AB taken with my 8-15 mm Canon fish eye lens and stitched together using PTGUi software into a flat 360 panorama below. The panorama is then converted into a spherical movie that can be displayed on an LCD monitor, computer or TV screen. It is also possible to print the rectangular stitched image.
Results of stitching 4 fish eye images into a 360 spherical image. An additional sky and ground shot was not necessary in this series of the McDougall church.
To view the virtual tour of the McDougall church in full screen mode click here.
You can click on animated red hot spots and walk around the building in a virtual tour.
It is possible to hand hold a camera to take a series of spherical images and some photographers use a string and weight attached to the lens in order to keep the camera at the same height (see this YouTube Video tutorial) and over the same rotation point. I prefer to use a monopod that I rotate while taking pictures and I also take a picture of the sky (zenith) and the ground (nadir). The ground shot does not need to be precise and often can be photographed an angle. For interiors where the floor and ceiling have patterns a special tripod is essential hat allows the lens to be centered over the nodal point (see picture below). These tripod heads are available from several dealers - see links below. With interiors, I set my camera to manual mode, lens to f8 or f11, and take 4 shots around, one up and one down. If the interior lighting has a wide dynamic range and\or is high in contrast I will bracket the exposures + 2, 0 and -2 EV and combine them into an HDR (high dynamic range) image in PTGUi (see PTGui tutorials on how to do this). Some cameras like the Canon 5D Mark III can combine three bracketed exposures in camera to create a single HDR image. The 4 HDR images are then stitched together to create a single HDR panorama.
Nodal Ninja II head with Canon 5D Mark II and the Canon 8-15 mm fish eye lens - this is the setup I use for indoor spherical panoramic photography. Outdoors I often use just a monopod.
HDR 360 panoramic image taken of the Deerfoot Inn and Casino restaurant in Calgary using a tripod.
Casino showing 360 interior created by stitching 4 HDR images - for full screen view click here.
Sigma makes an 8 mm fish eye lens that can be used with both Canon and Nikon cameras, Canon makes there own 8-15 mm fish eye lens. Nikon has a 10.5 mm fish eye lens that some photographers shave off the lens hood, but this lens does not produce a full 360 fish eye picture on the sensor and requires 6 round, I up and 1 down to make a spherical panorama and the lens only works on DX camera bodies (crop sensors). Nikon used to make an 8 mm fish eye f/2.8 lens that I would love to try, but these lenses are no longer in production and used lenses are very expensive. Other lenses can be used, but lenses with longer focal lengths will require more images and you will need a method to ensure each image overlaps the adjacent images. One company creates EPIC robotic camera mounts that automate the process of taking hundreds of over lapping pictures and prices start at $299 (Gigpan Robots).
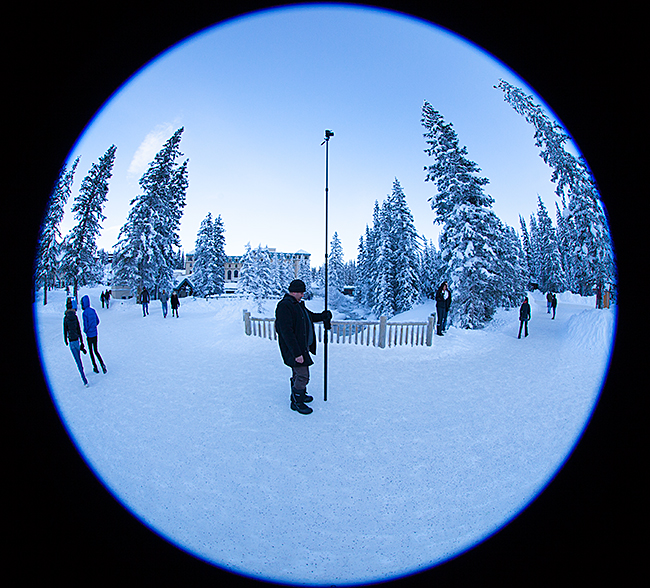
In addition to monopods and tripods, some photographers use special poles that can be extended 10-15 feet or higher into the air in order to take pictures from "above the crowd" and produce a different view point. The pole and camera is rotated 90° for each picture which is triggered using a remote control device. I use the SMDV RFN-4 Wireless remote shutter release availble from Amazon which is good up to 300 m. Another calgary photographer, Yury Rybalskiy has created a remote controlled camera that he attaches to a kite in order take spherical pans from the air. View some of Yury's spherical images here.
Ahmed Kassim with his Canon 5D Mark III, 8 mm Sigma lens and remote firing device that allows him to take pictures from on top of a carbon fiber telescopic pole. This creates spherical panoramas with a different perspective. I purchased a similar, but shorter pole.
When taking pictures with 8 mm spherical images you will get the best results if you lock the exposure by using the camera in M or manual mode or by pressing your exposure lock button while you take the series of photos. Unlike standard panoramic photography where you don't want to take pictures directly into the sun, with a fish eye lens the scene seems to be so big that it seems to work fine (see below). The Canon 8-15 mm lens has almost no flare when shooting in the sun but I still see flare spots when shooting indoors if there are bright lights. I will test the Sigma 8 mm fish eye lens on my Nikon Camera bodies in the near future.
Bow river at Castle junction photographed mid-day in January using 8-15 mm Canon fish eye lens. Four images were stitched together in PTGui. You can see my shadow on the right side of the image in front of Castle Mountain.
View full screen spherical movie by clicking here.
Inside Chateau Lake Louise Inn - stitched from 4 photographs taken with 8 mm fish eye lens, the camera mounted on a monopod, f/8 at ISO 1600.
View full screen spherical movie of the Chateau Lake Louise by clicking here.
Sunrise at Vermilion lake in January - Gus with his tripod and wearning a red coat appears twice since he moved during the picture taking process and so appears twice. When taking panoramas you want to try and avoid moving subjects as they make it more difficult to stitch the images seemlessly.
View full screen spherical movie by clicking here.
I find viewing spherical movies to be engaging and they seem to capture the essence of being there better then any single photograph I have ever taken. For this reason, one of my goals this year is to re-photograph many of my favorite locations in and around Alberta and create a library of outdoor panoramic movies. If you are interested in this type of photography please see the links below for more information in how to get started and there are step by step tutorials on using various software programs. Anyone that would like to get up to speed quickly I offer private training in this unusual type of photography. RB